DCMotor API Guide
Get started with your DC Motor Phidget


Quantity Available: 905
| Qty | Price |
|---|---|
| 10 | $57.00 |
| 25 | $51.00 |
| 50 | $45.00 |
| 100 | $42.00 |
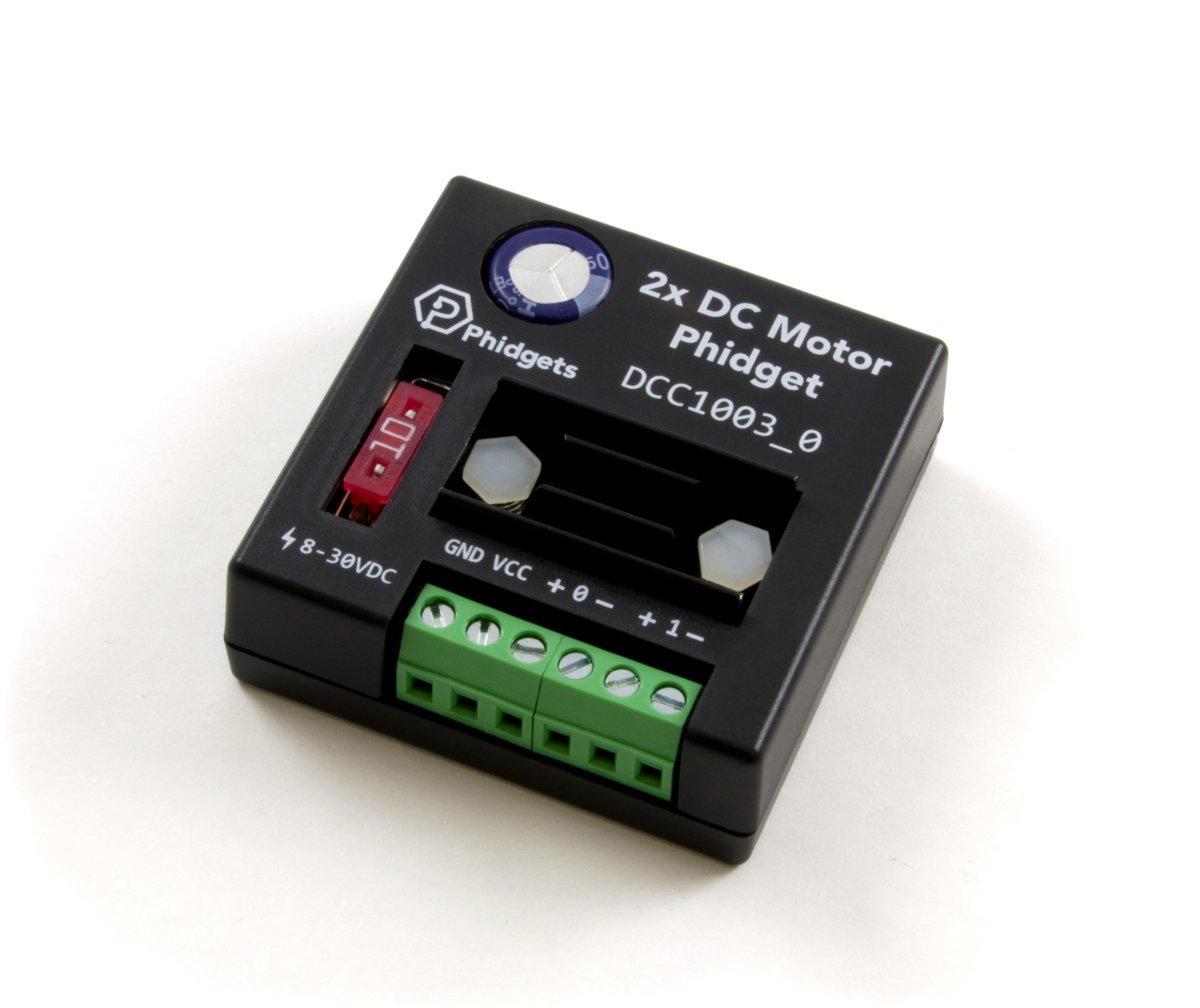
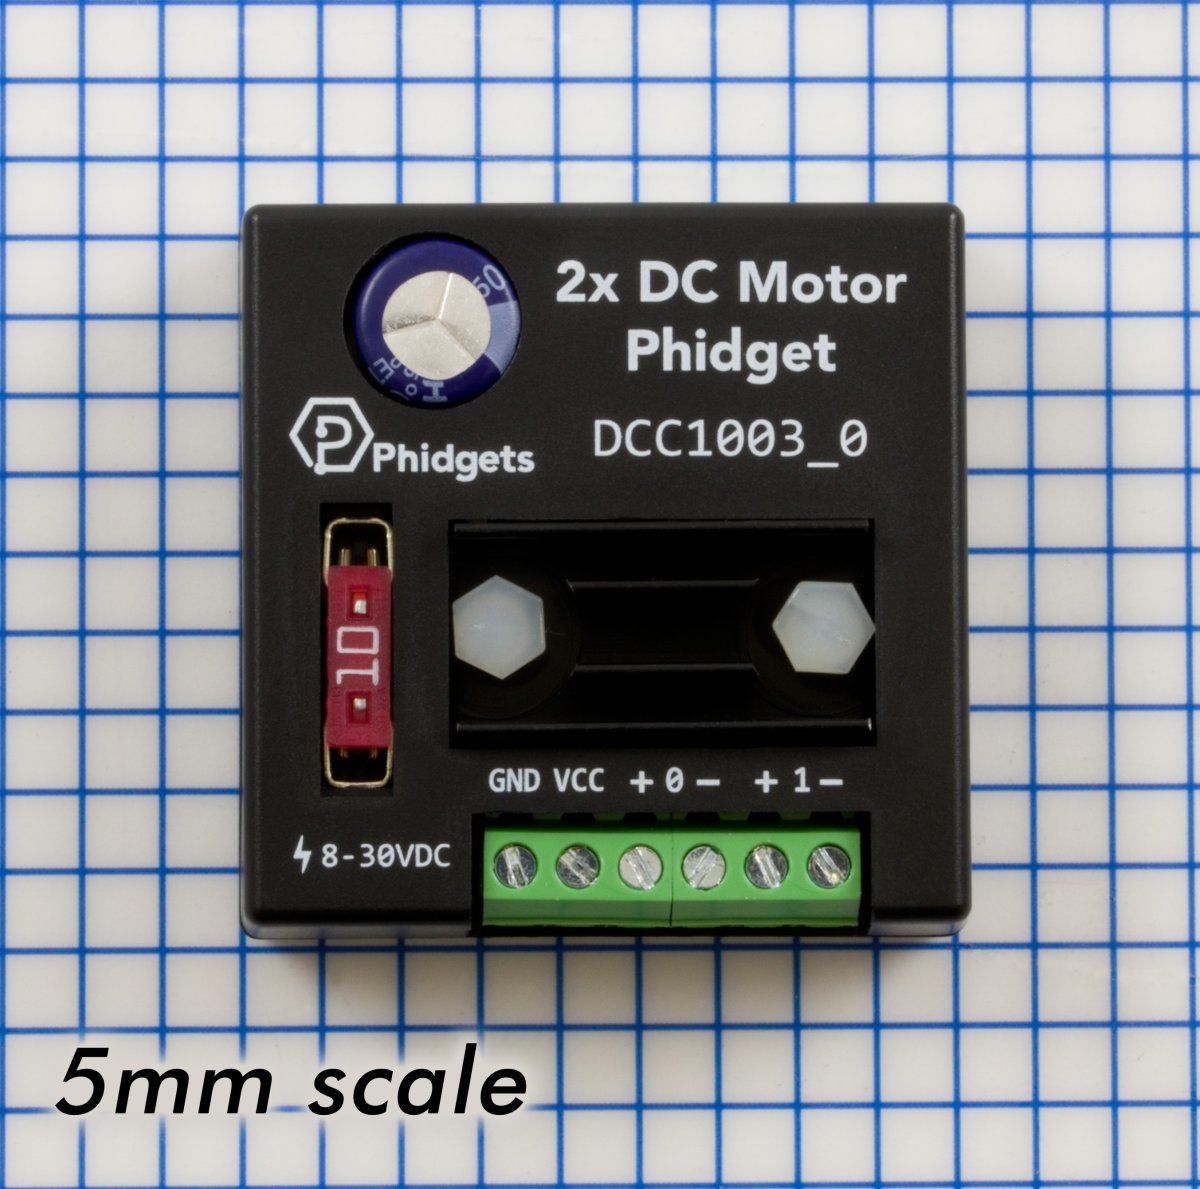
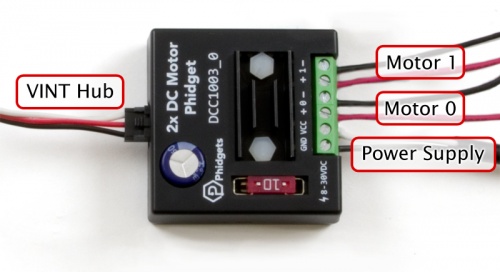
The 2x DC Motor Phidget is an easy-to-use DC motor driver that gives you complete control over two brushed DC motors. It has an 8-30V DC supply input and provides up to 4 amps of continuous current to each DC motor.
Safety features include overcurrent protection, polarity protection, and a standard failsafe mode.
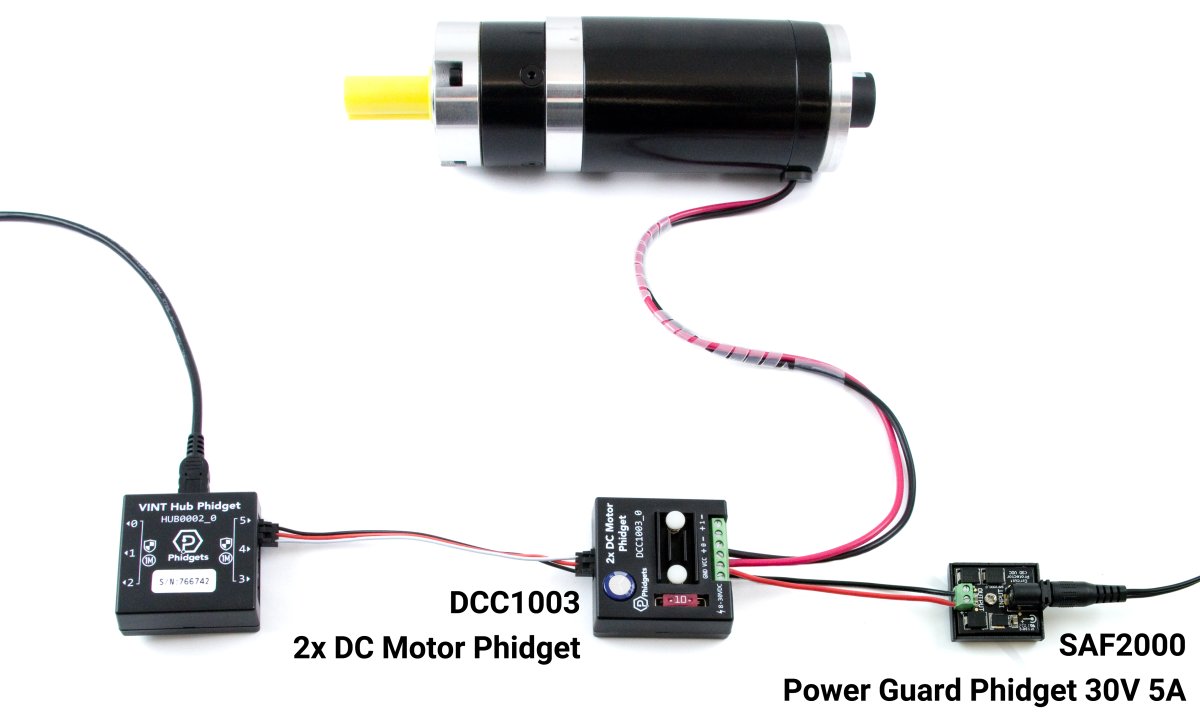
The 2x DC Motor Phidget must be connected to a VINT Hub Phidget to function. A Power Guard Phidget is also required for most applications. For more information, review our Power Guard Guide.
This Phidget is a smart device that must be controlled by a VINT Hub. For more information about VINT, have a look at the VINT Overview page. You can use a Phidget Cable to simply and easily connect the two devices. Here's a list of all of the different VINT Hubs currently available:
| Product | Board Properties | |||
|---|---|---|---|---|
| Part Number | Price | Number of VINT Ports | VINT Communication Speed Max | Controlled By |
 VINT Hub Phidget
|
$40.00 | 6 | 1 Mbit/s | USB (Mini-USB) |
 1-Port VINT Hub Phidget
|
$26.00 | 1 | 1 Mbit/s | USB (USB-A) |
 VINT Hub Phidget
|
$35.00 | 6 | 1 Mbit/s | USB (Mini-USB) |
 Wireless VINT Hub
|
$60.00 | 6 | 100 kbit/s | Local Network (Ethernet or Wi-Fi) |
 PhidgetSBC4
|
$120.00 | 6 | 100 kbit/s | — |
Use a Phidget cable to connect this device to the hub. You can solder multiple cables together in order to make even longer Phidget cables, but you should be aware of the effects of having long wires in your system.
| Product | Physical Properties | |
|---|---|---|
| Part Number | Price | Cable Length |
 Phidget Cable 10cm
|
$1.50 | 100 mm |
 Phidget Cable 30cm
|
$1.75 | 300 mm |
 Phidget Cable 60cm
|
$2.00 | 600 mm |
 Phidget Cable 60cm
|
$2.00 | 600 mm |
 Phidget Cable 90cm
|
$2.00 | 900 mm |
 Phidget Cable 120cm
|
$2.25 | 1.2 m |
 Phidget Cable 150cm
|
$2.50 | 1.5 m |
 Phidget Cable 180cm
|
$2.75 | 1.8 m |
 Phidget Cable 350cm
|
$3.00 | 3.5 m |
 Phidget Cable Kit
|
$10.00 | 80 mm |
 Phidget Cable Extension Wire 22AWG
|
$0.75/Meter | — |
Using motor controllers with large motors can pose a risk for your power supply. If your supply does not have protective features built-in, you can use a Power Guard Phidget to prevent damage from power spikes from back EMF that is generated when motors brake or change direction. We recommend that you use the SAF2000 for any motor with a current rating between 1 and 5 amperes, and the SAF1000 for motors above 5A.
| Product | Power Supply Protector | ||
|---|---|---|---|
| Part Number | Price | Trip Voltage | Continuous Current |
 Power Guard Phidget 30V 50A
|
$30.00 | 37 | 50 A |
 Power Guard Phidget 30V 5A
|
$10.00 | 37 | 5 A |
 Programmable Power Guard Phidget 30V 50A
|
$40.00 | Selectable via software 8 - 33 VDC | 50 A |
We offer a wide variety of DC motors that can be used with this Phidget. Motors with higher gearbox ratios will have higher torque at the cost of lower speed. If you want a motor that has an encoder attached to it, skip ahead to the next table.
| Product | Motor Properties | Physical Properties | Gearbox Specifications | ||||
|---|---|---|---|---|---|---|---|
| Part Number | Price | Rated Speed | Rated Torque | Shaft Diameter | Weight | Gear Ratio | Gearbox Type |
 12V/0.2Kg-cm/1080RPM 3.7:1 DC Gear Motor
|
$18.00 | 1080 RPM | 240 g·cm | 6 mm | 144 g | 3 12⁄17 : 1 | Planetary |
 12V/0.2Kg-cm/230RPM 10:1 DC Gear Motor
|
$10.00 | 230 RPM | 200 g·cm | 6 mm | 128 g | 10 : 1 | Spur |
 12V/0.9Kg-cm/285RPM 14:1 DC Gear Motor
|
$18.00 | 285 RPM | 900 g·cm | 6 mm | 170 g | 13 212⁄289 : 1 | Planetary |
 12V/0.3Kg-cm/127RPM 18:1 DC Gear Motor
|
$10.00 | 127 RPM | 310 g·cm | 6 mm | 133 g | 18 : 1 | Spur |
 12V/0.8Kg-cm/46RPM 50:1 DC Gear Motor
|
$11.00 | 46 RPM | 820 g·cm | 6 mm | 137 g | 50 : 1 | Spur |
 12V/1.6Kg-cm/23RPM 100:1 DC Gear Motor
|
$11.00 | 23 RPM | 1.6 kg·cm | 6 mm | 136 g | 100 : 1 | Spur |
 12V/0.5Kg-cm/670RPM 3.7:1 DC Gear Motor
|
$38.00 | 670 RPM | 540 g·cm | 8 mm | 416 g | 3 12⁄17 : 1 | Planetary |
 12V/1.9Kg-cm/175RPM 14:1 DC Gear Motor
|
$42.00 | 175 RPM | 1.9 kg·cm | 8 mm | 464 g | 13 212⁄289 : 1 | Planetary |
 12V/6.6Kg-cm/49RPM 51:1 DC Gear Motor
|
$43.00 | 49 RPM | 6.6 kg·cm | 8 mm | 526 g | 50 801⁄895 : 1 | Planetary |
 12V/6.6Kg-cm/49RPM 51:1 DC Gear Motor
|
$33.00 | 49 RPM | 6.6 kg·cm | 8 mm | 526 g | 50 801⁄895 : 1 | Planetary |
 12V/17.3Kg-cm/18RPM 139:1 DC Gear Motor
|
$43.00 | 18 RPM | 17.3 kg·cm | 8 mm | 526 g | * 139 184⁄1221 : 1 | Planetary |
 24V/2.5Kg-cm/3280RPM DC Motor
|
$40.00 | 3280 RPM | 3.3 kg·cm | 8 mm | 1.4 kg | — | — |
 24V/7Kg-cm/3000RPM DC Motor
|
$50.00 | 2800 RPM | 7.1 kg·cm | 10 mm | 2.7 kg | — | — |
 24V/9.6Kg-cm/3200RPM DC Motor
|
$60.00 | 2900 RPM | 9.7 kg·cm | 10 mm | 3.3 kg | — | — |
 24V/5.1Kg-cm/588RPM 4.25:1 DC Gear Motor
|
$69.00 | 588 RPM | 4.4 kg·cm | 12 mm | 1.3 kg | 4 1⁄4 : 1 | Planetary |
 24V/12.2Kg-cm/772RPM/4.25:1 DC Gear Motor
|
$80.00 | 772 RPM | 12.2 kg·cm | 12 mm | 1.9 kg | 4 1⁄4 : 1 | Planetary |
 24V/14.2Kg-cm/192RPM 13:1 DC Gear Motor
|
$66.00 | 192 RPM | 13.3 kg·cm | 12 mm | 1.5 kg | 12 24⁄25 : 1 | Planetary |
 24V/45Kg-cm/182RPM/18:1 DC Gear Motor
|
$82.00 | 182 RPM | 47 kg·cm | 12 mm | 2.1 kg | 18 : 1 | Planetary |
 24V/50.9Kg-cm/53RPM 47:1 DC Gear Motor
|
$72.00 | 53 RPM | 43.8 kg·cm | 12 mm | 1.7 kg | 46 82⁄125 : 1 | Planetary |
 24V/153Kg-cm/50RPM/65:1 DC Gear Motor
|
$84.00 | 50 RPM | 153 kg·cm | 12 mm | 2.2 kg | 65 : 1 | Planetary |
 24V/82.6Kg-cm/33RPM 76:1 DC Gear Motor
|
$72.00 | 33 RPM | 71.4 kg·cm | 12 mm | 1.7 kg | 76 49⁄64 : 1 | Planetary |
 24V/173.3Kg-cm/15RPM 168:1 DC Gear Motor
|
$76.00 | 15 RPM | 136.6 kg·cm | 12 mm | 2 kg | 167 601⁄625 : 1 | Planetary |
Linear actuators are simply DC motors that are hooked up to a linear screw which causes the shaft to move laterally instead of rotating. Unlike a rotary DC motor, linear actuators have a minimum and maximum position at which the shaft cannot contract or extend any further. On its own, the motor would not be smart enough to stop before attempting to push beyond these limits, possibly damaging the motor. That's why each linear actuator also has a built-in feedback potentiometer so you can monitor the position of the shaft and prevent the actuator from stalling out at its limits. The potentiometer can be read using one of the ports on your VINT Hub in VoltageRatioInput mode.
| Product | Motor Properties | Electrical Properties | Physical Properties | |||||
|---|---|---|---|---|---|---|---|---|
| Part Number | Price | Stroke Length | Maximum Speed | Peak Power Point | Peak Efficiency Point | Gear Ratio | Rated Voltage | Weight |
 DC Linear Actuator - 30mm - 18N
|
$40.00 | 30 mm | 50 mm/s | 18 N | — | — | 12 V DC | 63.6 g |
 DC Linear Actuator - 30mm - 60N
|
$40.00 | 30 mm | 15 mm/s | 60 N | — | — | 12 V DC | 69.9 g |
 DC Linear Actuator - 50mm - 50N
|
$80.00 | 50 mm | 32 mm/s | (@ 16 mm/s) 50 N | (@ 24 mm/s) 24 N | 35 : 1 | 12 V DC | 56 g |
 DC Linear Actuator - 50mm - 75N
|
$80.00 | 50 mm | 20 mm/s | (@ 10 mm/s) 75 N | (@ 15 mm/s) 38 N | 63 : 1 | 12 V DC | 56 g |
 DC Linear Actuator - 50mm - 175N
|
$80.00 | 50 mm | 8 mm/s | (@ 4 mm/s) 175 N | (@ 7 mm/s) 75 N | 150 : 1 | 12 V DC | 56 g |
 DC Linear Actuator - 100mm - 18N
|
$40.00 | 100 mm | 50 mm/s | 18 N | — | — | 12 V DC | 94.3 g |
 DC Linear Actuator - 100mm - 50N
|
$80.00 | 100 mm | 32 mm/s | (@ 16 mm/s) 50 N | (@ 24 mm/s) 24 N | 35 : 1 | 12 V DC | 74 g |
 DC Linear Actuator - 100mm - 60N
|
$40.00 | 100 mm | 15 mm/s | 60 N | — | — | 12 V DC | 93.9 g |
 DC Linear Actuator - 100mm - 75N
|
$80.00 | 100 mm | 20 mm/s | (@ 10 mm/s) 75 N | (@ 15 mm/s) 38 N | 63 : 1 | 12 V DC | 74 g |
 DC Linear Actuator - 100mm - 175N
|
$80.00 | 100 mm | 8 mm/s | (@ 4 mm/s) 175 N | (@ 7 mm/s) 75 N | 150 : 1 | 12 V DC | 74 g |
 DC Linear Actuator - 140mm - 50N
|
$80.00 | 140 mm | 32 mm/s | (@ 16 mm/s) 50 N | (@ 24 mm/s) 24 N | 35 : 1 | 12 V DC | 84 g |
 DC Linear Actuator - 140mm - 75N
|
$80.00 | 140 mm | 20 mm/s | (@ 10 mm/s) 75 N | (@ 15 mm/s) 38 N | 63 : 1 | 12 V DC | 84 g |
 DC Linear Actuator - 140mm - 175N
|
$80.00 | 140 mm | 8 mm/s | (@ 4 mm/s) 175 N | (@ 7 mm/s) 75 N | 150 : 1 | 12 V DC | 84 g |
This Phidget requires a power supply between 8 and 30V DC. We recommend that you use a 12V DC power supply for smaller motors and a 24V supply for larger motors. Check your motor's specifications if you're not sure. For best performance, you should get a 5 amp supply. Select the power supply from the list below that matches your region's wall socket type.
| Product | Electrical Properties | Physical Properties | ||
|---|---|---|---|---|
| Part Number | Price | Power Supply Current | Output Voltage | Wall Plug Style |
 Power Supply 24VDC 14.6A
|
$40.00 | 14.6 A | 24 V | — |
 Power Supply 24VDC 25A Current Limiting
|
$120.00 | 25 A | 24 V | — |
 Power Supply 12VDC 0.5A - EU
|
$1.50 | 500 mA | 12 V | European |
 Power Supply 12VDC 0.5A - US
|
$1.50 | 500 mA | 12 V | North American |
 Power Supply 12VDC 2.0A - AU
|
$10.00 | 2 A | 12 V | Australian |
 Power Supply 12VDC 2.0A - EU
|
$10.00 | 2 A | 12 V | European |
 Power Supply 12VDC 2.0A - UK
|
$10.00 | 2 A | 12 V | British |
 Power Supply 12VDC 5A
|
$20.00 | 5 A | 12 V | — |
 Power Supply 24VDC 1.0A - US
|
$10.00 | 1 A | 24 V | North American |
 Power Supply 24VDC 2.5A
|
$20.00 | 2.5 A | 24 V | — |
 Power Supply 24VDC 5A
|
$40.00 | 5 A | 24 V | — |
 Power Supply-12VDC 2.0A - US
|
$10.00 | 2 A | 12 V | North American |
You can use a pigtail wire if you want to avoid removing the barrel jack connector from your supply's cord:
| Product | Physical Properties | ||||
|---|---|---|---|---|---|
| Part Number | Price | Connector A | Connector B | Cable Length | Cable Gauge |
 Female Pigtail 5.5x2.1mm
|
$2.75 | Power Jack 5.5 x 2.1mm (Female) | 2 Loose Wires | 250 mm | 20 AWG |
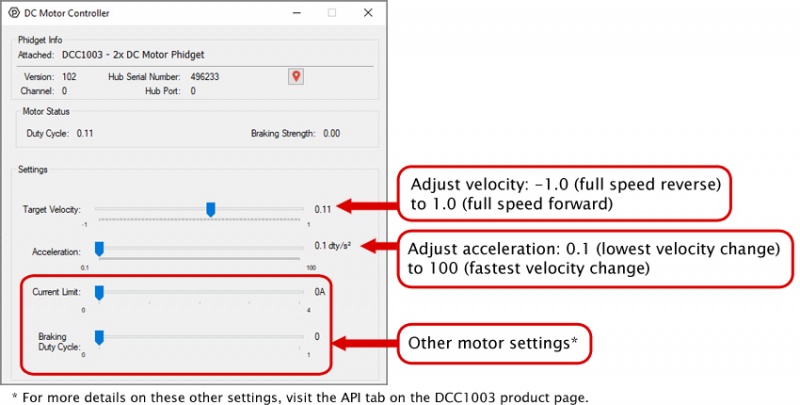
Control two brushed DC motors with a current rating of up to 4A with the DCC1003. With this Phidget, you can set the velocity (forward or reverse) and acceleration of your motor.
You can use your Control Panel to explore your Phidget's channels.
1. Open your Control Panel, and you will find the following channels:
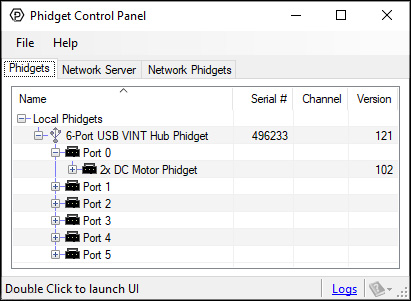
2. Double click on a channel to open an example program. Each channel belongs to the DC Motor channel class:
In your Control Panel, double click on "2x DC Motor Phidget":
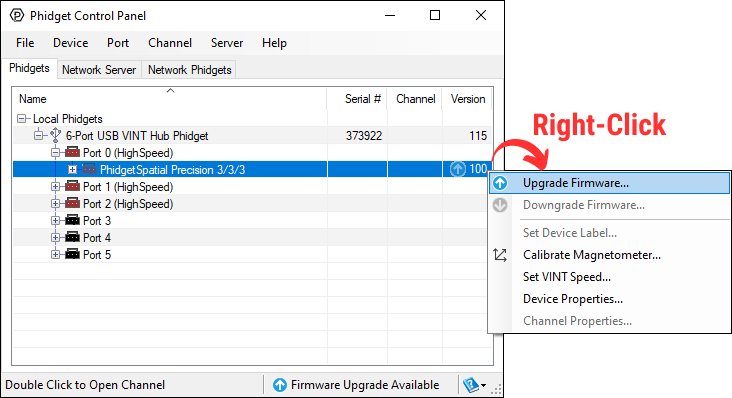
Firmware Upgrade
MacOS users can upgrade device firmware by double-clicking the device row in the Phidget Control Panel.
Linux users can upgrade via the phidget22admin tool (see included readme for instructions).
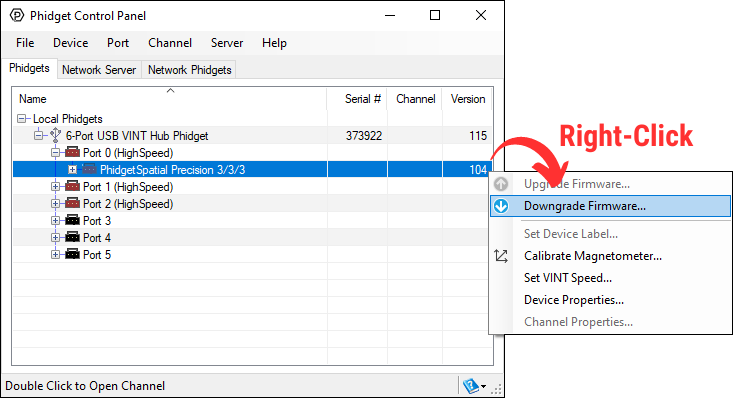
Windows users can upgrade the firmware for this device using the Phidget Control Panel as shown below.
Firmware Downgrade
Firmware upgrades include important bug fixes and performance improvements, but there are some situations where you may want to revert to an old version of the firmware (for instance, when an application you're using is compiled using an older version of phidget22 that doesn't recognize the new firmware).
MacOS and Linux users can downgrade using the phidget22admin tool in the terminal (see included readme for instructions).
Windows users can downgrade directly from the Phidget Control Panel if they have driver version 1.9.20220112 or newer:
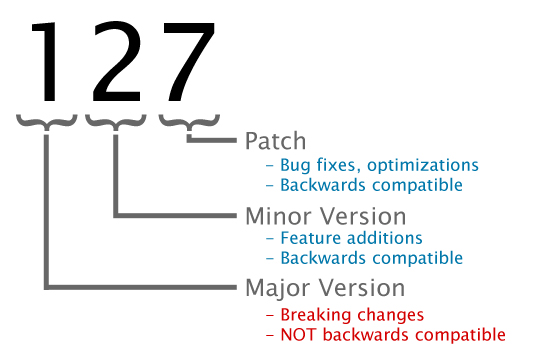
Firmware Version Numbering Schema
Phidgets device firmware is represented by a 3-digit number. For firmware patch notes, see the device history section on the Specifications tab on your device's product page.
Before you open a Phidget channel in your program, you can set these properties to specify which channel to open. You can find this information through the Control Panel.
1. Open the Control Panel and double-click on the red map pin icon:

2. The Addressing Information window will open. Here you will find all the information you need to address your Phidget in your program.

See the Phidget22 API for your language to determine exact syntax for each property.
| Board Properties | |
|---|---|
| Controlled By | VINT |
| Driver Support | Phidget22 |
| VINT Communication Speed Max | 10 kbit/s |
| Controller Properties | |
| Motor Type | DC Motor |
| Number of Motor Ports | 2 |
| Acceleration Min | 0.1 Duty Cycle/s |
| Acceleration Max | 100 Duty Cycle/s |
| PWM Frequency | 25 kHz |
| Sampling Interval Min | 100 ms/sample |
| Sampling Interval Max | 60 s/sample |
| Acceleration Resolution | 0.1 Duty Cycle/s |
| Velocity Resolution | 0.001 Duty Cycle |
| Current Limit Resolution | 5.6 mA |
| Acceleration Time Min | 20 ms |
| Acceleration Time Max | 20 s |
| Electrical Properties | |
| Continuous Motor Current Max | (per motor) 4 A |
| Supply Voltage Min | 8 V DC |
| Supply Voltage Max | 30 V DC |
| Current Consumption (Unconfigured) | (VINT Port) 500 μA |
| Current Consumption Max | (VINT Port) 750 μA |
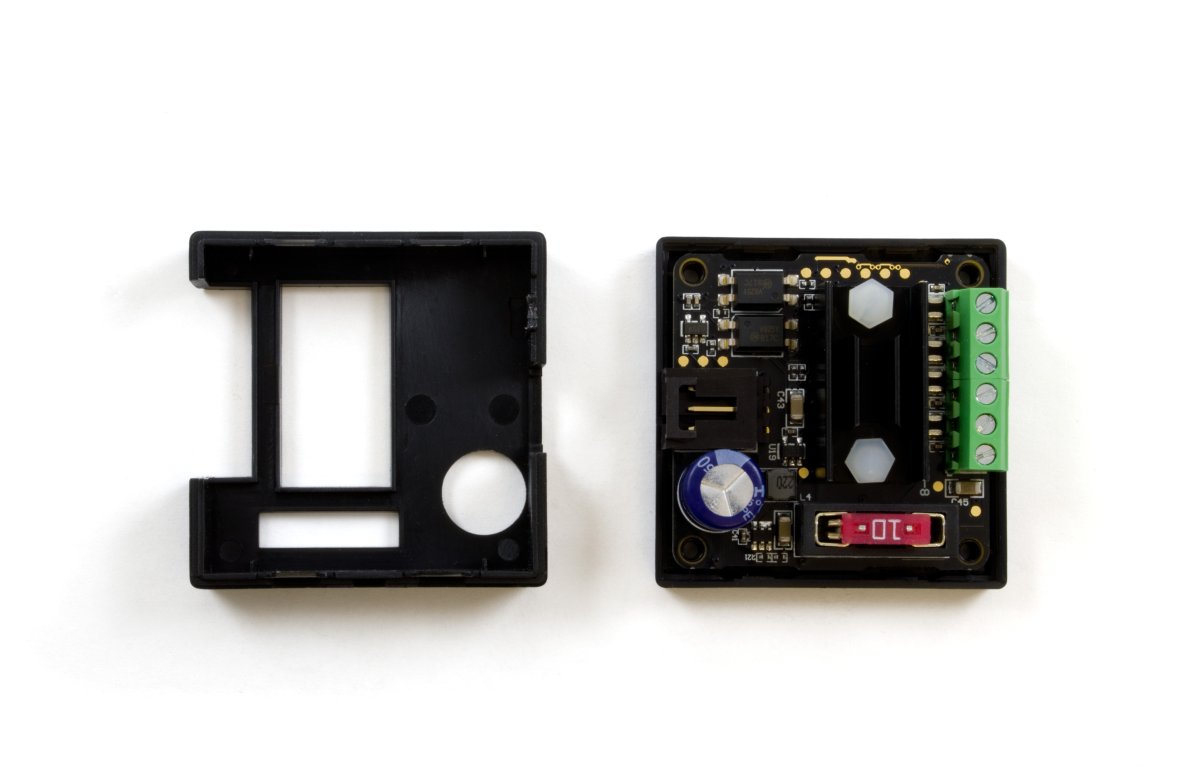
| Replacement Fuse | 10A Slow Blow Blade Type, Standard or Micro |
| Isolation Voltage (DC) | 3.8 kV DC |
| Physical Properties | |
| Recommended Wire Size | 16 - 26 AWG |
| Operating Temperature Min | -40 °C |
| Operating Temperature Max | 85 °C |
| Customs Information | |
| Canadian HS Export Code | 8471.80.00 |
| American HTS Import Code | 8471.80.40.00 |
| Country of Origin | CN (China) |
| Date | Board Revision | Device Version | Comment |
|---|---|---|---|
| May 2019 | 0 | 102 | Product Release |
| May 2019 | 0 | 110 | Added failsafe timer functionality |
| March 2022 | 0 | 120 | Failsafe timer now resets on any successful packet |
| Channel Name | API | Channel |
|---|---|---|
| DC Motor Controller | DCMotor | 0 - 1 |
| Product | Controller Properties | Electrical Properties | Board Properties | |||
|---|---|---|---|---|---|---|
| Part Number | Price | Number of Motor Ports | Velocity Resolution | Acceleration Resolution | Continuous Motor Current Max | Controlled By |
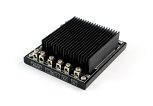
 30V 50A DC Motor Phidget
|
$150.00 | 1 | 0.00078 Duty Cycle | — | 50 A | VINT |
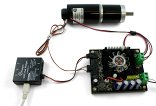
 DC Motor Phidget
|
$75.00 | 1 | 0.001 Duty Cycle | 1 Duty Cycle/s | 25 A | VINT |
 2x DC Motor Phidget
|
$60.00 | 2 | 0.001 Duty Cycle | 0.1 Duty Cycle/s | (per motor) 4 A | VINT |
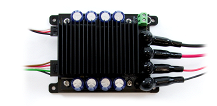
 4A DC Motor Phidget
|
$40.00 | 1 | 0.001 Duty Cycle | 0.1 Duty Cycle/s | 4 A | VINT |
 PhidgetMotorControl 1-Motor
|
$75.00 | 1 | 0.39 Duty Cycle | 24.5 Duty Cycle/s | 5 A | USB (Mini-USB) |
 PhidgetMotorControl HC
|
$115.00 | 2 | 0.79 Duty Cycle | 1.9 Duty Cycle/s | (per motor) 14 A | USB (Mini-USB) |