
Mechanical Relay Guide
Mechanical relays can switch a power or signal line by physically moving metal contacts with an electromagnet. Learn more here.
Quantity Available: 1000+
| Qty | Price |
|---|---|
| 10 | $11.40 |
| 25 | $10.20 |
| 50 | $9.00 |
| 100 | $8.40 |
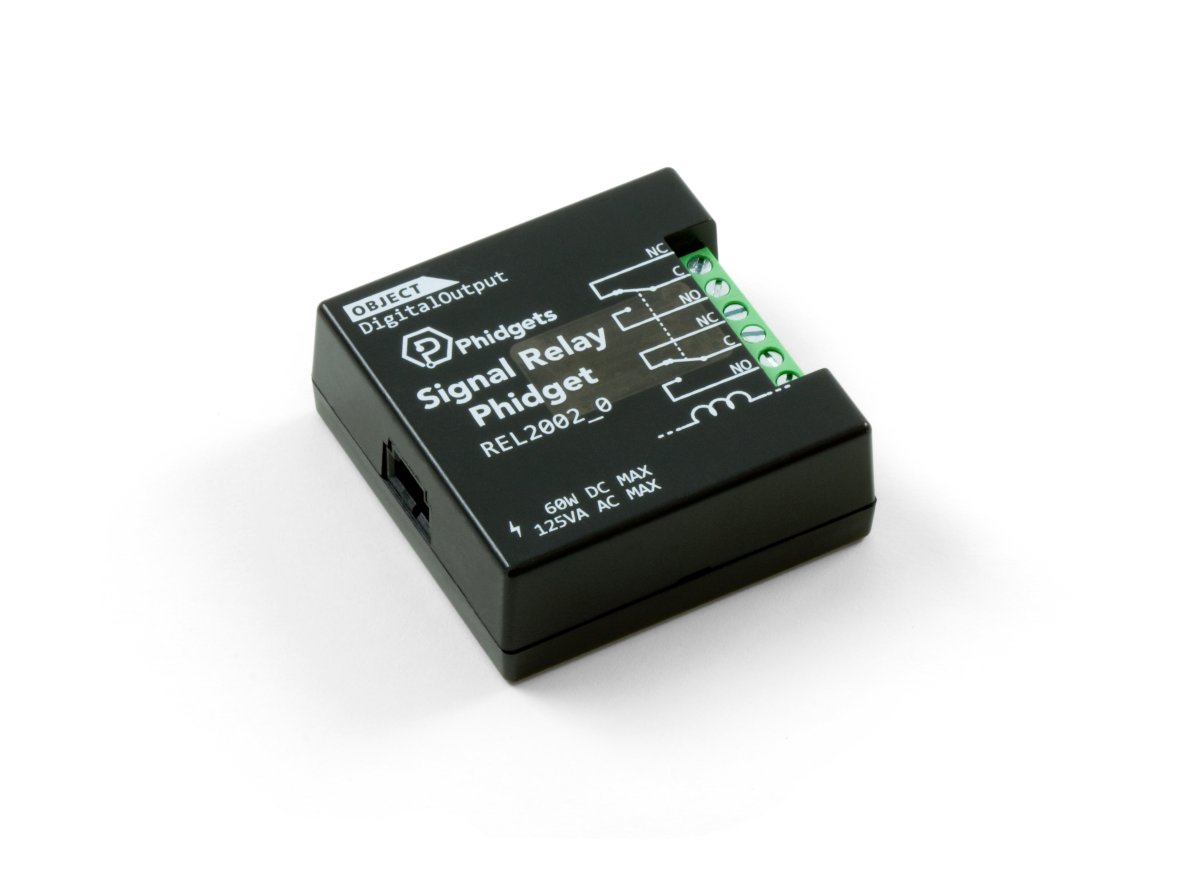
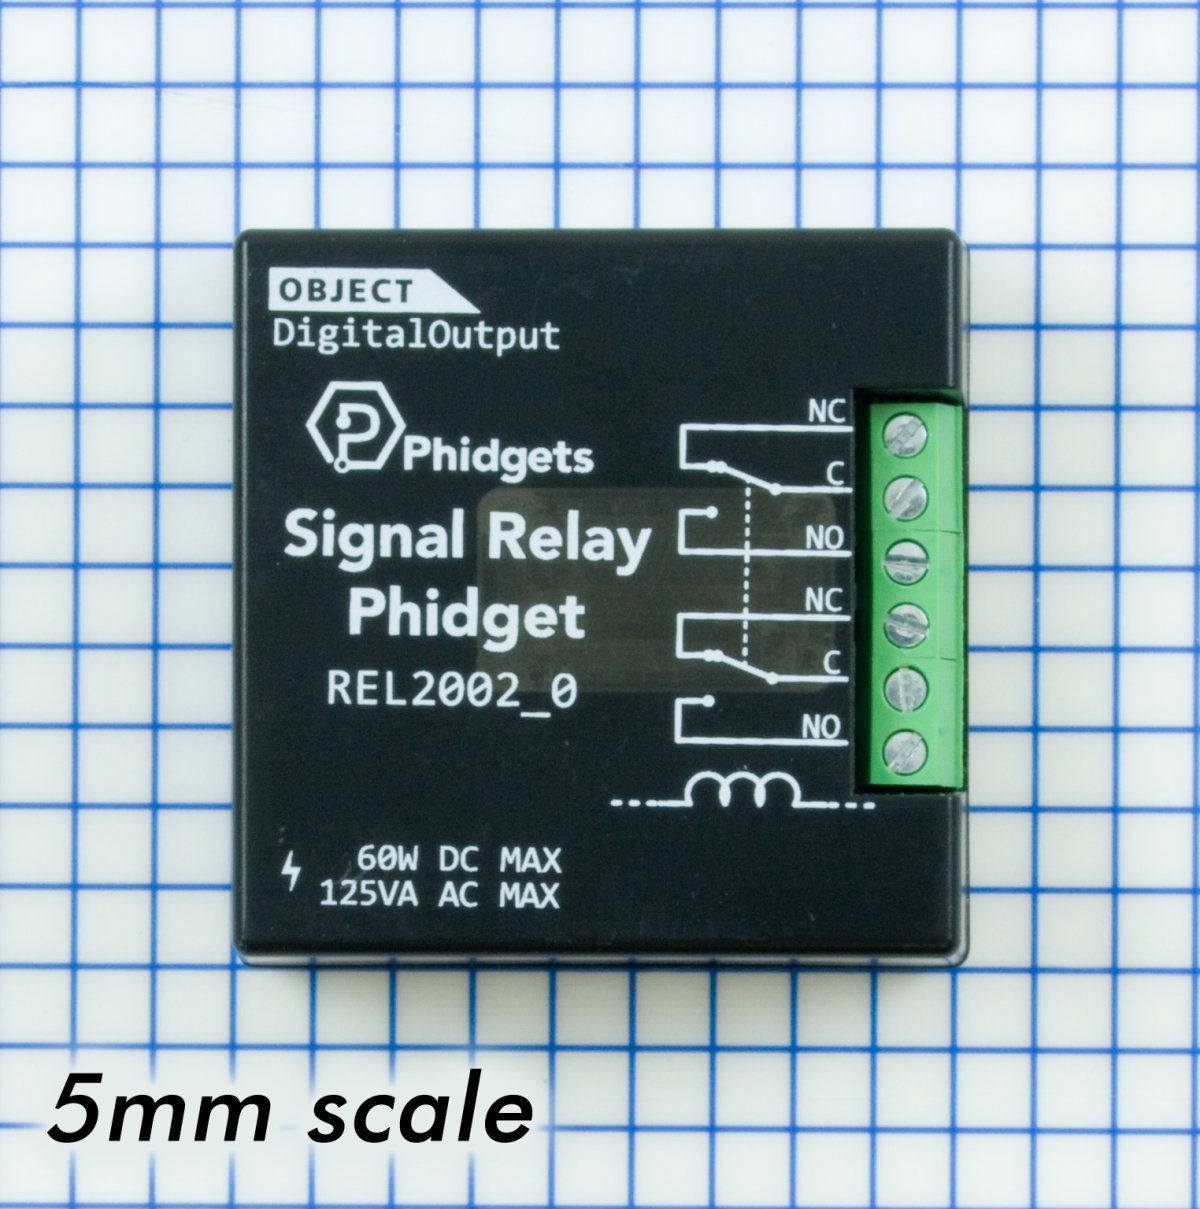
The Signal Relay Phidget is a mechanical relay board designed to switch signals.
It includes one DPDT mechanical relay capable of switching AC or DC signals. While typical mechanical relay boards are unable to switch signals due to an oxide buildup on the contacts, this product excels at switching both signals and low-power applications.
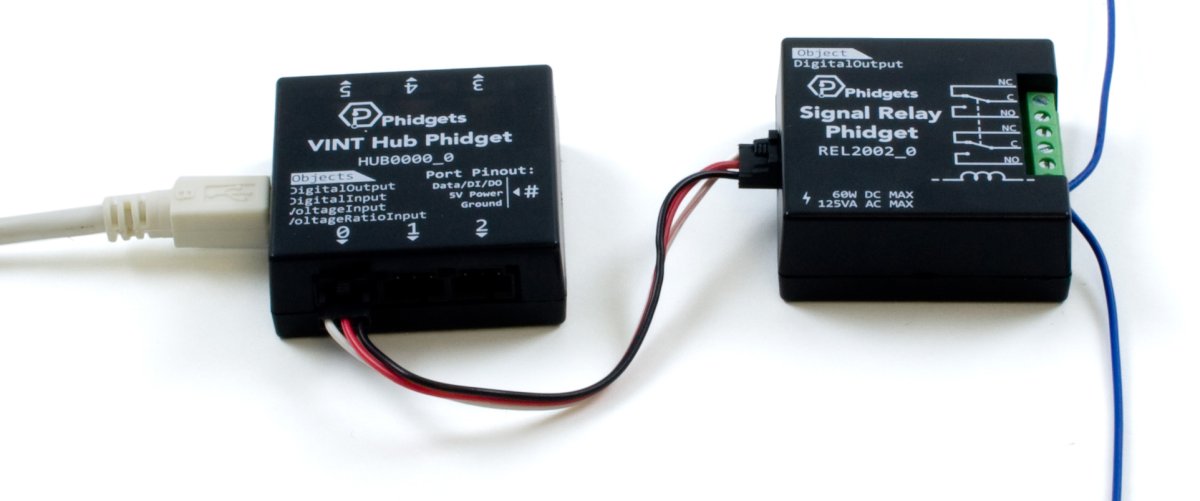
The Signal Relay Phidget connects to your computer through a VINT Hub Phidget.
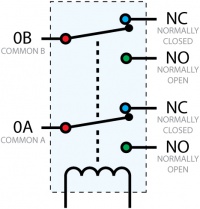
The REL2002 is a mechanical relay suitable for both AC and DC applications. It is a double-pole double-throw style relay meaning it will switch two circuits at once. You interact with the REL2002 through the Digital Output Channel Class to turn power to your circuit or device on and off .
Double click on the Digital Output channel class under the port your REL2002 is connected to.
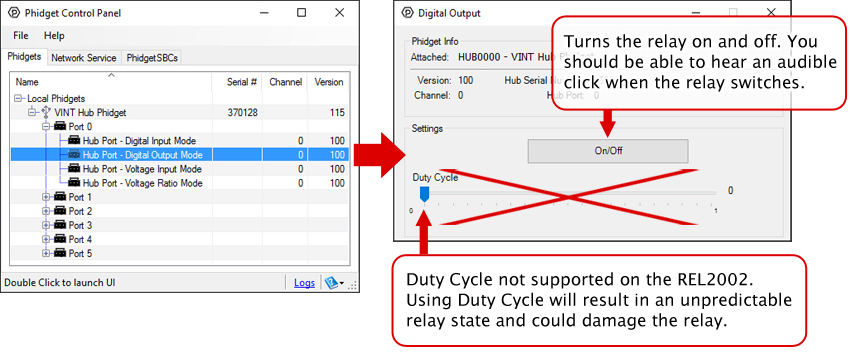
Before you open a Phidget channel in your program, you can set these properties to specify which channel to open. You can find this information through the Control Panel.
1. Open the Control Panel and double-click on the red map pin icon:

2. The Addressing Information window will open. Here you will find all the information you need to address your Phidget in your program.

See the Phidget22 API for your language to determine exact syntax for each property.
This relay is an electrically-controlled switch. For more information about how mechanical relays work and how to use them, visit the Mechanical Relay Guide.
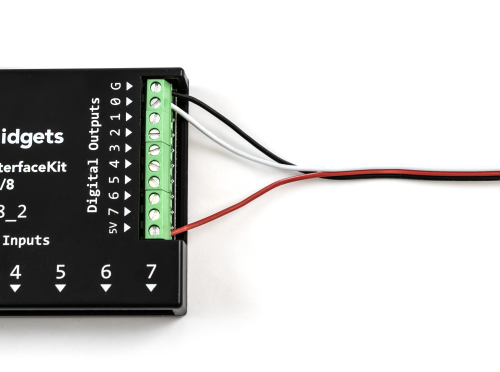
Unlike most VINT devices that communicate to the VINT Hub by sending packets on the data line, the REL2002 is simply controlled with the port in digital output mode. This means that you can control it with other digital output devices. For example, you can control it with a Phidget 1018 like this:
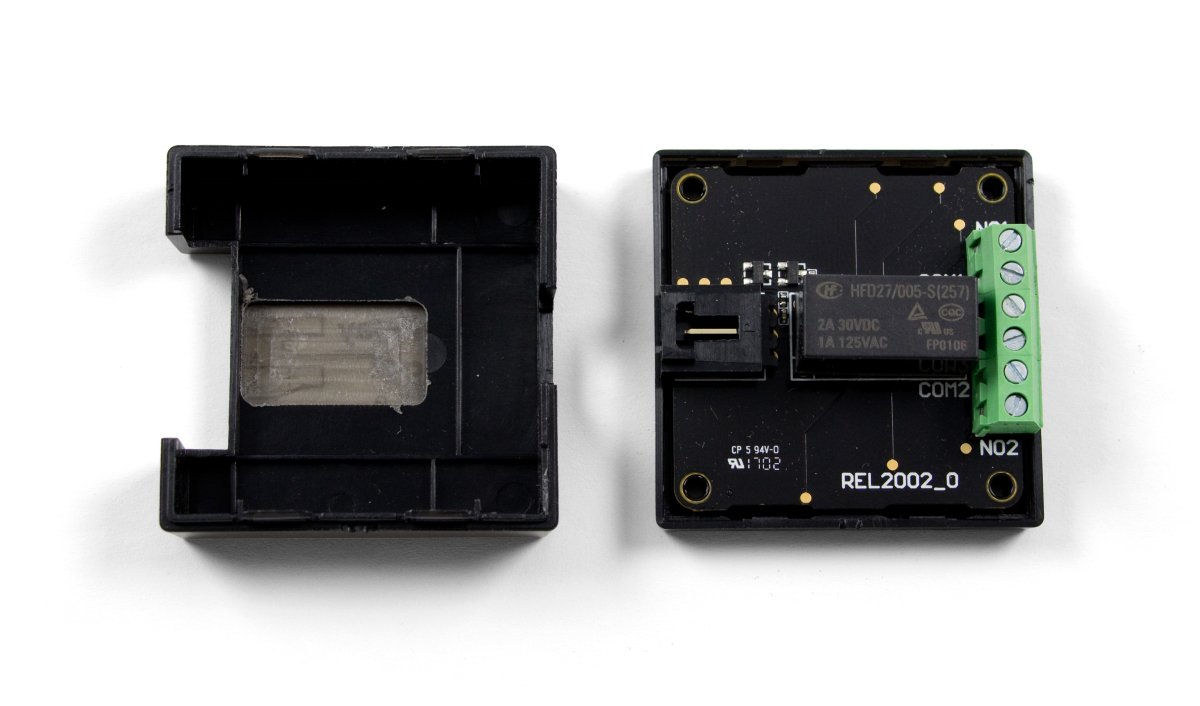
Here's a simplified diagram to clarify how the REL2002 works:
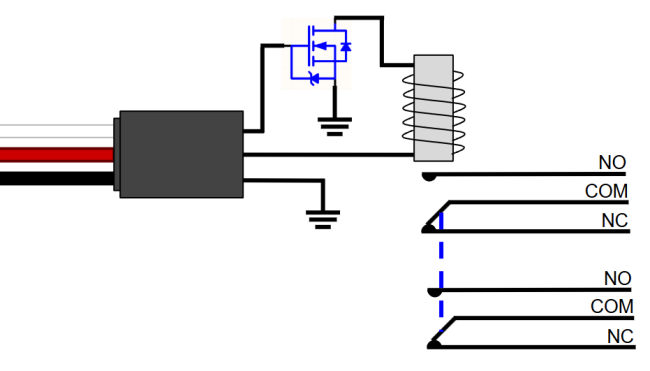
The red wire requires 5V to power the relay coil, and the white wire requires at least 3.3V to switch the MOSFET.
| Board Properties | |
|---|---|
| Controlled By | Digital Output |
| Relay Properties | |
| Switch Type | DPDT |
| Switching Speed Max | 20 cpm |
| Dielectric Strength | 1.5 kV AC |
| Contact Resistance Max | 100 mΩ |
| Load Current Min | 10 μA |
| Turn-on Time Max | 7 ms |
| Turn-off Time Max | 4 ms |
| Number of Relays | 1 |
| Electrical Properties | |
| Control Voltage Min | 4 V DC |
| Control Voltage Max | 5.5 V DC |
| Load Voltage Max (DC) | 120 V DC |
| Load Voltage Max (AC) | 240 V AC |
| Load Current Max (DC) | 2 A |
| Load Current Max (AC) | 2 A |
| Switching Power Max (Real) | 60 W |
| Switching Power Max (Apparent) | 125 VA |
| Current Consumption Min | 0 A |
| Current Consumption Max | 20 mA |
| Physical Properties | |
| Recommended Wire Size | 16 - 26 AWG |
| Operating Temperature Min | -40 °C |
| Operating Temperature Max | 85 °C |
| Customs Information | |
| Canadian HS Export Code | 8473.30.00 |
| American HTS Import Code | 8473.30.11.80 |
| Country of Origin | CN (China) |
| Date | Board Revision | Device Version | Comment |
|---|---|---|---|
| June 2017 | 0 | N/A | Product Release |
This device doesn't have an API of its own. It is controlled by opening a DigitalOutput channel on the Phidget that it's connected to. For a list of compatible Phidgets with Digital Output, see the Connection & Compatibility tab.
You can find details for the DigitalOutput API on the API tab for the Phidget that this sensor connects to.
This Phidget can be controlled by a VINT Hub or any other device with a digital output. You can use a Phidget Cable to simply and easily connect the two devices. Here's a list of all of the different VINT Hubs and Phidget InterfaceKits that can be used with this device:
| Product | Board Properties | |||
|---|---|---|---|---|
| Part Number | Price | Number of VINT Ports | VINT Communication Speed Max | Controlled By |
 VINT Hub Phidget
|
$40.00 | 6 | 1 Mbit/s | USB (Mini-USB) |
 1-Port VINT Hub Phidget
|
$26.00 | 1 | 1 Mbit/s | USB (USB-A) |
 Wireless VINT Hub
|
$65.00 | 6 | 100 kbit/s | Local Network (Ethernet or Wi-Fi) |
 PhidgetSBC4
|
$130.00 | 6 | 100 kbit/s | — |
| Product | Voltage Inputs | Digital Outputs | Digital Inputs | |
|---|---|---|---|---|
| Part Number | Price | Number of Voltage Inputs | Number of Digital Outputs | Number of Digital Inputs |
 PhidgetInterfaceKit 8/8/8
|
$90.00 | 8 | 8 | 8 |
 PhidgetInterfaceKit 2/2/2
|
$50.00 | 2 | 2 | 2 |
 PhidgetInterfaceKit 8/8/8
|
$90.00 | 8 | 8 | 8 |
 PhidgetInterfaceKit 8/8/8 Mini-Format
|
$70.00 | 8 | 8 | 8 |
 PhidgetInterfaceKit 8/8/8 w/6 Port Hub
|
$110.00 | 8 | 8 | 8 |
 PhidgetTextLCD 20X2 : White : Integrated PhidgetInterfaceKit 8/8/8
|
$70.00 | 8 | 8 | 8 |
Use a Phidget cable to connect this device to the hub. You can solder multiple cables together in order to make even longer Phidget cables, but you should be aware of the effects of having long wires in your system.
| Product | Physical Properties | |
|---|---|---|
| Part Number | Price | Cable Length |
 Phidget Cable 10cm
|
$1.50 | 100 mm |
 Phidget Cable 30cm
|
$1.75 | 300 mm |
 Phidget Cable 60cm
|
$2.00 | 600 mm |
 Phidget Cable 60cm
|
$2.00 | 600 mm |
 Phidget Cable 90cm
|
$2.00 | 900 mm |
 Phidget Cable 120cm
|
$2.25 | 1.2 m |
 Phidget Cable 150cm
|
$2.50 | 1.5 m |
 Phidget Cable 180cm
|
$2.75 | 1.8 m |
 Phidget Cable 350cm
|
$3.00 | 3.5 m |
 Phidget Cable Kit
|
$10.00 | 80 mm |
 Phidget Cable Extension Wire 22AWG
|
$0.75/Meter | — |
| Product | Electrical Properties | ||||
|---|---|---|---|---|---|
| Part Number | Price | Load Current Max (AC) | Load Voltage Max (AC) | Load Current Max (DC) | Load Voltage Max (DC) |
 PhidgetInterfaceKit 0/0/4
|
$60.00 | 12 A | 277 V AC | 7 A | * 30 V DC |
 4x Relay Phidget
|
$34.00 | 12 A | 277 V AC | 7 A | * 30 V DC |
 Relay Phidget
|
$12.00 | 12 A | 277 V AC | 7 A | * 30 V DC |
 Dual Relay Board
|
$17.00 | 12 A | 277 V AC | 7 A | * 30 V DC |
 PhidgetInterfaceKit 0/0/8
|
$95.00 | 2 A | 250 V AC | 2 A | 120 V DC |
 Signal Relay Phidget
|
$12.00 | 2 A | 240 V AC | 2 A | 120 V DC |
 PhidgetInterfaceKit 0/16/16
|
$105.00 | — | — | — | — |
 4x Isolated Solid State Relay Phidget
|
$28.00 | — | — | (per channel) 8 A | (per channel) 30 V DC |
 16x Isolated Solid State Relay Phidget
|
$56.00 | — | — | (per channel) 8 A | (per channel) 30 V DC |
 Solid State Relay Phidget
|
$15.00 | 10 A | 30 V AC | * 10 A | 30 V DC |
 Dual SSR Relay Board
|
$34.00 | (per channel) 9 A | 28 V AC | (per channel) 9 A | 40 V DC |
 SSR Relay Board 2.5A
|
$17.00 | 2.5 A | 28 V AC | 2.5 A | 40 V DC |
 Power Plug Phidget
|
$20.00 | 15 A | 125 V AC | — | — |
 PhidgetInterfaceKit 0/0/4
|
$60.00 | 12 A | 277 V AC | 7 A | * 30 V DC |
 PhidgetInterfaceKit 0/0/8
|
$95.00 | 2 A | 250 V AC | 2 A | * 120 V DC |
 SSR Relay Board 0.5A
|
$5.00 | 500 mA | 28 V AC | 500 mA | 40 V DC |
For applications with a higher switching power, Hockey Puck style relays are the more robust choice:
| Product | Electrical Properties | |||||
|---|---|---|---|---|---|---|
| Part Number | Price | Control Voltage Min | Control Voltage Max | Load Voltage Min (DC) | Load Voltage Max (DC) | Load Voltage Max (AC) |
 AC Solid State Relay - 280V 20A Random Turn-on
|
$15.00 | 4 V DC | 32 V DC | — | — | 280 V AC |
 AC Solid State Relay - 280V 20A Zero-Cross Turn-on
|
$15.00 | 4 V DC | 32 V DC | — | — | 280 V AC |
 DC Solid State Relay - 120V 75A
|
$45.00 | 3 V DC | 32 V DC | 5 V DC | 120 V DC | — |
 DC Solid State Relay - 30V 100A
|
$30.00 | 4 V DC | 32 V DC | — | 30 V DC | — |
 DC Solid State Relay - 30V 50A
|
$24.00 | 4 V DC | 32 V DC | — | 30 V DC | — |
 DC Solid State Relay - 50V 80A
|
$25.00 | 4 V DC | 32 V DC | — | 50 V DC | — |