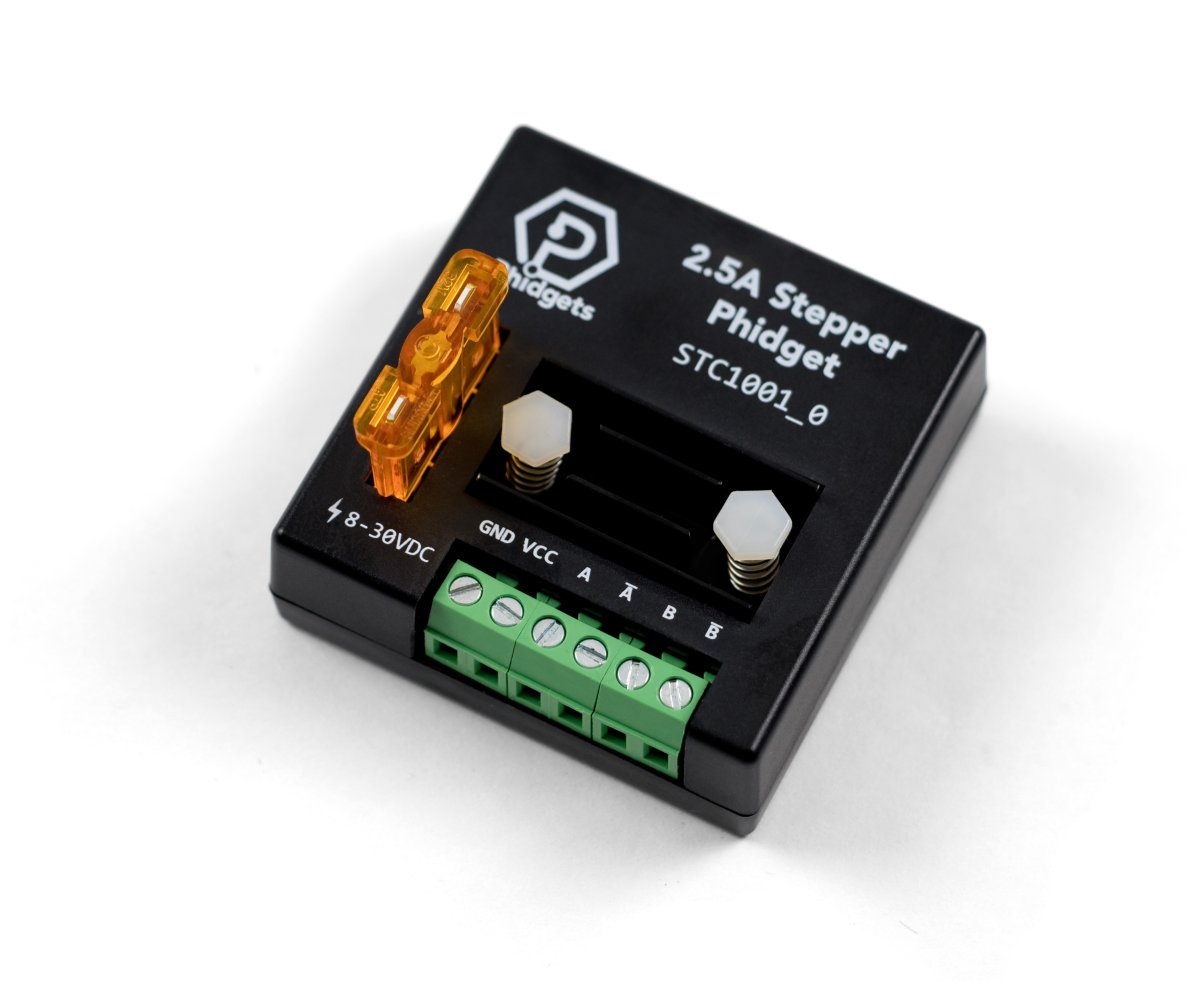
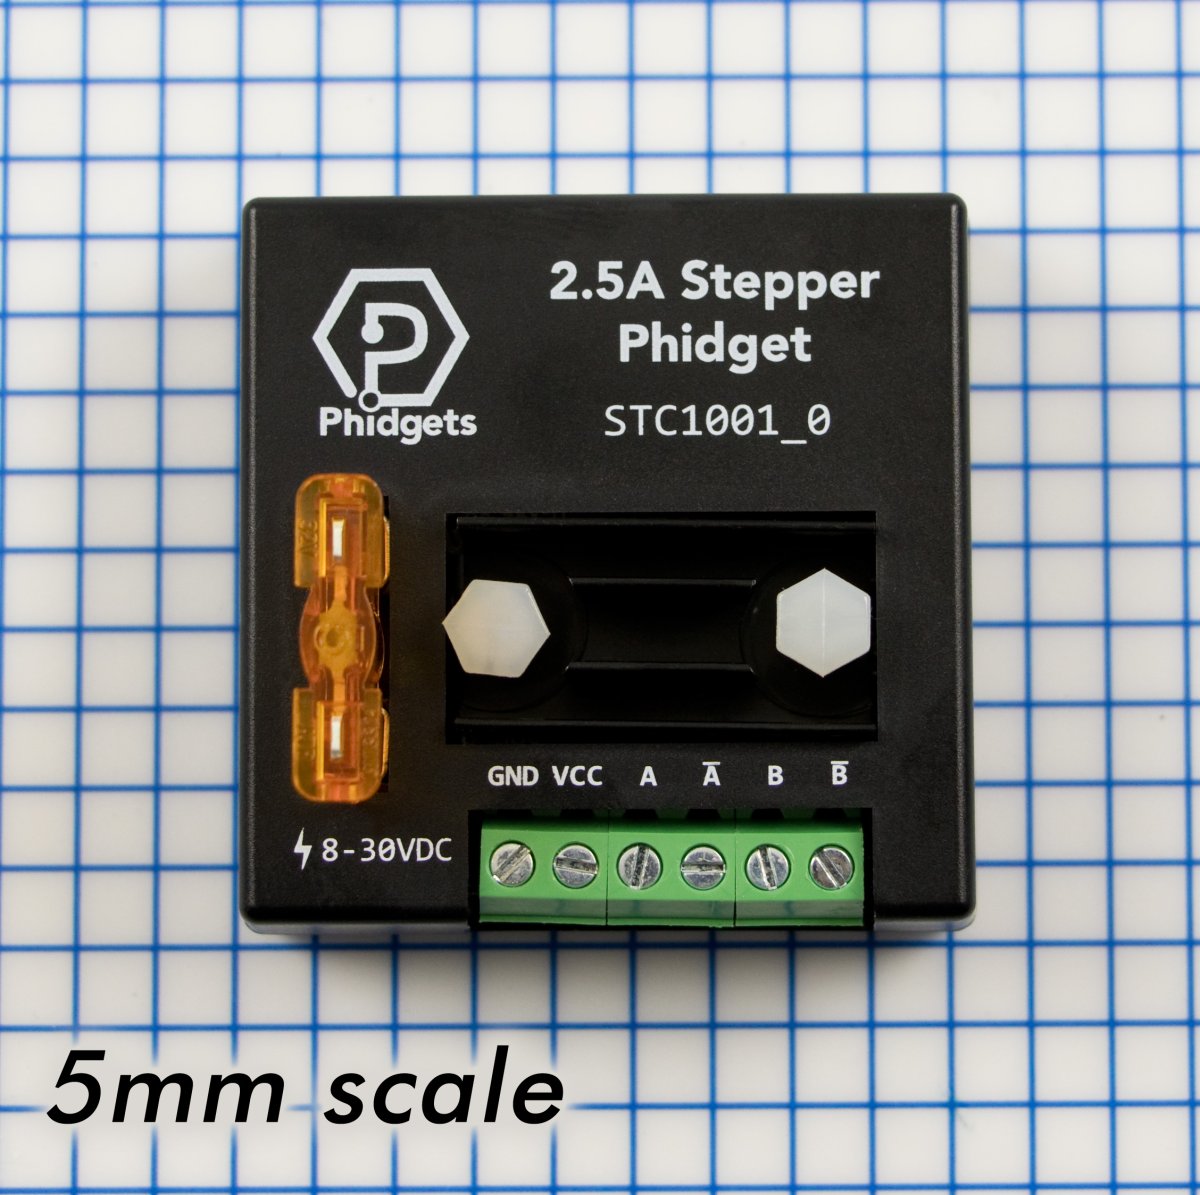
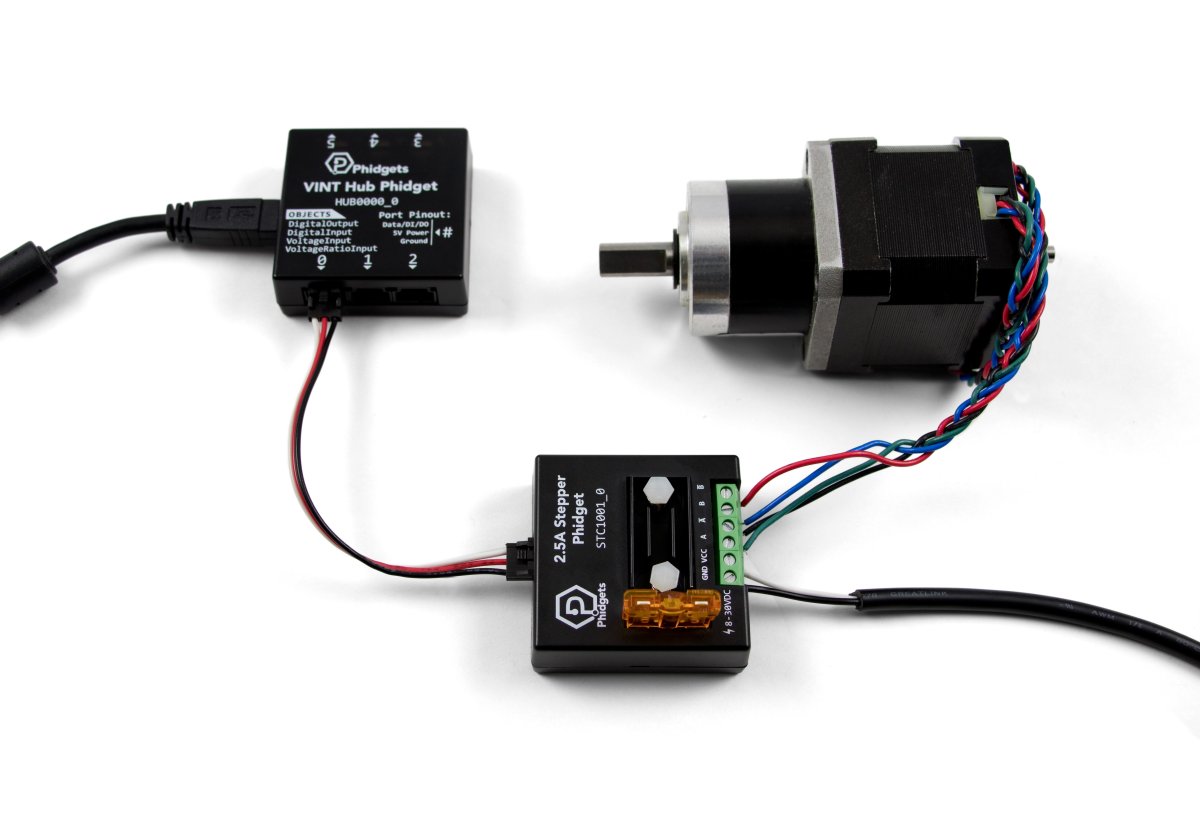
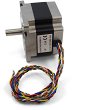
If you're looking for a compact solution for controlling a medium-sized stepper motor, the STC1001 is an affordable and convenient option. You can control the position, velocity, and acceleration of the motor by sending commands from your program. This Phidget connects to a VINT Hub; for a list of options see the Connection & Compatibility tab.
Safety Features
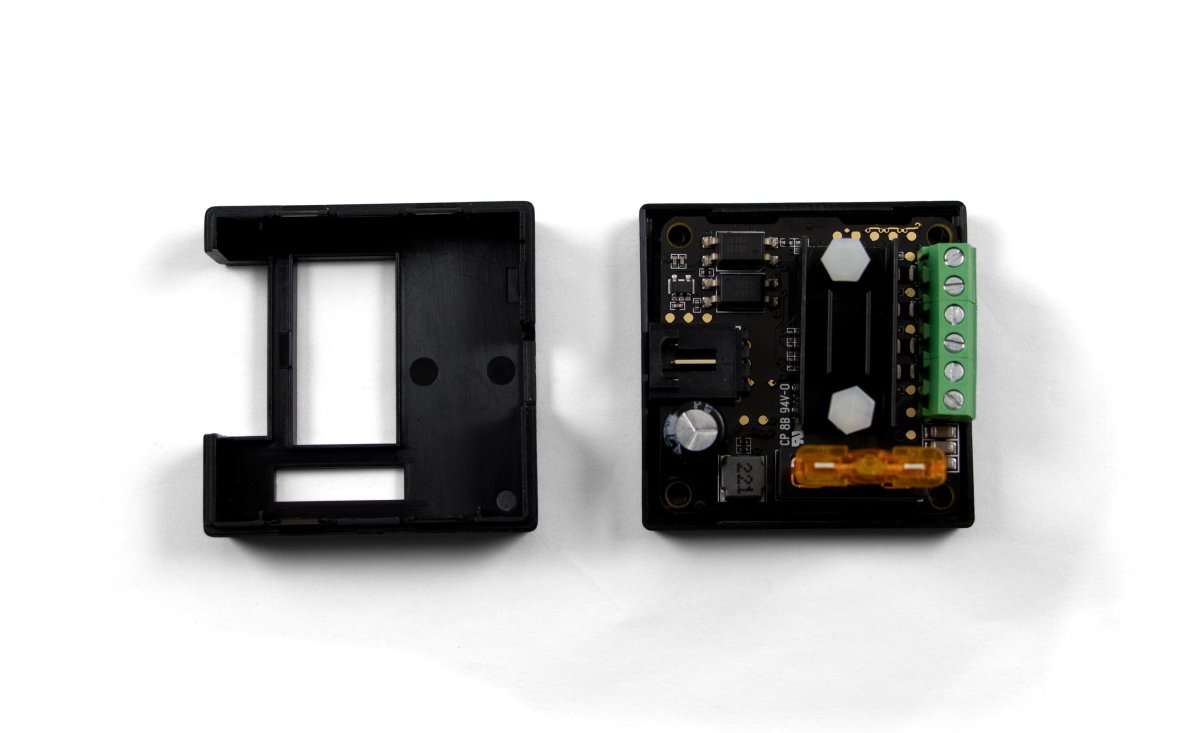
The STC1001 comes equipped with a heatsink to prevent the board from overheating during use. The power terminals on this device are polarity protected: if you happen to hook up the power supply backwards, the device simply won't power up and won't be damaged. A 5-amp automotive-style fuse is also included to protect the board from current spikes from the motor's back-EMF. This Phidget is isolated from input to output, so your VINT hub and computer will be protected if anything goes wrong.
Power Saving Options
For power-conscious users, we also allow for separate control over the current limit and the holding current limit. If you know your motor will be stationary for long periods of time, but still needs a small amount of holding torque to maintain its position, you can set the holding current appropriately without interfering with the running current limit.
Power Guards
Using motor controllers with large motors can pose a risk for your power supply. If your supply does not have protective features built-in, you can use a Power Guard Phidget to prevent damage from power spikes from back EMF that is generated when motors brake or change direction. We recommend that you use the SAF2000 for any motor with a coil current between 1.5 and 5 amperes, and the SAF1000 for motors above 5A.
The STC1001 can control both unipolar and bipolar motors, but in almost all cases you're better off with a bipolar motor due to their increased power and more precise step angles. If you care about torque, large motors with high gear ratios are your best bet. If you car about speed, motors with no gearbox and high step angles are better. If you want precision, steppers without gearboxes and low step angles are best because while gearboxes do result in smaller steps, they also introduce a flat 1-3 degrees of positional error due to backlash in the gears.
This Phidget is a smart device that must be controlled by a VINT Hub. For more information about VINT, have a look at the VINT Overview page. You can use a Phidget Cable to simply and easily connect the two devices. Here's a list of all of the different VINT Hubs currently available:
Use a Phidget cable to connect this device to the hub. You can solder multiple cables together in order to make even longer Phidget cables, but you should be aware of the effects of having long wires in your system.
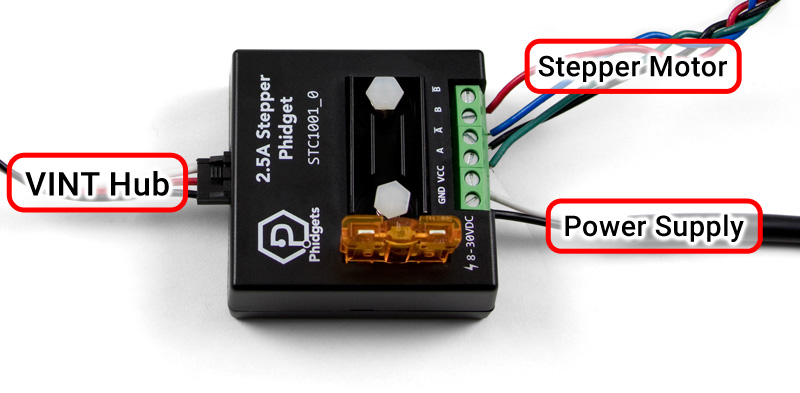
This Phidget requires a power supply between 8 and 30V DC. We recommend that you use a 12V DC power supply for small steppers and a 24V DC supply for larger ones. If you're not sure, check the data sheet for your motor for the recommended power supply voltage (not to be confused with the coil voltage, which is usually much lower). For best results, we recommend getting a 5 amp supply. Select the power supply from the list below that matches your region's wall socket type.
For installation instructions for these packages, see the README file included with each one.
Step 2: Connect Devices
● Connect USB Cable to your Linux Computer
● Connect VINT Device(s)
Step 3: Verify Connection
1. The easiest way to verify that your libraries are working properly is to compile and run an example program. Download and unpack this C example that will
detect any Phidget:
2. Next, open the terminal in the location where you unpacked the example. Compile and run using:
gcc HelloWorld.c -o HelloWorld -lphidget22
sudo ./HelloWorld
ou should receive a “Hello” line for each Phidget channel that is discovered:
I don’t see any Phidgets show up in the HelloWorld example
You need to run it with sudo in order to be able to access USB devices. In order to use
Phidgets without sudo, you need to set your udev rules. See the Advanced Information page on the final slide of this guide for details.
Done!
If you're able to see your devices in the Hello World example, you're done with the Setup part of this guide.
Scroll down to Part 2: Using Your Phidget for the next step.
For more info installing in Linux (e.g. Udev rules, old versions, etc.), visit this page:
If you're unsure which one you should get, press ⊞ WIN + Pause/Break:
Before installing our libraries, be sure to read our Software License.
Step 1: Install Phidgets Library
2. Open the download. If it asks you for permission, select Run
Step 1: Install Phidgets Library
3a. Select Next
Step 1: Install Phidgets Library
3b. Read the Licence Agreement. Select Next.
Step 1: Install Phidgets Library
3c. Choose Installation Location. Select Next.
Step 1: Install Phidgets Library
3d. Select Next to confirm install.
Step 1: Install Phidgets Library
3e. Wait for Installation to complete. This should only take a few moments.
Step 1: Install Phidgets Library
3f. Installation Complete. Close installation Window.
Step 2: Connect Devices
● Connect Power Jack
● Connect VINT Device(s)
● Connect Ethernet to a Router or Switch (optional)
Step 3: Verify Connection
Choose a setup method:
Configure with mobile device
Connect with ethernet cable
(Requires physical access to router or switch)
«
»
Connection (Mobile)
Step 3: Connect Wireless
1. When you connect the power supply to the HUB5000, the red LED should turn on.
Step 3: Connect Wireless
2. On your mobile device, go to the Wi-Fi settings and connect to the HUB5000:
Step 3: Connect Wireless
3. When asked for a password, enter the password printed on the HUB5000’s label.
Step 3: Connect Wireless
4. Once your device is connected to the HUB5000’s WiFi signal:
Click on the WiFi network and find an option that says “Manage router” or “Visit homepage”.
Go to your internet browser and type 192.168.100.1 in the address bar.
Step 3: Connect Wireless
5. Create a password for your HUB5000. You'll use it to access the Configure Page from now on.
Step 3: Connect Wireless
6. Navigate to the network page. Change the Mode to Client.
Step 3: Connect Wireless
7. Enter your Wifi Network details and click Save & Apply. It may take a few minutes for your Phidgets to appear in the Phidget Control Panel, which
we’ll check in the next step.
Step 4: Verify Connection
1. Open the Phidgets Control Panel:
If your Control Panel does not open, look in your taskbar. Double click the Phidget Icon.
Step 4: Verify Connection
2. If connected, your Phidgets will appear in the Phidget Control Panel.
Step 5: Update
Now that you've confirmed that you have access to your Phidgets, you should ensure the HUB5000 is fully updated. You can update the firmware of the VINT Hub by
going back to the Phidget Control Panel. If there's a blue arrow beside the version number, it means an update is available:
Right-click anywhere on that row and select Upgrade Firmware. When it's done, the number in the Version column will change.
Step 5: Update
Next, to update the OS firmware, go to the Network Phidgets tab in the control panel, find your HUB5000 and double-click on it. If the OS firmware is out
of date, you'll see the following window pop up with steps to follow:
1. Download the firmware (you can get it here if the button does not
work)
2. Open the web interface by clicking the button or entering the HUB5000's IP address in your web browser.
3. Go to the System tab and scroll down to the Upgrade Firmware section. Select the file you just downloaded and click Upgrade and Restart.
You'll be instructed to wait a few minutes before logging back into the web interface.
Step 5: Update
When you log back in, you can confirm that the new version has successfully installed by checking to see if the firmware version listed in the
Status section matches the first three numbers in the firmware file name that you downloaded. You can also check the version in the
Network Phidgets tab on the Phidget Control Panel.
Done!
Now that you're able to see and interact with your devices in the Phidget Control Panel and they're fully updated, you're done with the Setup part of this
guide.
Scroll down to Part 2: Using Your Phidget for the next step.
For more help installing in Windows (e.g. manual install, using a VM, etc.), visit this page:
1. When you connect the power supply to the HUB5000, the red LED should turn on.
Step 3: Connect Wireless
2. In your Web Browser, enter hub5000.local
Step 3: Connect Wireless
3. Create a password for your HUB5000. You'll use this password to access the Configure Page from now on.
Step 3: Connect Wireless
4. Navigate to the network page. Change the Mode to Client.
Step 3: Connect Wireless
5. Enter your Wifi Network details to use your Hub wirelessly and click Save & Apply. You can then disconnect the ethernet cable.
It may take a few minutes for your Phidgets to appear in the Phidget Control Panel, which we’ll check in the next step.
Step 4: Verify Connection
1. Open the Phidgets Control Panel:
If your Control Panel does not open, look in your taskbar. Double click the Phidget Icon.
Step 4: Verify Connection
2. If connected, your Phidgets will appear in the Phidget Control Panel.
Step 5: Update
Now that you've confirmed that you have access to your Phidgets, you should ensure the HUB5000 is fully updated. You can update the firmware of the VINT Hub by
going back to the Phidget Control Panel. If there's a blue arrow beside the version number, it means an update is available:
Right-click anywhere on that row and select Upgrade Firmware. When it's done, the number in the Version column will change.
Step 5: Update
Next, to update the OS firmware, go to the Network Phidgets tab in the control panel, find your HUB5000 and double-click on it. If the OS firmware is out
of date, you'll see the following window pop up with steps to follow:
1. Download the firmware (you can get it here if the button does not
work)
2. Open the web interface by clicking the button or entering the HUB5000's IP address in your web browser.
3. Go to the System tab and scroll down to the Upgrade Firmware section. Select the file you just downloaded and click Upgrade and Restart.
You'll be instructed to wait a few minutes before logging back into the web interface.
Step 5: Update
When you log back in, you can confirm that the new version has successfully installed by checking to see if the firmware version listed in the
Status section matches the first three numbers in the firmware file name that you downloaded. You can also check the version in the
Network Phidgets tab on the Phidget Control Panel.
Done!
Now that you're able to see and interact with your devices in the Phidget Control Panel and they're fully updated, you're done with the Setup part of this
guide.
Scroll down to Part 2: Using Your Phidget for the next step.
For more help installing in Windows (e.g. manual install, using a VM, etc.), visit this page:
Before installing our libraries, be sure to read our Software License.
Step 1: Install Phidgets Library
2. Open the download and double click on Phidgets.pkg
Step 1: Install Phidgets Library
3a. Select Continue
Step 1: Install Phidgets Library
3b. Read and continue. Read the License and click Agree.
Step 1: Install Phidgets Library
3c. Here, you have the option to select the installation location. Select Install.
Step 1: Install Phidgets Library
3d. MacOS may ask for permission to install. Enter your username and password and Install Software.
Step 1: Install Phidgets Library
3e. Wait for Installation to complete. This should only take a few moments.
Step 1: Install Phidgets Library
3f. You may see a message that the extension has been blocked. Select Open Security Preferences.
Step 1: Install Phidgets Library
3g. Beside the message for Phidgets Inc, Click Allow.
Step 1: Install Phidgets Library
3h. Installation Complete, Click Close.
Step 1: Install Phidgets Library
3i. To delete the installer, click Move to Trash.
Step 2: Connect Devices
● Connect Power Jack
● Connect VINT Device(s)
● Connect Ethernet to a Router or Switch (optional)
Step 3: Verify Connection
Choose a setup method:
Configure with mobile device
Connect with ethernet cable
(Requires physical access to router or switch)
«
»
Connection (Mobile)
Step 3: Connect Wireless
1. When you connect the power supply to the HUB5000, the red LED should turn on.
Step 3: Connect Wireless
2. On your mobile device, go to the Wi-Fi settings and connect to the HUB5000:
Step 3: Connect Wireless
3. When asked for a password, enter the password printed on the HUB5000’s label.
Step 3: Connect Wireless
4. Once your device is connected to the HUB5000’s WiFi signal:
Click on the WiFi network and find an option that says “Manage router” or “Visit homepage”.
Go to your internet browser and type 192.168.100.1 in the address bar.
Step 3: Connect Wireless
5. Create a password for your HUB5000. You'll use this password to access the Configure Page from now on.
Step 3: Connect Wireless
6. Navigate to the network page. Change the Mode to Client.
Step 3: Connect Wireless
7. Enter your Wifi Network details and click Save & Apply. It may take a few minutes for your Phidgets to appear in the Phidget Control Panel, which
we’ll check in the next step.
Step 4: Verify Connection
1. Open the Phidget Control Panel:
Step 4: Verify Connection
2. If connected, your Phidgets will appear in the Phidget Control Panel.
Step 5: Update
Now that you've confirmed that you have access to your Phidgets, you should ensure the HUB5000 is fully updated. You can update the firmware of the VINT Hub by
going back to the Phidget Control Panel. If the name of the device is red, it means an update is available:
Double click on the device in the control panel to update the VINT Hub firmware. When it's finished, the text will turn from red to black and the number in the
Version column will change.
Step 5: Update
To upgrade the firmware of the operating system on the HUB5000, download the most recent file
here.
Next, go back to the web configuration page and click on the System tab. Scroll down to Upgrade Firmware and select the file you download and hit
Upgrade & Restart. You'll be instructed to wait a few minutes before logging back into the web interface.
When you log back in, you can confirm that the new version has successfully installed by checking to see if the firmware version listed in the
Status section matches the first three numbers in the firmware file name that you downloaded.
Done!
Now that you're able to see and interact with your devices in the Phidget Control Panel, you're done with the Setup part of this guide.
Scroll down to Part 2: Using Your Phidget for the next step.
For more info installing in MacOS (e.g. developer tools, driver extension, etc.), visit this page:
1. When you connect the power supply to the HUB5000, the red LED should turn on.
Step 3: Connect Wireless
2. In your Web Browser, enter hub5000.local
Step 3: Connect Wireless
3. Create a password for your HUB5000. You'll use this password to access the Configure Page from now on.
Step 3: Connect Wireless
4. Navigate to the network page. Change the Mode to Client.
Step 3: Connect Wireless
5. Enter your Wifi Network details to use your Hub wirelessly and click Save & Apply. You can then disconnect the ethernet cable.
It may take a few minutes for your Phidgets to appear in the Phidget Control Panel, which we’ll check in the next step.
Step 4: Verify Connection
1. Open the Phidget Control Panel:
Step 4: Verify Connection
2. If connected, your Phidgets will appear in the Phidget Control Panel.
Step 5: Update
Now that you've confirmed that you have access to your Phidgets, you should ensure the HUB5000 is fully updated. You can update the firmware of the VINT Hub by
going back to the Phidget Control Panel. If the name of the device is red, it means an update is available:
Double click on the device in the control panel to update the VINT Hub firmware. When it's finished, the text will turn from red to black and the number in the
Version column will change.
Step 5: Update
To upgrade the firmware of the operating system on the HUB5000, download the most recent file
here.
Next, go back to the web configuration page and click on the System tab. Scroll down to Upgrade Firmware and select the file you download and hit
Upgrade & Restart. You'll be instructed to wait a few minutes before logging back into the web interface.
When you log back in, you can confirm that the new version has successfully installed by checking to see if the firmware version listed in the
Status section matches the first three numbers in the firmware file name that you downloaded.
Done!
Now that you're able to see and interact with your devices in the Phidget Control Panel, you're done with the Setup part of this guide.
Scroll down to Part 2: Using Your Phidget for the next step.
For more info installing in MacOS (e.g. developer tools, driver extension, etc.), visit this page:
For installation instructions for these packages, see the README file included with each one.
Step 2: Connect Devices
● Connect Power Jack
● Connect VINT Device(s)
● Connect Ethernet to a Router or Switch (optional)
Step 3: Verify Connection
Choose a setup method:
Configure with mobile device
Connect with ethernet cable
(Requires physical access to router or switch)
«
»
Connection (Mobile)
Step 3: Connect Wireless
1. When you connect the power supply to the HUB5000, the red LED should turn on.
Step 3: Connect Wireless
2. On your mobile device, go to the Wi-Fi settings and connect to the HUB5000:
Step 3: Connect Wireless
3. When asked for a password, enter the password printed on the HUB5000’s label.
Step 3: Connect Wireless
4. Once your device is connected to the HUB5000’s WiFi signal:
Click on the WiFi network and find an option that says “Manage router” or “Visit homepage”.
Go to your internet browser and type 192.168.100.1 in the address bar.
Step 3: Connect Wireless
5. Create a password for your HUB5000. You'll use this password to access the Configure Page from now on.
Step 3: Connect Wireless
6. Navigate to the network page. Change the Mode to Client.
Step 3: Connect Wireless
7. Enter your Wifi Network details and click Save & Apply. It may take a few minutes for your Phidgets to appear in the Phidget Control Panel, which
we’ll check in the next step.
Step 4: Verify Connection
1. The easiest way to verify that your libraries are working properly is to compile and run an example program. Download and unpack this C example that will
detect any Phidget:
2. Next, open the terminal in the location where you unpacked the example. Compile and run using:
gcc HelloWorld.c -o HelloWorld -lphidget22
sudo ./HelloWorld
ou should receive a “Hello” line for each Phidget channel that is discovered:
I don’t see any Phidgets show up in the HelloWorld example
You need to run it with sudo in order to be able to access USB devices. In order to use
Phidgets without sudo, you need to set your udev rules. See the Advanced Information page on the final slide of this guide for details.
Step 5: Update
Now that you've confirmed that you have access to your Phidgets, you should ensure the HUB5000 is fully updated. You can update the firmware of the VINT Hub
using the phidget22admin tool (see included readme for further
instructions).
To upgrade the firmware of the operating system on the HUB5000, download the most recent file
here.
Next, go back to the web configuration page and click on the System tab. Scroll down to Upgrade Firmware and select the file you download and hit
Upgrade & Restart. You'll be instructed to wait a few minutes before logging back into the web interface.
When you log back in, you can confirm that the new version has successfully installed by checking to see if the firmware version listed in the
Status section matches the first three numbers in the firmware file name that you downloaded.
Done!
Now that you're able to see your devices in the Hello World example and the device is fully updated, you're done with the Setup part of this guide.
Scroll down to Part 2: Using Your Phidget for the next step.
For more info installing in Linux (e.g. Udev rules, old versions, etc.), visit this page:
1. When you connect the power supply to the HUB5000, the red LED should turn on.
Step 3: Connect Wireless
2. In your Web Browser, enter hub5000.local
Step 3: Connect Wireless
3. Create a password for your HUB5000. You'll use this password to access the Configure Page from now on.
Step 3: Connect Wireless
4. Navigate to the network page. Change the Mode to Client.
Step 3: Connect Wireless
5. Enter your Wifi Network details to use your Hub wirelessly and click Save & Apply. You can then disconnect the ethernet cable.
It may take a few minutes for your Phidgets to appear in the Phidget Control Panel, which we’ll check in the next step.
Step 4: Verify Connection
1. The easiest way to verify that your libraries are working properly is to compile and run an example program. Download and unpack this C example that will
detect any Phidget:
2. Next, open the terminal in the location where you unpacked the example. Compile and run using:
gcc HelloWorld.c -o HelloWorld -lphidget22
sudo ./HelloWorld
You should receive a “Hello” line for each Phidget channel that is discovered:
I don’t see any Phidgets show up in the HelloWorld example
You need to run it with sudo in order to be able to access USB devices. In order to use
Phidgets without sudo, you need to set your udev rules. See the Advanced Information page on the final slide of this guide for details.
Step 5: Update
Now that you've confirmed that you have access to your Phidgets, you should ensure the HUB5000 is fully updated. You can update the firmware of the VINT Hub
using the phidget22admin tool (see included readme for further
instructions).
To upgrade the firmware of the operating system on the HUB5000, download the most recent file
here.
Next, go back to the web configuration page and click on the System tab. Scroll down to Upgrade Firmware and select the file you download and hit
Upgrade & Restart. You'll be instructed to wait a few minutes before logging back into the web interface.
When you log back in, you can confirm that the new version has successfully installed by checking to see if the firmware version listed in the
Status section matches the first three numbers in the firmware file name that you downloaded.
Done!
Now that you're able to see your devices in the Hello World example and the device is fully updated, you're done with the Setup part of this guide.
Scroll down to Part 2: Using Your Phidget for the next step.
For more info installing in Linux (e.g. Udev rules, old versions, etc.), visit this page:
For installation instructions for these packages, see the README file included with each one.
Step 2: Connect Devices
● Connect Power Jack
● Connect VINT Device(s)
● Connect Ethernet to a Router or Switch in the same network as your Linux machine
Step 3: Verify Connection
1. The easiest way to verify that your libraries are working properly is to compile and run an example program. Download and unpack this C example that will
detect any Phidget:
2. Next, open the terminal in the location where you unpacked the example. Compile and run using:
gcc HelloWorld.c -o HelloWorld -lphidget22
sudo ./HelloWorld
If everything is working, you should receive a “Hello” line for each Phidget channel that is discovered:
I don’t see any Phidgets show up in the HelloWorld example
You need to run it with sudo in order to be able to access USB devices. In order to use
Phidgets without sudo, you need to set your udev rules. See the Advanced Information page on the final slide of this guide for details.
Now that the SBC's ethernet connection is verified, it can be connected to wifi.
If you don't have a USB wifi adapter or you're planning to stay on ethernet, you can scroll down to
Part 2: Using Your Phidget
Step 4: Connect Wireless
1. In your web browser, enter phidgetsbc.local
If you're using a terminal-only Linux machine, use the browser on your phone instead.
(If you use a phone, you need to enter the IP address your router assigned to the SBC instead of phidgetsbc.local)
Step 4: Connect Wireless
2. Create a password for your SBC. You will use this to access the configuration page from now on.
Step 4: Connect Wireless
3. Navigate to Network -> Wireless. Select your Network, enter the wifi password and select Add This Network.
Step 4: Connect Wireless
4. Scroll down to your saved networks, click on your network and select Join This Network.
Step 4: Connect Wireless
5. It should now say connected in the status column.
You can now unplug the ethernet cable.
Step 4: Connect Wireless
6. Run the HelloWorld example again to confirm that your Phidgets are accessible over wifi.
Done!
If you're able to see your devices in the Hello World example, you're done with the Setup part of this guide.
Scroll down to Part 2: Using Your Phidget for the next step.
For more info installing in Linux (e.g. Udev rules, old versions, etc.), visit this page:
How do I know what channel, serial number, or hub port to use in my program?
Before you open a Phidget channel in your program, you can set these properties to specify which channel to open. You can find this information through the Control Panel.
1. Open the Control Panel and double-click on the red map pin icon:
2. The Addressing Information window will open. Here you will find all the information you need to address your Phidget in your program.
See the Phidget22 API for your language to determine exact syntax for each property.
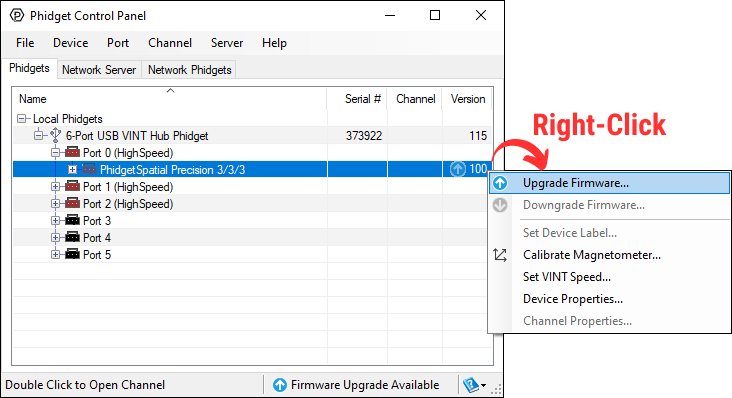
Upgrading or Downgrading Device Firmware
Firmware Upgrade
MacOS users can upgrade device firmware by double-clicking the device row in the Phidget Control Panel.
Linux users can upgrade via the phidget22admin tool (see included readme for instructions).
Windows users can upgrade the firmware for this device using the Phidget Control Panel as shown below.
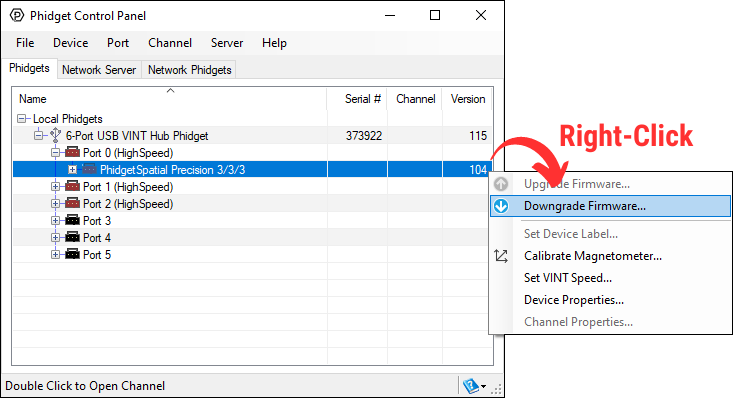
Firmware Downgrade
Firmware upgrades include important bug fixes and performance improvements, but there are some situations where you may want to revert to an old version of the firmware (for instance, when an application you're using is compiled using an older version of phidget22 that doesn't recognize the new firmware).
MacOS and Linux users can downgrade using the phidget22admin tool in the terminal (see included readme for instructions).
Windows users can downgrade directly from the Phidget Control Panel if they have driver version 1.9.20220112 or newer:
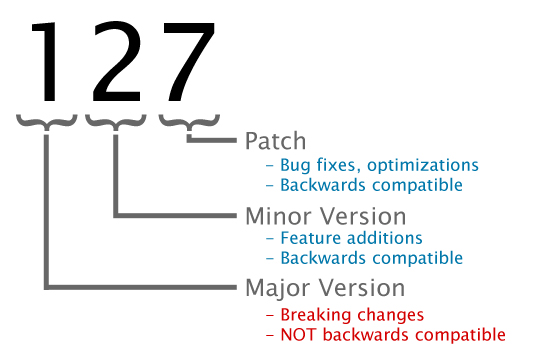
Firmware Version Numbering Schema
Phidgets device firmware is represented by a 3-digit number. For firmware patch notes, see the device history section on the Specifications tab on your device's product page.
If the digit in the 'ones' spot changes, it means there have been bug fixes or optimizations. Sometimes these changes can drastically improve the performance of the device, so you should still upgrade whenever possible. These upgrades are backwards compatible, meaning you can still use this Phidget on a computer that has Phidget22 drivers from before this firmware upgrade was released.
If the digit in the 'tens' spot changes, it means some features were added (e.g. new API commands or events). These upgrades are also backwards compatible, in the sense that computers running old Phidget22 drivers will still be able to use the device, but they will not be able to use any of the new features this version added.
If the digit in the 'hundreds' spot changes, it means a major change has occurred (e.g. a complete rewrite of the firmware or moving to a new architecture). These changes are not backwards compatible, so if you try to use the upgraded board on a computer with old Phidget22 drivers, it will show up as unsupported in the Control Panel and any applications build using the old libraries won't recognize it either. Sometimes, when a Phidget has a new hardware revision (e.g. 1018_2 -> 1018_3), the firmware version's hundreds digit will change because entirely new firmware was needed (usually because a change in the processor). In this case, older hardware revisions won't be able to be upgraded to the higher version number and instead continue to get bug fixes within the same major revision.
Fixed bug that caused STC1001 to become unresponsive
May 2019
0
110
Added failsafe timer functionality
Sept 2019
0
111
Fixed issue where stepper could stop functioning while still attached
Velocity changes that cause the motor to stop now cause deceleration instead of abrupt stop
Changing acceleration while the motor is moving now works properly as long as velocity is between -1000 and +1000 steps/sec. Changing acceleration outside of this velocity range can cause unpredictable acceleration behaviour because the device cannot recalculate the accerlation curve fast enough
Fixed issues that occured when switching between Run mode and Step mode and vice-versa while the motor is running
October 2019
0
112
Fixed msfollower bug
August 2020
0
113
Fixed crash that made STC1001 unresponsive until power cycle
September 2020
0
114
Fixed bug that prevented motor from moving
November 2020
0
115
Fixed crash that could occur at low acceleration
March 2022
0
121
Failsafe timer now resets on any successful packet. Step mode now waits for new velocity before moving.