HUB5000 - Product Video
Product video for the Wireless VINT Hub (HUB5000_0)


Quantity Available: 295
| Qty | Price |
|---|---|
| 10 | $57.00 |
| 25 | $51.00 |
| 50 | $45.00 |
| 100 | $42.00 |
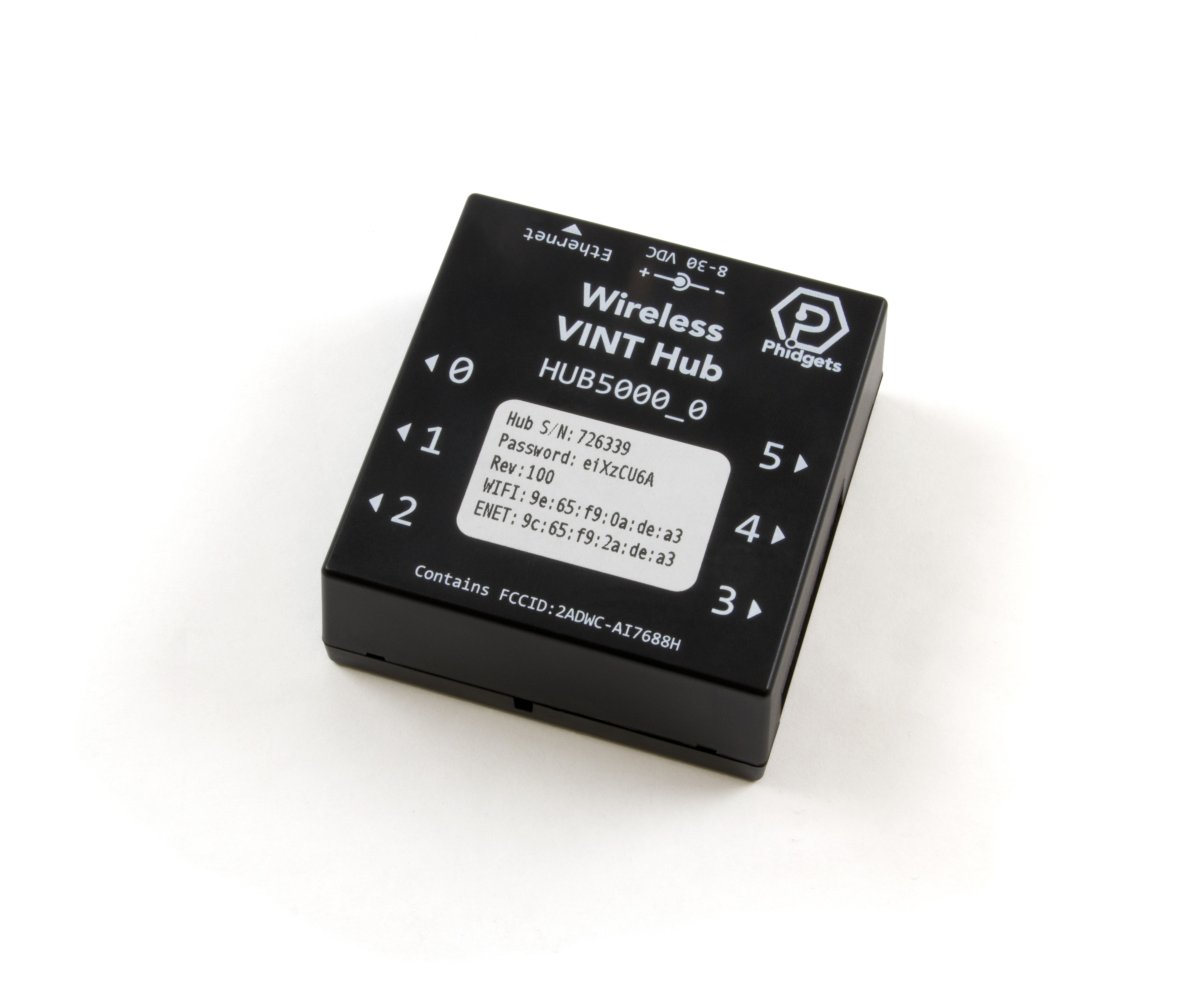
The Wireless VINT Hub is a simple way to use Phidgets in locations away from a computer by making them available on your local network via the Phidget Network Server. The HUB5000 requires a local WiFi signal and a power supply. You can also wire it directly into your modem or network switch using an ethernet cable.
Phidgets are "Plug and Program" - When plugged in, they are automatically discovered by the Phidget drivers and made available to your program. You can configure each port to operate in different modes that make it easy to interface with VINT devices, analog sensors, or logic-level circuits. Each port also has a power and ground pin, providing direct access to the Hub's 5V regulated power supply.
You can connect this Hub to your local network over Wi-Fi, or wire it in directly using an ethernet cable:
| Product | |
|---|---|
| Part Number | Price |
 Ethernet Cable 2m
|
$3.50 |
Use Phidget cables to connect sensors and VINT devices to this hub. You can solder multiple cables together in order to make even longer Phidget cables, but you should be aware of the effects of having long wires in your system.
| Product | Physical Properties | |
|---|---|---|
| Part Number | Price | Cable Length |
 Phidget Cable 10cm
|
$1.50 | 100 mm |
 Phidget Cable 30cm
|
$1.75 | 300 mm |
 Phidget Cable 60cm
|
$2.00 | 600 mm |
 Phidget Cable 60cm
|
$2.00 | 600 mm |
 Phidget Cable 90cm
|
$2.00 | 900 mm |
 Phidget Cable 120cm
|
$2.25 | 1.2 m |
 Phidget Cable 150cm
|
$2.50 | 1.5 m |
 Phidget Cable 180cm
|
$2.75 | 1.8 m |
 Phidget Cable 350cm
|
$3.00 | 3.5 m |
 Phidget Cable Kit
|
$10.00 | 80 mm |
 Phidget Cable Extension Wire 22AWG
|
$0.75/Meter | — |
This Phidget requires a power supply between 8 and 30V DC. Select the power supply from the list below that matches your region's wall socket type.
| Product | Electrical Properties | Physical Properties | ||
|---|---|---|---|---|
| Part Number | Price | Power Supply Current | Output Voltage | Wall Plug Style |
 Power Supply 24VDC 14.6A
|
$40.00 | 14.6 A | 24 V | — |
 Power Supply 24VDC 25A Current Limiting
|
$120.00 | 25 A | 24 V | — |
 Power Supply 12VDC 0.5A - EU
|
$1.50 | 500 mA | 12 V | European |
 Power Supply 12VDC 0.5A - US
|
$1.50 | 500 mA | 12 V | North American |
 Power Supply 12VDC 2.0A - AU
|
$10.00 | 2 A | 12 V | Australian |
 Power Supply 12VDC 2.0A - EU
|
$10.00 | 2 A | 12 V | European |
 Power Supply 12VDC 2.0A - UK
|
$10.00 | 2 A | 12 V | British |
 Power Supply 12VDC 5A
|
$20.00 | 5 A | 12 V | — |
 Power Supply 24VDC 1.0A - US
|
$10.00 | 1 A | 24 V | North American |
 Power Supply 24VDC 2.5A
|
$20.00 | 2.5 A | 24 V | — |
 Power Supply 24VDC 5A
|
$40.00 | 5 A | 24 V | — |
 Power Supply-12VDC 2.0A - US
|
$10.00 | 2 A | 12 V | North American |
The Wireless VINT Hub provides a stable wireless interface to connect your devices to your computer over your wi-fi network. The Wireless VINT Hub has 6 ports. Each port can either:
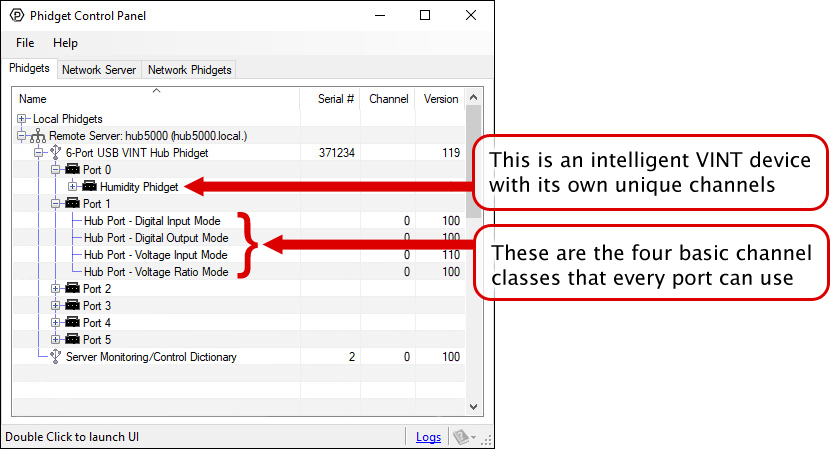
The Wireless VINT Hub is a connecting point between your computer and device allowing for simple communication. You can use your Control Panel to view your attached Phidgets. Explore the 5 types of connections bellow:
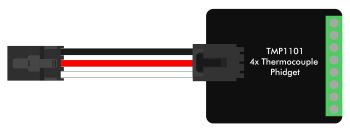
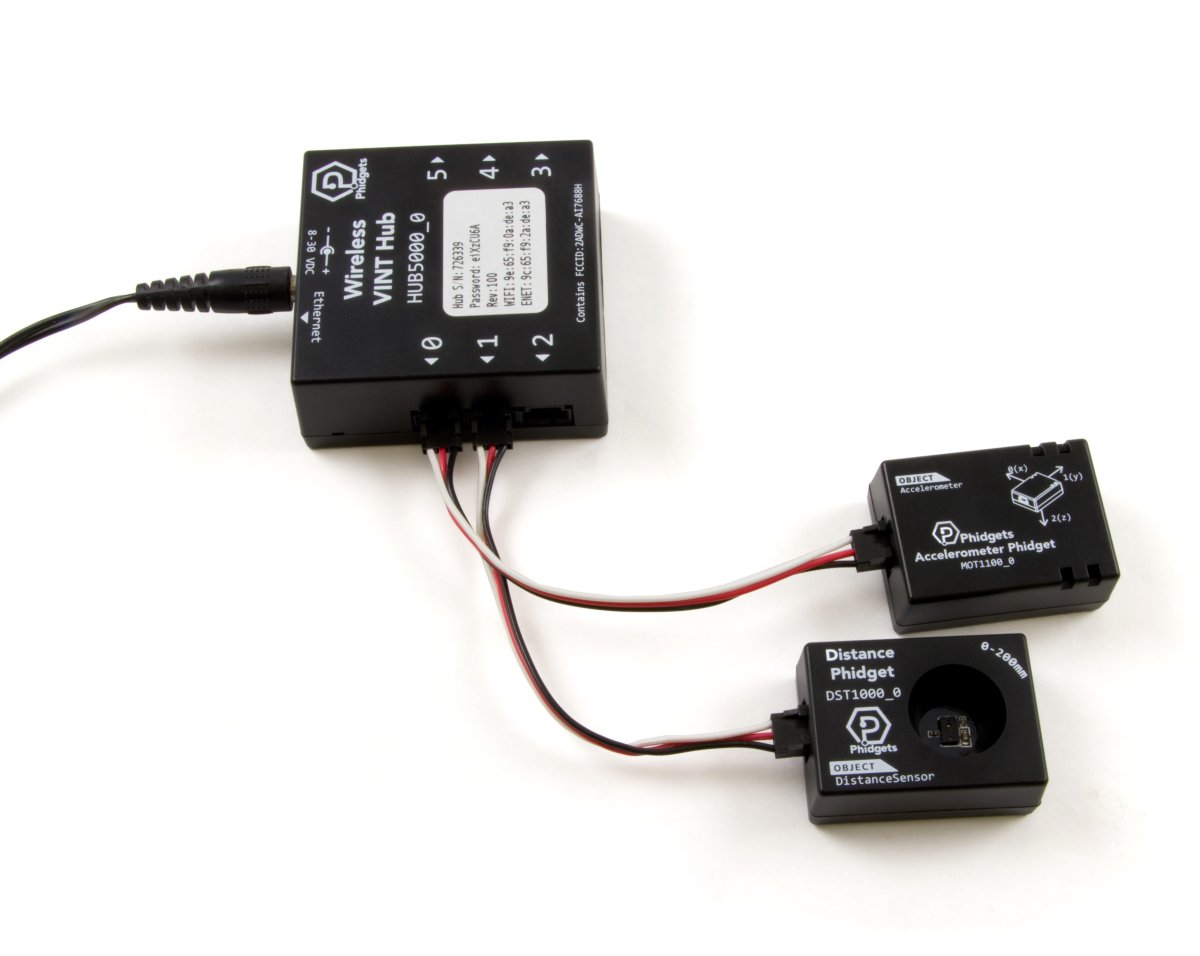
VINT Devices like the TMP1101 or DCC1003 are Phidgets that digitally communicate with the VINT Hub. Each device will have unique features, so it is recommended you visit the individual product page for more details.
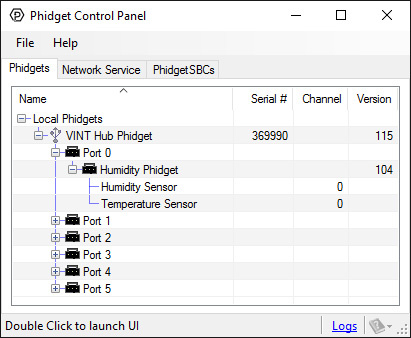
When attached correctly these Phidgets will appear by name in your Control Panel, with each channel listed below the name. For example, when the HUM1000 is attached you will see:
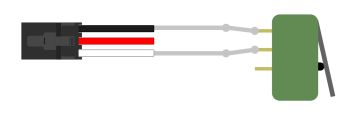
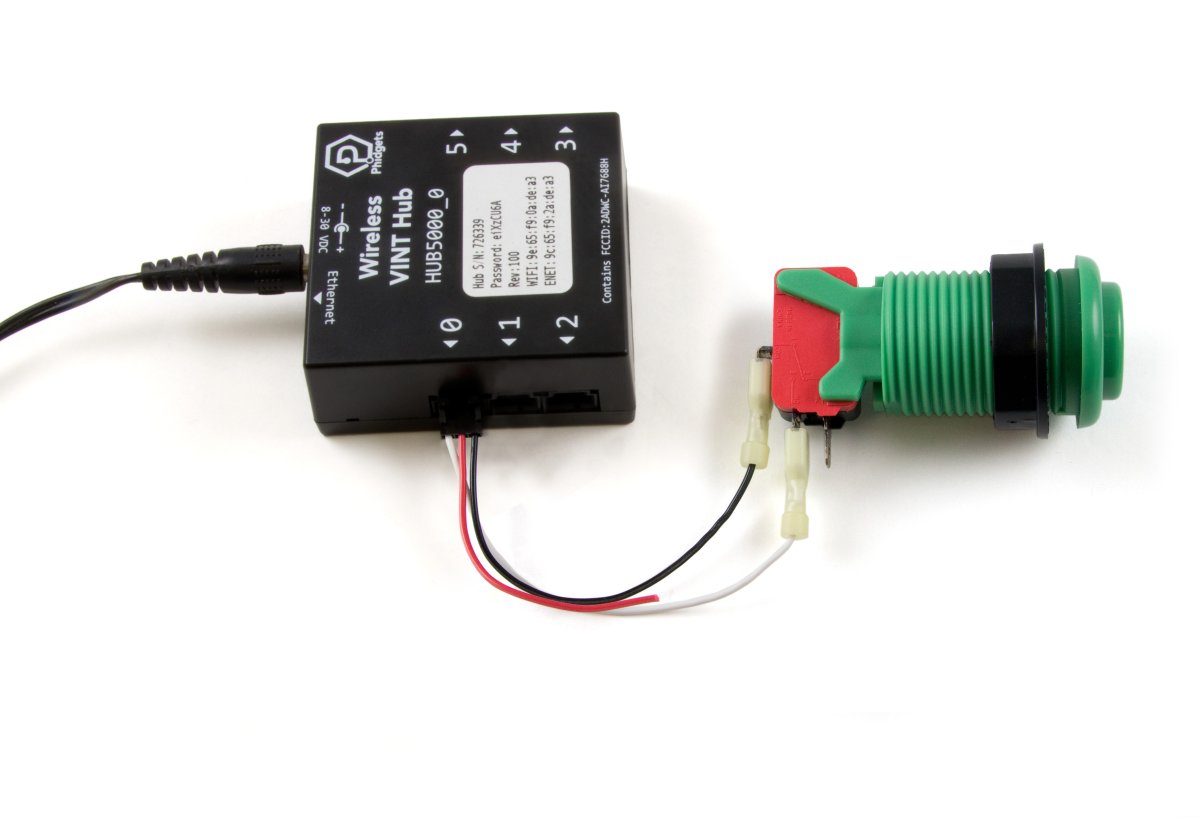
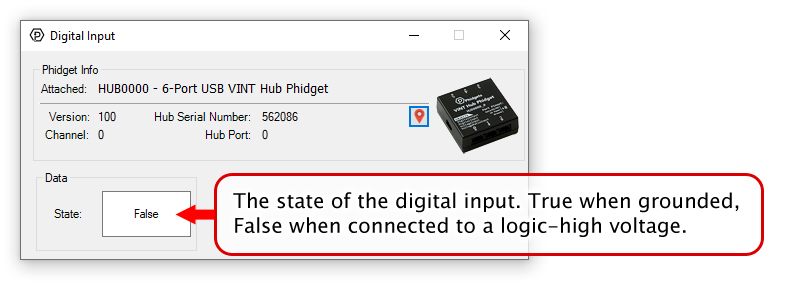
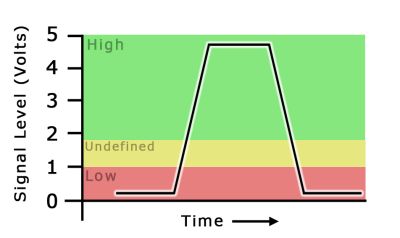
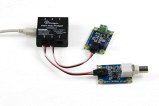
Digital Input is one of the VINT Hub’s built-in Channel Classes. Any of the these ports can act as an active-low digital input, making them useful for reading switches and buttons. The above image provides an example of how to wire a switch to be used with the VINT Hub.
If you open Digital Input Mode in the Control Panel you will be able to see the state of your button/switch.

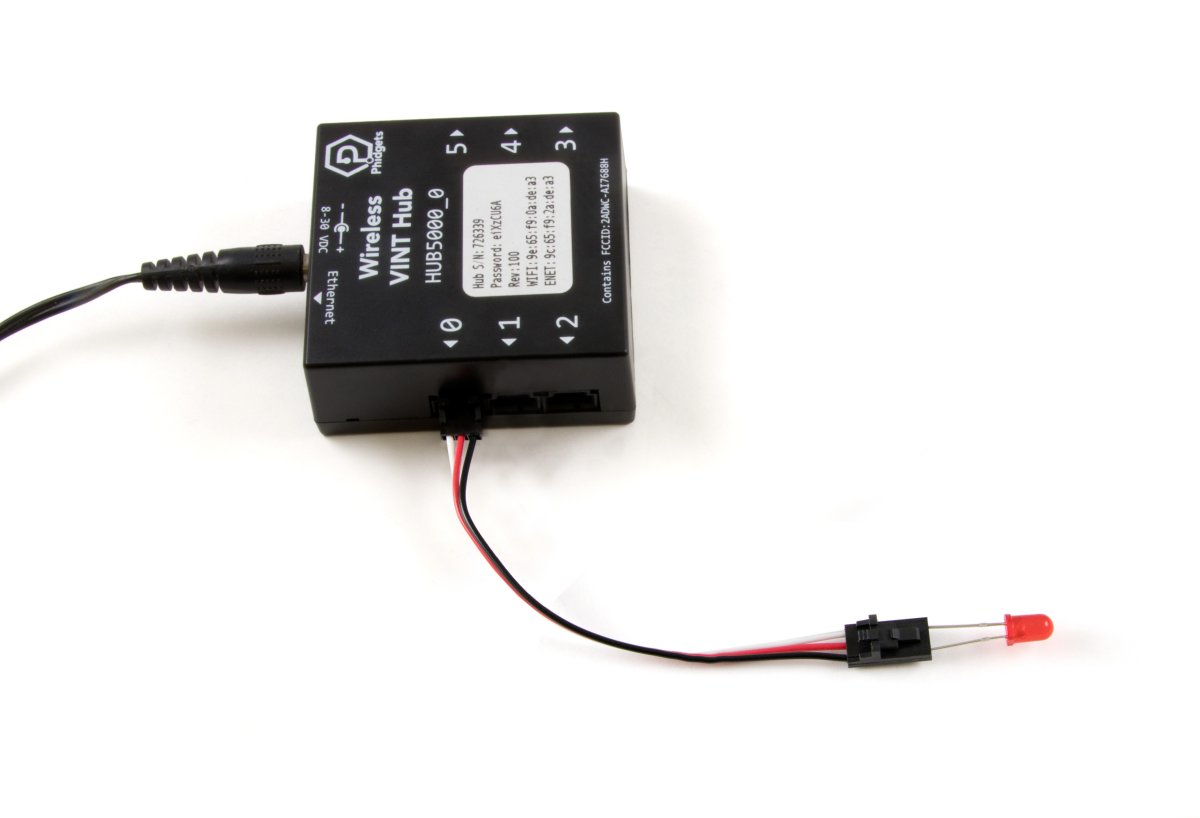
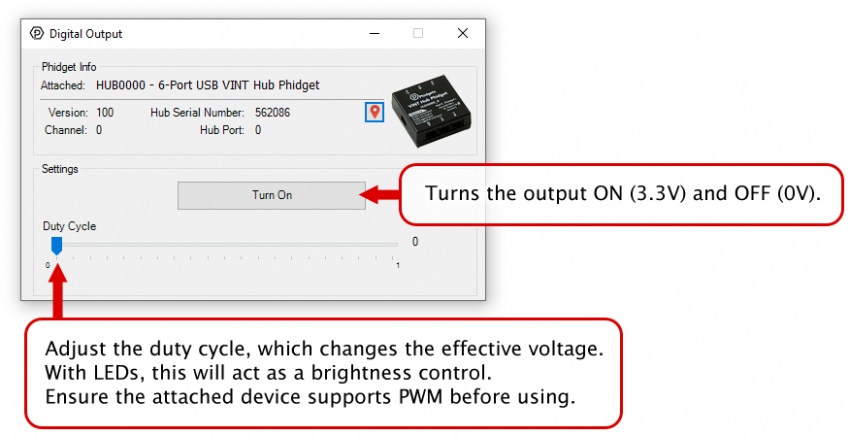
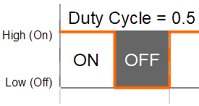
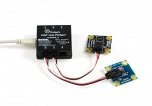
Digital Output is one of the VINT Hub’s built-in Channel Classes. Any of these ports can be used as a 3.3V digital output, making them useful for blinking LEDs. The above image demonstrates how to connect your LED to be used with the VINT Hub.
Open Digital Output Mode in the Control Panel to control the 3.3V output.
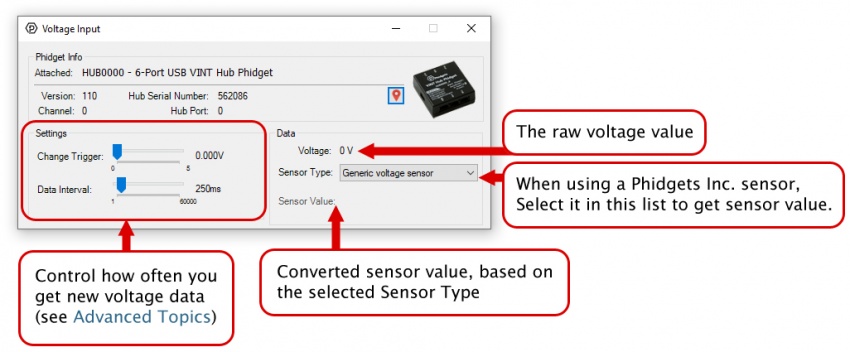
Voltage Input is one of the VINT Hub’s built-in Channel Classes. Any of these ports can be used to read voltage, making them great for reading non-ratiometric sensors and monitoring 5V digital circuits.
Open Voltage Input Mode in the Control Panel to view your device’s output voltage.
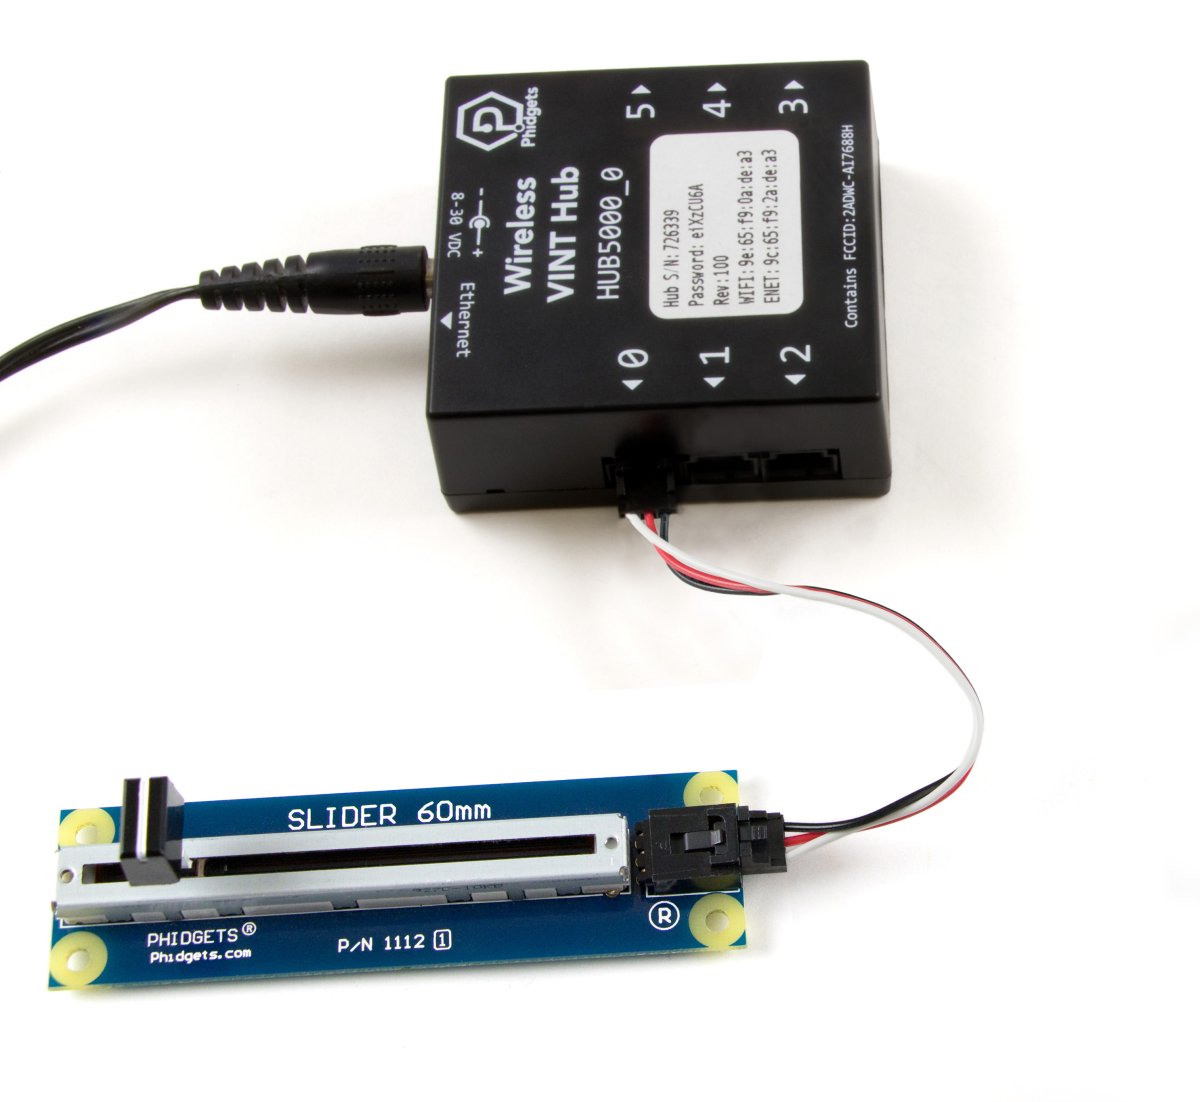
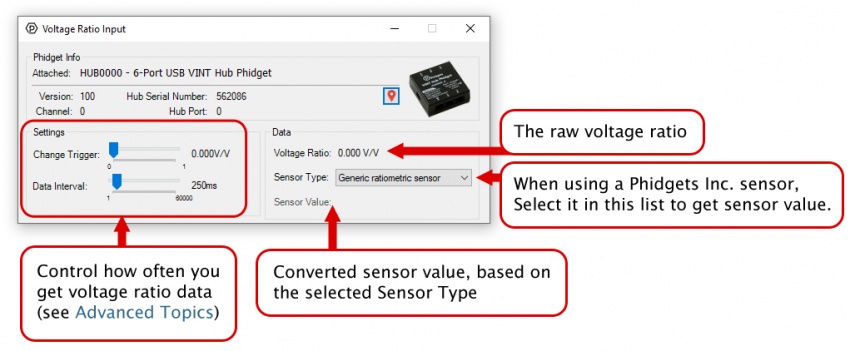
Voltage Ratio Input is one of the VINT Hub’s built-in Channel Classes. Any of these ports can act as a Voltage Ratio Input comparing the voltage provided to the voltage returned by the device, making it useful for connecting ratiometric sensors. The voltage ratio is reported in Volts per Volt. For example, if the Phidget is providing 5V and the sensor is sending back 2.5V, the ratio will be 0.5V/V.
Open Voltage Ratio Input Mode in the Control Panel to view your device’s voltage ratio.
Since you'll be accessing your Phidget devices over the network, you should read the Phidget Network Server page to learn how to connect to remote Phidgets in your code.
Before you open a Phidget channel in your program, you can set these properties to specify which channel to open. You can find this information through the Control Panel.
1. Open the Control Panel and double-click on the red map pin icon:

2. The Addressing Information window will open. Here you will find all the information you need to address your Phidget in your program.

See the Phidget22 API for your language to determine exact syntax for each property.
The Change Trigger is the minimum change in the sensor data needed to trigger a new data event.
The Data Interval is the time (in ms) between data events sent out from your Phidget.
The Data Rate is the reciprocal of Data Interval (measured in Hz), and setting it will set the reciprocal value for Data Interval and vice-versa.
You can modify one or both of these values to achieve different data outputs. You can learn more about these properties here.
If the sensor requires 5V DC power and outputs a 0-5V signal, you can connect it directly to a VINT Port. The easiest way to connect it is to cut the end off of a Phidget Cable and solder the bare wires to the appropriate pins:
You should check the sensor's datasheet to determine if it is Ratiometric or Non-Ratiometric. Ratiometric sensors output a voltage proportional to the voltage on the 5V power line, so they're more resilient against noise and power fluctuations. Non-Ratiometric sensors have their own 5V regulator, and always output a voltage relative to that 5V reference point. You need to use the appropriate channel class when opening the sensor (i.e. the VoltageRatioInput class or the VoltageInput class), or else your sensor readings will be inaccurate.
You can tell a sensor is ratiometric if the output in the datasheet is specified in units of volts-per-volt (V/V) or in terms of its supply voltage ("Vcc"):
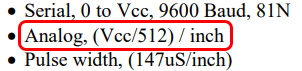
This specification says the sensor outputs a voltage value of Vcc/512 for each inch of measurement, so it must be ratiometric.
If the sensor outputs a 0-5V signal, but requires 12-24V DC power, the VINT Hub cannot provide the correct voltage by itself. You can use a DAQ1400, and then connect that to one of the ports on your VINT Hub. See the DAQ1400 product page and User Guide for details.
An NPN sensor with a power requirement of 5V DC can be connected directly to a port on your VINT Hub:
The easiest way to connect it is to snip the end off of a Phidget Cable and solder the wires to the sensor's wires.
A PNP sensor cannot be connected directly to a VINT Hub, because the digital inputs are active low. You'd need to use a pull-down resistor between the white and black wires of the Phidget cable that leads to the sensor in order for it to work.
Digital sensors that require 12V or 24V DC power can be used with the DAQ1400. See the DAQ1400 product page and User Guide for details.
Sensors with a 4-20mA output can also be interfaced with the DAQ1400. See the DAQ1400 product page and User Guide for details.
Sensors that use serial, I2C, or other digital communication protocols cannot easily be used with Phidgets. You should check the datasheet and pinout to see if they have an analog or 4-20mA output feature available.
To update the VINT Hub firmware, open the Phidget Control Panel and check if there is an upgrade icon beside the version number. If there is, right-click and select "Upgrade Firmware".
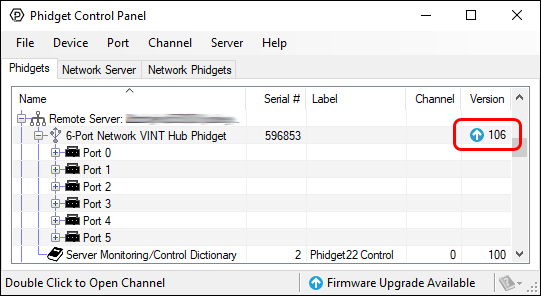
To update the OS firmware, go to the Network Phidgets tab in the control panel, find your HUB5000 and double-click on it. If the OS firmware is out of date, you'll see the following window pop up:
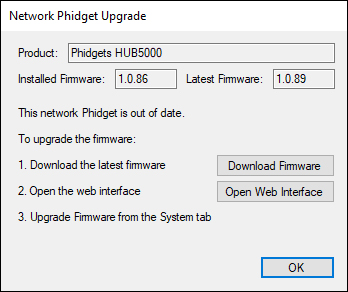
Follow the steps in the window above:
When you log in, you can confirm that the new version has successfully installed by checking to see if the firmware version listed in the "Status" section matches the first three numbers in the firmware file name that you downloaded. You can also check the version in the Network Phidgets tab on the Phidget Control Panel.
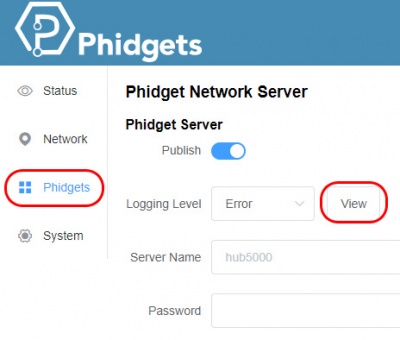
You can find the HUB5000's network server logs by opening the web configuration page as outlined in Part 1 of this User Guide. From there, click on "Phidgets" and then "View" beside the logging level selection.
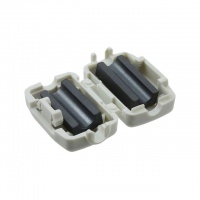
For an ethernet connected HUB5000 to be completely CE compliant, you must put a ferrite bead on the ethernet cable. Ferrite beads are only necessary when building the HUB5000 into a larger system that needs to be CE compliant. You can find clamp-on ferrite beads at electronic parts stores such as Digikey.
For more information on the capabilities of the ports on the VINT Hub, see the VINT Guide.
To get to the HUB5000's configuration page, open the Phidget Control Panel and find it under the "Network Phidgets" tab as outlined in Part 1 of this User Guide.
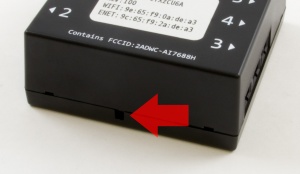
If the HUB5000 is in access point mode, you can access the configuration page through your phone: Connect to the HUB5000 Wi-Fi signal and enter the password on the sticker. Once you're connected, go to your internet app and go to address 192.168.100.1 . This address will take you to the configuration login page.
Pressing the reset button will reboot the HUB5000.
Holding the button down for 10 seconds before releasing will perform a reset. The reset will clear all settings, including the web configuration page password, and reset the Wi-Fi password to the one on the HUB5000's label.
As a last resort, you can perform a factory reset. Only perform a factory reset if the regular reset is not working, or there was an error during a firmware upgrade. Holding the button down before plugging in power, and keeping pressed for 15 seconds before releasing, will restore the original factory firmware. The red LED will start blinking after the button is released. Once the red LED turns solid, the restore is complete.
When opening channels with Phidgets, you can set several properties to make sure you are accessing the precise channel you want. The HUB5000 has a unique serial number that can be used to find its ports or any VINT devices connected to them. If you want something more customizable and human-readable, you can use the device label instead. You can customize the device label by using writeDeviceLabel on the Hub object after it has been opened.
With the device label, you can address any of the VINT Hub's channels, or any connected VINT device channels. The device label will remain after the VINT Hub is unplugged as it is stored in flash memory.
Many VINT devices have power-saving automatically built-in, but you also have the ability to turn off the VINT ports entirely if they're not in use. The ports can be enabled and disabled in groups of three (Ports 0-1-2 and Ports 3-4-5). This is because those ports share the same power supply. You can toggle the port power using the PortPower property of the Hub object. For more details and a code snippet, visit the Phidget22 API page and select your language, device, and then USB and Hub API for the final two menus.
If you're using a Windows PC, it can sometimes get confused when switching networks, causing MDNS server discovery to not work properly. Since Access Point mode requires you to switch from your existing network connection to the HUB5000's network, it can often trigger this issue. There are two options for working around it:
| Board Properties | |
|---|---|
| Controlled By | Local Network (Ethernet or Wi-Fi) |
| USB Stack | PHIDUSB |
| Driver Support | Phidget22 |
| Number of VINT Ports | 6 |
| WiFi Frequency | 2.4 GHz |
| VINT Communication Speed Max | 100 kbit/s |
| Electrical Properties | |
| USB Voltage Min | 4.5 V DC |
| USB Voltage Max | 5.3 V DC |
| USB Speed | High Speed |
| Current Consumption Min | 32.5 mA |
| Available External Current | 600 mA |
| Supply Voltage Min | 8 V DC |
| Supply Voltage Max | 30 V DC |
| VINT Port Voltage | 5 V DC |
| Voltage Inputs | |
| Number of Voltage Inputs | 6 (Shared) |
| Voltage Input Resolution (bits) | * 16 bit |
| Sensor Input Impedance | 324 kΩ |
| Input Voltage Min (DC) | 0 V DC |
| Input Voltage Max (DC) | 5 V DC |
| Voltage Input Noise | ** 1 mV DC |
| Sampling Interval Max | 60 s/sample |
| Sampling Interval Min | 1 ms/sample |
| Digital Inputs | |
| Pull-up Resistance | 124 kΩ |
| Low Voltage Max (True) | 1 V DC |
| High Voltage Min (False) | 1.8 V DC |
| Low Voltage Trigger Length Min | 3 ms |
| High Voltage Trigger Length Min | 3 ms |
| Digital Input Voltage Max | 5.5 V DC |
| Digital Input Type | Switch (Active Low) |
| Number of Digital Inputs | 6 (Shared) |
| Digital Outputs | |
| Series Resistance | 510 Ω |
| Digital Output Available Current | 8.1 mA |
| Digital Output Voltage Min | 0 V DC |
| Digital Output Voltage Max | 3.3 V DC |
| PWM Frequency Max | 50 kHz |
| Duty Cycle Resolution | 0.8 % |
| Number of Digital Outputs | 6 (Shared) |
| Physical Properties | |
| Operating Temperature Min | -40 °C |
| Operating Temperature Max | 85 °C |
| Customs Information | |
| Canadian HS Export Code | 8471.80.00 |
| American HTS Import Code | 8471.80.40.00 |
| Country of Origin | CN (China) |
* - Voltage measured with a 10-bit ADC, oversampled to 16-bits.
** - Typical noise varies from 600uV to 10mV depending on selected data interval.
| Date | Board Revision | Device Ver. | Comment |
|---|---|---|---|
| June 2019 | 0 | 102 | Product Release |
| August 2019 | 0 | 103 | Fixed USB bug that caused watchdog reset |
| August 2019 | 0 | 104 | Fixed USB bug that caused "IN" packets to get lost |
| September 2019 | 0 | 105 | Fixed bug that reported false detaches |
| April 2020 | 0 | 106 | Added gap between wakeup pulse and sending data |
| December 2021 | 0 | 203 |
|
| June 2023 | 0 | 205 | Miscellaneous bug fixes, improved CPU optimization |
The above table is for the hardware version and VINT Hub device version. For the firmware version, see the firmware changelog instead.
| Digital Input | ||
|---|---|---|
| Date | Port Version | Comment |
| June 2017 | 100 | Product Release |
| Digital Output | ||
| Date | Port Version | Comment |
| June 2017 | 100 | Product Release |
| December 2021 | 110 | Added support for failsafe functionality |
| Voltage Input | ||
| Date | Port Version | Comment |
| June 2017 | 100 | Product Release |
| January 2019 | 110 | Increased input range from 5V to 5.25V |
| VoltageRatio Input | ||
| Date | Port Version | Comment |
| June 2017 | 100 | Product Release |
| Channel Name | API | Channel | Hub Port | Interface |
|---|---|---|---|---|
| Hub Port - Digital Input Mode | ||||
| Digital Input | DigitalInput | 0 | 0 - 5 | VINT |
| Hub Port - Digital Output Mode | ||||
| Digital Output | DigitalOutput | 0 | 0 - 5 | VINT |
| Hub Port - Voltage Input Mode | ||||
| Voltage Input | VoltageInput | 0 | 0 - 5 | VINT |
| Hub Port - Voltage Ratio Mode | ||||
| Voltage Ratio Input | VoltageRatioInput | 0 | 0 - 5 | VINT |
| 6-Port Network VINT Hub Phidget | ||||
| VINT Hub | Hub | 0 | USB | |
| API | Detail | Language | OS | |
|---|---|---|---|---|
| DigitalInput | Visual Studio GUI | C# | Windows | Download |
| DigitalInput | Objective-C | macOS | Download | |
| DigitalInput | Swift | macOS | Download | |
| DigitalInput | Swift | iOS | Download | |
| DigitalInput | Visual Basic | Windows | Download | |
| DigitalInput | Max | Multiple | Download | |
| DigitalOutput | Visual Studio GUI | C# | Windows | Download |
| DigitalOutput | Objective-C | macOS | Download | |
| DigitalOutput | Swift | macOS | Download | |
| DigitalOutput | Swift | iOS | Download | |
| DigitalOutput | Visual Basic | Windows | Download | |
| DigitalOutput | Max | Multiple | Download | |
| VoltageInput | Visual Studio GUI | C# | Windows | Download |
| VoltageInput | Objective-C | macOS | Download | |
| VoltageInput | Swift | macOS | Download | |
| VoltageInput | Swift | iOS | Download | |
| VoltageInput | Visual Basic | Windows | Download | |
| VoltageInput | Max | Multiple | Download | |
| VoltageRatioInput | Visual Studio GUI | C# | Windows | Download |
| VoltageRatioInput | Load Cell Calibrator | C# | Windows | Download |
| VoltageRatioInput | Objective-C | macOS | Download | |
| VoltageRatioInput | Swift | macOS | Download | |
| VoltageRatioInput | Swift | iOS | Download | |
| VoltageRatioInput | Visual Basic | Windows | Download | |
| VoltageRatioInput | Max | Multiple | Download | |
| Hub | Visual Studio GUI | C# | Windows | Download |
| Product | Board Properties | |||
|---|---|---|---|---|
| Part Number | Price | Number of VINT Ports | VINT Communication Speed Max | Controlled By |
 VINT Hub Phidget
|
$40.00 | 6 | 1 Mbit/s | USB (Mini-USB) |
 1-Port VINT Hub Phidget
|
$26.00 | 1 | 1 Mbit/s | USB (USB-A) |
 VINT Hub Phidget
|
$35.00 | 6 | 1 Mbit/s | USB (Mini-USB) |
 Wireless VINT Hub
|
$60.00 | 6 | 100 kbit/s | Local Network (Ethernet or Wi-Fi) |
 PhidgetSBC4
|
$120.00 | 6 | 100 kbit/s | — |