What is VINT?
VINT stands for Versatile Interface and it is the system that all modern Phidgets use to communicate.

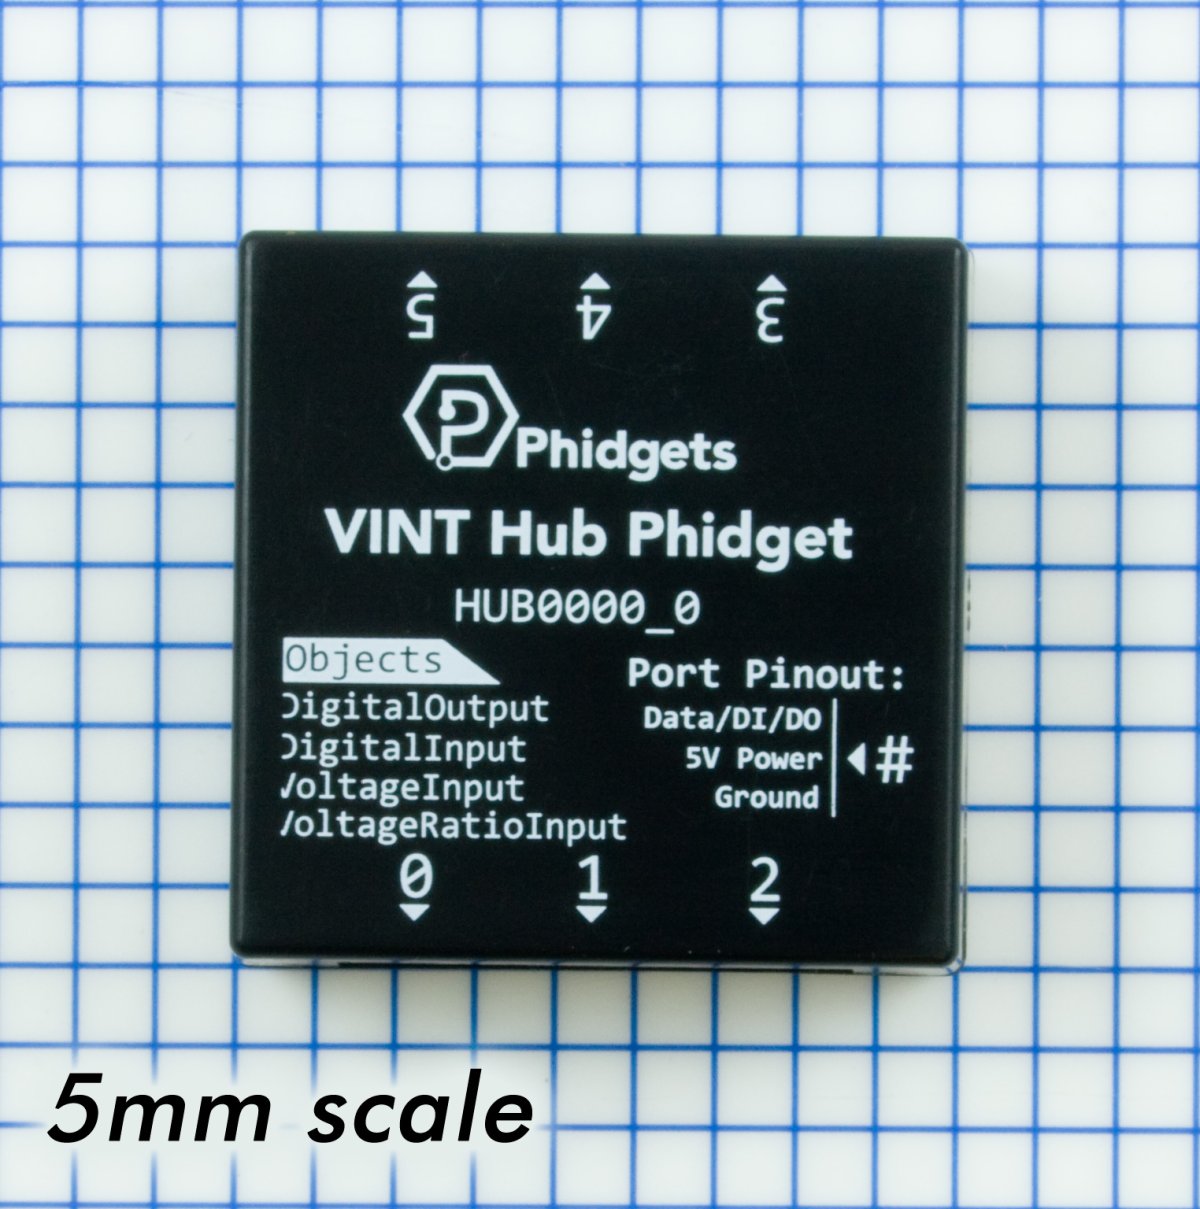

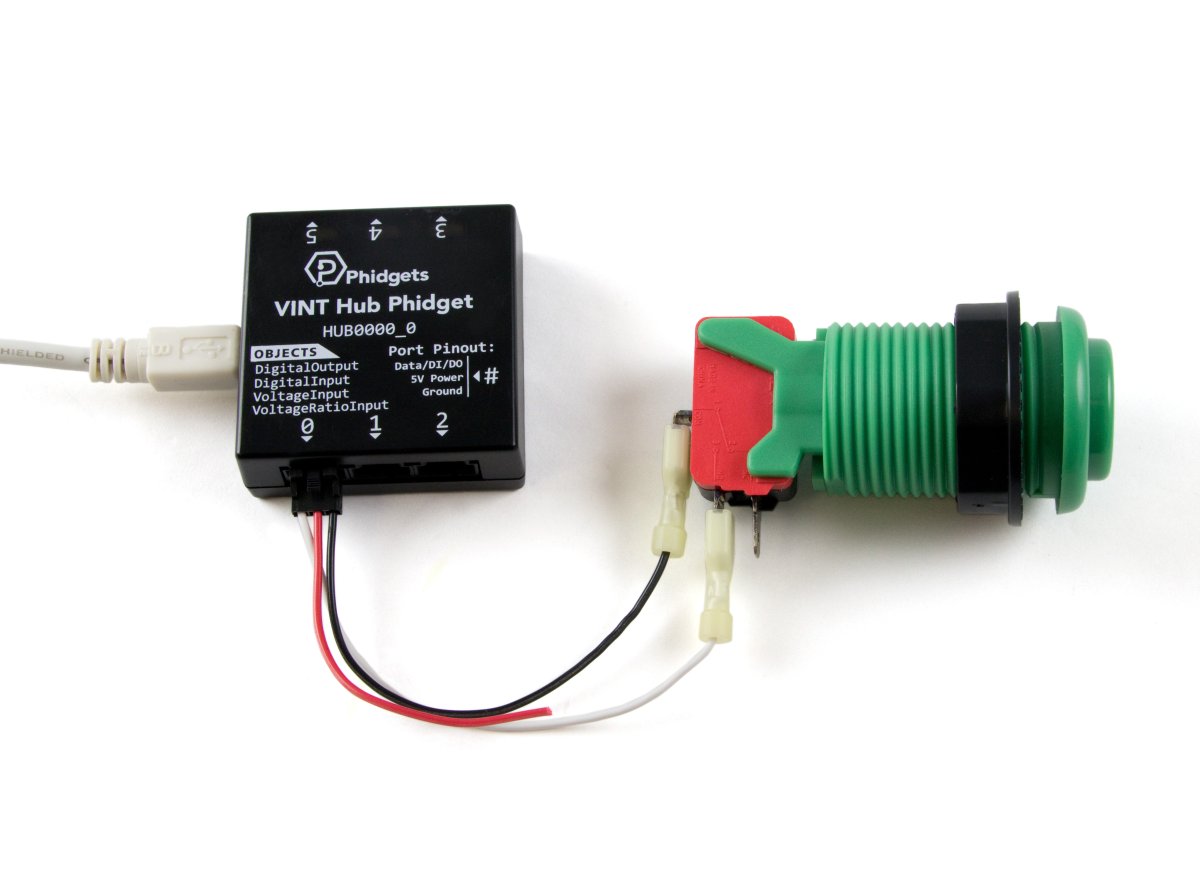


The VINT Hub is one of the most commonly used Phidgets. Connect up to six devices to your computer through a single USB port. Phidgets are "Plug and Program" - When plugged in, they are automatically discovered by the Phidget drivers and made available to your program. You can configure each port to operate in different modes that make it easy to interface with VINT devices, analog sensors, or logic-level circuits. Each port also has a power and ground pin, providing direct access to the USB voltage supply.
For specific information about using the HUB0000_0 with other devices, please look at the User Guide tab, above.
Use a USB cable to connect this Phidget to your computer. We have a number of different lengths available, although the maximum length of a USB cable is 5 meters due to limitations in the timing protocol. For longer distances, we recommend that you use a Single Board Computer to control the Phidget remotely.
| Product | Physical Properties | |||
|---|---|---|---|---|
| Part Number | Price | Connector A | Connector B | Cable Length |
 USB-A to Mini-B Cable 28cm 24AWG
|
$3.00 | USB Type A | USB Mini-B | 280 mm |
 USB-A to Mini-B Cable 28cm Right Angle
|
$3.50 | USB Type A | USB Mini-B (90 degree) | 280 mm |
 USB-A to Mini-B Cable 60cm 24AWG
|
$3.50 | USB Type A | USB Mini-B | 600 mm |
 USB-A to Mini-B Cable 83cm Right Angle
|
$4.50 | USB Type A | USB Mini-B (90 degree) | 830 mm |
 USB-A to Mini-B Cable 120cm 24AWG
|
$4.00 | USB Type A | USB Mini-B | 1.2 m |
 USB-A to Mini-B Cable 180cm 24AWG
|
$4.00 | USB Type A | USB Mini-B | 1.8 m |
 USB-A to Mini-B Cable 450cm, 20 AWG 2C
|
$12.00 | USB Type A | USB Mini-B | 4.5 m |
 USB-C to Mini-B Cable 60cm 24AWG
|
$5.00 | USB Type C | USB Mini-B | 600 mm |
 USB-C to Mini-B Cable 180cm 24AWG
|
$6.00 | USB Type C | USB Mini-B | 1.8 m |
Use Phidget cables to connect sensors and VINT devices to this hub. You can solder multiple cables together in order to make even longer Phidget cables, but you should be aware of the effects of having long wires in your system.
| Product | Physical Properties | |
|---|---|---|
| Part Number | Price | Cable Length |
 Phidget Cable 10cm
|
$1.50 | 100 mm |
 Phidget Cable 30cm
|
$1.75 | 300 mm |
 Phidget Cable 60cm
|
$2.00 | 600 mm |
 Phidget Cable 60cm
|
$2.00 | 600 mm |
 Phidget Cable 90cm
|
$2.00 | 900 mm |
 Phidget Cable 120cm
|
$2.25 | 1.2 m |
 Phidget Cable 150cm
|
$2.50 | 1.5 m |
 Phidget Cable 180cm
|
$2.75 | 1.8 m |
 Phidget Cable 350cm
|
$3.00 | 3.5 m |
 Phidget Cable Kit
|
$10.00 | 80 mm |
 Phidget Cable Extension Wire 22AWG
|
$0.75/Meter | — |
The VINT Hub provides a stable interface to connect your devices to your computer via USB. The VINT Hub has 6 ports. Each port can:
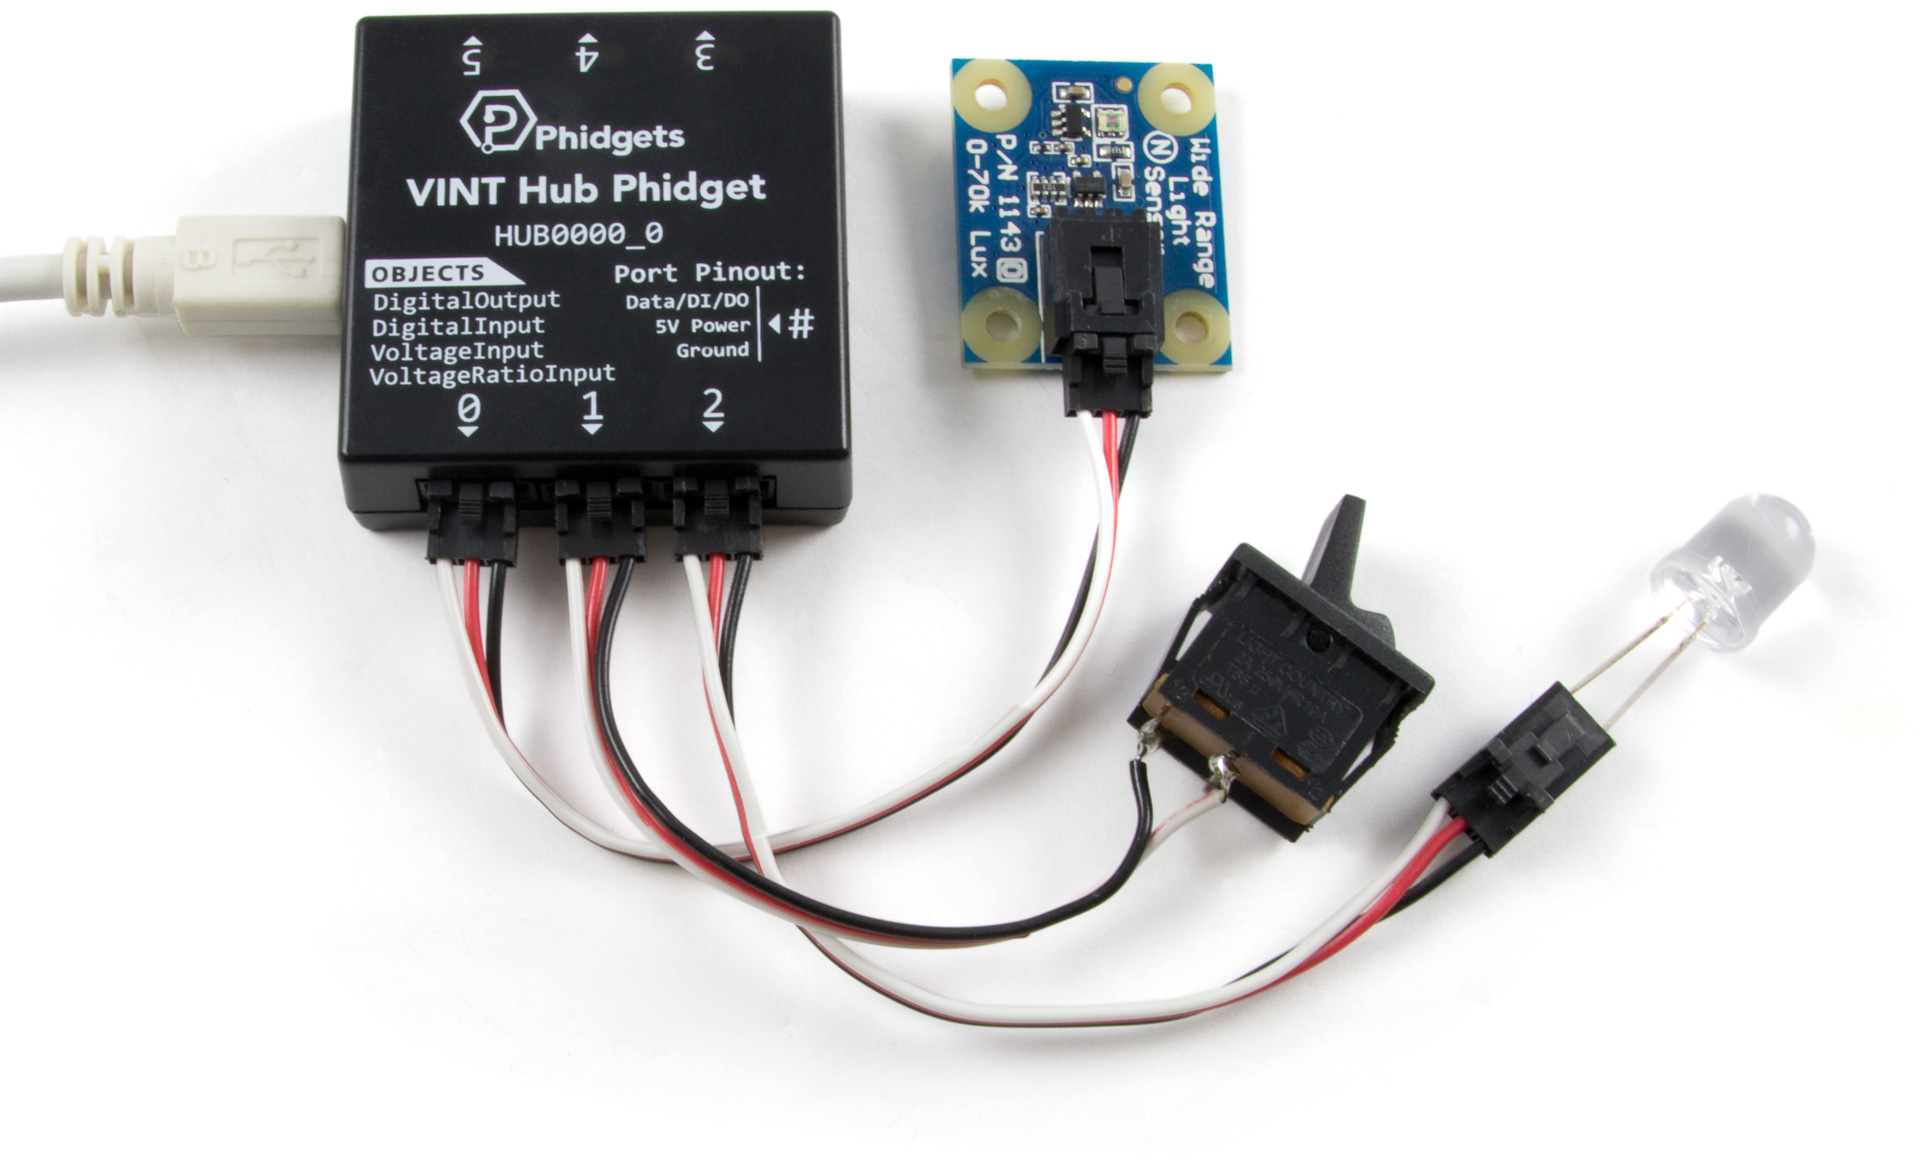
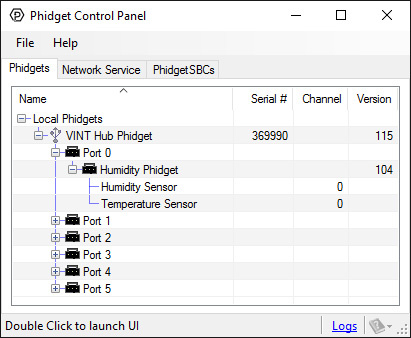
The VINT Hub is a connecting point between your computer and device allowing for simple communication. You can use your Control Panel to view your attached Phidgets. Explore the 5 types of connections bellow:
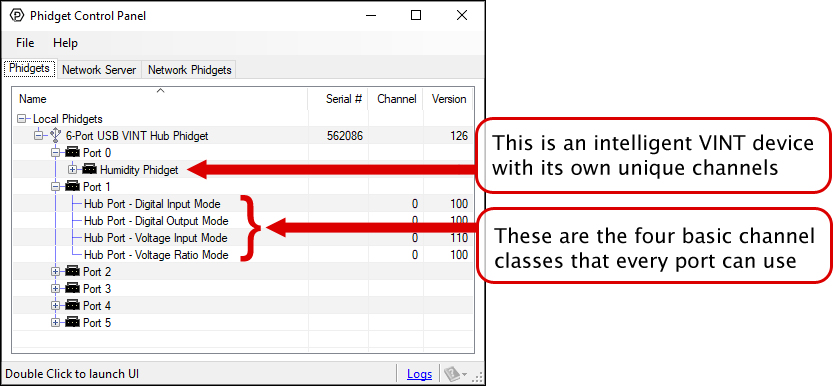
VINT Devices like the TMP1101 or DCC1003 are Phidgets that digitally communicate with the VINT Hub. Each device will have unique features, so it is recommended you visit the individual product page for more details.
When attached correctly these Phidgets will appear by name in your Control Panel, with each channel listed below the name. For example, when the HUM1000 is attached you will see:
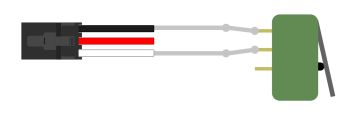
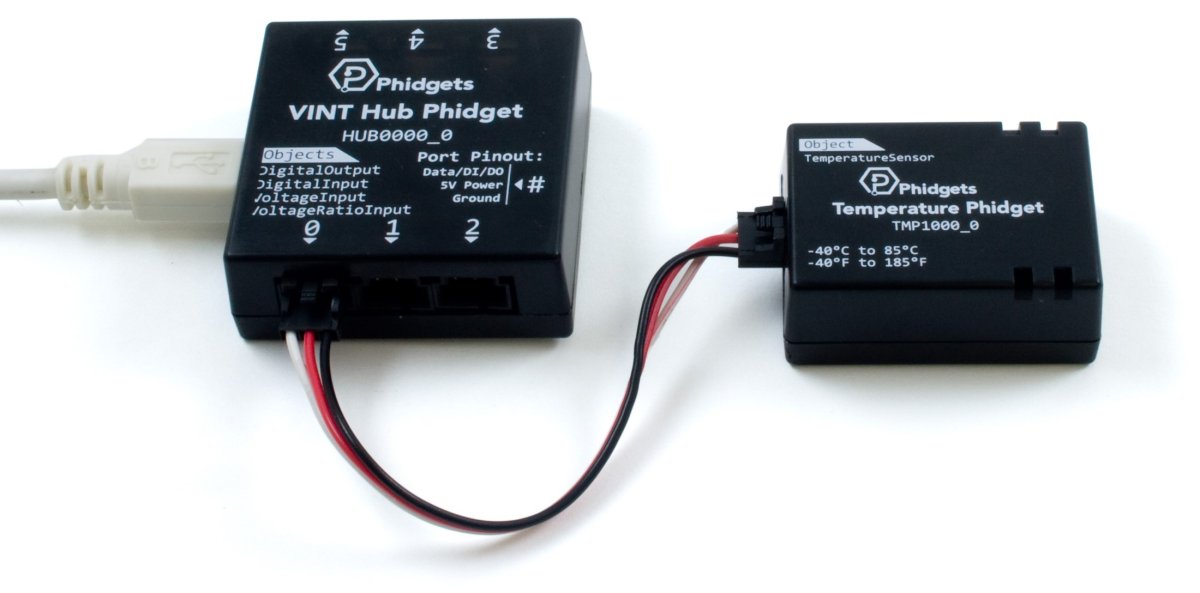
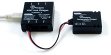
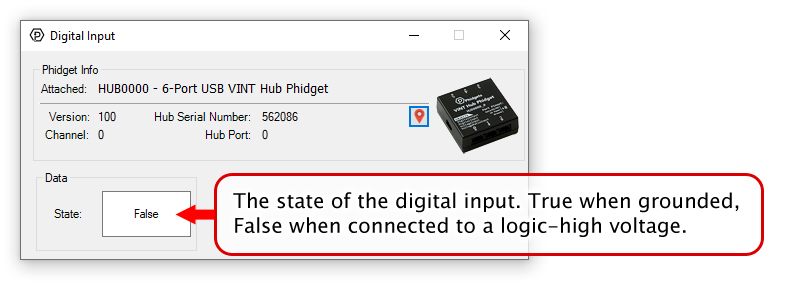
Digital Input is one of the VINT Hub’s built-in Channel Classes. Any of the these ports can act as an active-low digital input, making them useful for reading switches and buttons. The above image provides an example of how to wire a switch to be used with the VINT Hub.
If you open Digital Input Mode in the Control Panel you will be able to see the state of your button/switch.

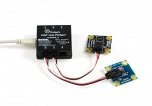
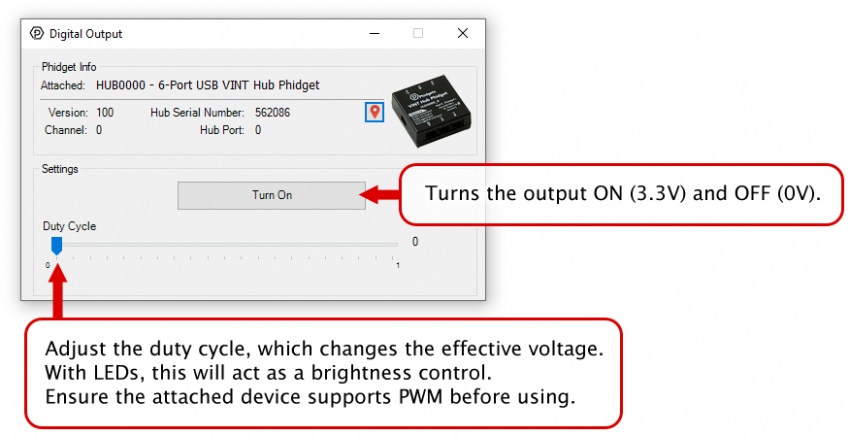
Digital Output is one of the VINT Hub’s built-in Channel Classes. Any of these ports can be used as a 3.3V digital output, making them useful for blinking LEDs. The above image demonstrates how to connect your LED to be used with the VINT Hub.
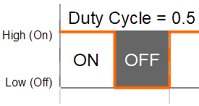
Open Digital Output Mode in the Control Panel to control the 3.3V output.
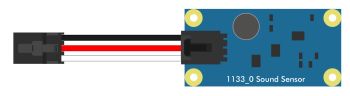
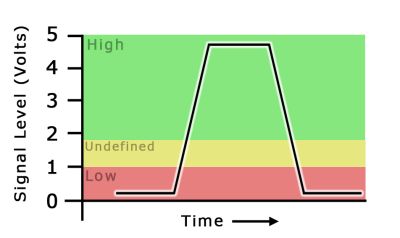
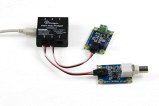
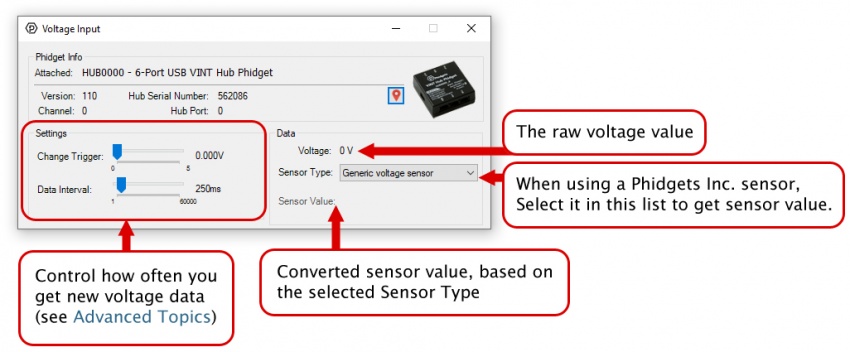
Voltage Input is one of the VINT Hub’s built-in Channel Classes. Any of these ports can be used to read voltage, making them great for reading non-ratiometric sensors and monitoring 5V digital circuits.
Open Voltage Input Mode in the Control Panel to view your device’s output voltage.
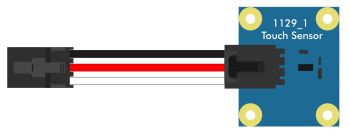
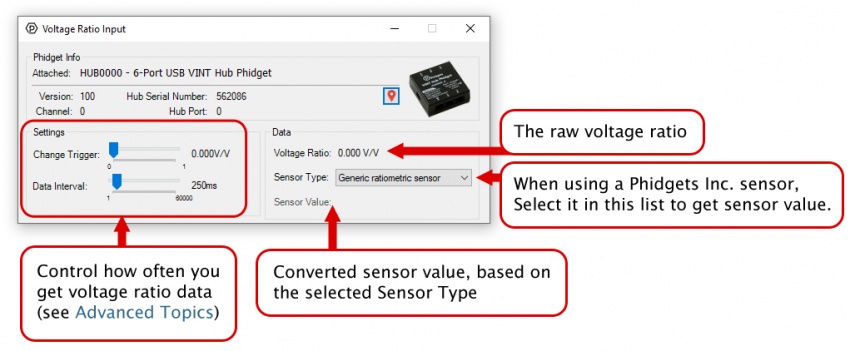
Voltage Ratio Input is one of the VINT Hub’s built-in Channel Classes. Any of these ports can act as a Voltage Ratio Input comparing the voltage provided to the voltage returned by the device, making it useful for connecting ratiometric sensors. The voltage ratio is reported in Volts per Volt. For example, if the Phidget is providing 5V and the sensor is sending back 2.5V, the ratio will be 0.5V/V.
Open Voltage Ratio Input Mode in the Control Panel to view your device’s voltage ratio.
Before you open a Phidget channel in your program, you can set these properties to specify which channel to open. You can find this information through the Control Panel.
1. Open the Control Panel and double-click on the red map pin icon:

2. The Addressing Information window will open. Here you will find all the information you need to address your Phidget in your program.

See the Phidget22 API for your language to determine exact syntax for each property.
Note: Graphing and logging is currently only supported in the Windows version of the Phidget Control Panel.
In the Phidget Control Panel, open the channel for your device and click on the ![]() icon next to the data type that you want to plot. This will open up a new window:
icon next to the data type that you want to plot. This will open up a new window:
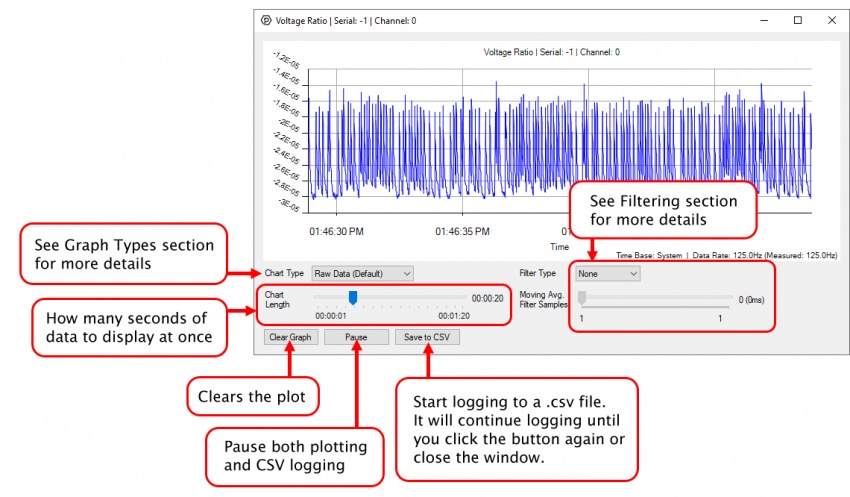
If you need more complex functionality such as logging multiple sensors to the same sheet or performing calculations on the data, you'll need to write your own program. Generally this will involve addressing the correct channel, opening it, and then creating an Event Handler and adding graphing/logging code to it.
The quickest way to get started is to download some sample code for your desired programming language and then search google for logging or plotting in that language (e.g. "how to log to csv in python") and add the code to the existing change handler.
You can perform filtering on the raw data in order to reduce noise in your graph. For more information, see the Control Panel Graphing page.
You can perform a transform on the incoming data to get different graph types that may provide insights into your sensor data. For more information on how to use these graph types, see the Control Panel Graphing page.
The Change Trigger is the minimum change in the sensor data needed to trigger a new data event.
The Data Interval is the time (in ms) between data events sent out from your Phidget.
The Data Rate is the reciprocal of Data Interval (measured in Hz), and setting it will set the reciprocal value for Data Interval and vice-versa.
You can modify one or both of these values to achieve different data outputs. You can learn more about these properties here.
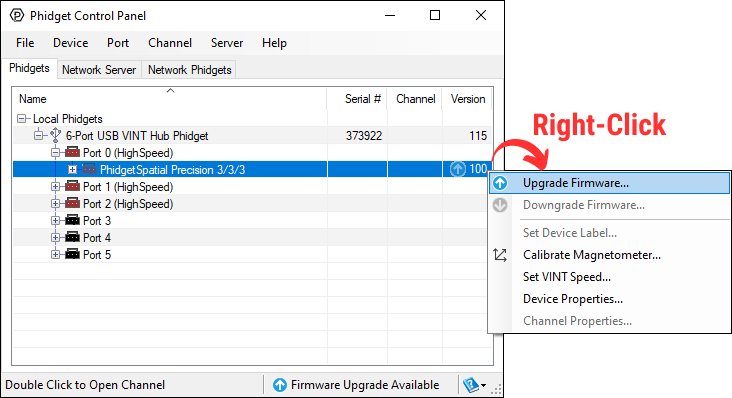
Firmware Upgrade
MacOS users can upgrade device firmware by double-clicking the device row in the Phidget Control Panel.
Linux users can upgrade via the phidget22admin tool (see included readme for instructions).
Windows users can upgrade the firmware for this device using the Phidget Control Panel as shown below.
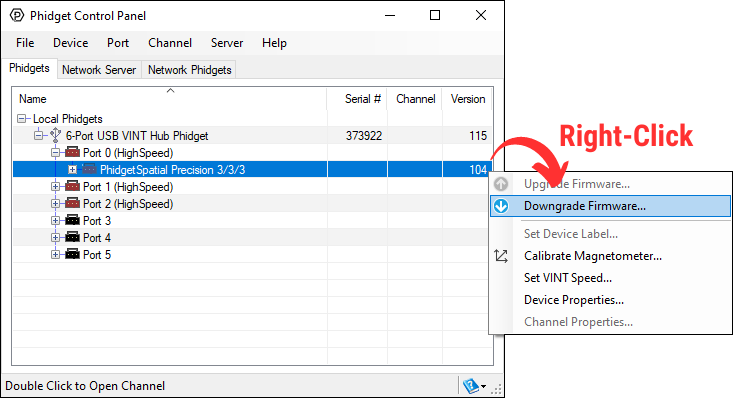
Firmware Downgrade
Firmware upgrades include important bug fixes and performance improvements, but there are some situations where you may want to revert to an old version of the firmware (for instance, when an application you're using is compiled using an older version of phidget22 that doesn't recognize the new firmware).
MacOS and Linux users can downgrade using the phidget22admin tool in the terminal (see included readme for instructions).
Windows users can downgrade directly from the Phidget Control Panel if they have driver version 1.9.20220112 or newer:
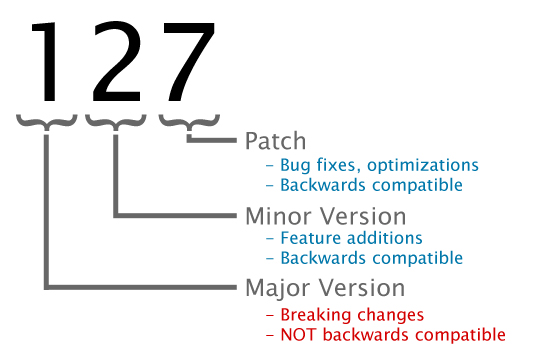
Firmware Version Numbering Schema
Phidgets device firmware is represented by a 3-digit number. For firmware patch notes, see the device history section on the Specifications tab on your device's product page.
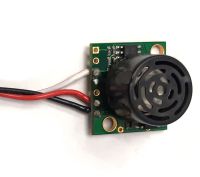
If the sensor requires 5V DC power and outputs a 0-5V signal, you can connect it directly to a VINT Port. The easiest way to connect it is to cut the end off of a Phidget Cable and solder the bare wires to the appropriate pins:
You should check the sensor's datasheet to determine if it is Ratiometric or Non-Ratiometric. Ratiometric sensors output a voltage proportional to the voltage on the 5V power line, so they're more resilient against noise and power fluctuations. Non-Ratiometric sensors have their own 5V regulator, and always output a voltage relative to that 5V reference point. You need to use the appropriate channel class when opening the sensor (i.e. the VoltageRatioInput class or the VoltageInput class), or else your sensor readings will be inaccurate.
You can tell a sensor is ratiometric if the output in the datasheet is specified in units of volts-per-volt (V/V) or in terms of its supply voltage ("Vcc"):
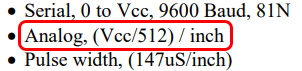
This specification says the sensor outputs a voltage value of Vcc/512 for each inch of measurement, so it must be ratiometric.
If the sensor outputs a 0-5V signal, but requires 12-24V DC power, the VINT Hub cannot provide the correct voltage by itself. You can use a DAQ1400, and then connect that to one of the ports on your VINT Hub. See the DAQ1400 product page and User Guide for details.
An NPN sensor with a power requirement of 5V DC can be connected directly to a port on your VINT Hub:
The easiest way to connect it is to snip the end off of a Phidget Cable and solder the wires to the sensor's wires.
A PNP sensor cannot be connected directly to a VINT Hub, because the digital inputs are active low. You'd need to use a pull-down resistor between the white and black wires of the Phidget cable that leads to the sensor in order for it to work.
Digital sensors that require 12V or 24V DC power can be used with the DAQ1400. See the DAQ1400 product page and User Guide for details.
Sensors with a 4-20mA output can also be interfaced with the DAQ1400. See the DAQ1400 product page and User Guide for details.
Sensors that use serial, I2C, or other digital communication protocols cannot easily be used with Phidgets. You should check the datasheet and pinout to see if they have an analog or 4-20mA output feature available.
For more information on the capabilities of the ports on the VINT Hub, see the VINT Guide.
When opening channels with Phidgets, you can set several properties to make sure you are accessing the precise channel you want. The HUB0000 has a unique serial number that can be used to find its ports or any VINT devices connected to them. If you want something more customizable and human-readable, you can use the device label instead. You can customize the device label by using writeDeviceLabel on the Hub object after it has been opened.
With the device label, you can address any of the VINT Hub's channels, or any connected VINT device channels. The device label will remain after the VINT Hub is unplugged as it is stored in flash memory.
Many VINT devices have power-saving automatically built-in, but you also have the ability to turn off the VINT ports entirely if they're not in use. The ports can be enabled and disabled in groups of three (Ports 0-1-2 and Ports 3-4-5). This is because those ports share the same power supply. You can toggle the port power using the PortPower property of the Hub object. For more details and a code snippet, visit the Phidget22 API page and select your language, device, and then USB and Hub API for the final two menus.
| Board Properties | |
|---|---|
| Controlled By | USB (Mini-USB) |
| USB Stack | PHIDUSB |
| Driver Support | Phidget22 |
| Number of VINT Ports | 6 |
| VINT Communication Speed Max | 100 kbit/s |
| Electrical Properties | |
| USB Voltage Min | 4.5 V DC |
| USB Voltage Max | 5.3 V DC |
| USB Speed | Full Speed |
| Current Consumption Min | 32.5 mA |
| Available External Current | 470 mA |
| VINT Port Voltage | ** 5 V DC |
| Voltage Inputs | |
| Voltage Input Resolution (bits) | * 16 bit |
| Sensor Input Impedance | 324 kΩ |
| Input Voltage Min (DC) | 0 V DC |
| Input Voltage Max (DC) | 5 V DC |
| Voltage Input Noise | ± 630 μV DC |
| Sampling Interval Max | 60 s/sample |
| Number of Voltage Inputs | 6 (Shared) |
| Sampling Interval Min | 1 ms/sample |
| Digital Inputs | |
| Pull-up Resistance | 124 kΩ |
| Low Voltage Max (True) | 1 V DC |
| High Voltage Min (False) | 1.8 V DC |
| Low Voltage Trigger Length Min | 3 ms |
| High Voltage Trigger Length Min | 3 ms |
| Digital Input Voltage Max | 5.5 V DC |
| Digital Input Type | Switch (Active Low) |
| Number of Digital Inputs | 6 (Shared) |
| Digital Outputs | |
| Series Resistance | 510 Ω |
| Digital Output Available Current | 8.1 mA |
| Digital Output Voltage Min | 0 V DC |
| Digital Output Voltage Max | 3.3 V DC |
| PWM Frequency Max | 50 kHz |
| Duty Cycle Resolution | 0.8 % |
| Number of Digital Outputs | 6 (Shared) |
| Physical Properties | |
| Operating Temperature Min | -40 °C |
| Operating Temperature Max | 85 °C |
| Customs Information | |
| Canadian HS Export Code | 8471.80.00 |
| American HTS Import Code | 8471.80.40.00 |
| Country of Origin | CN (China) |
*Voltage measured with a 10-bit ADC, oversampled to 16-bits.
**VINT Port voltage is taken directly from USB voltage, so it may not be exactly 5V depending on what kind of USB port the HUB0000 is plugged into.
| Date | Board Revision | Device Version | Comment |
|---|---|---|---|
| June 2017 | 0 | 117 | Product Release |
| July 2017 | 0 | 118 | USB Bug fix, sometimes can't communicate on attach |
| June 2018 | 0 | 119 | Fixed issue that caused spurious detach events |
| January 2019 | 0 | 121 | Increased voltage input range to 5.25V |
| August 2019 | 0 | 122 | Fixed USB bug that caused watchdog reset |
| August 2019 | 0 | 123 | Fixed bug that caused a send timeout in the library |
| August 2019 | 0 | 124 | Fixed USB bugs, mostly affecting macOS |
| August 2019 | 0 | 125 | Fixed USB bug that caused "IN" packets to get lost |
| September 2019 | 0 | 126 | Fixed bug that reported false detaches |
| April 2020 | 0 | 127 | Added gap between wakeup pulse and sending data |
| December 2021 | 0 | 307 |
|
| Digital Input | ||
|---|---|---|
| Date | Port Version | Comment |
| June 2017 | 100 | Product Release |
| Digital Output | ||
| Date | Port Version | Comment |
| June 2017 | 100 | Product Release |
| December 2021 | 110 | Added support for failsafe functionality |
| Voltage Input | ||
| Date | Port Version | Comment |
| June 2017 | 100 | Product Release |
| January 2019 | 110 | Increased input range from 5V to 5.25V |
| VoltageRatio Input | ||
| Date | Port Version | Comment |
| June 2017 | 100 | Product Release |
| Channel Name | API | Channel | Hub Port | Interface |
|---|---|---|---|---|
| Hub Port - Digital Input Mode | ||||
| Digital Input | DigitalInput | 0 | 0 - 5 | VINT |
| Hub Port - Digital Output Mode | ||||
| Digital Output | DigitalOutput | 0 | 0 - 5 | VINT |
| Hub Port - Voltage Input Mode | ||||
| Voltage Input | VoltageInput | 0 | 0 - 5 | VINT |
| Hub Port - Voltage Ratio Mode | ||||
| Voltage Ratio Input | VoltageRatioInput | 0 | 0 - 5 | VINT |
| 6-Port USB VINT Hub Phidget | ||||
| VINT Hub | Hub | 0 | USB | |
| API | Detail | Language | OS | |
|---|---|---|---|---|
| DigitalInput | Visual Studio GUI | C# | Windows | Download |
| DigitalInput | Objective-C | macOS | Download | |
| DigitalInput | Swift | macOS | Download | |
| DigitalInput | Swift | iOS | Download | |
| DigitalInput | Visual Basic | Windows | Download | |
| DigitalInput | Max | Multiple | Download | |
| DigitalOutput | Visual Studio GUI | C# | Windows | Download |
| DigitalOutput | Objective-C | macOS | Download | |
| DigitalOutput | Swift | macOS | Download | |
| DigitalOutput | Swift | iOS | Download | |
| DigitalOutput | Visual Basic | Windows | Download | |
| DigitalOutput | Max | Multiple | Download | |
| VoltageInput | Visual Studio GUI | C# | Windows | Download |
| VoltageInput | Objective-C | macOS | Download | |
| VoltageInput | Swift | macOS | Download | |
| VoltageInput | Swift | iOS | Download | |
| VoltageInput | Visual Basic | Windows | Download | |
| VoltageInput | Max | Multiple | Download | |
| VoltageRatioInput | Visual Studio GUI | C# | Windows | Download |
| VoltageRatioInput | Load Cell Calibrator | C# | Windows | Download |
| VoltageRatioInput | Objective-C | macOS | Download | |
| VoltageRatioInput | Swift | macOS | Download | |
| VoltageRatioInput | Swift | iOS | Download | |
| VoltageRatioInput | Visual Basic | Windows | Download | |
| VoltageRatioInput | Max | Multiple | Download | |
| Hub | Visual Studio GUI | C# | Windows | Download |