Products for USB Sensing and Control Canada flag
Products for USB Sensing and Control

sales inquiries

quotes, distributor information, purchase orders
sales@phidgets.com

technical inquiries

support, advice, warranty, returns, misshipment
support@phidgets.com

website inquiries

corrections or suggestions
web@phidgets.com

Address

Unit 1 - 6115 4 St SE
Calgary AB  T2H 2H9
Canada

Power Plug Phidget

ID: PSU1000_0

This wall socket makes it easy for your VINT Hub to switch power to a device or appliance.

Discontinued

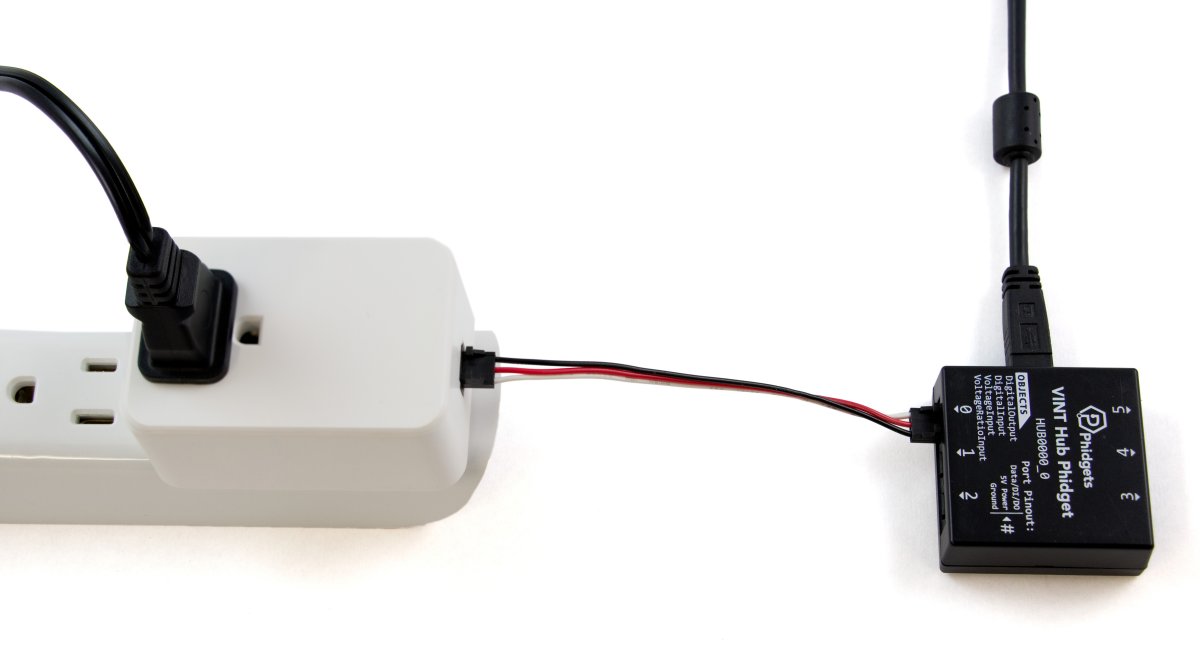
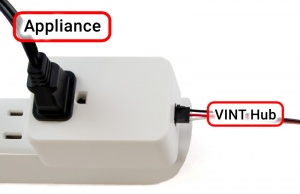
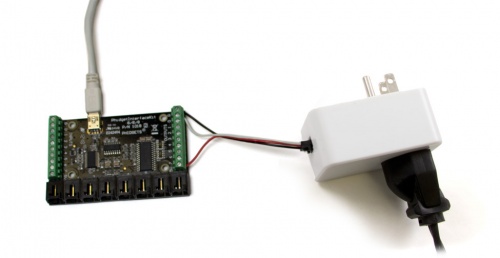
If you have an appliance or device that uses mains power from a wall socket that you want to integrate into your Phidgets system, the PSU1000 is the safest and most convenient option available. Simply plug it into a wall socket, plug your appliance in, and connect a VINT Hub using a Phidget Cable. You'll be able to switch your device on and off using commands from our API in your program!

Features

  • Switch mains power to one electrical appliance or power bar
  • Controlled by the digital output of a VINT Hub
  • ETL Certified

VINT Hubs and InterfaceKits

This Phidget can be controlled by a VINT Hub or any other device with a digital output. You can use a Phidget Cable to simply and easily connect the two devices. Here's a list of all of the different VINT Hubs and Phidget InterfaceKits that can be used with this device:

Product Board Properties
Part Number Price Number of VINT Ports VINT Communication Speed Max Controlled By
HUB0000_1
VINT Hub Phidget
$30.00 6 100 kbit/s USB (Mini-USB)
HUB0001_0
VINT Hub Phidget
$35.00 6 1 Mbit/s USB (Mini-USB)
HUB0002_0
VINT Hub Phidget
$40.00 6 1 Mbit/s USB (Mini-USB)
HUB0007_0
1-Port VINT Hub Phidget
$24.00 1 1 Mbit/s USB (USB-A)
HUB5000_0
Wireless VINT Hub
$60.00 6 100 kbit/s Local Network (Ethernet or Wi-Fi)
SBC3003_0
PhidgetSBC4
$120.00 6 100 kbit/s
Product Voltage Inputs Digital Outputs Digital Inputs
Part Number Price Number of Voltage Inputs Number of Digital Outputs Number of Digital Inputs
1010_0
PhidgetInterfaceKit 8/8/8 Mini-Format
$80.00 8 8 8
1011_0
PhidgetInterfaceKit 2/2/2
$50.00 2 2 2
1018_2B
PhidgetInterfaceKit 8/8/8
$80.00 8 8 8
1018_3B
PhidgetInterfaceKit 8/8/8
$80.00 8 8 8
1019_1B
PhidgetInterfaceKit 8/8/8 w/6 Port Hub
$110.00 8 8 8
1203_2B
PhidgetTextLCD 20X2 : White : Integrated PhidgetInterfaceKit 8/8/8
$70.00 8 8 8

Phidget Cables

Use a Phidget cable to connect this device to the hub. You can solder multiple cables together in order to make even longer Phidget cables, but you should be aware of the effects of having long wires in your system.

Product Physical Properties
Part Number Price Cable Length
3002_0
Phidget Cable 60cm
$2.00 600 mm
3003_0
Phidget Cable 10cm
$1.50 100 mm
3004_0
Phidget Cable 350cm
$3.00 3.5 m
3038_0
Phidget Cable 120cm
$2.25 1.2 m
3039_0
Phidget Cable 180cm
$2.75 1.8 m
CBL4104_0
Phidget Cable 30cm
$1.75 300 mm
CBL4105_0
Phidget Cable 90cm
$2.00 900 mm
CBL4106_0
Phidget Cable 150cm
$2.50 1.5 m
KIT4030_0
Phidget Cable Kit
$10.00 80 mm


Part 1: Setup

Select Device

Your Phidget must be connected to a device with a VINT port using a 3-wire Phidget cable.

Which device are you connecting to?

«
»

USB VINT Hub - Select OS

Select your Operating System:

«
»

HUB5000 - Select OS

Select your Operating System:

«
»

SBC3003 - Select OS

Select your Operating System:

«
»

USB VINT Hub - Windows

Step 1: Install Phidgets Library

Step 2: Connect Devices

Step 3: Verify Connection

Step 1: Install Phidgets Library

Before you begin using your Phidgets, you will need to install the Phidget Library.

1. Download the installer for your system:

● 32-bit Installer Download

● 64-bit Installer Download

If you're unsure which one you should get, press ⊞ WIN + Pause/Break:

Before installing our libraries, be sure to read our Software License.

Step 1: Install Phidgets Library

2. Open the download. If it asks you for permission, select Run

Step 1: Install Phidgets Library

3a. Select Next

Step 1: Install Phidgets Library

3b. Read the Licence Agreement. Select Next.

Step 1: Install Phidgets Library

3c. Choose Installation Location. Select Next.

Step 1: Install Phidgets Library

3d. Confirm Install

Step 1: Install Phidgets Library

3e. Wait for Installation to complete. This should only take a few moments.

Step 1: Install Phidgets Library

3f. Installation Complete. Close installation Window.

Step 2: Connect Devices

● Connect USB Cable to your Windows Computer

● Connect VINT Device(s)

Step 3: Verify Connection

1. Open the Phidgets Control Panel:

If your Control Panel does not open, look in your taskbar. Double click the Phidget Icon.

Step 3: Verify Connection

2. If connected, your Phidgets will appear in the Phidget Control Panel.

Done!

If you're able to see and interact with your devices in the Phidget Control Panel, you're done with the Setup part of this guide.

Scroll down to Part 2: Using Your Phidget for the next step.


For more help installing in Windows (e.g. manual install, using a VM, etc.), visit this page:

Windows Advanced Information

«
»

USB VINT Hub - MacOS

Step 1: Install Phidgets Library

Step 2: Connect Devices

Step 3: Verify Connection

Step 1: Install Phidgets Library

Before you begin using your Phidgets, you will need to install the Phidget Library.

1. Download the installer for your system:

● OS X 10.11+: Installer Download

● Mac OS X 10.7 - OS X 10.10: Installer Download

● Mac OS X 10.5 - OS X 10.6: Installer Download


Before installing our libraries, be sure to read our Software License.

Step 1: Install Phidgets Library

2. Open the download and double click on Phidgets.pkg

Step 1: Install Phidgets Library

3a. Select Continue

Step 1: Install Phidgets Library

3b. Read and continue. Read the License and click Agree.

Step 1: Install Phidgets Library

3c. Here, you have the option to select the installation location. Select Install to continue.

Step 1: Install Phidgets Library

3d. MacOS may ask for permission to install. Enter your username and password and Install Software.

Step 1: Install Phidgets Library

3e. Wait for Installation to complete. This should only take a few moments.

Step 1: Install Phidgets Library

3f. You may see a message that the extension has been blocked. Select Open Security Preferences.

Step 1: Install Phidgets Library

3g. Beside the message for Phidgets Inc, Click Allow.

Step 1: Install Phidgets Library

3h. Installation Complete, Click Close.

Step 1: Install Phidgets Library

3i. To delete the installer, click Move to Trash.

Step 2: Connect Devices

● Connect USB Cable to your Mac

● Connect VINT Device(s)

Step 3: Verify Connection

1. Open the Phidgets Control Panel:

Step 3: Verify Connection

2. If connected, your Phidgets will appear in the Phidget Control Panel.

Done!

If you're able to see and interact with your devices in the Phidget Control Panel, you're done with the Setup part of this guide.

Scroll down to Part 2: Using Your Phidget for the next step.


For more info installing in MacOS (e.g. developer tools, driver extension, etc.), visit this page:

MacOS Advanced Information

«
»

USB VINT Hub - Linux

Step 1: Install Phidgets Library

Step 2: Connect Devices

Step 3: Verify Connection

Step 1: Install Phidgets Library

1. First, you need to install the libusb-1.0 development libraries. For example, in Debian based distributions:

apt-get install libusb-1.0-0-dev


You’ll also need a C compiler and builder, if you don’t already have one installed.

apt-get install gcc
apt-get install make

Step 1: Install Phidgets Library

2. Next, download and unpack the Phidgets library:

libphidget22

Step 1: Install Phidgets Library

3. Use the following commands in the location you unpacked to install the library:

./configure
make
sudo make install

Step 1: Install Phidgets Library

4. (Optional) You can also download and unpack the following optional packages:

phidget22networkserver - Phidget Network Server, which enables the use of Phidgets over your network

phidget22admin - Admin tool to track who is connected to your Phidgets when using the network server

libphidget22extra - Required for phidget22networkserver and phidget22admin

libphidget22java - The Java libraries for Phidget22


For installation instructions for these packages, see the README file included with each one.

Step 2: Connect Devices

● Connect USB Cable to your Linux Computer

● Connect VINT Device(s)

Step 3: Verify Connection

1. The easiest way to verify that your libraries are working properly is to compile and run an example program. Download and unpack this C example that will detect any Phidget:

HelloWorld C Example

Step 3: Verify Connection

2. Next, open the terminal in the location where you unpacked the example. Compile and run using:

gcc HelloWorld.c -o HelloWorld -lphidget22
sudo ./HelloWorld

ou should receive a “Hello” line for each Phidget channel that is discovered:

I don’t see any Phidgets show up in the HelloWorld example

You need to run it with sudo in order to be able to access USB devices. In order to use Phidgets without sudo, you need to set your udev rules. See the Advanced Information page on the final slide of this guide for details.

Done!

If you're able to see your devices in the Hello World example, you're done with the Setup part of this guide.

Scroll down to Part 2: Using Your Phidget for the next step.


For more info installing in Linux (e.g. Udev rules, old versions, etc.), visit this page:

Linux Advanced Information

«
»

HUB5000 - Windows

Step 1: Install Phidgets Library

Step 2: Connect Devices

Step 3: Connect Wireless

Step 4: Verify Connection

Step 5: Update

Step 1: Install Phidgets Library

Before you begin using your Phidgets, you will need to install the Phidget Library.

1. Download the installer for your system:

● 32-bit Installer Download

● 64-bit Installer Download

If you're unsure which one you should get, press ⊞ WIN + Pause/Break:

Before installing our libraries, be sure to read our Software License.

Step 1: Install Phidgets Library

2. Open the download. If it asks you for permission, select Run

Step 1: Install Phidgets Library

3a. Select Next

Step 1: Install Phidgets Library

3b. Read the Licence Agreement. Select Next.

Step 1: Install Phidgets Library

3c. Choose Installation Location. Select Next.

Step 1: Install Phidgets Library

3d. Select Next to confirm install.

Step 1: Install Phidgets Library

3e. Wait for Installation to complete. This should only take a few moments.

Step 1: Install Phidgets Library

3f. Installation Complete. Close installation Window.

Step 2: Connect Devices

● Connect Power Jack

● Connect VINT Device(s)

● Connect Ethernet to a Router or Switch (optional)

Step 3: Verify Connection

Choose a setup method:

«
»

Connection (Mobile)

Step 3: Connect Wireless

1. When you connect the power supply to the HUB5000, the red LED should turn on.

Step 3: Connect Wireless

2. On your mobile device, go to the Wi-Fi settings and connect to the HUB5000:

Step 3: Connect Wireless

3. When asked for a password, enter the password printed on the HUB5000’s label.

Step 3: Connect Wireless

4. Once your device is connected to the HUB5000’s WiFi signal:

Click on the WiFi network and find an option that says “Manage router” or “Visit homepage”.

Go to your internet browser and type 192.168.100.1 in the address bar.

Step 3: Connect Wireless

5. Create a password for your HUB5000. You'll use it to access the Configure Page from now on.

Step 3: Connect Wireless

6. Navigate to the network page. Change the Mode to Client.

Step 3: Connect Wireless

7. Enter your Wifi Network details and click Save & Apply. It may take a few minutes for your Phidgets to appear in the Phidget Control Panel, which we’ll check in the next step.

Step 4: Verify Connection

1. Open the Phidgets Control Panel:

If your Control Panel does not open, look in your taskbar. Double click the Phidget Icon.

Step 4: Verify Connection

2. If connected, your Phidgets will appear in the Phidget Control Panel.

Step 5: Update

Now that you've confirmed that you have access to your Phidgets, you should ensure the HUB5000 is fully updated. You can update the firmware of the VINT Hub by going back to the Phidget Control Panel. If there's a blue arrow beside the version number, it means an update is available:

Right-click anywhere on that row and select Upgrade Firmware. When it's done, the number in the Version column will change.

Step 5: Update

Next, to update the OS firmware, go to the Network Phidgets tab in the control panel, find your HUB5000 and double-click on it. If the OS firmware is out of date, you'll see the following window pop up with steps to follow:

1. Download the firmware (you can get it here if the button does not work)

2. Open the web interface by clicking the button or entering the HUB5000's IP address in your web browser.

3. Go to the System tab and scroll down to the Upgrade Firmware section. Select the file you just downloaded and click Upgrade and Restart. You'll be instructed to wait a few minutes before logging back into the web interface.

Step 5: Update

When you log back in, you can confirm that the new version has successfully installed by checking to see if the firmware version listed in the Status section matches the first three numbers in the firmware file name that you downloaded. You can also check the version in the Network Phidgets tab on the Phidget Control Panel.

Done!

Now that you're able to see and interact with your devices in the Phidget Control Panel and they're fully updated, you're done with the Setup part of this guide.

Scroll down to Part 2: Using Your Phidget for the next step.


For more help installing in Windows (e.g. manual install, using a VM, etc.), visit this page:

Windows Advanced Information

«
»

Connection (Ethernet)

Step 3: Connect Wireless

1. When you connect the power supply to the HUB5000, the red LED should turn on.

Step 3: Connect Wireless

2. In your Web Browser, enter hub5000.local

Step 3: Connect Wireless

3. Create a password for your HUB5000. You'll use this password to access the Configure Page from now on.

Step 3: Connect Wireless

4. Navigate to the network page. Change the Mode to Client.

Step 3: Connect Wireless

5. Enter your Wifi Network details to use your Hub wirelessly and click Save & Apply. You can then disconnect the ethernet cable.

It may take a few minutes for your Phidgets to appear in the Phidget Control Panel, which we’ll check in the next step.

Step 4: Verify Connection

1. Open the Phidgets Control Panel:

If your Control Panel does not open, look in your taskbar. Double click the Phidget Icon.

Step 4: Verify Connection

2. If connected, your Phidgets will appear in the Phidget Control Panel.

Step 5: Update

Now that you've confirmed that you have access to your Phidgets, you should ensure the HUB5000 is fully updated. You can update the firmware of the VINT Hub by going back to the Phidget Control Panel. If there's a blue arrow beside the version number, it means an update is available:

Right-click anywhere on that row and select Upgrade Firmware. When it's done, the number in the Version column will change.

Step 5: Update

Next, to update the OS firmware, go to the Network Phidgets tab in the control panel, find your HUB5000 and double-click on it. If the OS firmware is out of date, you'll see the following window pop up with steps to follow:

1. Download the firmware (you can get it here if the button does not work)

2. Open the web interface by clicking the button or entering the HUB5000's IP address in your web browser.

3. Go to the System tab and scroll down to the Upgrade Firmware section. Select the file you just downloaded and click Upgrade and Restart. You'll be instructed to wait a few minutes before logging back into the web interface.

Step 5: Update

When you log back in, you can confirm that the new version has successfully installed by checking to see if the firmware version listed in the Status section matches the first three numbers in the firmware file name that you downloaded. You can also check the version in the Network Phidgets tab on the Phidget Control Panel.

Done!

Now that you're able to see and interact with your devices in the Phidget Control Panel and they're fully updated, you're done with the Setup part of this guide.

Scroll down to Part 2: Using Your Phidget for the next step.


For more help installing in Windows (e.g. manual install, using a VM, etc.), visit this page:

Windows Advanced Information

«
»

HUB5000 - MacOS

Step 1: Install Phidgets Library

Step 2: Connect Devices

Step 3: Connect Wireless

Step 4: Verify Connection

Step 5: Update

Step 1: Install Phidgets Library

Before you begin using your Phidgets, you will need to install the Phidget Library.

1. Download the installer for your system:

● OS X 10.11+: Installer Download

● Mac OS X 10.7 - OS X 10.10: Installer Download

● Mac OS X 10.5 - OS X 10.6: Installer Download


Before installing our libraries, be sure to read our Software License.

Step 1: Install Phidgets Library

2. Open the download and double click on Phidgets.pkg

Step 1: Install Phidgets Library

3a. Select Continue

Step 1: Install Phidgets Library

3b. Read and continue. Read the License and click Agree.

Step 1: Install Phidgets Library

3c. Here, you have the option to select the installation location. Select Install.

Step 1: Install Phidgets Library

3d. MacOS may ask for permission to install. Enter your username and password and Install Software.

Step 1: Install Phidgets Library

3e. Wait for Installation to complete. This should only take a few moments.

Step 1: Install Phidgets Library

3f. You may see a message that the extension has been blocked. Select Open Security Preferences.

Step 1: Install Phidgets Library

3g. Beside the message for Phidgets Inc, Click Allow.

Step 1: Install Phidgets Library

3h. Installation Complete, Click Close.

Step 1: Install Phidgets Library

3i. To delete the installer, click Move to Trash.

Step 2: Connect Devices

● Connect Power Jack

● Connect VINT Device(s)

● Connect Ethernet to a Router or Switch (optional)

Step 3: Verify Connection

Choose a setup method:

«
»

Connection (Mobile)

Step 3: Connect Wireless

1. When you connect the power supply to the HUB5000, the red LED should turn on.

Step 3: Connect Wireless

2. On your mobile device, go to the Wi-Fi settings and connect to the HUB5000:

Step 3: Connect Wireless

3. When asked for a password, enter the password printed on the HUB5000’s label.

Step 3: Connect Wireless

4. Once your device is connected to the HUB5000’s WiFi signal:

Click on the WiFi network and find an option that says “Manage router” or “Visit homepage”.

Go to your internet browser and type 192.168.100.1 in the address bar.

Step 3: Connect Wireless

5. Create a password for your HUB5000. You'll use this password to access the Configure Page from now on.

Step 3: Connect Wireless

6. Navigate to the network page. Change the Mode to Client.

Step 3: Connect Wireless

7. Enter your Wifi Network details and click Save & Apply. It may take a few minutes for your Phidgets to appear in the Phidget Control Panel, which we’ll check in the next step.

Step 4: Verify Connection

1. Open the Phidget Control Panel:

Step 4: Verify Connection

2. If connected, your Phidgets will appear in the Phidget Control Panel.

Step 5: Update

Now that you've confirmed that you have access to your Phidgets, you should ensure the HUB5000 is fully updated. You can update the firmware of the VINT Hub by going back to the Phidget Control Panel. If the name of the device is red, it means an update is available:

Double click on the device in the control panel to update the VINT Hub firmware. When it's finished, the text will turn from red to black and the number in the Version column will change.

Step 5: Update

To upgrade the firmware of the operating system on the HUB5000, download the most recent file here.

Next, go back to the web configuration page and click on the System tab. Scroll down to Upgrade Firmware and select the file you download and hit Upgrade & Restart. You'll be instructed to wait a few minutes before logging back into the web interface.

When you log back in, you can confirm that the new version has successfully installed by checking to see if the firmware version listed in the Status section matches the first three numbers in the firmware file name that you downloaded.

Done!

Now that you're able to see and interact with your devices in the Phidget Control Panel, you're done with the Setup part of this guide.

Scroll down to Part 2: Using Your Phidget for the next step.


For more info installing in MacOS (e.g. developer tools, driver extension, etc.), visit this page:

MacOS Advanced Information

«
»

Connection (Ethernet)

Step 3: Connect Wireless

1. When you connect the power supply to the HUB5000, the red LED should turn on.

Step 3: Connect Wireless

2. In your Web Browser, enter hub5000.local

Step 3: Connect Wireless

3. Create a password for your HUB5000. You'll use this password to access the Configure Page from now on.

Step 3: Connect Wireless

4. Navigate to the network page. Change the Mode to Client.

Step 3: Connect Wireless

5. Enter your Wifi Network details to use your Hub wirelessly and click Save & Apply. You can then disconnect the ethernet cable.

It may take a few minutes for your Phidgets to appear in the Phidget Control Panel, which we’ll check in the next step.

Step 4: Verify Connection

1. Open the Phidget Control Panel:

Step 4: Verify Connection

2. If connected, your Phidgets will appear in the Phidget Control Panel.

Step 5: Update

Now that you've confirmed that you have access to your Phidgets, you should ensure the HUB5000 is fully updated. You can update the firmware of the VINT Hub by going back to the Phidget Control Panel. If the name of the device is red, it means an update is available:

Double click on the device in the control panel to update the VINT Hub firmware. When it's finished, the text will turn from red to black and the number in the Version column will change.

Step 5: Update

To upgrade the firmware of the operating system on the HUB5000, download the most recent file here.

Next, go back to the web configuration page and click on the System tab. Scroll down to Upgrade Firmware and select the file you download and hit Upgrade & Restart. You'll be instructed to wait a few minutes before logging back into the web interface.

When you log back in, you can confirm that the new version has successfully installed by checking to see if the firmware version listed in the Status section matches the first three numbers in the firmware file name that you downloaded.

Done!

Now that you're able to see and interact with your devices in the Phidget Control Panel, you're done with the Setup part of this guide.

Scroll down to Part 2: Using Your Phidget for the next step.


For more info installing in MacOS (e.g. developer tools, driver extension, etc.), visit this page:

MacOS Advanced Information

«
»

HUB5000 - Linux

Step 1: Install Phidgets Library

Step 2: Connect Devices

Step 3: Connect Wireless

Step 4: Verify Connection

Step 5: Update

Step 1: Install Phidgets Library

1. First, you need to install the libusb-1.0 development libraries. For example, in Debian based distributions:

apt-get install libusb-1.0-0-dev


You’ll also need a C compiler and builder, if you don’t already have one installed.

apt-get install gcc
apt-get install make

Step 1: Install Phidgets Library

2. Next, download and unpack the Phidgets library:

libphidget22

Step 1: Install Phidgets Library

3. Use the following commands in the location you unpacked to install the library:

./configure
make
sudo make install

Step 1: Install Phidgets Library

4. (Optional) You can also download and unpack the following optional packages:

phidget22networkserver - Phidget Network Server, which enables the use of Phidgets over your network

phidget22admin - Admin tool to track who is connected to your Phidgets when using the network server

libphidget22extra - Required for phidget22networkserver and phidget22admin

libphidget22java - The Java libraries for Phidget22


For installation instructions for these packages, see the README file included with each one.

Step 2: Connect Devices

● Connect Power Jack

● Connect VINT Device(s)

● Connect Ethernet to a Router or Switch (optional)

Step 3: Verify Connection

Choose a setup method:

«
»

Connection (Mobile)

Step 3: Connect Wireless

1. When you connect the power supply to the HUB5000, the red LED should turn on.

Step 3: Connect Wireless

2. On your mobile device, go to the Wi-Fi settings and connect to the HUB5000:

Step 3: Connect Wireless

3. When asked for a password, enter the password printed on the HUB5000’s label.

Step 3: Connect Wireless

4. Once your device is connected to the HUB5000’s WiFi signal:

Click on the WiFi network and find an option that says “Manage router” or “Visit homepage”.

Go to your internet browser and type 192.168.100.1 in the address bar.

Step 3: Connect Wireless

5. Create a password for your HUB5000. You'll use this password to access the Configure Page from now on.

Step 3: Connect Wireless

6. Navigate to the network page. Change the Mode to Client.

Step 3: Connect Wireless

7. Enter your Wifi Network details and click Save & Apply. It may take a few minutes for your Phidgets to appear in the Phidget Control Panel, which we’ll check in the next step.

Step 4: Verify Connection

1. The easiest way to verify that your libraries are working properly is to compile and run an example program. Download and unpack this C example that will detect any Phidget:

HelloWorld C Example

Step 4: Verify Connection

2. Next, open the terminal in the location where you unpacked the example. Compile and run using:

gcc HelloWorld.c -o HelloWorld -lphidget22
sudo ./HelloWorld

ou should receive a “Hello” line for each Phidget channel that is discovered:

I don’t see any Phidgets show up in the HelloWorld example

You need to run it with sudo in order to be able to access USB devices. In order to use Phidgets without sudo, you need to set your udev rules. See the Advanced Information page on the final slide of this guide for details.

Step 5: Update

Now that you've confirmed that you have access to your Phidgets, you should ensure the HUB5000 is fully updated. You can update the firmware of the VINT Hub using the phidget22admin tool (see included readme for further instructions).

To upgrade the firmware of the operating system on the HUB5000, download the most recent file here.

Next, go back to the web configuration page and click on the System tab. Scroll down to Upgrade Firmware and select the file you download and hit Upgrade & Restart. You'll be instructed to wait a few minutes before logging back into the web interface.

When you log back in, you can confirm that the new version has successfully installed by checking to see if the firmware version listed in the Status section matches the first three numbers in the firmware file name that you downloaded.

Done!

Now that you're able to see your devices in the Hello World example and the device is fully updated, you're done with the Setup part of this guide.

Scroll down to Part 2: Using Your Phidget for the next step.


For more info installing in Linux (e.g. Udev rules, old versions, etc.), visit this page:

Linux Advanced Information

«
»

Connection (Ethernet)

Step 3: Connect Wireless

1. When you connect the power supply to the HUB5000, the red LED should turn on.

Step 3: Connect Wireless

2. In your Web Browser, enter hub5000.local

Step 3: Connect Wireless

3. Create a password for your HUB5000. You'll use this password to access the Configure Page from now on.

Step 3: Connect Wireless

4. Navigate to the network page. Change the Mode to Client.

Step 3: Connect Wireless

5. Enter your Wifi Network details to use your Hub wirelessly and click Save & Apply. You can then disconnect the ethernet cable.

It may take a few minutes for your Phidgets to appear in the Phidget Control Panel, which we’ll check in the next step.

Step 4: Verify Connection

1. The easiest way to verify that your libraries are working properly is to compile and run an example program. Download and unpack this C example that will detect any Phidget:

HelloWorld C Example

Step 4: Verify Connection

2. Next, open the terminal in the location where you unpacked the example. Compile and run using:

gcc HelloWorld.c -o HelloWorld -lphidget22
sudo ./HelloWorld

You should receive a “Hello” line for each Phidget channel that is discovered:

I don’t see any Phidgets show up in the HelloWorld example

You need to run it with sudo in order to be able to access USB devices. In order to use Phidgets without sudo, you need to set your udev rules. See the Advanced Information page on the final slide of this guide for details.

Step 5: Update

Now that you've confirmed that you have access to your Phidgets, you should ensure the HUB5000 is fully updated. You can update the firmware of the VINT Hub using the phidget22admin tool (see included readme for further instructions).

To upgrade the firmware of the operating system on the HUB5000, download the most recent file here.

Next, go back to the web configuration page and click on the System tab. Scroll down to Upgrade Firmware and select the file you download and hit Upgrade & Restart. You'll be instructed to wait a few minutes before logging back into the web interface.

When you log back in, you can confirm that the new version has successfully installed by checking to see if the firmware version listed in the Status section matches the first three numbers in the firmware file name that you downloaded.

Done!

Now that you're able to see your devices in the Hello World example and the device is fully updated, you're done with the Setup part of this guide.

Scroll down to Part 2: Using Your Phidget for the next step.


For more info installing in Linux (e.g. Udev rules, old versions, etc.), visit this page:

Linux Advanced Information

«
»

SBC3003 - Windows

Step 1: Install Phidgets Library

Step 2: Connect Devices

Step 3: Verify Connection

Step 4: Connect Wireless

Step 1: Install Phidgets Library

Before you begin using your Phidgets, you will need to install the Phidget Library.

1. Download the installer for your system:

● 32-bit Installer Download

● 64-bit Installer Download

If you're unsure which one you should get, press ⊞ WIN + Pause/Break:

Before installing our libraries, be sure to read our Software License.

Step 1: Install Phidgets Library

2. Open the download. If it asks you for permission, select Run.

Step 1: Install Phidgets Library

3a. Select Next.

Step 1: Install Phidgets Library

3b. Read the Licence Agreement. Select Next.

Step 1: Install Phidgets Library

3c. Choose Installation Location. Select Next.

Step 1: Install Phidgets Library

3d. Select Next.

Step 1: Install Phidgets Library

3e. Wait for Installation to complete. This should only take a few moments.

Step 1: Install Phidgets Library

3f. Installation Complete. Close installation Window.

Step 2: Connect Devices

● Connect Power Jack

● Connect VINT Device(s)

● Connect Ethernet to a Router or Switch in the same network as your Windows PC

Step 3: Verify Connection

1. Open the Phidgets Control Panel:

If your Control Panel does not open, look in your taskbar. Double click the Phidget Icon.

Step 3: Verify Connection

2. If connected, your Phidgets will appear in the Phidget Control Panel.

Now that the SBC's ethernet connection is verified, it can be connected to wifi.

If you don't have a USB wifi adapter or you're planning to stay on ethernet, you can scroll down to

Part 2: Using Your Phidget

Step 4: Connect Wireless

1. In your web browser, enter phidgetsbc.local

Step 4: Connect Wireless

2. Create a password for your SBC. You'll use this to access the configuration page from now on.

Step 4: Connect Wireless

3. Navigate to Network -> Wireless. Select your Network, enter the wifi password and select Add This Network.

Step 4: Connect Wireless

4. Scroll down to your saved networks, click on your network and select Join This Network.

Step 4: Connect Wireless

5. It should now say connected in the status column.

You can now unplug the ethernet cable.

Step 4: Connect Wireless

6. Return to the Phidget Control Panel to access your Phidgets.

Done!

If you're able to see and interact with your devices in the Phidget Control Panel, you're done with the Setup part of this guide.

Scroll down to Part 2: Using Your Phidget for the next step.


For more help installing in Windows (e.g. manual install, using a VM, etc.), visit this page:

Windows Advanced Information

«
»

SBC3003 - MacOS

Step 1: Install Phidgets Library

Step 2: Connect Devices

Step 3: Verify Connection

Step 4: Connect Wireless

Step 1: Install Phidgets Library

Before you begin using your Phidgets, you will need to install the Phidget Library.

1. Download the installer for your system:

● OS X 10.11+: Installer Download

● Mac OS X 10.7 - OS X 10.10: Installer Download

● Mac OS X 10.5 - OS X 10.6: Installer Download


Before installing our libraries, be sure to read our Software License.

Step 1: Install Phidgets Library

2. Open the download and double click on Phidgets.pkg

Step 1: Install Phidgets Library

3a. Select Continue

Step 1: Install Phidgets Library

3b. Read and continue. Read the License and click Agree.

Step 1: Install Phidgets Library

3c. Here, you have the option to select the installation location. Select Install.

Step 1: Install Phidgets Library

3d. MacOS may ask for permission to install. Enter your username and password and Install Software.

Step 1: Install Phidgets Library

3e. Wait for Installation to complete. This should only take a few moments.

Step 1: Install Phidgets Library

3f. You may see a message that the extension has been blocked. Select Open Security Preferences.

Step 1: Install Phidgets Library

3g. Click Allow.

Step 1: Install Phidgets Library

3h. Installation Complete, Click Close.

Step 1: Install Phidgets Library

3i. To delete the installer, click Move to Trash.

Step 2: Connect Devices

● Connect Power Jack

● Connect VINT Device(s)

● Connect Ethernet to a Router or Switch in the same network as your Mac

Step 3: Verify Connection

1. Open the Phidget Control Panel:

Step 3: Verify Connection

2. If connected, your Phidgets will appear in the Phidget Control Panel.

Now that the SBC's ethernet connection is verified, it can be connected to wifi.

If you don't have a USB wifi adapter or you're planning to stay on ethernet, you can scroll down to

Part 2: Using Your Phidget

Step 4: Connect Wireless

1. In your web browser, enter phidgetsbc.local

Step 4: Connect Wireless

2. Create a password for your SBC. You will use this to access the configuration page from now on.

Step 4: Connect Wireless

3. Navigate to Network -> Wireless. Select your Network, enter the wifi password and select Add This Network.

Step 4: Connect Wireless

4. Scroll down to your saved networks, click on your network and select Join This Network.

Step 4: Connect Wireless

5. It should now say connected in the status column.

You can now unplug the ethernet cable.

Step 4: Connect Wireless

6. Return to the Phidget Control Panel to access your Phidgets.

Done!

If you're able to see and interact with your devices in the Phidget Control Panel, you're done with the Setup part of this guide.

Scroll down to Part 2: Using Your Phidget for the next step.


For more info installing in MacOS (e.g. developer tools, driver extension, etc.), visit this page:

MacOS Advanced Information

«
»

SBC3003 - Linux

Step 1: Install Phidgets Library

Step 2: Connect Devices

Step 3: Verify Connection

Step 4: Connect Wireless

Step 1: Install Phidgets Library

1. First, you need to install the libusb-1.0 development libraries. For example, in Debian based distributions:

apt-get install libusb-1.0-0-dev


You’ll also need a C compiler and builder, if you don’t already have one installed.

apt-get install gcc
apt-get install make

Step 1: Install Phidgets Library

2. Next, download and unpack the Phidgets library:

libphidget22

Step 1: Install Phidgets Library

3. Use the following commands in the location you unpacked to install the library:

./configure
make
sudo make install

Step 1: Install Phidgets Library

4. (Optional) You can also download and unpack the following optional packages:

phidget22networkserver - Phidget Network Server, which enables the use of Phidgets over your network

phidget22admin - Admin tool to track who is connected to your Phidgets when using the network server

libphidget22extra - Required for phidget22networkserver and phidget22admin

libphidget22java - The Java libraries for Phidget22


For installation instructions for these packages, see the README file included with each one.

Step 2: Connect Devices

● Connect Power Jack

● Connect VINT Device(s)

● Connect Ethernet to a Router or Switch in the same network as your Linux machine

Step 3: Verify Connection

1. The easiest way to verify that your libraries are working properly is to compile and run an example program. Download and unpack this C example that will detect any Phidget:

HelloWorld C Example

Step 3: Verify Connection

2. Next, open the terminal in the location where you unpacked the example. Compile and run using:

gcc HelloWorld.c -o HelloWorld -lphidget22
sudo ./HelloWorld

If everything is working, you should receive a “Hello” line for each Phidget channel that is discovered:

I don’t see any Phidgets show up in the HelloWorld example

You need to run it with sudo in order to be able to access USB devices. In order to use Phidgets without sudo, you need to set your udev rules. See the Advanced Information page on the final slide of this guide for details.

Now that the SBC's ethernet connection is verified, it can be connected to wifi.

If you don't have a USB wifi adapter or you're planning to stay on ethernet, you can scroll down to

Part 2: Using Your Phidget

Step 4: Connect Wireless

1. In your web browser, enter phidgetsbc.local

If you're using a terminal-only Linux machine, use the browser on your phone instead.

(If you use a phone, you need to enter the IP address your router assigned to the SBC instead of phidgetsbc.local)

Step 4: Connect Wireless

2. Create a password for your SBC. You will use this to access the configuration page from now on.

Step 4: Connect Wireless

3. Navigate to Network -> Wireless. Select your Network, enter the wifi password and select Add This Network.

Step 4: Connect Wireless

4. Scroll down to your saved networks, click on your network and select Join This Network.

Step 4: Connect Wireless

5. It should now say connected in the status column.

You can now unplug the ethernet cable.

Step 4: Connect Wireless

6. Run the HelloWorld example again to confirm that your Phidgets are accessible over wifi.

Done!

If you're able to see your devices in the Hello World example, you're done with the Setup part of this guide.

Scroll down to Part 2: Using Your Phidget for the next step.


For more info installing in Linux (e.g. Udev rules, old versions, etc.), visit this page:

Linux Advanced Information

«
»

Part 2: Using Your Phidget

About

PSU1000 About.jpg


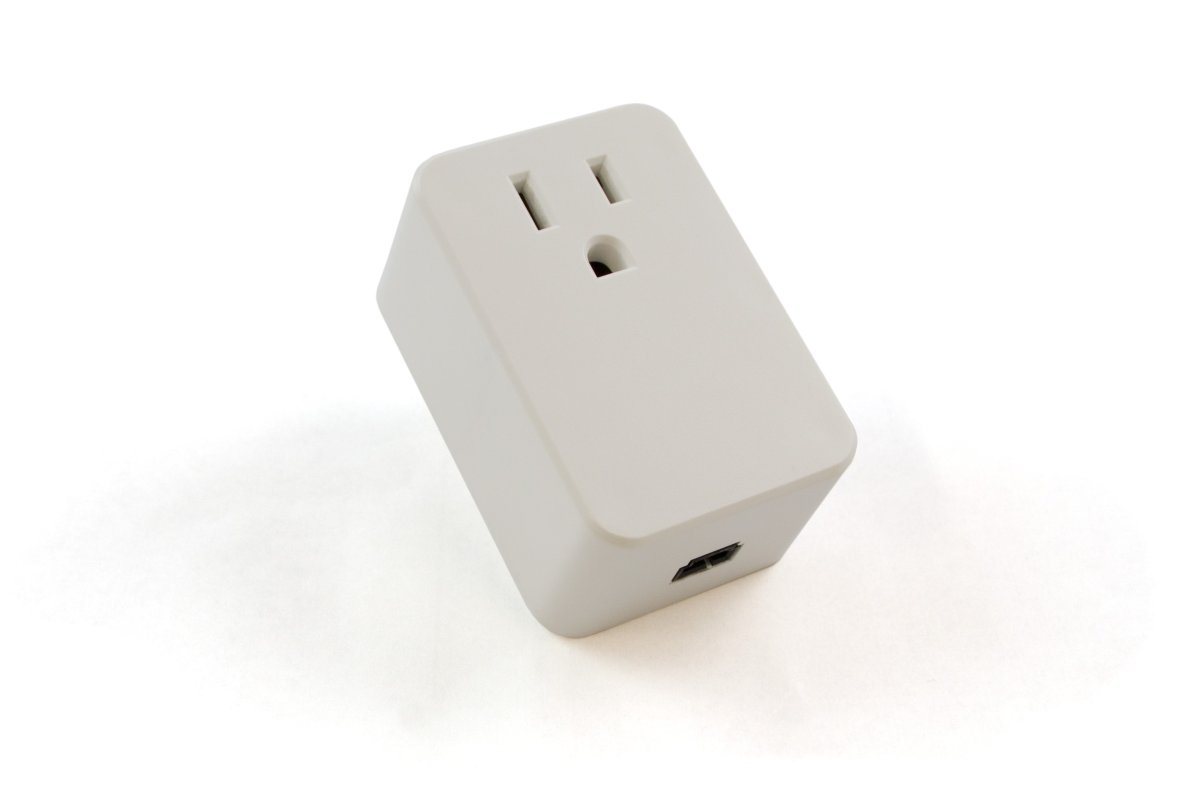
The PSU1000 is a mechanical relay built into a wall adapter plug. You interact with the REL2001 through the Digital Output Channel Class to turn on and off power to your appliance or device.

Before you use a device or appliance with the PSU1000, please ensure that the power specifications fall within the appropriate range (125V AC, maximum 15amps).


Some devices don't operate properly when they have their power supply cut suddenly or frequently (e.g. computers usually need to be shut down before cutting power). You should read the user's manual for your device or appliance before using the PSU1000 to switch on and off.

Explore your Phidget Channels Using the Control Panel

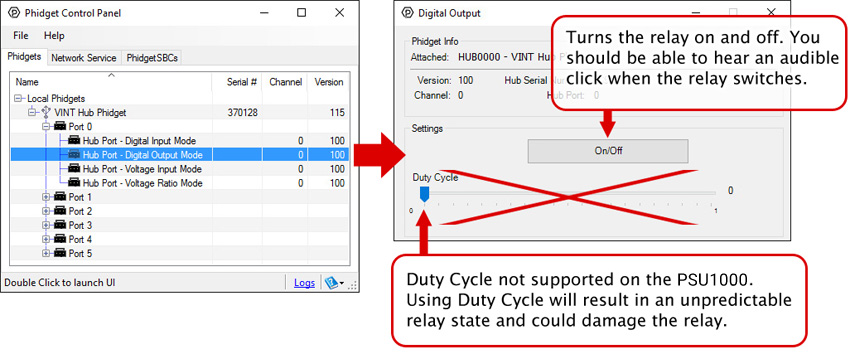
Double click on the Digital Output channel class under the port your PSU1000 is connected to.

PSU1000 0 Panel Example.jpg

Part 3: Create your Program

1. Setting up your Programming Environment

2. Phidget Programming Basics

Part 4: Advanced Topics and Troubleshooting

Expand All
How do I know what channel, serial number, or hub port to use in my program?

Before you open a Phidget channel in your program, you can set these properties to specify which channel to open. You can find this information through the Control Panel.

1. Open the Control Panel and double-click on the red map pin icon:

The locate Phidget button is found in the device information box

2. The Addressing Information window will open. Here you will find all the information you need to address your Phidget in your program.

All the information you need to address your Phidget


See the Phidget22 API for your language to determine exact syntax for each property.

Mechanical Relays

This relay is an electrically-controlled switch. For more information about how mechanical relays work and how to use them, visit the Mechanical Relay Guide.

Use with an InterfaceKit
PSU1000 InterfaceKit Terminals Picture.jpg

In addition to plugging directly into VINT ports, the PSU1000 can be used with Interface Kits that have a Digital Output and 5V supply (like the 1018 - Phidget InterfaceKit).

To connect the PSU1000 to the Interface Kit, cut one end off a Phidget Cable and:

  • Connect the red wire to the 5V terminal of the Interface Kit
  • Connect the black wire to G terminal of the Interface Kit
  • Connect the white wire to the desired Digital Output terminal

Plug the end that still has a connector into the PSU1000.

To control the relay, open the DigitalOutput object for the channel the white wire is connected to. Setting the output state TRUE or FALSE will set the state of the relay.

Product Specifications

Board Properties
Controlled By Digital Output
Physical Properties
Wall Plug Style North American
Relay Properties
Estimated Relay Lifespan 50000 actuations
Electrical Properties
Load Current Max (AC) 15 A
Load Voltage Max (AC) 125 V AC
Customs Information
Canadian HS Export Code 8536.49.00
American HTS Import Code 8536.49.00.75
Country of Origin CN (China)

Documents

Product History

Date Board Revision Device Version Comment
November 20200N/AProduct Release

This device doesn't have an API of its own. It is controlled by opening a DigitalOutput channel on the Phidget that it's connected to. For a list of compatible Phidgets with Digital Output, see the Connection & Compatibility tab.

You can find details for the DigitalOutput API on the API tab for the Phidget that this sensor connects to.

Code Samples


Example Options


Downloads

				Make your selections to display sample code.