Products for USB Sensing and Control

Replaced by the 1032 - PhidgetLED-64 Advanced.
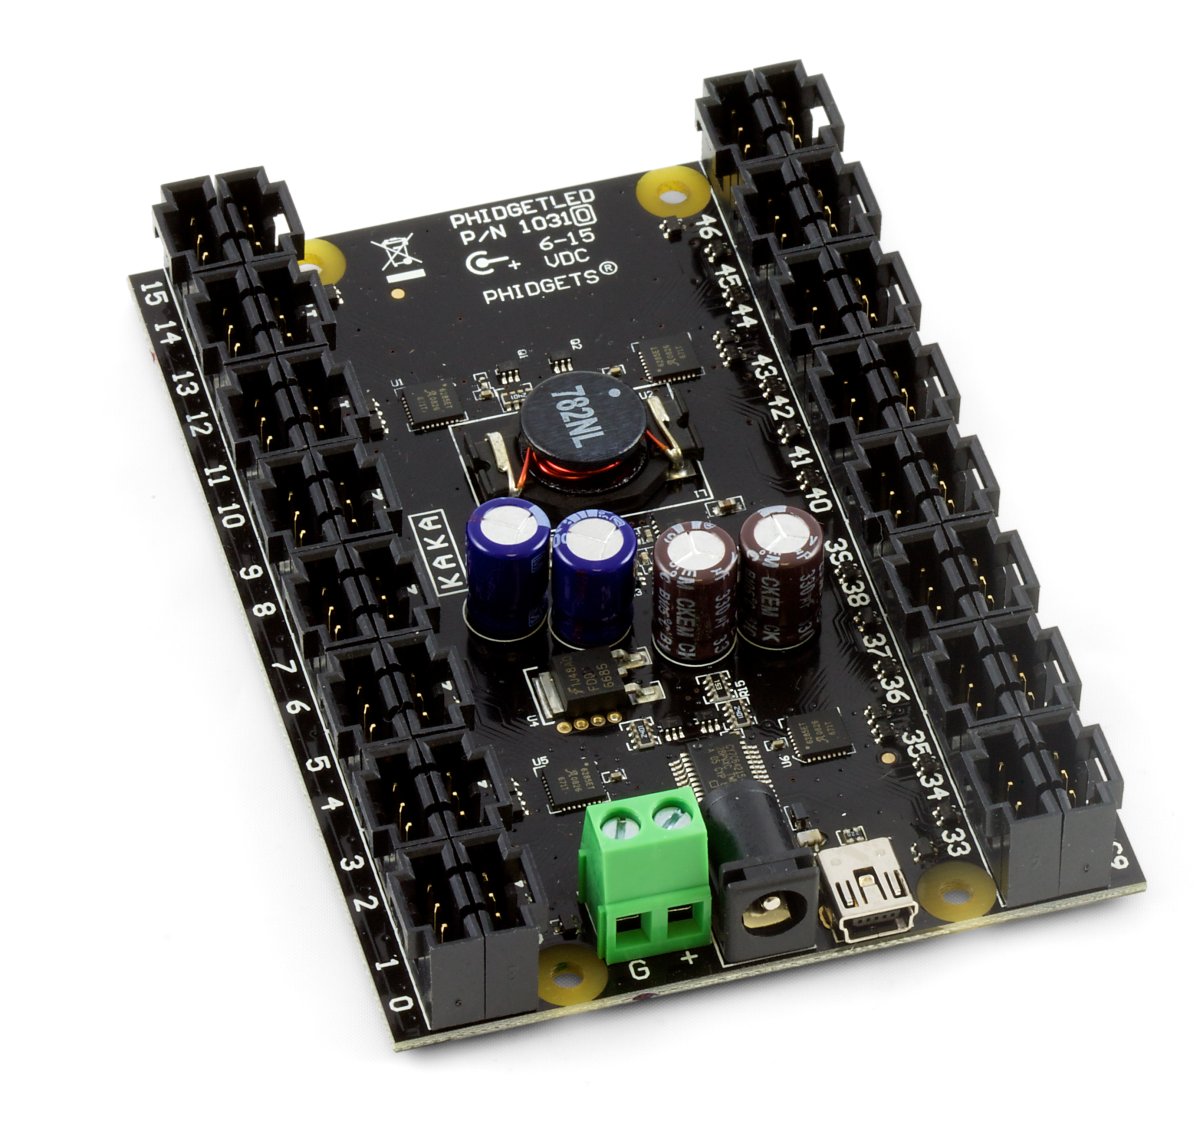
The PhidgetLED 64 allows you to independently control 64 Light Emitting Diodes. Each LED can be turned on and off, and its brightness controlled.
Most standard LEDs with colors such as red, amber, orange, yellow, and green have forward voltages below 2.75 Volts, and can be used with the PhidgetLED by simply soldering them to a connector-wire and inserting the wire into any PhidgetLED board connector. The forward voltage will default to 2.75V, and the maximum current defaults to 20mA.
The 1031 is capable of adjusting the forward voltage supplied to the LEDs with 1.7, 2.75, 3.9 and 5 volts settings allowing you to properly drive blue, white, violet, ultra violet and purple LEDs.
Bi-color LEDs, tri-color LEDs, seven-segment displays, bar LEDs, and other array-style arrangements of LEDs can also be used with the 1031.
The maximum current can be set to 20, 40, 60 or 80mA, and applies to all LEDs. The API allows the brightness control of individual LEDs.
Note: Cut the Double Ended cables in half and solder the cut end to the LED. Check the Getting Started section of the User Guide for more detailed information.
| Physical Properties | |
|---|---|
| API Object Name | LED |
| Number of LED Outputs | 64 |
| Recommended Wire Size | 12 - 24 AWG |
| Power Jack Hole Diameter | 5.5 mm |
| Power Jack Pin Diameter | 2.1 mm |
| Power Jack Polarity | Center Positive |
| Operating Temperature Min | 0 °C |
| Operating Temperature Max | 70 °C |
| Electrical Properties | |
| USB Voltage Min | 4.5 V DC |
| USB Voltage Max | 5.3 V DC |
| Current Consumption Min | 195 mA |
| Supply Voltage Min | 6 V DC |
| Supply Voltage Max | 15 V DC |
| Selectable Output Voltage Levels | 1.7 VDC, 2.75 VDC, 3.0 VDC, 5.0 VDC |
| Selectable Output Current Levels | 20 mA, 40 mA, 60 mA, 80 mA |
| USB Speed | Full Speed |
| Customs Information | |
| Canadian HS Export Code | 8471.80.00 |
| American HTS Import Code | 8471.80.40.00 |
| Country of Origin | CN (China) |
| Device | Object Name | Channel |
|---|---|---|
| LED Output | DigitalOutput | 0 - 63 |
| API | Detail | Language | OS | |
|---|---|---|---|---|
| DigitalOutput | Visual Studio GUI | C# | Windows | Download |
| DigitalOutput | Objective-C | macOS | Download | |
| DigitalOutput | Swift | macOS | Download | |
| DigitalOutput | Swift | iOS | Download | |
| DigitalOutput | Visual Basic | Windows | Download | |
| DigitalOutput | Max | Multiple | Download |
| Date | Board Revision | Device Version | Comment |
|---|---|---|---|
| March 2010 | 0 | 100 | Product Release |
| May 2011 | 0A | 101 | getLabelString fix for labels > 7 characters |
| January 2013 | Product Discontinued. Succeeded by the 1032 - PhidgetLED Advanced. The main improvement of the 1032 is the ability to set the current limit of each channel separately. | ||
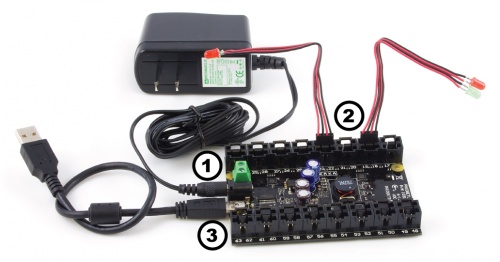
Welcome to the 1031 user guide! In order to get started, make sure you have the following hardware on hand:
Next, you will need to connect the pieces:
Now that you have everything together, let's start using the 1031!
In order to demonstrate the functionality of the 1031, the Phidget Control Panel running on a Windows machine will be used.
The Phidget Control Panel is available for use on both macOS and Windows machines.
To open the Phidget Control Panel on Windows, find the ![]() icon in the taskbar. If it is not there, open up the start menu and search for Phidget Control Panel
icon in the taskbar. If it is not there, open up the start menu and search for Phidget Control Panel
To open the Phidget Control Panel on macOS, open Finder and navigate to the Phidget Control Panel in the Applications list. Double click on the ![]() icon to bring up the Phidget Control Panel.
icon to bring up the Phidget Control Panel.
For more information, take a look at the getting started guide for your operating system:
Linux users can follow the getting started with Linux guide and continue reading here for more information about the 1031.
After plugging the 1031 into your computer and opening the Phidget Control Panel, you will see something like this:
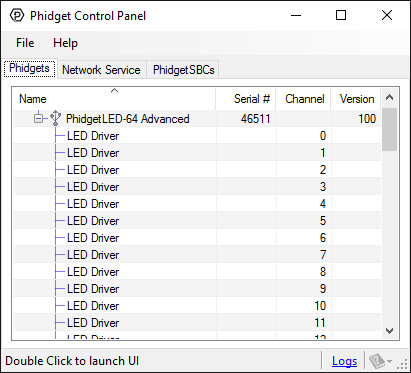
The Phidget Control Panel will list all connected Phidgets and associated objects, as well as the following information:
The Phidget Control Panel can also be used to test your device. Double-clicking on an object will open an example.
Double-click on a Digital Output object, labelled LED Driver, in order to run the example:
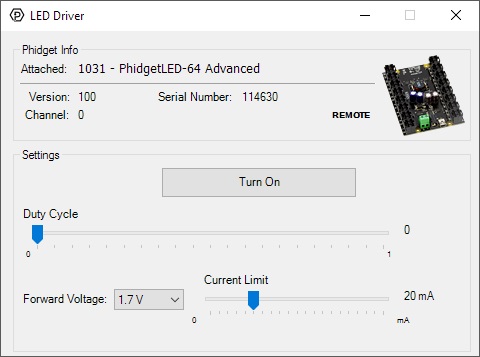
General information about the selected object will be displayed at the top of the window. You can also experiment with the following functionality:
Before you can access the device in your own code, and from our examples, you'll need to take note of the addressing parameters for your Phidget. These will indicate how the Phidget is physically connected to your application. For simplicity, these parameters can be found by clicking the button at the top of the Control Panel example for that Phidget.

In the Addressing Information window, the section above the line displays information you will need to connect to your Phidget from any application. In particular, note the Channel Class field as this will be the API you will need to use with your Phidget, and the type of example you should use to get started with it. The section below the line provides information about the network the Phidget is connected on if it is attached remotely. Keep track of these parameters moving forward, as you will need them once you start running our examples or your own code.

You are now ready to start writing your own code for the device. The best way to do that is to start from our Code Samples.
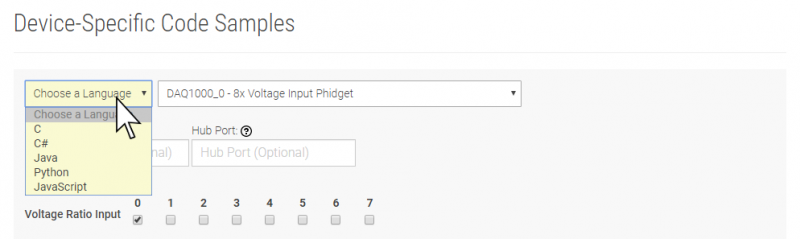
Select your programming language of choice from the drop-down list to get an example for your device. You can use the options provided to further customize the example to best suit your needs.
Once you have your example, you will need to follow the instructions on the page for your programming language to get it running. To find these instructions, select your programming language from the Programming Languages page.
The 1031 uses four controller chips that allow you to vary the current and voltage supplied to each channel. It does not use pulse-width modulation, another common control method for LEDs.
You can have multiple LEDs hooked up to a single channel on the 1031, (for example, a short string of LEDs) to reduce the amount of wiring, although keep in mind that you'll lose control of the individual lights, and can only toggle or dim the entire string. When using multiple LEDs on a single channel, you'll need to increase the voltage limit for that channel. If the LEDs are too dim at the maximum voltage, you should spread them out to other channels.
If you're using high-current LEDs, you should spread your load evenly across the board to avoid having one of the controller chips overheat. There are four controller chips, each controlling the channels on a quarter of the board.
| Controller | Channels |
| 1 | 0, 1, 2, 3, 4, 5, 6, 7, 24, 25, 26, 27, 28, 29, 30, 31 |
| 2 | 8, 9, 10, 11, 12, 13, 14, 15, 16, 17, 18, 19, 20, 21, 22, 23 |
| 3 | 32, 33, 34, 35, 36, 37, 38, 39, 56, 57, 58, 59, 60, 61, 62, 63 |
| 4 | 40, 41, 42, 43, 44, 45, 46, 47, 48, 49, 50, 51, 52, 53, 54, 55 |
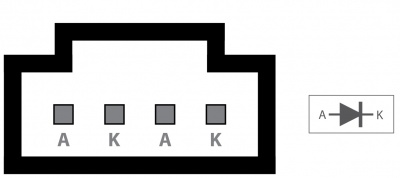
The connector used on the 1031 LED board is a Molex 70543-0003. The mating connector used on our LED cables is the Molex 50-57-9404.
For more information, take a look at the LED Guide.
| Channel Name | API | Channel |
|---|---|---|
| LED Driver | DigitalOutput | 0 - 63 |