Polling vs. Events: Difference between revisions
No edit summary |
|||
| Line 105: | Line 105: | ||
[[Logging, Exceptions, and Errors]] - Learn about all the tools you can use to debug your program. | [[Logging, Exceptions, and Errors]] - Learn about all the tools you can use to debug your program. | ||
[[Phidget Network | [[Phidget Network Server]] - Phidgets can be controlled and communicated with over your network- either wirelessly or over ethernet. | ||
Revision as of 19:40, 28 April 2017
In your program, user and device actions can be handled by either:
- Letting the program tell you when they happen and then doing something (event driven code)
- Checking for certain things to happen (polling) and then doing something (logic code)
The style of programming you choose depends on what you want to do with the Phidget. The two sections, Event Driven Code and Logic Code below give benefits, drawbacks, and general examples of each style. Programs will always contain some amount of logic code, for initialization of variables and event handlers, for example. This page is mostly discussing the differences between choosing to handle Phidget data with events or with polling.
Examples in pseudo-code are given below for each style type.
Logic Code
Logic code is best used for:
- Simple test applications
- Non-GUI applications (GUIs usually are event driven)
- The user driving the device rather than listening to it
- Low-power applications that only need to read a sensor on very infrequent intervals
Logic code is relatively easy to write. For example, creating and opening a Phidget in logic code might be written like this:
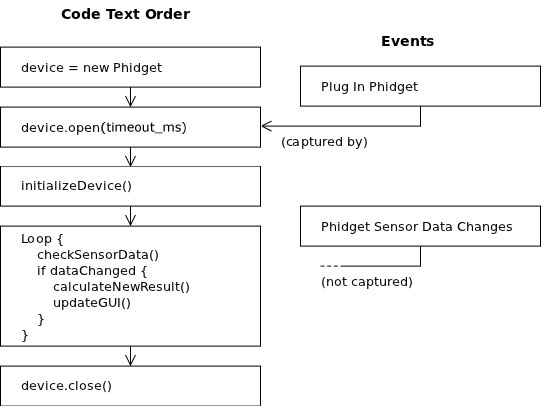
This design does not explicitly capture every event that fires when data or input changes. You would typically only use polling when you don't need a constant stream of data. For many Phidgets, the maximum data rate is 1 minute. In some low-power applications where you only want data on hourly intervals or longer, polling with logic code and an internal timer is the most effective solution.
Logic code cannot handle constant, asynchronous data as cleanly as event driven code can.
If you find that in logic code you have a highly complex loop driving your program, you should consider changing some of it to event driven code. This type of awkward if-loop might look like this:
  Create Device Software Object
  Open Device

  Loop Until Exit Requested {
     if No Device Attached {
         Try to open device until timeout
         if Wait Timeout Reached {
             break
         } else {
             Initialize Device
         }
     } else {  // Device Is Attached
         if Device Data Type 1 Changed {
             Do Something
         }
         if Device Data Type 2 Changed {
             Do Something Else
         }
         // ... More data change functions here
     }
     Collect User Input
  }

  Close Device
  Delete Device
In the next section, we'll talk about how events can make this type of program easier to write.
Event Driven Code
Event driven code allows for clean handling of complex, asynchronous programs:
- Handling multiple Phidgets
- Handling active plugging or unplugging of the Phidget (multiple attach and detach events)
- Working behind a GUI, as many GUIs are already event driven
- Capturing all sensor data - or input and output - without constantly polling
Without event driven code, you will need to constantly poll the device to see if any state has changed. If you poll at a slower rate than your input or output changes, you will not capture all data.
However, event driven code is usually not as useful or efficient for:
- Only one open and close event
- Using only one device
- Having the user make changes to the device (in contrast to reading data from the device),
Event driven code can be difficult to design properly. It may help to draw out a flowchart, state machine, or at least a pseudo-code outline of your system design and all events you wish to handle before writing code. One of the most important things to remember when designing event driven code is to keep the amount of code in the actual event handler to a minimum. If events are coming in at a rapid pace and you have large blocks of code in the event handlers, there is a good chance that the events coming in will overwhelm the processor and you will start missing data samples, which will manifest as "sample overrun" errors. Actually, it's not necessarily the amount of code, but the amount of time it takes to execute. For this reason, slow processes like printing text to the console or updating a GUI may cause overrun errors. If you have a lot you need to accomplish for each event, make separate functions and call them in an entirely new thread from the event handler. This way new events can continue to come in while the code executes in parallel.
The code examples given for each specific language use event-driven code.
For example, creating and opening a Phidget in an event-driven program may look like this:
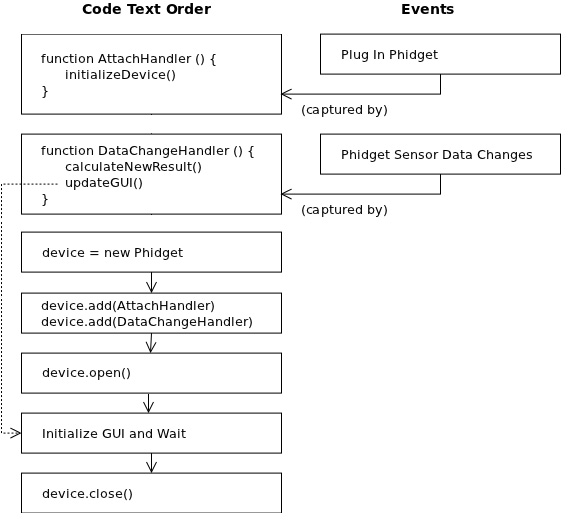
As you can see, the attach handler and event handler are separate functions that trigger when the Phidget is plugged in or when some data is available, respectively. The rest of the program is logic-driven, and simply initializes the Phidget and GUI, sets up the event handlers, and then waits for events to fire and make updates to the GUI. This continues until the user decides to close the program.
Once you have written this code flow, the actual order of events that occur within the program look something like this:
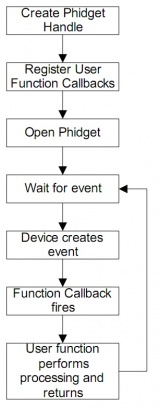
Note that the device itself (not the program), initiates the function call by 'firing' the event. This allows you to update only when events fire, and ensures that you can capture and respond to all data events.
Further Reading
Phidget Programming Basics - Here you can find the basic concepts to help you get started with making your own programs that use Phidgets.
Data Interval/Change Trigger - Learn about these two properties that control how much data comes in from your sensors.
Using Multiple Phidgets - It can be difficult to figure out how to use more than one Phidget in your program. This page will guide you through the steps.
Logging, Exceptions, and Errors - Learn about all the tools you can use to debug your program.
Phidget Network Server - Phidgets can be controlled and communicated with over your network- either wirelessly or over ethernet.