Language - Visual Basic
From Phidgets Support
(Redirected from Language - Visual Basic .NET)
Get Started
With the Phidget22.NET library, it's easy to create VB applications that work with Phidget devices.
VB Libraries
Nuget Package
The Phidget22.NET library is available as a nuget package. This is the recommend way to install and manage the Phidget22.NET library.
Library Files
If you would like to manually manage the Phidget22.NET library files, you can download them here.
Development Environment Configuration
Visual Studio
Start with the Code Samples |
||
| One of the best ways to start programming with Phidgets is to use our example code as a guide. Download the example(s) that correspond to your Phidget's channel classes. You can find them listed on the enclosure in most cases, or on the API tab of the product page. | 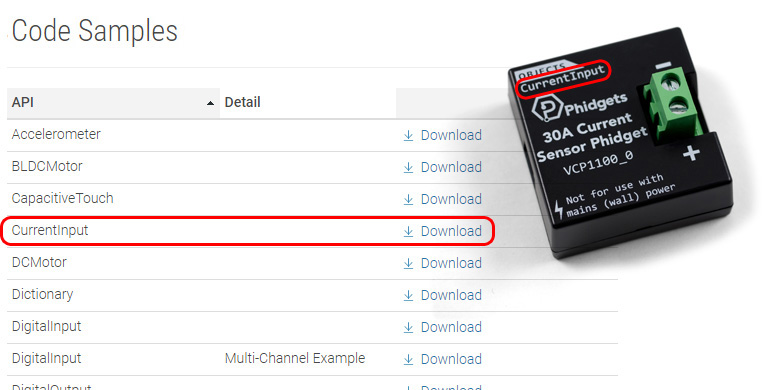 | |
| Unpack and open the example project and click the Start button. The application will open the Phidget, list basic information about the Phidget, and demonstrate the Phidget's functionality. |  | |
Editing the Examples |
||
| The Visual Basic .Net examples are derived from the Windows Phidget Control Panel, so you'll need to modify a few things to adapt them for your own purposes. To begin with, you can remove the following line: | ||
commandLineData phidgetParameters = open.parseCmdLine(); //get command line parameters
|
||
| Then, you can modify any line that mentions phidgetParameters by setting it to the desired value instead of using PhidgetParameters object. | ||
For instance:Try 'set all the values grabbed from command line. these values have defaults that are set in ExampleUtils.vb, you can check there to see them
device.Channel = phidgetParameters.Channel 'selects the channel on the device to open
device.DeviceSerialNumber = phidgetParameters.SerialNumber 'selects the device or hub to open
device.HubPort = phidgetParameters.HubPort 'selects th eport on the hub to open
device.IsHubPortDevice = phidgetParameters.isHubPortDevice 'is the device a port on a vint hub?
If phidgetParameters.isRemote Then 'are we trying to open a remote device?
device.IsRemote = True
Net.EnableServerDiscovery(ServerType.Device) 'turn on network scan
If phidgetParameters.Password <> vbNullString And
phidgetParameters.ServerName <> vbNullString Then
Net.SetServerPassword(phidgetParameters.ServerName, phidgetParameters.Password)
End If
Else
device.IsLocal = True
End If
device.Open() 'open the device specified by the above parameters
Catch ex As PhidgetException
errorBox.addMessage("Error opening the device: " + ex.Message)
End Try
| ||
Might become: Try
device.Channel = 0
device.DeviceSerialNumber = 370097
device.HubPort = 0
device.IsHubPortDevice = True
device.IsLocal = True
device.Open()
Catch ex As PhidgetException
errorBox.addMessage("Error opening the device: " + ex.Message)
End Try
| ||
Setting up a New Project |
||
| When you are building a project from scratch, or adding Phidget functionality to an existing project, you'll need to configure your development environment to properly link the Phidget .NET library. Create a new VB Forms Application, open the NuGet package manager. | 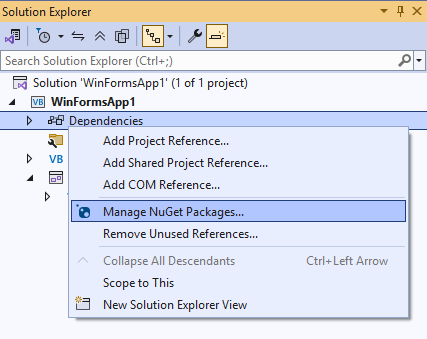 | |
| On the following screen, click Browse, search for Phidget22, and install the Phidget22.NET package. | 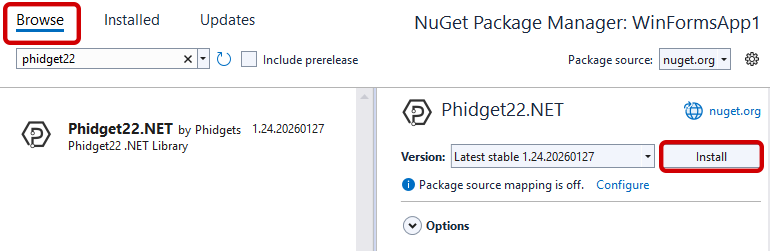 | |
Then, you just need to add the following lines: Imports Phidget22
Imports Phidget22.Events
| ||
Mono
HelloWorld Example |
|
| First, download and unpack the HelloWorld example for VB. This example uses the Phidget Manager to list all Phidget channels that can be accessed by your computer. All other VB examples use Windows Forms, so they are not compatible with Mono. | |
Next, copy Phidget22.NET.dll from type the following location:C:\Program Files\Phidgets\Phidget22\Phidget22.NET.dll |
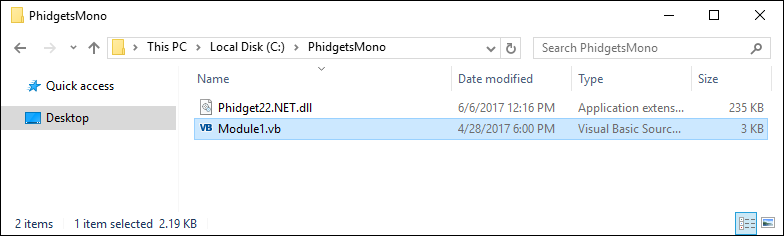 |
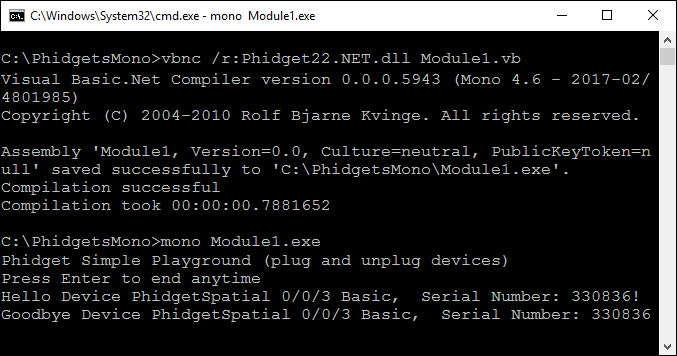
Open the command prompt at the folder location and enter the following command:vbnc /r:Phidget22.NET.dll Module1.vbmono Module1.exe | |
| You should be able to see the channels of your Phidget listed when the program starts or whenever the Phidget is plugged in while the program is running. Now that you've confirmed that your devices are properly connected, the next step is to download and edit sample code for your specific device. |
 |
Other Examples |
|
| To download the code samples, visit this page. Download the example(s) that correspond to your Phidget's channel classes. You can find them listed on the enclosure in most cases, or on the API tab of the product page. | |
The Visual Basic examples are derived from the Windows Phidget Control Panel, so you'll need to modify a few things to adapt them for your own purposes. To begin with, you can remove the following line:
commandLineData phidgetParameters = open.parseCmdLine(); //get command line parameters
| |
For instance:Try 'set all the values grabbed from command line. these values have defaults that are set in ExampleUtils.vb, you can check there to see them
device.Channel = phidgetParameters.Channel 'selects the channel on the device to open
device.DeviceSerialNumber = phidgetParameters.SerialNumber 'selects the device or hub to open
device.HubPort = phidgetParameters.HubPort 'selects th eport on the hub to open
device.IsHubPortDevice = phidgetParameters.isHubPortDevice 'is the device a port on a vint hub?
If phidgetParameters.isRemote Then 'are we trying to open a remote device?
device.IsRemote = True
Net.EnableServerDiscovery(ServerType.Device) 'turn on network scan
If phidgetParameters.Password <> vbNullString And
phidgetParameters.ServerName <> vbNullString Then
Net.SetServerPassword(phidgetParameters.ServerName, phidgetParameters.Password)
End If
Else
device.IsLocal = True
End If
device.Open() 'open the device specified by the above parameters
Catch ex As PhidgetException
errorBox.addMessage("Error opening the device: " + ex.Message)
End Try
| |
Might become: Try
device.Channel = 0
device.DeviceSerialNumber = 370097
device.HubPort = 0
device.IsHubPortDevice = True
device.IsLocal = True
device.Open()
Catch ex As PhidgetException
errorBox.addMessage("Error opening the device: " + ex.Message)
End Try
| |
Setting up a New Project |
|
To start a project from scratch, or add Phidget functionality to an existing project, you'll need to include the Phidget .NET library by adding the following lines to your code:Imports Phidget22
Imports Phidget22.Events
| |
Next, copy Phidget22.NET.dll from the following location:C:\Program Files\Phidgets\Phidget22\Phidget22.NET.dll |
|
Open the command prompt at the folder location and enter the following command:vbnc /r:Phidget22.NET.dll Module1.vbmono Module1.exe | |
Example Code
Navigate to our Code Samples Page to view and download code samples that are tailored to your specific device. These code samples all use Windows Forms, except for the "Hello World" manager example.
Phidget Programming Basics
To learn more about the structure of the example code, visit our Phidget Programming Basics guide.