|
|
| (46 intermediate revisions by 3 users not shown) |
| Line 1: |
Line 1: |
| | <metadesc>Communicate over USB with sensors, controllers and relays with Phidgets! Program in Linux using a wide variety of programming languages.</metadesc> |
| [[Category:OS]] | | [[Category:OS]] |
| {{OSLang|[[File:icon-Linux.png|64x64px|left|link=OS - Linux]]|On Linux, Phidgets can be either plugged directly into a USB Port or run over a network using the [[#Network Service | Network Service]].}}
| |
| __TOC__ | | __TOC__ |
|
| |
| <span style="color:#FF0000">You need kernel '''version 2.6''' (released in 2003) or later.</span>
| |
|
| |
| ==Quick Downloads== | | ==Quick Downloads== |
| | Already know what you're doing? Here you go: |
| | *[{{SERVER}}/downloads/phidget22/libraries/linux/libphidget22.tar.gz libphidget22] |
| | *[{{SERVER}}/downloads/phidget22/libraries/linux/libphidget22extra.tar.gz libphidget22extra] |
| | *[{{SERVER}}/downloads/phidget22/libraries/linux/libphidget22java.tar.gz libphidget22java] |
| | *[{{SERVER}}/downloads/phidget22/servers/linux/phidget22networkserver.tar.gz phidget22networkserver] |
| | *[{{SERVER}}/downloads/phidget22/tools/linux/phidget22admin.tar.gz phidget22admin] |
|
| |
|
| Linux has complete support for all Phidgets and their software APIs; the only thing it lacks when compared to Windows and OS X is a graphical user interface. We walk you through all steps for download, installation, checking, and starting to write code below. | | If you need older versions of the Phidget22 Linux libraries, [{{SERVER}}/downloads/phidget22/libraries/linux/libphidget22/ click here]. |
|
| |
|
| If you are already a pro, and just want the downloads: | | If you need Phidget21 Linux Libraries, [{{SERVER}}/downloads/phidget21/libraries/linux/libphidget/ click here]. |
| *[{{SERVER}}/downloads/phidget22/libraries/linux/libphidget22.tar.gz Phidget Libraries for Linux]
| |
| *[{{SERVER}}/downloads/phidget22/servers/linux/phidgetnetworkserver22.tar.gz Phidget Network Service for Linux]
| |
| *[[Software License]]
| |
|
| |
|
| ==Getting Started with Linux== | | ==Getting Started with Linux== |
| | Welcome to using Phidgets with Linux. If you are ready to go, the first step in creating Linux applications with Phidgets is installing our libraries! |
|
| |
|
| ===Installing=== | | ===Install=== |
| | If your Linux machine is running 32-bit Debian, jump ahead to [[#Debian install | Debian install]]. |
|
| |
|
| To install the libraries, follow these steps: | | ====Generic Install==== |
| | | To install our libraries, first install libusb-1.0 development libraries. The exact command and package name will vary depending on distribution. For Debian based distributions, including Ubuntu and Mint, the command would be: |
| #Install libusb-1.0 development libraries - {{Code|libusb-1.0-0-dev}}.
| | <syntaxhighlight lang=bash> |
| #*Note that libusb-1.0 may be already on your system, but the development libraries probably aren't.
| | apt-get install libusb-1.0-0-dev |
| #*Search for {{Code|libusb-1.0-0-dev}} or similar in your distribution package directory via {{Code|sudo apt-get install libusb-1.0-0-dev}}
| | </syntaxhighlight> |
| #*Or install [http://www.libusb.org/ from source].
| |
| #Unpack and install the [{{SERVER}}/downloads/libraries/libphidget22.tar.gz Phidget Libraries]
| |
| #*From the main unpacked libraries directory, run:
| |
| #*:{{Code|./configure}}
| |
| #*:{{Code|make}}
| |
| #*:{{Code|sudo make install}}
| |
| #*This will compile phidget22.h and place the library into your gcc path
| |
|
| |
|
| '''Note:''' Although these libraries are written in C, the additional libraries for Python, Java, and most other Phidget-supported languages depend on them so they must be installed no matter what else you want to do.
| |
|
| |
|
| ===Checking===
| | Next, download and unpack the following files: |
| | *[{{SERVER}}/downloads/phidget22/libraries/linux/libphidget22.tar.gz libphidget22] (Mandatory) |
| | *[{{SERVER}}/downloads/phidget22/libraries/linux/libphidget22extra.tar.gz libphidget22extra] (Optional - needed by NetworkServer and Admin) |
| | *[{{SERVER}}/downloads/phidget22/libraries/linux/libphidget22java.tar.gz libphidget22java] (Optional - Java Libraries) |
| | *[{{SERVER}}/downloads/phidget22/servers/linux/phidget22networkserver.tar.gz phidget22networkserver] (Optional - [[Phidget Network Server]]) |
| | *[{{SERVER}}/downloads/phidget22/tools/linux/phidget22admin.tar.gz phidget22admin] (Optional - Phidget Admin Tool) |
| | Open the README file that is included at the top of each directory. This file will give you important information about how to properly install the files. |
|
| |
|
| To confirm the libraries were installed and work correctly, you can check both the hardware and software sides of the interface. It is worth checking the software side first, because if it works then you know the hardware side is also okay.
| |
|
| |
|
| ====Software====
| | Libraries are installed in /usr/local/lib by default. If you run into trouble finding the libraries during linking or at runtime, this probably means that /usr/local/lib is not on the library path for your distribution. |
|
| |
|
| To confirm that the libraries were installed correctly and can be used in code, you can use the [{{SERVER}}/downloads/examples/phidget21-c-examples.tar.gz C examples].
| | You can handle this in a number of ways: |
|
| |
|
| The easiest way to confirm correct installation will be to compile and run the {{Code|HelloWorld}} C example, included in the examples download. This does not involve writing any C code, but it does involve compiling the example and running it, which is a quick process as we show below. If you feel more comfortable running the {{Code|HelloWorld}} example for your specific language, you can skip below and pick your language, but keep in mind that any problems could be with the C library installation and not necessarily with your language.
| | Specify a different install folder during compile |
| | <syntaxhighlight lang=bash>./configure --prefix=/usr && make && sudo make install</syntaxhighlight> |
| | OR Add /usr/local/lib to the system-wide library path |
| | <syntaxhighlight lang=bash>echo /usr/local/lib >> /etc/ld.so.conf && sudo ldconfig</syntaxhighlight> |
| | OR Add /usr/local/lib in your local shell every time |
| | <syntaxhighlight lang=bash>export LD_LIBRARY_PATH=$LD_LIBRARY_PATH:/usr/local/lib</syntaxhighlight> |
|
| |
|
| To compile and run the basic C example for checking your installation:
| | The libraries are now installed on your machine. Next, let's verify that they are working properly. Jump ahead to [[#Verify | verifying]]. |
|
| |
|
| 1. Unpack the Phidget Generic C Examples<br>
| | ====Debian Install==== |
| 2. Open a terminal (often Ctrl-Alt-T) and go to the directory where the examples are unpacked<br>
| | To install our libraries on Debian, first enter the following command in the terminal: |
| 3. Compile the {{Code|HelloWorld.c}} example:<br>
| |
| <div class="source">
| |
| <syntaxhighlight lang=bash> | | <syntaxhighlight lang=bash> |
| | wget -qO- http://www.phidgets.com/gpgkey/pubring.gpg | apt-key add - |
| | </syntaxhighlight> |
|
| |
|
| gcc HelloWorld.c -o HelloWorld -lphidget22
| |
|
| |
|
| | Next, enter the following command if you are running Debian ''stretch'': |
| | <syntaxhighlight lang=bash> |
| | echo 'deb http://www.phidgets.com/debian stretch main' > /etc/apt/sources.list.d/phidgets.list |
| </syntaxhighlight> | | </syntaxhighlight> |
| </div>
| | If you are running ''squeeze'' (Debian 6), ''wheezy'' (Debian 7) or ''jessie'' (Debian 8) simply replace ''stretch'' in the command above with your release. If you are running Ubuntu 16.04, replace ''stretch'' with ''xenial''. |
| 4. Run the {{Code|HelloWorld}} example:<br>
| |
| <div class="source">
| |
| <syntaxhighlight lang=bash>
| |
|
| |
|
| sudo ./HelloWorld
| |
|
| |
|
| | Update your package lists: |
| | <syntaxhighlight lang=bash> |
| | apt-get update |
| </syntaxhighlight> | | </syntaxhighlight> |
| </div>
| |
| (The sudo is needed for USB access for now, see the [[#Setting udev Rules|Setting udev Rules]] section for how to change this)
| |
|
| |
|
| The {{Code|-lphidget22}} will look in the standard library location for your Linux distribution (usually {{Code|/usr/lib/}}) for the Phidget 22 library file. Generally, libraries to be linked on Linux through {{Code|gcc}} have a naming convention. For example, {{Code|-lphidget22}} looks for the binary files '''{{Code|libphidget22.a}}''' and '''{{Code|libphidget22.so}}''' in the library location. These files are automatically put in the library location during the {{Code|make install}} step of [[#Installing | installing the libraries]].
| |
|
| |
|
| The HelloWorld program will simply print out basic information for any device you plug in, and print a message upon unplugging the device. For example, starting the program, plugging in an Interface Kit Phidget, unplugging the Interface Kit, and pressing Enter displays:
| | Finally, install the Phidget package by entering the command below: |
| | <syntaxhighlight lang=bash> |
| | apt-get install libphidget22 |
| | </syntaxhighlight> |
|
| |
|
| <div class="source">
| | You may also want to apt-get install the following optional packages: |
| <syntaxhighlight lang=bash>
| | * '''libphidget22-dev''': The C development libraries for Phidget22 |
| | * '''libphidget22extra''': Extra runtime library required for the Network Server and Admin tools |
| | * '''phidget22networkserver''': The [[Phidget Network Server]], which enables use of Phidgets over your network |
| | * '''libphidget22java''': The Java libraries for Phidget22 |
| | * '''phidget22admin''': An administrator utility which helps keep track of who is connected to your Phidgets over the network server |
| | * '''phidget22wwwjs''': The JavaScript libraries for Phidget22. This package also installs the HTML examples which can be accessed through the web interface |
|
| |
|
| $ sudo ./HelloWorld
| |
|
| |
| Opening...
| |
| Press Enter to end
| |
|
| |
|
| Hello to Device Phidget InterfaceKit 8/8/8, Serial Number: 37299
| | The libraries are now installed on your machine. Next, let's verify that they are working properly. |
| Goodbye Device Phidget InterfaceKit 8/8/8, Serial Number: 37299
| |
|
| |
|
| Closing...
| | ===Verify=== |
| | The best way to verify that your libraries are working properly is to compile and run an example program. |
|
| |
|
| </syntaxhighlight>
| |
| </div>
| |
|
| |
|
| ====Hardware====
| | First, download and unpack this C example: |
| | *[{{SERVER}}/downloads/phidget22/examples/c/Manager/Phidget22_HelloWorld_C_Ex.zip HelloWorld C example] |
|
| |
|
| If the out-of-the-box examples do not work, make sure the Phidget is seen by your USB interface. To check this, you can use the kernel log reader {{Code|dmesg}}. Pipe the output of {{Code|dmesg}} into the utility {{Code|tail}} to read the last ten lines of the log:
| |
|
| |
|
| <div class="source">
| | Next, open the terminal at the example location. Compile the example by entering the following command: |
| <syntaxhighlight lang=bash> | | <syntaxhighlight lang=bash> |
| | | gcc HelloWorld.c -o HelloWorld -lphidget22 |
| $> dmesg | tail | |
| ....(3 lines)....
| |
| [337.189132] usb 1-2: new full-speed USB device number 5 using ochi-pci
| |
| [337.464709] usb 1-2: New USB device found, idVendor=06c2 idProduct=0034
| |
| [337.464714] usb 1-2: New USB device strongs: Mfr=1, Product=2, SerialNumber=3
| |
| [337.464718] usb 1-2: Product: 1024_0
| |
| [337.464721] usb 1-2: Manufacturer: Phidgets Inc.
| |
| [337.464724] usb 1-2: SerialNumber: 388624
| |
| [337.491426] usb 1-2: hid-generic 0003:06C2:0034.0004: hiddev0,hidraw1: USB HID v1.01 Device [Phidgets Inc. 1024_0] on usb-0000:00:06.0-2/input0
| |
| | |
| </syntaxhighlight> | | </syntaxhighlight> |
| </div>
| |
|
| |
| The number between the [ ] is the system time in seconds since the last boot up, so you can tell whether the event was recent or not. (This will also tell you the interrupt type of Phidget that is registered by the USB interface, see the [[#Common Problems and Solutions | common problems section below]] for more information on what this means.)
| |
|
| |
|
| The Phidget should both connect and disconnect properly, so unplugging it should result in an additional line at the tail:
| |
|
| |
|
| <div class="source">
| | Run the HelloWorld example: |
| <syntaxhighlight lang=bash> | | <syntaxhighlight lang=bash> |
| | | ./HelloWorld |
| $> dmesg | tail
| |
| ....(9 lines)....
| |
| [744.558055] usb 1-2: USB disconnect, device number 5
| |
| | |
| </syntaxhighlight> | | </syntaxhighlight> |
| </div>
| |
|
| |
| If you don't see similar lines to these at the tail of your kernel log, take a look at the [[#Troubleshooting|troubleshooting]] section below, as well as the '''Communications''' section of our [[General Troubleshooting#Communications Troubleshooting|general troubleshooting page]].
| |
|
| |
|
| ====Troubleshooting====
| |
|
| |
|
| If the examples '''do not''' work but USB '''does''' work (i.e. your computer can consistently see the device in the [[#Hardware|hardware]]), take a moment to check the basics:
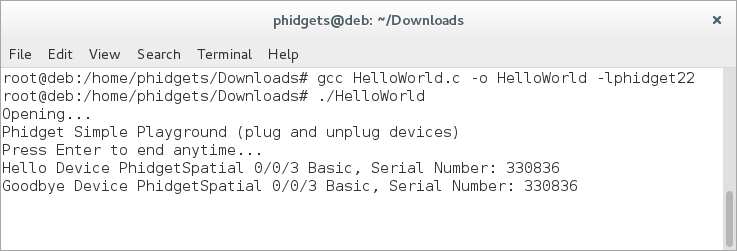
| | Your terminal should look something like this: |
| * No other programs, drivers, or processes are using that USB port in software
| | [[File:linux_helloworld.PNG|link=|center]] |
| * You are running the example program as root (or your udev rules have been set properly)
| |
| * You are using libusb 1.0 (not the older 0.1 release)
| |
| * You have compiled versions of libphidget22.a and libphidget22.so in your system library location (usually {{Code|/usr/lib}})
| |
| * The Phidget libraries are the latest version (visit the [[#Quick Downloads| quick downloads section]] to download them)
| |
| * Your Linux kernel version is 2.6 or later (type {{Code|uname -r}} in a terminal to get your kernel version)
| |
| * Check the [[#Common Problems and Solutions|common problems]] section below, some specific combinations can cause problems
| |
|
| |
|
| If your problem doesn't seem to be fixed by these steps, make sure that the Phidget is seen '''consistently''' by USB (if it is erratic, try our [[General Troubleshooting|general troubleshooting guide]]). If you are still having problems after using the troubleshooting guide, please {{ContactUs|ask us}}!
| |
|
| |
|
| ==Programming Languages==
| | The HelloWorld program will simply communicate when a Phidget has been attached or detached, as can be seen in the image above. |
|
| |
|
| Now that you have the basic libraries installed, you can pick your language and begin programming!
| |
|
| |
|
| If you are not using the [[#NetworkService | network service]] (discussed below) to control a Phidget over a network, your next step will be to delve into the use of your specific language. Each page has its own set of specific libraries, code examples, and setup instructions.
| | Your Phidget is now able to communicate with your development machine. The next step is selecting a programming language so you can start to write some code! |
|
| |
|
| On Linux, we recommend the following languages:
| | ==Programming== |
| | Ready to write some code? Select one of the programming languages below: |
|
| |
|
| *[[Language - C/C++|C/C++]] | | ''Great choices for beginners:'' |
| | *[[Language - C|C]] |
| *[[Language - Java | Java]] | | *[[Language - Java | Java]] |
| *[[Language - Python | Python]] | | *[[Language - Python | Python]] |
| | | ''Also supported:'' |
| We also support these languages on Linux:
| |
| | |
| *[[Language - C Sharp | C#]] | | *[[Language - C Sharp | C#]] |
| *[[Language - Visual Basic .NET | VB.Net]] | | *[[Language - Visual Basic .NET | VB.Net]] |
| *[[Language - JavaScript | JavaScript]] | | *[[Language - JavaScript | JavaScript]] |
|
| |
|
| ==Phidget Network Service== | | ==Phidget Network Server== |
| | | The Phidget Network Server is an extremely useful tool that allows you to remotely control Phidgets over your network. If you haven't already, check out the [[Phidget Network Server]] page for a complete overview. |
| The Phidget Network Service allows you to remotely control a Phidget over a network.<br>This section helps you install, check, and use the Network Service on Linux, but we also have an overview of the [[Phidget Network Service]] in general. | |
| | |
| ===Installing the Network Service===
| |
| | |
| To install the Network Service, you must first have the [[#Installing|Phidget libraries installed]]. Then, follow these steps:
| |
| | |
| #Download '''avahi''' and its development libraries (mdnsresponder/bonjour is also an option, see the [[#Network Service with mDNSResponder|network service with mDNSResponder]] section)
| |
| #*Try {{Code|apt-cache search avahi}} in a terminal to find current packages
| |
| #*Often, this is installed in a default system, you may already have it
| |
| #Unpack and install the [{{SERVER}}/downloads/libraries/phidgetnetworkserver.tar.gz Phidgets Network Service] source code tarball for Linux
| |
| #*From the unpacked Network Service source code directory, run:
| |
| #*:{{Code|./configure}}
| |
| #*:{{Code|make}}
| |
| #*:{{Code|sudo make install}}
| |
| #*This will compile the executable {{Code|phidget22networkserver}} and place it into {{Code|/usr/bin/phidget22networkserver}}
| |
|
| |
|
| ====Network Service with mDNSResponder==== | | ===Try it Out!=== |
| | In order to try the Phidget Network Server out, you will need a host computer, and a client computer with the Phidget libraries installed: |
| | *'''Host computer:''' the computer that is physically connected to the Phidgets via USB and is running the Phidget Network Server. |
| | *'''Client computer:''' a computer running a Phidgets application that accesses Phidgets connected to the host computer. |
| | If you only have one computer, don't worry, your machine can act as both a host and a client. |
|
| |
|
| To use '''mdnsresponder''' instead of avahi, change the configure script to be:
| |
|
| |
|
| <div class="source">
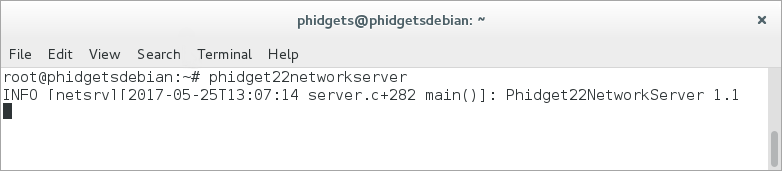
| | Next, open the terminal on the host computer and type in the following command to run the Network Server in the terminal: |
| <syntaxhighlight lang=bash> | | <syntaxhighlight lang=bash> |
| ./configure --enable-zeroconf=bonjour
| | phidget22networkserver |
| </syntaxhighlight> | | </syntaxhighlight> |
| </div>
| |
|
| |
| (To see all options, use {{Code|./configure --help}} like you would any configure script)
| |
|
| |
| ===Setting Up the Network Service===
| |
|
| |
| To set up and use the Phidget Network Service, it helps to have [[#Setting udev Rules|set your udev rules]]. Otherwise, you must run it as root.
| |
|
| |
| You can get command line help with {{Code|phidget22networkserver}} by using the {{Code|-h}} option:
| |
|
| |
|
| <div class="source">
| | Or, as a daemon: |
| <syntaxhighlight lang=bash> | | <syntaxhighlight lang=bash> |
| $ phidget22networkserver -h
| | phidget22networkserver -D |
| </syntaxhighlight> | | </syntaxhighlight> |
|
| |
|
| <syntaxhighlight lang=text>
| |
| usage: phidget22networkserver [-D][-E][-c <cfg>][-l <logfile>][-v][-w]
| |
| -D run as daemon
| |
| -E log to stderr
| |
| -c <cfg> configuration file
| |
| -l <logfile> log to 'logfile'
| |
| -v enable verbose logging (may be specified more than once)
| |
| -p run phidget sever
| |
| -w run web server
| |
| </syntaxhighlight>
| |
| </div>
| |
|
| |
|
| You will see this help regardless of whether the network service was correctly hooked in to avahi. In fact, you will see it even if you explicitly disabled mDNS in the {{Code|./configure}} step at compile:
| | [[File:Linux_networkserver.PNG|link=|center]] |
|
| |
|
| <div class="source">
| |
| <syntaxhighlight lang=bash>
| |
| ./configure --disable-zeroconf
| |
| </syntaxhighlight>
| |
| </div>
| |
|
| |
| ===Using the Network Service===
| |
|
| |
| To use a Phidget over the network service, you'll want to:
| |
| * Obtain code you can use to open a Phidget remotely
| |
| * Start the network service on the computer that directly connects to the Phidget
| |
| * Run your program on the remote computer that will control the Phidget over the network
| |
|
| |
| The easiest way to test these steps on Linux is simply to set up the network service and run the Phidget program on the same computer, using the loopback interface. Later, you can replace one of the two ends with a different computer and/or operating system.
| |
|
| |
| To quickly create code to run remotely, in our examples we include commented out lines with openRemote() function calls of different types. In the C example for your device, find the line that says:
| |
|
| |
|
| {{Code|CPhidget_open((CPhidgetHandle) device, -1)}}
| | The Network Server is now running on your machine with the default configuration. If you would like to change the Network Server configuration, you can do so by modifying the following file: |
| | */etc/phidgets/phidget22networkserver.pc |
|
| |
|
| and change it to be:
| |
|
| |
|
| <div class="source">
| | You can also simply point towards your own configuration file with the following command: |
| <syntaxhighlight lang=bash> | | <syntaxhighlight lang=bash> |
| int serial_number = 37299
| | phidget22networkserver -c /path/to/configuration/file |
| CPhidget_openRemoteIP ((CPhidgetHandle) device, serial_number, "127.0.0.1", 5001, NULL)
| |
| </syntaxhighlight> | | </syntaxhighlight> |
| </div>
| |
|
| |
|
| Except that you should replace '''37299''' with the serial number of your Phidget, which you can obtain from either the Phidget board itself, or from when you [[#Checking|ran the HelloWorld example code]]. The IP address "127.0.0.1" simply loops back to the same computer, and 5001 is the default port as found from using {{Code|phidget21networkservice -h}} in [[#Setting Up the Network Service|the Setting Up the Network Service]] section. The NULL is used to not specify a password.
| |
|
| |
|
| Save the changed example under a different filename. In the walkthrough here, we are using the {{Code|InterfaceKit.c}} example, and we rename it to be {{Code|InterfaceKitRemote.c}}
| | Now that you have the Network Server running on your host computer, the next step will be accessing the Phidgets connected to your host computer from your client computer. Follow the steps below: |
|
| |
|
| Compile your new C file. In our {{Code|InterfaceKitRemote.c}} case, this would be by:
| |
|
| |
|
| <div class="source">
| | Open the terminal on the client computer and type in the following command (if you are using a single machine, simply open a new terminal session and continue): |
| <syntaxhighlight lang=bash> | | <syntaxhighlight lang=bash> |
| gcc InterfaceKitRemote.c -o InterfaceKitRemote -lphidget21
| | phidget22admin -s |
| </syntaxhighlight> | | </syntaxhighlight> |
| </div>
| | [[File:Linux_networkserver_phidgetadmin.PNG|link=|center]] |
| | |
| 1. Start two terminals to run this test, usually opened via Ctrl-Alt-T. Your [[#Setting udev Rules|udev rules]] need to be set up or you should use sudo for every command. First, start the network service in Terminal #1:
| |
| | |
| [[Image:Linux_ws_start.png|link=]]
| |
| | |
| This will broadcast any Phidget events, and receive any Phidget requests, both over the network.
| |
| | |
| 2. Start the InterfaceKitRemote program that you just compiled which will open the remote Phidget. In this case, it is {{Code|InterfaceKitRemote}}:
| |
| | |
| [[Image:Linux_ws_step2.png|link=]] | |
| | |
| 3. Now, plug in the Phidget! The {{Code|phidget21networkservice}} program captures the attach and other events and sends them out over the network (in the background in Terminal #1) and the Phidget software objected opened with openRemote in Terminal #2 receives them:
| |
| | |
| [[Image:Linux_ws_step3.png|link=]]
| |
| | |
| 4. You can confirm that the network service was indeed behind this exchange by killing the network service process while still allowing the remote program to run:
| |
|
| |
|
| [[Image:Linux_ws_step4.png|link=]]
| |
|
| |
|
| ===Debugging the Network Service===
| | This will list all of the Phidget Servers on your network. Confirm that you can see the Network Server running on your host computer. |
|
| |
|
| In addition to enabling [[General Phidget Programming#Logging|logging]] in your Phidget code, you can get additional debugging information from the Network Service itself. You can enable logging by editing {{Code|networkserver.cfg}}, which can be found in the build directory for the network service.
| |
|
| |
|
| <div class="source">
| | After you have confirmed your Network Server is running, type in the following command: |
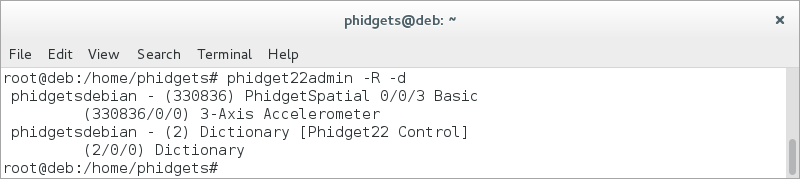
| <syntaxhighlight lang=bash> | | <syntaxhighlight lang=bash> |
| | phidget22admin -R -d |
| | </syntaxhighlight> |
|
| |
|
| # Server log level
| |
| # verbose | debug | info | warn | err
| |
| loglevel: debug
| |
|
| |
| # Server log file
| |
| logfile: "/home/<username>/Desktop/networkserver.log"
| |
| </syntaxhighlight>
| |
| </div>
| |
|
| |
|
| You can change the {{Code|loglevel}} to change what kind of messages show up in the logfile. Each successive level contains the messages of the lower levels as well.
| | This command will list all remote Phidgets on the network. Confirm that you can see the Phidgets attached to your host computer: |
| | [[File:Linux_networkserver_phidadminlist.PNG|link=|center]] |
|
| |
|
| * '''err''': The lowest logging level; Only messages from errors will be logged.
| |
| * '''warn''': Adds warning messages which result from unexpected but not necessarily erroneous behaviour.
| |
| * '''info''': Adds informational messages that track important events in the network service.
| |
| *'''debug''': For debugging the inner workings of the network service; not typically useful for end-users.
| |
| *'''verbose''': The highest logging level; Even not-very-important events will be tracked, so it may be difficult to find the messages that matter.
| |
|
| |
|
| The {{Code|logfile}} path will lead you to the log file, or you can change the path to something else. | | The next step will be running a program that uses the Network Server, luckily, every programming language we support comes with example code on how to do this! Jump to [[#Programming|programming languages]] above. |
|
| |
|
| If you suspect multicast DNS (mDNS) may be the problem, you can: | | ===Run Phidget Network Server on Boot=== |
| * Try compiling the network service with mDNSResponder, as described in [[#Installing the Network Service|Installing the Network Service]], or
| | If you would like the Network Server to run automatically when your computer boots, take a look at [{{SERVER}}/?view=articles&article=Daemon1 this project]. |
| * Try compiling the network service completely without mDNS, as described in [[#Setting Up the Network Service|Setting Up the Network Service]]
| |
|
| |
|
| ==Advanced Uses==
| |
|
| |
|
| | ==Advanced Information== |
| ===Setting udev Rules=== | | ===Setting udev Rules=== |
| | | If you don't want to be using ''sudo'' to run Phidget programs (including the Network Server) forever, you will want to create a udev rule to allow yourself access to the Phidget when you are not root. |
| If you don't want to be using {{Code|sudo}} to run Phidget programs (including the Network Service) forever, you will want to create a {{Code|udev}} rule to allow yourself access to the Phidget when you are not root. | |
|
| |
|
| Udev has an easy way to set the owner and permissions of the USB interface of the Phidget - it finds all devices that match a given set of rules, and applies new traits to them. But you need to give udev something to match in order to apply the new settings. Here, we will tell udev to match the vendor code for Phidgets, Inc. | | Udev has an easy way to set the owner and permissions of the USB interface of the Phidget - it finds all devices that match a given set of rules, and applies new traits to them. But you need to give udev something to match in order to apply the new settings. Here, we will tell udev to match the vendor code for Phidgets, Inc. |
| Line 305: |
Line 197: |
| We recommend that you use the rules file included in the library download you have already installed. Check the README file included in that download for information on how exactly to install it, or continue reading here. | | We recommend that you use the rules file included in the library download you have already installed. Check the README file included in that download for information on how exactly to install it, or continue reading here. |
|
| |
|
| The rules for udev are kept in files in {{Code|/etc/udev/rules.d/}} and are traditionally grouped into order of running (10 runs before 20, 30, etc) and device type (cd, network, etc). There should be one or more files in there already. Simply find the file named {{Code|99-libphidget22.rules}} included with our library files, and move it into {{Code|/etc/udev/rules.d/}}. | | The rules for udev are kept in files in ''/etc/udev/rules.d'' and are traditionally grouped into order of running (10 runs before 20, 30, etc) and device type (cd, network, etc). There should be one or more files in there already. Simply find the file named ''99-libphidget22.rules'' included with our library files, and move it into ''/etc/udev/rules.d''. |
| | |
| Strictly speaking, the files run in lexical order (i.e. the order they're listed when you use {{Code|ls}}). A device can match many rules, and all will apply (if possible). If conflicting rules are found, the first rule found is followed.
| |
| | |
| ===Starting the Network Service at Boot===
| |
| | |
| If you are tired of starting the network service on the command line all the time, you can have the network service start when your system starts, every time.
| |
| | |
| ====User Space====
| |
| | |
| If you are running a standard Linux machine with an X-server (Unity, KDE) the easiest way to do this is to have the Phidget Network Service start when your x server starts.
| |
| | |
| In this case, the network service will be running in user space, so your [[#Setting udev Rules|udev rules need to be set up]] for the your user permissions to be able to access the USB ports using libusb.
| |
| | |
| Within the X-windowing system, there is usually some sort of {{Code|System → Settings/Preferences → Startup}} that you can choose to add programs that start when a user session starts. On Ubuntu you can use Unity to find programs listing "startup" in their names to accomplish the same thing. This will eventually lead you to a window like this one:
| |
| | |
| [[Image:linux_ws_boot.png|400px|link=]]
| |
| | |
| Simply add the {{Code|/usr/bin/phidget22networkserver}} program to the list.
| |
| | |
| ====As A Service====
| |
| | |
| You would want to set the boot start of {{Code|phidgetnetworkservice21}} to be a service if you are running a server, or a headless machine. It is handy any time you need the network service to be started as a booted, respawning service with a presence in different run levels and for all users.
| |
| | |
| A service is essentially a program that hangs out in the background, waiting to be used by some incoming task. When the service is needed, the service forks a program to handle that need. Most services that run on your Linux computer already have the ability to fork themselves.
| |
| | |
| The network service, however, is just a binary on Linux - {{Code|phidgetnetworkservice21}} - and so we need a program that handles the forking for us. For this, we use the {{Code|start-stop-daemon}} program to spawn a standalone process for us, or kill it, based on our service-like start, stop, and restart commands.
| |
| | |
| To do this, we need:
| |
| # A script that tells the boot process how to start and handle the networkservice (i.e. by using {{Code|start-stop-daemon}})
| |
| # A link from that script to the boot list
| |
| # An initialization file for the script
| |
| | |
| First, the script. We will walk through Debian here, both because it is such a common distribution and because it is the distribution that our [{{SERVER}}products.php?product_id=1073 Single Board Computer] runs. But {{Code|init}} is surprisingly diverse on Linux, including everything from a different boot order, to different initialization programs and structure, and even different runlevels.
| |
| | |
| On Debian (including Ubuntu), the initialization script covers:
| |
| * Runlevels that the service should be present on
| |
| * Dependencies of the service
| |
| * Name of the service and other informative data
| |
| * The location of the PIDFILE, which stores the process ID (pid) for later dealing with a spawned instance
| |
| * Any configuration file locations
| |
| * What to do when the service is given instructions to '''start''', '''stop''', or '''reload'''.
| |
| | |
| The Debian script we use to start the network service on the [{{SERVER}}products.php?product_id=1073 Single Board Computer]:
| |
| | |
| <div class="source">
| |
| <syntaxhighlight line start="1" lang=bash>
| |
| | |
| #!/bin/sh
| |
| | |
| ### BEGIN INIT INFO
| |
| # Provides: phidgetnetworkservice
| |
| # Required-Start: $network $remote_fs
| |
| # Required-Stop: $network $remote_fs
| |
| # Should-Start: avahi
| |
| # Should-Stop: avahi
| |
| # Default-Start: 2 3 4 5
| |
| # Default-Stop: 0 1 6
| |
| # Short-Description: Phidget Network Service
| |
| # Description: Phidget Network Service for controlling Phidgets over the network.
| |
| ### END INIT INFO
| |
| | |
| DESC="Phidget Network Service"
| |
| NAME=phidgetnetworkservice
| |
| BIN=phidgetnetworkservice21
| |
| DAEMON=/usr/bin/$BIN
| |
| PIDFILE=/var/run/$NAME.pid
| |
| CFG=/etc/default/$NAME
| |
| | |
| # Gracefully exit if the package has been removed.
| |
| test -x $DAEMON || exit 0
| |
| | |
| # load config
| |
| pws_port="5001"
| |
| pws_serverid=""
| |
| pws_password=""
| |
| [ -f $CFG ] && . $CFG
| |
| | |
| start() {
| |
| [ -z "$pws_port" ] || OPTIONS="-p $pws_port "
| |
| [ -z "$pws_password" ] || OPTIONS="$OPTIONS-P $pws_password "
| |
| | |
| if [ -z "$pws_serverid" ]; then
| |
| OPTIONS="$OPTIONS -n $( hostname )"
| |
| else
| |
| OPTIONS="$OPTIONS -n $pws_serverid"
| |
| fi
| |
|
| |
| echo -n "Starting $DESC: "
| |
| start-stop-daemon -S -b -q -p $PIDFILE -m -x $DAEMON -- $OPTIONS && echo "OK" || echo "ALREADY RUNNING"
| |
| }
| |
| | |
| stop() {
| |
| echo -n "Stopping $DESC: "
| |
| start-stop-daemon -K -q -p $PIDFILE -x $DAEMON && echo "OK" || echo "NOT RUNNING"
| |
| }
| |
| | |
| case "$1" in
| |
| start)
| |
| start
| |
| ;;
| |
| stop)
| |
| stop
| |
| ;;
| |
| restart|force-reload)
| |
| stop
| |
| sleep 1
| |
| start
| |
| ;;
| |
| *)
| |
| echo "Usage: $0 {start|stop|restart}"
| |
| esac
| |
| | |
| exit 0
| |
| </syntaxhighlight>
| |
| </div>
| |
| | |
| | |
| Save the script into a file called {{Code|phidgetnetworkservice}}, and use {{Code|chmod 755}} to make it executable.
| |
| | |
| Also on Debian, startup service scripts should go in {{Code|/etc/init.d}}, and then put within the appropriate runlevel-numbered folder - by symbolic link. There is a handy tool to do this for you, called {{Code|insserv}}:
| |
| | |
| <div class="source">
| |
| <syntaxhighlight lang=bash>
| |
| sudo insserv -d phidgetnetworkservice
| |
| </syntaxhighlight>
| |
| </div>
| |
| | |
| | |
| The {{Code|insserv}} program is the program that makes use of the {{Code|### BEGIN INIT INFO...### END INIT INFO}} that appears at the top of the {{Code|phidgetnetworkservice}} script. Use {{Code|man insserv}} for more information. The {{Code|insserv}} tool handles the mess of finding the right runlevel folders (i.e. the {{Code|rc.d}} numbered folders) and making the appropriate links. You can see what links would be updated by running {{Code|insserv}} with the {{Code|-n}} option, for a dry run.
| |
| | |
| '''Note:''' When you run {{Code|insserv}}, all of the dependencies for the boot order are re-written. This means that all of the initialization scripts in {{Code|/etc/init.d}} are re-examined. So, you'll probably get a lot of output when you run the command.
| |
| | |
| Then, you can check that {{Code|phidgetnetworkservice}} is on the service list with:
| |
| | |
| <div class="source">
| |
| <syntaxhighlight lang=bash>
| |
| service --status-all
| |
| </syntaxhighlight>
| |
| </div>
| |
| | |
| | |
| And you can start it right now without rebooting like this:
| |
| | |
| [[Image:linux_system_service_start.png|link=]]
| |
| | |
| The {{Code|service}} command has many options to start and stop services like the phidgetnetworkservice, try {{Code|man service}} for more information.
| |
| | |
| At this point, you can follow the client instructions on [[#Using the Network Service|using the network service]] to create a loopback test for the new network service that should now be running.
| |
| | |
| The final piece, for future configuration changes, is that the {{Code|/etc/init.d}} script looks for the file {{Code|/etc/default/phidgetnetwork service}} upon starting up. The file is expected to contain the port, server ID, and password for the server side of the network service. These are also set in the {{Code|phidgetnetworkservice}} script in {{Code|init.d}}, as you can see from reading the code above, but if you want to change them a lot, you can edit the configuration file rather than changing the {{Code|phidgetnetworkservice}} script and re-installing by {{Code|insserv}} every time. The configuration file in {{Code|/etc/default/}} should contain the same syntax as that used in the script source above:
| |
| | |
| <div class="source">
| |
| <syntaxhighlight lang=bash>
| |
| pws_port="5001"
| |
| pws_serverid=""
| |
| pws_password=""
| |
| </syntaxhighlight>
| |
| </div>
| |
| | |
| ===Cross-Compiling with a Custom Toolchain===
| |
| | |
| This would allow you to have the Phidget libraries compiled to include in code for an embedded device. When developing for an embedded device, you will often write code for it on your 'normal' computer, and then build the code to binary with a different target than the processor in your computer. Many microcontrollers do not have the ability to run a full operating system, and hence cannot compile code natively.
| |
| | |
| The collection of tools used to create binary code for a separate system is called a ''toolchain''. Compiling the Phidget libraries specifically for an embedded system, and placing them into the path for writing code on top of the libraries is like adding another link in this chain.
| |
| | |
| You can use the typical {{Code|./configure}} setup for custom build targets:
| |
| | |
| <div class="source">
| |
| <syntaxhighlight lang=bash>
| |
| ./configure --prefix=toolchain_location --build=this_system --host=target_system
| |
| </syntaxhighlight>
| |
| </div>
| |
| | |
| For the Phidget libraries, the {{Code|./configure}} tool works this way as well. You'd use this in the [[#Installing|install the libraries section]] setup. For example, let's say you're building the libraries to develop code for the [{{SERVER}}products.php?product_id=1073 Single Board Computer] as a target. Your system is a standard Linux system (i686-pc-linux-gnu) and the target system for the SBC is {{Code|arm-linux-gnueabi}}. For this target, you'll need the base of the GNU embedded Debian chain:
| |
| | |
| <div class="source">
| |
| <syntaxhighlight lang=bash>
| |
| sudo apt-get install gcc-arm-linux-gnueabi
| |
| </syntaxhighlight>
| |
| </div>
| |
| | |
| Then, download the Phidget libraries [[#Quick Downloads|above]] and unpack them into a folder {{Code|phidget_libraries}}. If {{Code|/usr/arm-linux-gnueabi}} is the location of your ARM toolchain (downloaded above in {{Code|gcc-arm-linux-gnueabi}}), type:
| |
| | |
| <div class="source">
| |
| <syntaxhighlight lang=bash>
| |
| ~/phidget_libraries $> ./configure --prefix=/usr/arm-linux-gnueabi --build=i686-pc-linux-gnu --host=arm-linux-gnueabi
| |
| </syntaxhighlight>
| |
| </div>
| |
| | |
| ===Linux on Non-Standard Systems===
| |
| | |
| We occasionally get requests to use Phidgets on Linux systems other than a standard laptop or desktop. One example is the Raspberry Pi system. Often these systems include USB ports, so the combination makes sense.
| |
| | |
| Our libraries are installed by building from source, and their main dependency is the {{Code|libusb-1.0-0-dev}} library, so if you can get gcc on your machine (or set up a cross compiler for it) and you can also install the libusb-1.0 development headers, you can probably get Phidgets to work. Of course, we don't offer much support for these systems, so - depending on your system - expect to spend some raw time getting it up and going.
| |
| | |
| If you're new to the embedded computer thing, keep in mind that for these super basic systems, once you've gotten a power supply, and storage, and put the kernel you want on it, and then spent a couple of days of time getting things working, and more time getting your drivers going, costs add up pretty quickly. If you want a compact system that works right out of the box (and which can use all of our analog sensors in addition to our USB Phidgets), check out our [{{SERVER}}products.php?product_id=1073 Single Board Computer]. Our SBC3:
| |
| * Has many more USB ports than super-stripped devices, and also has digital and analog ports
| |
| * Includes a power supply and can run on batteries easily
| |
| * Has a nice amount of RAM, a decent embedded processor, and built-in onboard storage (we've run R, GRASS, and X11 on it)
| |
| * Includes installed Debian, working Phidget drivers, and [[Phidget Network Service|networked Phidget drivers]] from the moment it ships
| |
| * Has access to the full Debian repository including Python, Mono .NET, Ruby, and gcc
| |
| * Has a kernel development kit with patch file and instructions for adding new drivers (bluetooth, wireless, and so on)
| |
| * Comes with very in-depth documentation and technical support by phone and email
| |
| * Etc, etc.
| |
| The [[Phidget Network Service|networked support]] in particular allows it to work with your cell phone and more.
| |
| | |
| But if you really do want a raw hobbyist system to tinker with, go for it! We're all nerds here - we've been there too and we certainly understand!
| |
| | |
| ==Common Problems and Solutions==
| |
| | |
| {{ProblemSolution|Low Speed Phidgets (Max of 8)|Linux will only schedule one low-speed interrupt transfer per millisecond.}}
| |
| | |
| You can find out the type of your Phidget by attaching it and then running <code><font size=3>dmesg | tail</font></code>, which will display the type of Phidget from your kernel logs, as described above in the [[#Hardware|hardware section]]. The practical consequence of this is if your system has many low speed Phidgets attached, they will each be throttled down. Low speed Phidgets require an interrupt transfer as often as every 8 milliseconds. A Linux system could only have up to 8 of these Phidgets attached.
| |
| | |
| {{ProblemSolution|Sample Overrun Error|The data read from a program, or the first packet on the Network Service, can give a sample overrun error (EEPHIDGET_OVERRUN).}}
| |
| | |
| Linux only polls data from the analog inputs on Phidgets when you ask it to. So there is some delay between when you open the device and when it actually attaches when data from those inputs are accumulating...and overrunning the buffer. This is simply in the nature of how Linux polls USB - we recommend catching (but ignoring) this one-time initial error.
| |
| | |
| {{ProblemSolution|Raspberry Pi USB Current|Your device doesn't seem to run as expected on a Raspberry Pi.}}
| |
|
| |
|
| The USB ports on the standard Raspberry Pi are only capable of supplying around 100mA reliably. Since USB specification dictates 500mA of current maximum, many USB devices require several hundred mA to run smoothly. Since the Pi cannot supply this much current it is common to see buggy performance or complete failure to run at all. The get around this you should use a USB hub connected to the Pi that has it's own external power supply. This will allow the devices connected to have as much power as they require.
| | Strictly speaking, the files run in lexical order (i.e. the order they're listed when you use the ''ls'' command). A device can match many rules, and all will apply (if possible). If conflicting rules are found, the first rule found is followed. |
Quick Downloads
Already know what you're doing? Here you go:
If you need older versions of the Phidget22 Linux libraries, click here.
If you need Phidget21 Linux Libraries, click here.
Getting Started with Linux
Welcome to using Phidgets with Linux. If you are ready to go, the first step in creating Linux applications with Phidgets is installing our libraries!
Install
If your Linux machine is running 32-bit Debian, jump ahead to Debian install.
Generic Install
To install our libraries, first install libusb-1.0 development libraries. The exact command and package name will vary depending on distribution. For Debian based distributions, including Ubuntu and Mint, the command would be:
apt-get install libusb-1.0-0-dev
Next, download and unpack the following files:
Open the README file that is included at the top of each directory. This file will give you important information about how to properly install the files.
Libraries are installed in /usr/local/lib by default. If you run into trouble finding the libraries during linking or at runtime, this probably means that /usr/local/lib is not on the library path for your distribution.
You can handle this in a number of ways:
Specify a different install folder during compile
./configure --prefix=/usr && make && sudo make install
OR Add /usr/local/lib to the system-wide library path
echo /usr/local/lib >> /etc/ld.so.conf && sudo ldconfig
OR Add /usr/local/lib in your local shell every time
export LD_LIBRARY_PATH=$LD_LIBRARY_PATH:/usr/local/lib
The libraries are now installed on your machine. Next, let's verify that they are working properly. Jump ahead to verifying.
Debian Install
To install our libraries on Debian, first enter the following command in the terminal:
wget -qO- http://www.phidgets.com/gpgkey/pubring.gpg | apt-key add -
Next, enter the following command if you are running Debian stretch:
echo 'deb http://www.phidgets.com/debian stretch main' > /etc/apt/sources.list.d/phidgets.list
If you are running squeeze (Debian 6), wheezy (Debian 7) or jessie (Debian 8) simply replace stretch in the command above with your release. If you are running Ubuntu 16.04, replace stretch with xenial.
Update your package lists:
Finally, install the Phidget package by entering the command below:
apt-get install libphidget22
You may also want to apt-get install the following optional packages:
- libphidget22-dev: The C development libraries for Phidget22
- libphidget22extra: Extra runtime library required for the Network Server and Admin tools
- phidget22networkserver: The Phidget Network Server, which enables use of Phidgets over your network
- libphidget22java: The Java libraries for Phidget22
- phidget22admin: An administrator utility which helps keep track of who is connected to your Phidgets over the network server
- phidget22wwwjs: The JavaScript libraries for Phidget22. This package also installs the HTML examples which can be accessed through the web interface
The libraries are now installed on your machine. Next, let's verify that they are working properly.
Verify
The best way to verify that your libraries are working properly is to compile and run an example program.
First, download and unpack this C example:
Next, open the terminal at the example location. Compile the example by entering the following command:
gcc HelloWorld.c -o HelloWorld -lphidget22
Run the HelloWorld example:
Your terminal should look something like this:
The HelloWorld program will simply communicate when a Phidget has been attached or detached, as can be seen in the image above.
Your Phidget is now able to communicate with your development machine. The next step is selecting a programming language so you can start to write some code!
Programming
Ready to write some code? Select one of the programming languages below:
Great choices for beginners:
Also supported:
Phidget Network Server
The Phidget Network Server is an extremely useful tool that allows you to remotely control Phidgets over your network. If you haven't already, check out the Phidget Network Server page for a complete overview.
Try it Out!
In order to try the Phidget Network Server out, you will need a host computer, and a client computer with the Phidget libraries installed:
- Host computer: the computer that is physically connected to the Phidgets via USB and is running the Phidget Network Server.
- Client computer: a computer running a Phidgets application that accesses Phidgets connected to the host computer.
If you only have one computer, don't worry, your machine can act as both a host and a client.
Next, open the terminal on the host computer and type in the following command to run the Network Server in the terminal:
Or, as a daemon:
phidget22networkserver -D
The Network Server is now running on your machine with the default configuration. If you would like to change the Network Server configuration, you can do so by modifying the following file:
- /etc/phidgets/phidget22networkserver.pc
You can also simply point towards your own configuration file with the following command:
phidget22networkserver -c /path/to/configuration/file
Now that you have the Network Server running on your host computer, the next step will be accessing the Phidgets connected to your host computer from your client computer. Follow the steps below:
Open the terminal on the client computer and type in the following command (if you are using a single machine, simply open a new terminal session and continue):
This will list all of the Phidget Servers on your network. Confirm that you can see the Network Server running on your host computer.
After you have confirmed your Network Server is running, type in the following command:
This command will list all remote Phidgets on the network. Confirm that you can see the Phidgets attached to your host computer:
The next step will be running a program that uses the Network Server, luckily, every programming language we support comes with example code on how to do this! Jump to programming languages above.
Run Phidget Network Server on Boot
If you would like the Network Server to run automatically when your computer boots, take a look at this project.
Advanced Information
Setting udev Rules
If you don't want to be using sudo to run Phidget programs (including the Network Server) forever, you will want to create a udev rule to allow yourself access to the Phidget when you are not root.
Udev has an easy way to set the owner and permissions of the USB interface of the Phidget - it finds all devices that match a given set of rules, and applies new traits to them. But you need to give udev something to match in order to apply the new settings. Here, we will tell udev to match the vendor code for Phidgets, Inc.
We recommend that you use the rules file included in the library download you have already installed. Check the README file included in that download for information on how exactly to install it, or continue reading here.
The rules for udev are kept in files in /etc/udev/rules.d and are traditionally grouped into order of running (10 runs before 20, 30, etc) and device type (cd, network, etc). There should be one or more files in there already. Simply find the file named 99-libphidget22.rules included with our library files, and move it into /etc/udev/rules.d.
Strictly speaking, the files run in lexical order (i.e. the order they're listed when you use the ls command). A device can match many rules, and all will apply (if possible). If conflicting rules are found, the first rule found is followed.