HIN1101 User Guide
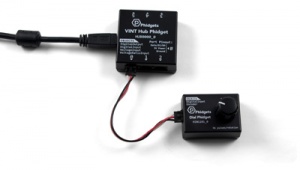
Required Hardware
- A HIN1101 Dial Phidget
- A USB cable
- A computer
- A 3-wire Phidget cable
- A VINT Hub
Connecting the Pieces
- Connect the VINT Hub to your computer with a USB cable.
- Connect the HIN1101 to the VINT Hub using the Phidget Cable.
Testing Using Windows
Phidget Control Panel
In order to demonstrate the functionality of the HIN1101, the Phidget Control Panel running on a Windows machine will be used.
The Phidget Control Panel is available for use on both macOS and Windows machines.
Windows
To open the Phidget Control Panel on Windows, find the ![]() icon in the taskbar. If it is not there, open up the start menu and search for Phidget Control Panel
icon in the taskbar. If it is not there, open up the start menu and search for Phidget Control Panel
macOS
To open the Phidget Control Panel on macOS, open Finder and navigate to the Phidget Control Panel in the Applications list. Double click on the ![]() icon to bring up the Phidget Control Panel.
icon to bring up the Phidget Control Panel.
For more information, take a look at the getting started guide for your operating system:
Linux users can follow the getting started with Linux guide and continue reading here for more information about the HIN1101.
First Look
After plugging the HIN1101 into your computer and opening the Phidget Control Panel, you will see something like this:
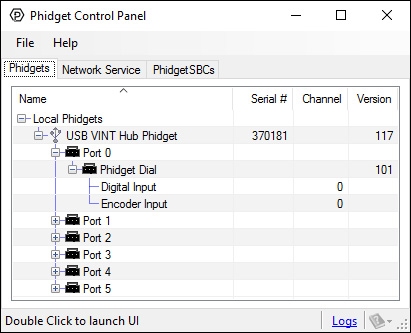
The Phidget Control Panel will list all connected Phidgets and associated objects, as well as the following information:
- Serial number: allows you to differentiate between similar Phidgets.
- Channel: allows you to differentiate between similar objects on a Phidget.
- Version number: corresponds to the firmware version your Phidget is running. If your Phidget is listed in red, your firmware is out of date. Update the firmware by double-clicking the entry.
The Phidget Control Panel can also be used to test your device. Double-clicking on an object will open an example.
Encoder
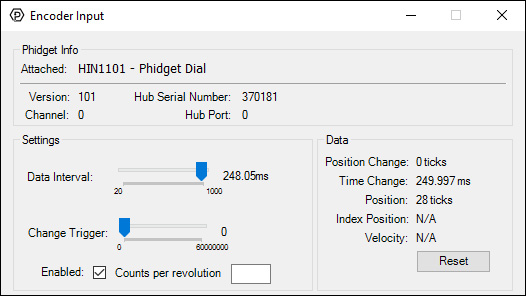
When you double click on an Encoder object, a window like the one pictured will open.
- At the top of the window, information about your device and the properties of this particular channel will be listed.
- On the left, you can enable the input (if applicable) and specify the counts per revolution (CPR) to enable velocity calculation. Press enter after typing a number to enable velocity. You can also adjust the Data Interval and Change Trigger.
- On the right, real-time data is displayed:
- Position Change: The number of ticks (or quadrature cycles) that have occurred since the last change event.
- Time Change: The amount of time in milliseconds that has elapsed since the last change event.
- Position: The total position in ticks relative to where the encoder was when the window was opened.
- Index Position: Not supported by this device.
- Velocity: If a CPR has been specified, the average velocity in rotations per minute.
Digital Input (Button)
Double-click on a Digital Input Button object in order to run the example: [[Image:{{{1}}}_DigitalInput_Example.jpg|center|link=]]
General information about the selected object will be displayed at the top of the window. You can also experiment with the following functionality:
- {{{2}}}
Testing Using Mac OS X
- Go to the Quick Downloads section on the Mac OS X page.
- Download and run the Phidget OS X Installer
- Click on System Preferences >> Phidgets (under Other) to activate the Preference Pane
- Make sure your device is properly attached
- Double click on your device's objects in the listing to open them. The Preference Pane and examples will function very similarly to the ones described above in the Windows section.
Testing Using Linux
For a general step-by-step guide on getting Phidgets running on Linux, see the Linux page.
Using a Remote OS
We recommend testing your Phidget on a desktop OS before moving on to remote OS. Once you've tested your Phidget, you can go to the PhidgetSBC, or iOS pages to learn how to proceed.
What to do Next
- Programming Languages - Find your preferred programming language here and learn how to write your own code with Phidgets!
- Phidget Programming Basics - Once you have set up Phidgets to work with your programming environment, we recommend you read our page on to learn the fundamentals of programming with Phidgets.