Products for USB Sensing and Control


Note: The 1045_1B is identical to the 1045_1, except that you have the option of whether you want to include the USB cable.
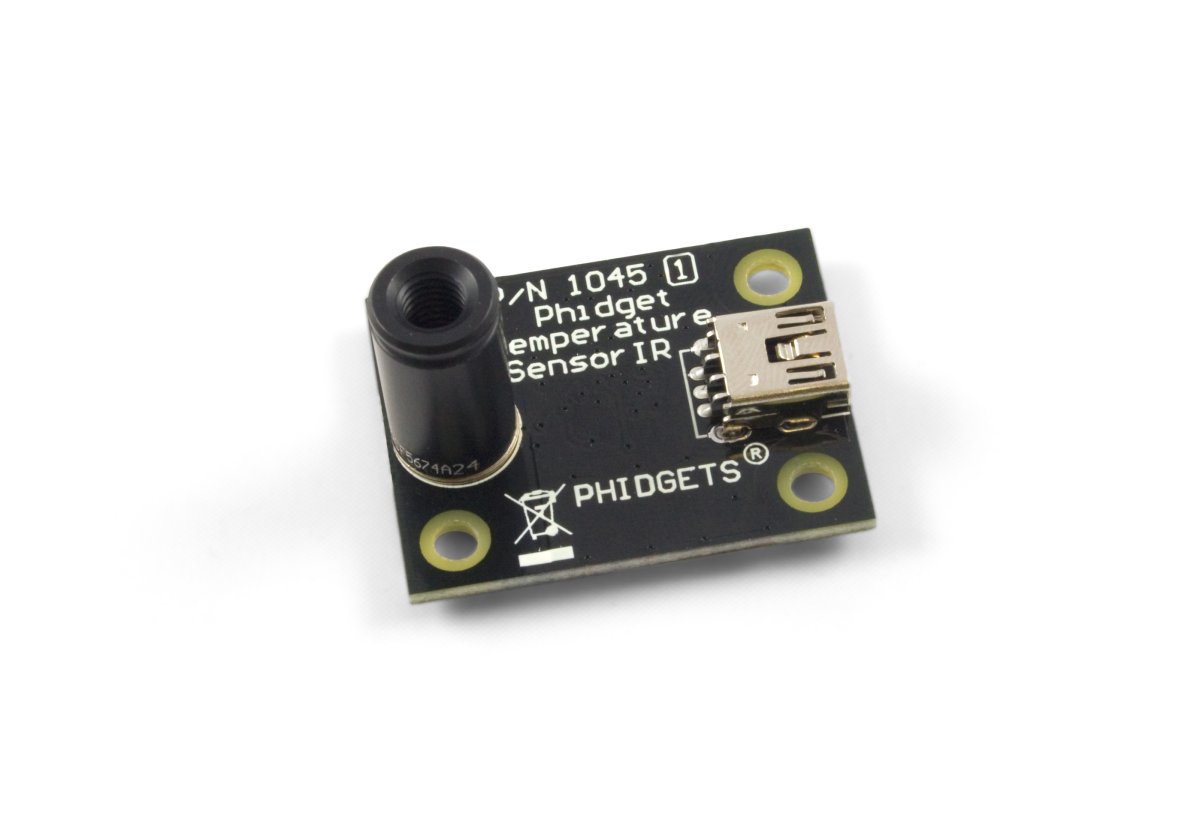
The 1045 is an intelligent non-contact temperature sensor with a 10° field of view and a USB interface for easy connection to your computer. It takes an average of the temperature of objects placed within its cone of detection. It's especially useful for applications where you need to measure the surface temperature of an object without making direct contact, or for detecting the presence of humans or animals.
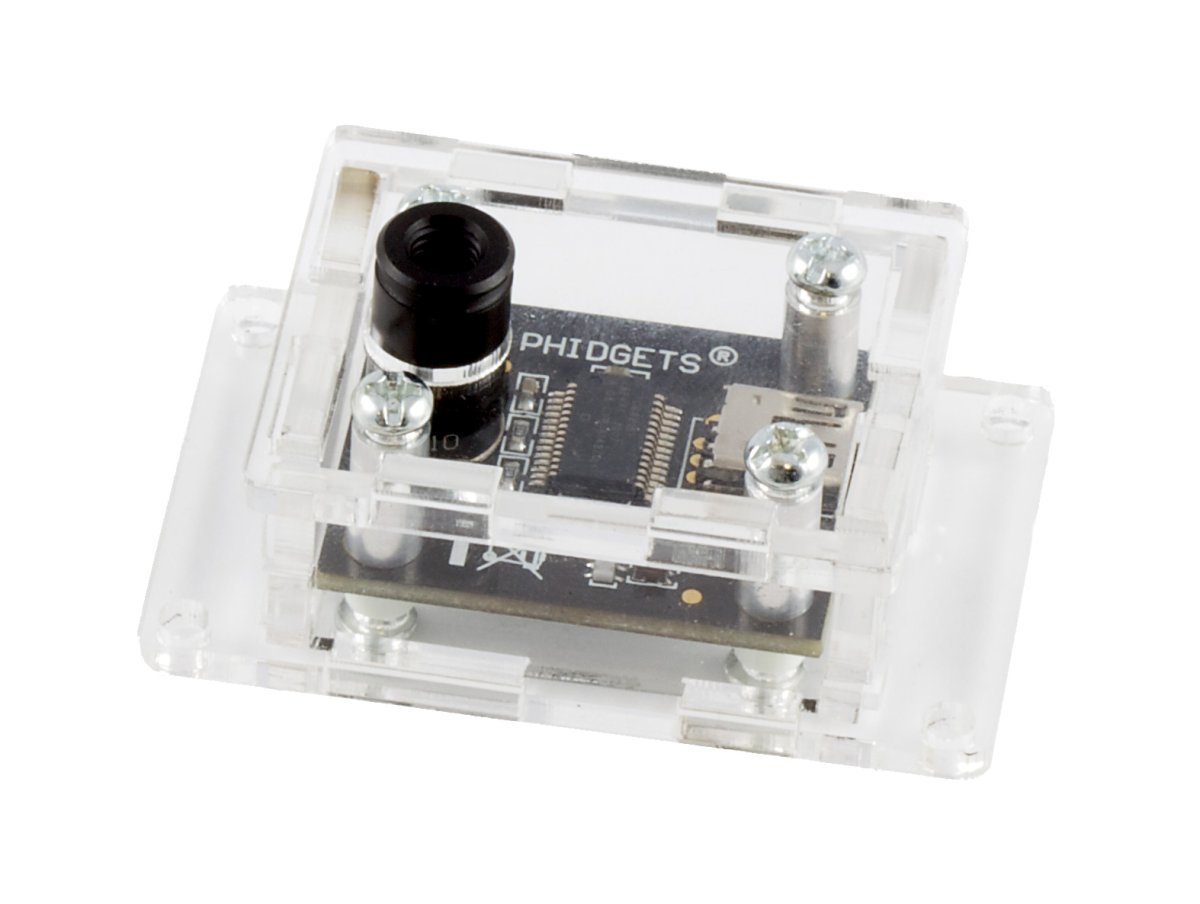
You can protect your board from dust and debris by purchasing an enclosure. An enclosure will also prevent unintentional shorts caused by objects touching the pins on the bottom of the board or any terminal screws.
| Product | Physical Properties | |
|---|---|---|
| Part Number | Price | Material |
 Acrylic Enclosure for the 1045
|
$7.00 | Clear Acrylic |
Use a USB cable to connect this Phidget to your computer. We have a number of different lengths available, although the maximum length of a USB cable is 5 meters due to limitations in the timing protocol. For longer distances, we recommend that you use a Single Board Computer to control the Phidget remotely.
| Product | Physical Properties | |||
|---|---|---|---|---|
| Part Number | Price | Connector A | Connector B | Cable Length |
 USB-A to Mini-B Cable 28cm 24AWG
|
$3.00 | USB Type A | USB Mini-B | 280 mm |
 USB-A to Mini-B Cable 28cm Right Angle
|
$3.50 | USB Type A | USB Mini-B (90 degree) | 280 mm |
 USB-A to Mini-B Cable 60cm 24AWG
|
$3.50 | USB Type A | USB Mini-B | 600 mm |
 USB-C to Mini-B Cable 60cm 28AWG
|
$5.00 | USB Type C | USB Mini-B | 600 mm |
 USB-A to Mini-B Cable 83cm Right Angle
|
$4.50 | USB Type A | USB Mini-B (90 degree) | 830 mm |
 USB-A to Mini-B Cable 120cm 24AWG
|
$4.00 | USB Type A | USB Mini-B | 1.2 m |
 USB-A to Mini-B Cable 180cm 24AWG
|
$4.00 | USB Type A | USB Mini-B | 1.8 m |
 USB-C to Mini-B Cable 180cm 28AWG
|
$6.00 | USB Type C | USB Mini-B | 1.8 m |
 USB-A to Mini-B Cable 450cm 20AWG
|
$12.00 | USB Type A | USB Mini-B | 4.5 m |
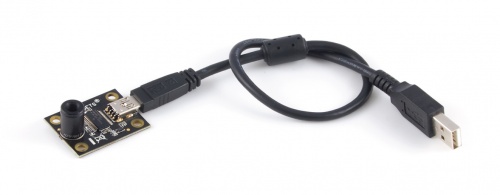
Welcome to the 1045 user guide! In order to get started, make sure you have the following hardware on hand:
Next, you will need to connect the pieces:
Now that you have everything together, let's start using the 1045!
In order to demonstrate the functionality of the 1045, the Phidget Control Panel running on a Windows machine will be used.
The Phidget Control Panel is available for use on both macOS and Windows machines.
To open the Phidget Control Panel on Windows, find the ![]() icon in the taskbar. If it is not there, open up the start menu and search for Phidget Control Panel
icon in the taskbar. If it is not there, open up the start menu and search for Phidget Control Panel
To open the Phidget Control Panel on macOS, open Finder and navigate to the Phidget Control Panel in the Applications list. Double click on the ![]() icon to bring up the Phidget Control Panel.
icon to bring up the Phidget Control Panel.
For more information, take a look at the getting started guide for your operating system:
Linux users can follow the getting started with Linux guide and continue reading here for more information about the 1045.
After plugging the 1045 into your computer and opening the Phidget Control Panel, you will see something like this:
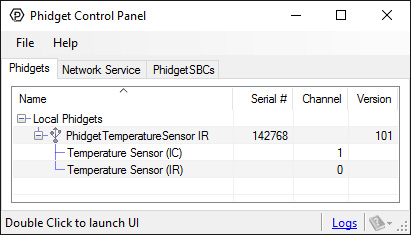
The Phidget Control Panel will list all connected Phidgets and associated objects, as well as the following information:
The Phidget Control Panel can also be used to test your device. Double-clicking on an object will open an example.
Double-click on the Temperature Sensor object, labelled Temperature Sensor (IR), in order to run the example:

General information about the selected object will be displayed at the top of the window. You can also experiment with the following functionality:
Double-click on the Temperature Sensor object , labelled Temperature Sensor (IC), in order to run the example:
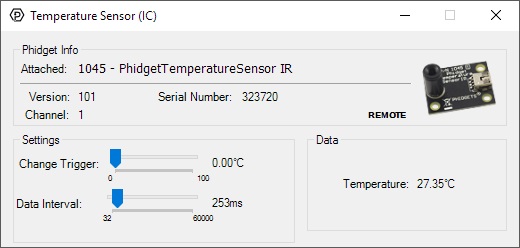
General information about the selected object will be displayed at the top of the window. You can also experiment with the following functionality:
Before you can access the device in your own code, and from our examples, you'll need to take note of the addressing parameters for your Phidget. These will indicate how the Phidget is physically connected to your application. For simplicity, these parameters can be found by clicking the button at the top of the Control Panel example for that Phidget.

In the Addressing Information window, the section above the line displays information you will need to connect to your Phidget from any application. In particular, note the Channel Class field as this will be the API you will need to use with your Phidget, and the type of example you should use to get started with it. The section below the line provides information about the network the Phidget is connected on if it is attached remotely. Keep track of these parameters moving forward, as you will need them once you start running our examples or your own code.

You are now ready to start writing your own code for the device. The best way to do that is to start from our Code Samples.
Select your programming language of choice from the drop-down list to get an example for your device. You can use the options provided to further customize the example to best suit your needs.
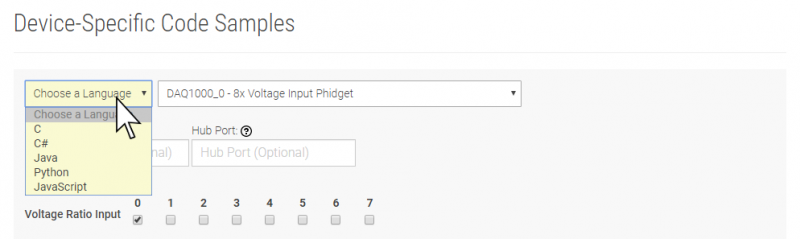
Once you have your example, you will need to follow the instructions on the page for your programming language to get it running. To find these instructions, select your programming language from the Programming Languages page.
The 1045 is factory calibrated in wide temperature ranges: -40°C to 125°C for the ambient temperature and -70°C to 382.2°C for the object temperature.
To get an accurate reading, it is important that the object being measured occupies the sensor's full field of view of the sensor while not making physical contact with the sensor. Since an infrared sensor measures temperature based on what the object is emitting, there is theoretically no limit to the range of such a sensor, except that the further away from the sensor the object is, the larger the area of detection is. If the object being measured doesn't occupy the full area, the emissions of other objects could reduce the accuracy of the reading. In addition, the temperature of the object and of the environment also affect the overall accuracy. The highest degree of accuracy is ±0.5°C when both the ambient temperature and the object temperature are between 0°C and 50°C. As either temperature changes, the accuracy can decrease to up to ±4°C.
The measured value is the average temperature of all objects in the sensor's 10° field of view.
It is very important to understand that the specifications are only guaranteed and achievable when the sensor is in thermal equilibrium and under isothermal conditions (i.e. there are no temperature differences across the sensor package board). The accuracy of the 1045 can be influenced by temperature differences in the board. These differences can be caused by the following:
The 1045 assumes that the ambient temperature has settled to a constant temperature. If the surrounding temperature is constantly changing, or if there is a difference of temperature across the sensor package, additional infrared radiation will be sensed which can result in temperature errors outside of the calibrated errors.
In order to measure temperature using infrared radiation, it is absolutely essential to know the emissivity of the surface being measured. Emissivity is a measure of how effective a surface is at radiating energy. An emissivity of 1 is the most effective radiator - for a given temperature, it will radiate the most heat. The 1045 assumes that the surface being measured has an emissivity of 1. If the 1045 is used to measure a surface with an emissivity of 0.5, the measured temperature will be 50% of the difference in temperature between the board and object.
A few examples of some materials with a large difference in emissivity are aluminum, with a typical value of 0.18, and plastics, which can have a value ranging from 0.85 to 0.95. The visible colour of the object does not necessarily mean it has a higher emissivity value. A heavily oxidized aluminum object has an emissivity value of around 0.3, even though it looks very dark. The closer the value is to 1, the better the object is at emitting radiation.
The 1045 is calibrated for an object emissivity of 1.
For an arbitrary emissivity, the measured temperature can be converted to the surface temperature using this formula:
Surface Temperature = (Sensor Temperature - Ambient Temperature) * Emissivity + Ambient Temperature
A good resource of emissivity values of different materials can be found on here.
Emissivity is a complicated topic, as it can vary depending on the temperature of the material. For precise measurements, you may have to calculate the emissivity of your material by comparing the reported Sensor Temperature to the actual surface temperature measured with a contact thermocouple.
IR measurements are true surface temperature measurements. For example, when measuring the temperature of a person, the actual temperature measured by an IR thermometer will be temperature of the clothing and not the skin temperature. Emissivity of the clothes is another issue that has to be considered.
The Temperature Sensor also contains a built-in optical filter to cut off the visible spectra and increase immunity against errors introduced by any surrounding light sources.
The wavelength pass band of this optical filter is from 5.5μm to 14μm.
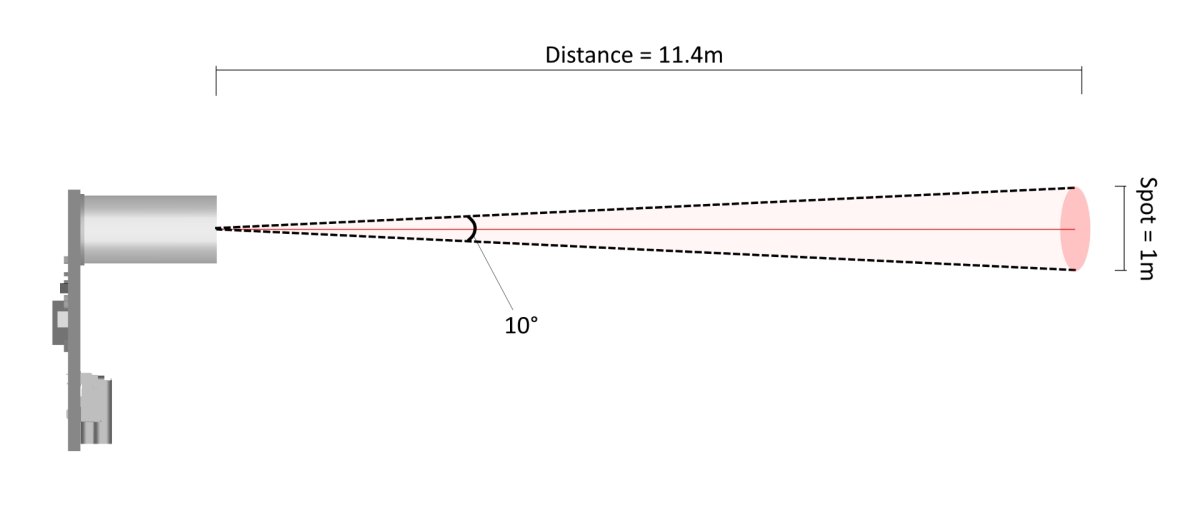
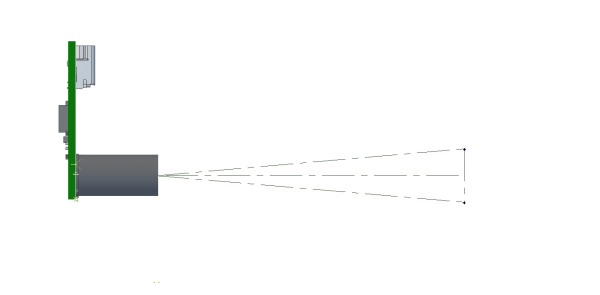
In order to determine the maximum distance the 1045 can be effective at we first need to understand how the sensor measures temperature. The 1045 takes in IR radiation in a conical pattern from directly in front of the black canister mounted on the board. The field of view (FOV) of the device is rated at 10°, to illustrate:
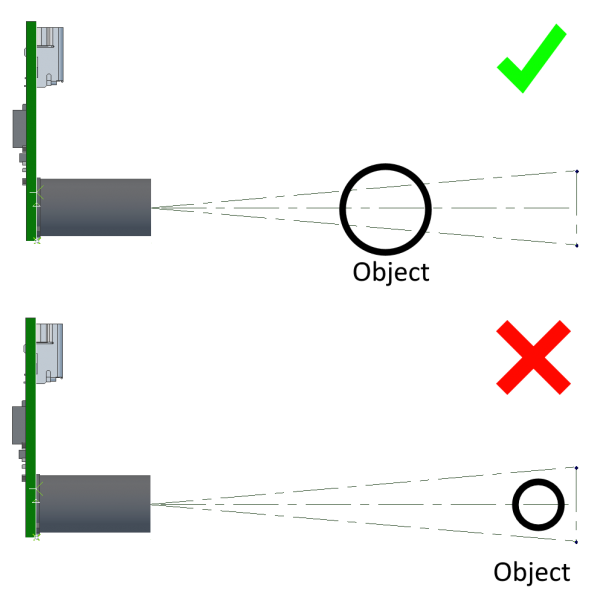
The 1045 measures temperature by averaging the temperature of all points inside it's FOV. This means that if the surface you are trying to measure the temperature of doesn't occupy the entire FOV, the average will be thrown off by the temperature of the surrounding surfaces. Ideally then the surface you are measuring should be close enough to cover the entire 10° arc:
This means that the theoretical maximum distance you can get accurate readings from is the distance at which a circle that is the base of a 10° cone has a radius equal to the surface being measured:
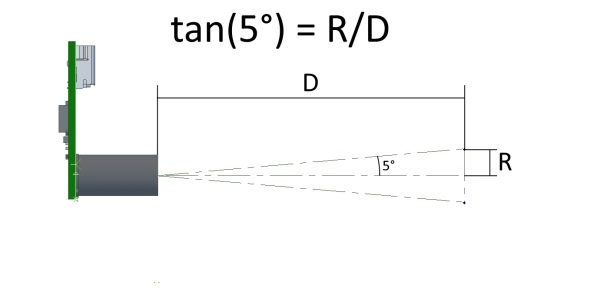
Note that this means that you can measure the temperature of objects from any distance provided the object is of sufficient size. This is a bit counter-intuitive but true. You could measure the temperature of the sun from 7.9 million kilometers away though the data would admittedly be about 26 seconds old.
| Board Properties | |
|---|---|
| Controlled By | USB (Mini-USB) |
| API Object Name | TemperatureSensor |
| Sensor Properties | |
| API Object Name | TemperatureSensor |
| Sensor Type | Temperature (Infrared) |
| Temperature Sensor | |
| Field of View | 10° |
| Temperature Error Typical (At 25°C) | ± 0.5 °C |
| Ambient Temperature Min | 0 °C |
| Ambient Temperature Max | 70 °C |
| Ambient Temperature Resolution | 0.02 °C |
| Ambient Temperature Error Max | ± 4 °C |
| Object Temperature Min | -70 °C |
| Object Temperature Max | 380 °C |
| Object Temperature Resolution | 0.02 °C |
| Object Temperature Error Max | ± 4 °C |
| Update Rate | 31.3 samples/s |
| Assumed Object Emissivity | 1 |
| Electrical Properties | |
| Current Consumption Max | 27 mA |
| USB Voltage Min | 4.8 V DC |
| USB Voltage Max | 5.3 V DC |
| USB Speed | Full Speed |
| Physical Properties | |
| Operating Temperature Min | 0 °C |
| Operating Temperature Max | 70 °C |
| Customs Information | |
| Canadian HS Export Code | 8471.80.00 |
| American HTS Import Code | 8471.80.40.00 |
| Country of Origin | CN (China) |
| Date | Board Revision | Device Version | Packaging Revision | Comment |
|---|---|---|---|---|
| February 2011 | 0 | 100 | Product Release | |
| May 2011 | 0 | 101 | getLabelString fix for lables > 7 characters | |
| September 2012 | 1 | 101 | ICs put on reverse side to reduce error from self-heating | |
| January 2018 | 1 | 101 | B | Removed USB cable from packaging |
| Channel Name | API | Channel |
|---|---|---|
| Temperature Sensor (IR) | TemperatureSensor | 0 |
| Temperature Sensor (IC) | TemperatureSensor | 1 |
| API | Detail | Language | OS | |
|---|---|---|---|---|
| TemperatureSensor | Visual Studio GUI | C# | Windows | Download |
| TemperatureSensor | JavaScript | Browser | Download | |
| TemperatureSensor | Objective-C | macOS | Download | |
| TemperatureSensor | Swift | macOS | Download | |
| TemperatureSensor | Swift | iOS | Download | |
| TemperatureSensor | Visual Basic .NET | Windows | Download | |
| TemperatureSensor | Max/MSP | Multiple | Download |