|
Notice: This page contains information for the legacy Phidget21 Library. Phidget21 is out of support. Bugfixes may be considered on a case by case basis. Phidget21 does not support VINT Phidgets, or new USB Phidgets released after 2020. We maintain a selection of legacy devices for sale that are supported in Phidget21. We recommend that new projects be developed against the Phidget22 Library.
|
Language - Visual Basic for Applications: Difference between revisions
| (11 intermediate revisions by 3 users not shown) | |||
| Line 1: | Line 1: | ||
[[Category:Language]] | [[Category:Language]] | ||
{{OSLang|[[File:Icon-Visual Basic for Applications.png|64x64px|alt=|link=]]|'''Visual Basic for Applications''' ('''VBA''') is an implementation of [http://msdn.microsoft.com/en-ca/office Microsoft]'s event-driven programming language [[Language_-_Visual_Basic_6.0|Visual Basic 6.0]] and its associated integrated development environment (IDE), which are built into most [http://office.microsoft.com Microsoft Office] applications.}} | {{OSLang|[[File:Icon-Visual Basic for Applications.png|64x64px|alt=|link=]]|'''Visual Basic for Applications''' ('''VBA''') is an implementation of [http://msdn.microsoft.com/en-ca/office Microsoft]'s event-driven programming language [[Language_-_Visual_Basic_6.0|Visual Basic 6.0]] and its associated integrated development environment (IDE), which are built into most [http://office.microsoft.com Microsoft Office] applications.}} | ||
==Introduction== | |||
{{LanguageSupport|Visual Basic for Applications|the complete Phidget API, including events|Accelerometer (not Spatial), Encoder, InterfaceKit, RFID, TemperatureSensor and Servo.|Microsoft Office on Windows|}} | |||
== | ==Quick Downloads== | ||
{{QuickDownloads|Visual Basic for Applications| | |||
{{APIQuickDownloads|{{SERVER}}/documentation/COM_API_Manual.pdf .COM}}| | |||
''Note: Example code is programmed to run in Microsoft Excel.'' | |||
{{ExampleQuickDownloads|{{SERVER}}/downloads/phidget21/examples/com/VBA.zip|}}| | |||
{{WindowsQuickDownloads}}}} | |||
==Getting Started with Visual Basic for Applications (VBA)== | |||
If you are new to writing code for Phidgets, we recommend starting by running, then modifying existing examples. This will allow you to: | |||
{{ExampleCodeReasons}} | |||
Support for VBA is only on [[#Windows(2000/XP/Vista/7)|Windows 2000 / XP / Vista / 7]]. | |||
==Windows (XP/Vista/7/8)== | |||
For a description of the Phidget library files, please see the main [[OS - Windows|Windows page]]. | |||
The Phidget examples were written using Microsoft Excel 2000 and this tutorial assumes its use. Other environments such as Microsoft Office should work provided they support VBA, and each would be set up in a similar manner. | |||
===Use Our Examples=== | |||
First, open the command prompt in administrator mode and type the following command: | |||
<code> | |||
regsvr32 "C:\Progarm Files\Phidgets\Phidget21COM.dll" | |||
</code> | |||
If you installed the Phidgets libraries in a different location, you'll have to modify the command. | |||
Then, download and unpack the [{{SERVER}}/downloads/phidget21/examples/com/VBA.zip VBA Examples]. Here you will find an example called HelloWorld which is a simple, high-level example which will work with any Phidget device. You will also find specific, in-depth examples for some of our other devices. {{FindYourDevice}} | |||
The easiest example to start with is the HelloWorld example. Find it in the unpacked examples folder: | |||
[[Image:Vba openexample.png|border|link=|alt=]] | |||
And then double click on it to open it in Excel. It contains Macros, so you may get a message that you can't run the program without changing your security settings. The settings can be found in Office XP under Tools → Options → Security (tab). Then you can set the security level to Medium so you can choose to run the Phidget Examples: | |||
[[Image:Vba_setsecurity.png|link=|alt=]] | |||
This will bring up the example itself. Hello and goodbye messages are printed to the screen as Phidgets are plugged in (attached) and unplugged (detached). Here, we plugged a Phidget Interface Kit in: | |||
[[Image:Vba_runhelloworld.png|link=|alt=]] | |||
===Write Your Own Code=== | |||
To begin, launch Excel with a new workbook for our project. Launch the VBA editor (Tools | Macro | Visual Basic Editor) and open “ThisWorkbook” in the navigator. | |||
Before you can use the Phidget, you must include the library in your project. | Before you can use the Phidget in your code, you must include the library in your project. This can be accomplished from the references screen (Tools | References...) by checking the box beside “Phidget Library 2.1”, or by browsing to the location the framework was installed and choosing the Phidget21COM.dll. | ||
This can be accomplished from the references screen (Tools | References...) by checking the box beside “Phidget Library 2.1”, or by browsing to the location the framework was installed and choosing the Phidget21COM.dll. | |||
Afterwards, the Phidget object will need to be declared and then initialized inside the workbook | Afterwards, the Phidget object will need to be declared and then initialized inside the new workbook (“ThisWorkbook”). For example, we can declare and create a PhidgetInterfaceKit at the top of the code with: | ||
For example, we can declare and create a PhidgetInterfaceKit at the top of the code with: | |||
<div class="source"><syntaxhighlight lang=vb> | <div class="source"><syntaxhighlight lang=vb> | ||
Public WithEvents phid As PhidgetInterfaceKit | Public WithEvents phid As PhidgetInterfaceKit | ||
Private Sub Workbook_Open() | Private Sub Workbook_Open() | ||
Set phid = New PhidgetInterfaceKit | Set phid = New PhidgetInterfaceKit | ||
End Sub | End Sub | ||
</syntaxhighlight></div> | |||
The object name for any type of Phidget is listed in the API manual. Each Phidget (Spatial, Temperature Sensor, Motor Controller, Interface Kit) has a different software object named similarly to its own name. If you are not sure what the software object for your device is, find your Phidget on our [{{SERVER}} webpage], and then check the API documentation for it. Every type of Phidget also inherits functionality from the Phidget base class. | |||
You can now play around with the examples and basic code, and when you are ready to begin writing your project you can go through our instructional section on what [[#Follow The Examples|code is in the examples]]. | |||
==Follow The Examples== | |||
By following the instructions above, you probably now have a working example and want to understand it better so you can change it to do what you want. This teaching section has resources for you to learn from the examples and write your own. | |||
Your main reference for writing VBA code will be our .COM API information, with syntax for all of our functions: | |||
{{UsingAPhidgetInCodeGeneral|both of which are available in VBA|[{{SERVER}}/documentation/COM_API_Manual.pdf .COM API]}} | |||
===Code Snippets=== | |||
Specific calls in VBA will differ in syntax from those on the [[General Phidget Programming]] page, but the concepts stay the same. | |||
It may help to have the [[General Phidget Programming]] page and this section open at the same time, because they parallel each other and you can refer to the .COM/VBA syntax. However, ''many'' additional concepts are covered on the General Phidget Programming page on a high level, such as using multiple Phidgets, handling errors, and different styles of programming. | |||
=== | ====Step One: Initialize and Open==== | ||
Be sure you have set up access to your Phidget in the section [[#Write Your Own Code|Write Your Own Code]]. That section also includes an initialization of the Phidget, i.e. a creation of the variable (phid) that will allow access to our Phidget, in this case an Interface Kit: | |||
<div class="source"><syntaxhighlight lang=vb> | <div class="source"><syntaxhighlight lang=vb> | ||
Public WithEvents phid As PhidgetInterfaceKit | |||
Private Sub Workbook_Open() | |||
Set phid = New PhidgetInterfaceKit | |||
End Sub | |||
</syntaxhighlight></div> | |||
Also within that Sub, we can open the new Phidget variable: | |||
<div class="source"><syntaxhighlight lang=vb> | |||
phid.Open | phid.Open | ||
</syntaxhighlight></div> | </syntaxhighlight></div> | ||
Open will continuously try to connect to a Phidget, based on the parameters given, even trying to reconnect if it gets disconnected. There are many different forms of open - by serial number, or even over a network using the [[Phidget WebService]]. You can check the .COM API manual for all the types of open available and how to use them. | |||
One important thing to remember is that when working with Phidgets, a local connection will reserve the device until closed. This prevents any other instances from retrieving data from the Phidget, including other programs. The one connection per device limit does not apply when exclusively using the Phidget WebService. | |||
====Step Two: Wait for Attachment (plugging in) of the Phidget==== | |||
To use the Phidget, it must be plugged in (attached). This means that simply calling open does not guarantee you can use the Phidget immediately. We can handle this by using event driven programming and tracking the AttachEvents and DetachEvents, or we can handle this by calling waitForAttachment. This function works for any Phidget. WaitForAttachment will block indefinitely until a connection is made to the Phidget, or an optional timeout is exceeded: | |||
<div class="source"><syntaxhighlight lang=vb> | |||
phid.WaitForAttachment(3000) | |||
</syntaxhighlight></div> | </syntaxhighlight></div> | ||
=== | ====Step Three: Do Things with the Phidget==== | ||
We recommend the use of event driven programming when working with Phidgets. In Visual Basic, we hook an event handler with the following code: | We recommend the use of event driven programming when working with Phidgets. In Visual Basic, we hook an event handler with the following code: | ||
<div class="source"><syntaxhighlight lang=vb> | <div class="source"><syntaxhighlight lang=vb> | ||
Private Sub phid_OnSensorChange(ByVal Index As Long, ByVal SensorValue As Long) | Private Sub phid_OnSensorChange(ByVal Index As Long, ByVal SensorValue As Long) | ||
Range("A2").Select | Range("A2").Select | ||
ActiveCell.Offset(Index, 0).Value = SensorValue | ActiveCell.Offset(Index, 0).Value = SensorValue | ||
End Sub | End Sub | ||
</syntaxhighlight></div> | </syntaxhighlight></div> | ||
With this method, the code inside onSensorChange will get executed every time the | With this method, the code inside onSensorChange will get executed every time the - in this case - Interface Kit reports a change on one of its analog inputs. You can let the editor generate the procedure declaration for you through the drop down menu at the top of the code window. | ||
You can let the editor generate the procedure declaration for you through the drop down menu at the top of the code window | |||
Some events such as Attach and Detach belong to the base Phidget object and thus are common to all types of Phidgets. Other events, such as this one to read a sensor change, are specific to the type of Phidget (for example, a Temperature Sensor would have a temperature change event). Please refer to the API manual for a full list of events and their usage. | |||
Some values can be directly read and set on the Phidget, and inside polling loops used as an alternative to event driven programming. | Some values can be directly read and set on the Phidget, and inside polling loops used as an alternative to event driven programming. Simply use the instance properties such as SensorValue(Index as Long) or OutputState(Index as Long) for Interface Kits: | ||
Simply use the instance properties such as SensorValue(Index as Long) or OutputState(Index as Long) for | |||
<div class="source"><syntaxhighlight lang=vb> | <div class="source"><syntaxhighlight lang=vb> | ||
phid.OutputState(4) = True | phid.OutputState(4) = True | ||
</syntaxhighlight></div> | </syntaxhighlight></div> | ||
=== | ====Step Four: Close and Delete==== | ||
At the end of your program, don’t forget to call close to free any locks on the Phidget: | |||
<div class="source"><syntaxhighlight lang=vb> | |||
Private Sub Workbook_BeforeClose(Cancel As Boolean) | |||
phid.Close | |||
End Sub | |||
</syntaxhighlight></div> | |||
{{MoreHowTos}} | |||
==Common Problems and Solutions/Workarounds== | |||
None at this time. | |||
Latest revision as of 18:00, 31 July 2018
| Visual Basic for Applications (VBA) is an implementation of Microsoft's event-driven programming language Visual Basic 6.0 and its associated integrated development environment (IDE), which are built into most Microsoft Office applications. |
Introduction
If this is your first time working with a Phidget, we suggest starting with the Getting Started page for your specific device. This can be found in the user guide for your device. That page will walk you through installing drivers and libraries for your operating system, and will then bring you back here to use Visual Basic for Applications specifically.
Visual Basic for Applications is capable of using the complete Phidget API, including events. We also provide example code in Visual Basic for Applications for Accelerometer (not Spatial), Encoder, InterfaceKit, RFID, TemperatureSensor and Servo.
Visual Basic for Applications can be developed with Microsoft Office on Windows.
You can compare Visual Basic for Applications with our other supported languages.
Quick Downloads
Just need the Visual Basic for Applications documentation, drivers, libraries, and examples? Here they are:
Documentation
Example Code
Note: Example code is programmed to run in Microsoft Excel.
Libraries and Drivers
- 32-bit Windows Drivers Installer
- 64-bit Windows Drivers Installer
- Windows Driver and Library Files (Zipped)
Getting Started with Visual Basic for Applications (VBA)
If you are new to writing code for Phidgets, we recommend starting by running, then modifying existing examples. This will allow you to:
- Make sure your libraries are properly linked
- Go from source code to a test application as quickly as possible
- Ensure your Phidget is hooked up properly
Support for VBA is only on Windows 2000 / XP / Vista / 7.
Windows (XP/Vista/7/8)
For a description of the Phidget library files, please see the main Windows page.
The Phidget examples were written using Microsoft Excel 2000 and this tutorial assumes its use. Other environments such as Microsoft Office should work provided they support VBA, and each would be set up in a similar manner.
Use Our Examples
First, open the command prompt in administrator mode and type the following command:
regsvr32 "C:\Progarm Files\Phidgets\Phidget21COM.dll"
If you installed the Phidgets libraries in a different location, you'll have to modify the command.
Then, download and unpack the VBA Examples. Here you will find an example called HelloWorld which is a simple, high-level example which will work with any Phidget device. You will also find specific, in-depth examples for some of our other devices. The source file will be named the same as the software object for your device. If you are not sure what the software object for your device is, find your Phidget on our webpage, and then check the API documentation for it.
The easiest example to start with is the HelloWorld example. Find it in the unpacked examples folder:

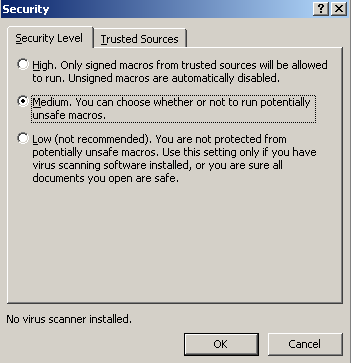
And then double click on it to open it in Excel. It contains Macros, so you may get a message that you can't run the program without changing your security settings. The settings can be found in Office XP under Tools → Options → Security (tab). Then you can set the security level to Medium so you can choose to run the Phidget Examples:
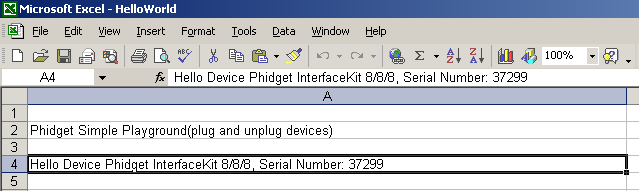
This will bring up the example itself. Hello and goodbye messages are printed to the screen as Phidgets are plugged in (attached) and unplugged (detached). Here, we plugged a Phidget Interface Kit in:
Write Your Own Code
To begin, launch Excel with a new workbook for our project. Launch the VBA editor (Tools | Macro | Visual Basic Editor) and open “ThisWorkbook” in the navigator.
Before you can use the Phidget in your code, you must include the library in your project. This can be accomplished from the references screen (Tools | References...) by checking the box beside “Phidget Library 2.1”, or by browsing to the location the framework was installed and choosing the Phidget21COM.dll.
Afterwards, the Phidget object will need to be declared and then initialized inside the new workbook (“ThisWorkbook”). For example, we can declare and create a PhidgetInterfaceKit at the top of the code with:
  Public WithEvents phid As PhidgetInterfaceKit
  Private Sub Workbook_Open()
      Set phid = New PhidgetInterfaceKit
  End Sub
The object name for any type of Phidget is listed in the API manual. Each Phidget (Spatial, Temperature Sensor, Motor Controller, Interface Kit) has a different software object named similarly to its own name. If you are not sure what the software object for your device is, find your Phidget on our webpage, and then check the API documentation for it. Every type of Phidget also inherits functionality from the Phidget base class.
You can now play around with the examples and basic code, and when you are ready to begin writing your project you can go through our instructional section on what code is in the examples.
Follow The Examples
By following the instructions above, you probably now have a working example and want to understand it better so you can change it to do what you want. This teaching section has resources for you to learn from the examples and write your own.
Your main reference for writing VBA code will be our .COM API information, with syntax for all of our functions:
- .COM API (This is the complete set of functions you have available for all Phidgets)
- Device Specific APIs - The one for your Phidget can be found in its user guide.
To learn the details behind opening, configuring, using, and closing your Phidget, try the General Phidget Programming page. That page also describes using the Phidget in an event-driven manner and in a traditional manner, both of which are available in VBA.
Code Snippets
Specific calls in VBA will differ in syntax from those on the General Phidget Programming page, but the concepts stay the same.
It may help to have the General Phidget Programming page and this section open at the same time, because they parallel each other and you can refer to the .COM/VBA syntax. However, many additional concepts are covered on the General Phidget Programming page on a high level, such as using multiple Phidgets, handling errors, and different styles of programming.
Step One: Initialize and Open
Be sure you have set up access to your Phidget in the section Write Your Own Code. That section also includes an initialization of the Phidget, i.e. a creation of the variable (phid) that will allow access to our Phidget, in this case an Interface Kit:
  Public WithEvents phid As PhidgetInterfaceKit
  Private Sub Workbook_Open()
      Set phid = New PhidgetInterfaceKit
  End Sub
Also within that Sub, we can open the new Phidget variable:
phid.Open
Open will continuously try to connect to a Phidget, based on the parameters given, even trying to reconnect if it gets disconnected. There are many different forms of open - by serial number, or even over a network using the Phidget WebService. You can check the .COM API manual for all the types of open available and how to use them.
One important thing to remember is that when working with Phidgets, a local connection will reserve the device until closed. This prevents any other instances from retrieving data from the Phidget, including other programs. The one connection per device limit does not apply when exclusively using the Phidget WebService.
Step Two: Wait for Attachment (plugging in) of the Phidget
To use the Phidget, it must be plugged in (attached). This means that simply calling open does not guarantee you can use the Phidget immediately. We can handle this by using event driven programming and tracking the AttachEvents and DetachEvents, or we can handle this by calling waitForAttachment. This function works for any Phidget. WaitForAttachment will block indefinitely until a connection is made to the Phidget, or an optional timeout is exceeded:
phid.WaitForAttachment(3000)
Step Three: Do Things with the Phidget
We recommend the use of event driven programming when working with Phidgets. In Visual Basic, we hook an event handler with the following code:
    Private Sub phid_OnSensorChange(ByVal Index As Long, ByVal SensorValue As Long)
        Range("A2").Select
        ActiveCell.Offset(Index, 0).Value = SensorValue
    End Sub
With this method, the code inside onSensorChange will get executed every time the - in this case - Interface Kit reports a change on one of its analog inputs. You can let the editor generate the procedure declaration for you through the drop down menu at the top of the code window.
Some events such as Attach and Detach belong to the base Phidget object and thus are common to all types of Phidgets. Other events, such as this one to read a sensor change, are specific to the type of Phidget (for example, a Temperature Sensor would have a temperature change event). Please refer to the API manual for a full list of events and their usage.
Some values can be directly read and set on the Phidget, and inside polling loops used as an alternative to event driven programming. Simply use the instance properties such as SensorValue(Index as Long) or OutputState(Index as Long) for Interface Kits:
phid.OutputState(4) = True
Step Four: Close and Delete
At the end of your program, don’t forget to call close to free any locks on the Phidget:
  Private Sub Workbook_BeforeClose(Cancel As Boolean)
     phid.Close
  End Sub
More How-To's
The General Phidget Programming page gives more information about:
- Using Multiple Phidgets (or a Phidget other than the Interface Kit)
- Catching exceptions and errors and using logging
- Event catching versus direct polling
- And more....
Common Problems and Solutions/Workarounds
None at this time.