|
Notice: This page contains information for the legacy Phidget21 Library. Phidget21 is out of support. Bugfixes may be considered on a case by case basis. Phidget21 does not support VINT Phidgets, or new USB Phidgets released after 2020. We maintain a selection of legacy devices for sale that are supported in Phidget21. We recommend that new projects be developed against the Phidget22 Library.
|
Language - Max/MSP
| Max/MSP, developed by Cycling74 is a visual programming language for creating music and media applications. |
Introduction
If this is your first time working with a Phidget, we suggest starting with the Getting Started page for your specific device. This can be found in the user guide for your device. That page will walk you through installing drivers and libraries for your operating system, and will then bring you back here to use Max/MSP specifically.
Max/MSP is capable of using most of the Phidget API, including events. All the supported functions for Max/MSP will be documented in the .help files. We also provide example code in Max/MSP for all Phidget devices.
Max/MSP can be developed with Windows and OS X.
Only 32-bit Max/MSP 4.5 or higher is supported. 64-bit support is planned.
You can compare Max/MSP with our other supported languages.
Quick Downloads
Just need the Max/MSP documentation, drivers, libraries, and examples? Here they are:
Documentation
.helpfile (Windows - same file as Max/MSP Examples and Libraries).helpfile (OS X - same file as Max/MSP Examples and Libraries)
Example Code
- Example Code (Windows - same file as Max/MSP Documentation and Libraries)
- Example Code (OS X - same file as Max/MSP Documentation and Libraries)
Libraries and Drivers
- Max/MSP Libraries (Windows - same file as Max/MSP Documentation and Examples)
- Max/MSP Libraries (OS X - same file as Max/MSP Documentation and Examples)
- 32-bit Windows Drivers Installer
- 64-bit Windows Drivers Installer
- Windows Driver and Library Files (Zipped)
- OS X Drivers Installer
Getting started with Max/MSP
If you are new to writing code for Phidgets, we recommend starting by running, then modifying existing examples. This will allow you to:
- Make sure your libraries are properly linked
- Go from source code to a test application as quickly as possible
- Ensure your Phidget is hooked up properly
Instructions are divided up by operating system. Choose:
Windows (XP/Vista/7/8)
Description of Library Files
Max/MSP programs on Windows depend on the following files. The installers in the Quick Downloads section put only the phidget21.dll into your system. You will need to manually put the PhidgetXXX.mxe onto your system.
phidget21.dllcontains the actual Phidget library, which is used at run-time. By default, the installer places it inC:\Windows\System32.PhidgetXXX.mxeis the Phidget library for your specific device. XXX denotes the name of your device, Please make sure the.mxefile corresponds with the device you are using. For example, if you are using the PhidgetInterfaceKit, you will need thePhidgetInterfaceKit.mxe. It is to be placed in the same directory as your Max/MSP application or anywhere in the Max/MSP search path.
If you do not want to use our installer, you can download the phidget21.dll and manually install it where you want; refer to our Manual Installation Instructions.
Use Our Examples
Please start by downloading the Max/MSP Examples and Library and unpack them into a folder. These examples were written in Max/MSP 4.6, but any version above 4.5 are also supported.
Here, you will find example programs, in .help format for all the devices. The source file will be named the same as the software object for your device. If you are not sure what the software object for your device is, find your Phidget on our webpage, and then check the API documentation for it.
The only thing left to do is to run the examples! Open the .help file in the Max environment.
Once you have the Max/MSP examples running, we have a teaching section below to help you follow them.
Write Your Own Code
When you are building a project from scratch, or adding Phidget function calls to an existing project, you'll need to configure the Max/MSP environment to properly link the Phidget Max/MSP libraries. To begin:
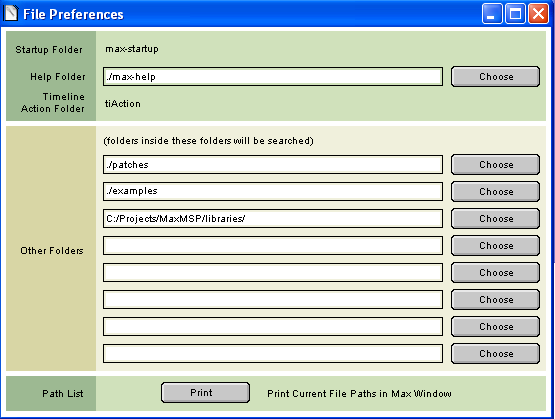
Place the .mxe in the same directory as the patcher, or anywhere in the Max/MSP search path. You can verify the search path locations by navigating to Options → File Preferences.
The best way to start writing your patch is to modify an example, and saving it as a .pat file.
If you wish to start a new patch. All you need to do is create an object named PhidgetXXX where XXX is the name of your device. For example, the PhidgetRFID device will have the PhidgetRFID object name.
The project now has access to the Phidget function calls and you are ready to begin coding.
The same teaching section which describes the examples also has further resources for programming your Phidget.
OS X
Max/MSP has excellent support on OS X.
The first step in using Max/MSP on Mac is to install the Phidget library. Compile and install as described on the OS - OS X page, which also describes the different Phidget files, their installed locations, and their roles.
Use Our Examples
Please start by downloading the Max/MSP Examples and Library and unpack them into a folder. These examples were written in Max/MSP 4.6, but any version above 4.5 are also supported.
Here, you will find example programs, in .help format for all the devices. The source file will be named the same as the software object for your device. If you are not sure what the software object for your device is, find your Phidget on our webpage, and then check the API documentation for it.
The only thing left to do is to run the examples! Open the .help file in the Max environment.
Once you have the Max/MSP examples running, we have a teaching section below to help you follow them.
Write Your Own Code
When you are building a project from scratch, or adding Phidget function calls to an existing project, you'll need to configure the Max/MSP environment to properly link the Phidget Max/MSP libraries. To begin:
Place the .mxe in the same directory as the patcher, or anywhere in the Max/MSP search path. You can verify the search path locations by navigating to Options → File Preferences.
The best way to start writing your patch is to modify an example, and saving it as a .pat file.
If you wish to start a new patch. All you need to do is create an object named PhidgetXXX where XXX is the name of your device. For example, the PhidgetRFID device will have the PhidgetRFID object name.
The project now has access to the Phidget function calls and you are ready to begin coding.
The same teaching section which describes the examples also has further resources for programming your Phidget.
Follow the Examples
By following the instructions for your operating system, you probably now have a working example and want to understand it better so you can change it to do what you want. This teaching section has resources for you to learn from the examples and write your own.
First, let's explain how to operate the example.
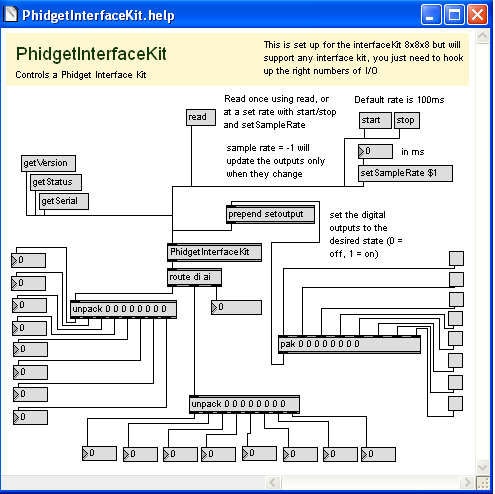
The above screenshot is what shows up when you open the example for the PhidgetInterfaceKit. If you are using a different device, your example patch will be different, but the idea is the same.
For this particular example, the Max object is called PhidgetInterfaceKit, which is located in the center of the screen. Objects/message boxes are connected to the inputs and outputs of the PhidgetInterfaceKit object. The input objects will either cause a property of the device to change or request for a property to be retrieved. The output objects return the retrieved information. All the supported features of the device are shown in the .help file.
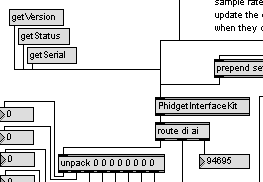
Try it for yourself! Click on the getSerial message box to request the Phidget to retrieve the serial number of the device. You should see the last output object of route changed to the serial number of your device. All devices support the getSerial object, and is the easiest way to determine if the Phidget libraries are correctly set up, and whether the Max/MSP application is connected to your device.
If your example contains the read message box, click on it. This will return device specific values to the screen.
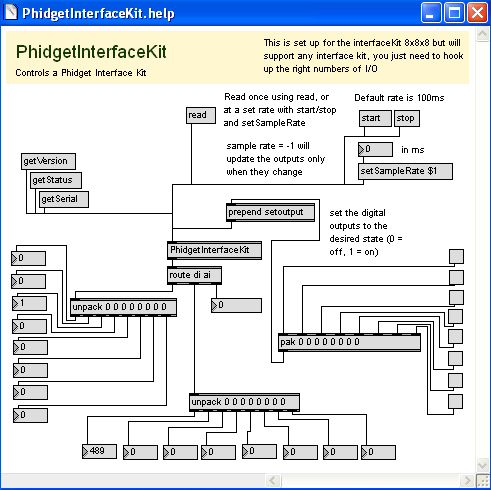
If your example contains the start message box, you can continuously poll for events. Set the sample rate input for the setSampleRate object. Then, press the start message box to start sampling. When a noteworthy event occurs on a Phidget(i.e., when an analog sensor senses a change in the environment), the value will be displayed onto the screen. Press the stop message box to stop sampling.
For the PhidgetInterfaceKit example, there also a setoutput message box. Clicking on the check boxes will cause the digital outputs of the PhidgetInterfaceKit device to change. Your example may contain device specific message boxes/objects to click on. See for yourself what they do!
For information regarding calls specific to your device, please see the API for your specific device, which can be found in its user guide. Please note that some device functionality are not supported in Max/MSP; the .help example shows the complete list of functionality supported under Max/MSP.
Code Snippets
Your best resource to program code .help files in MaxMSP will be our examples. The examples are both our complete API (they include all of the calls for each Phidget you can use, and none you can't) and examples of how to use our API.
If you aren't familiar with concepts in Phidget programming, you may find our General Phidget Programming page helpful. It provides a very generic overview of what traditional languages follow when using Phidgets. For setup 'syntax', your main resource will of course be this MaxMSP page and the examples. But for conceptual details about particular actions - opening a Phidget, for example - the General Phidget Programming page is a more in-depth resource.
Keep in mind when reading these general resources that the Max/MSP libraries may not implement the full Phidget API - some function calls and Phidget classes may not be supported. The .help files included with the Phidget externals show all the supported function calls for their type of Phidget.
In general, Phidgets can be placed inside the patcher using Max objects, and functions can be called on them using appropriately connected messages. We go over a basic setup for this below.
Step One: Initialize and Open
This tutorial uses a Phidget Interface Kit and a new instance will be created. This initializing and opening can be done by placing a new "object" object. Other objects can handle different Phidgets - a Spatial, a Temperature Sensor, a Motor Controller, etc. Only the name of the object changes. You can find the name in the example .help file for your device. The source file will be named the same as the software object for your device. If you are not sure what the software object for your device is, find your Phidget on our webpage, and then check the API documentation for it.
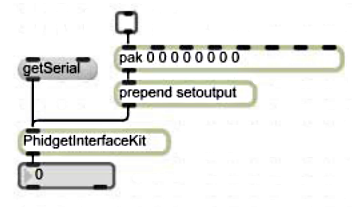
In the case of an Interface Kit, we name it PhidgetInterfaceKit:
![]()
Important: a local connection will reserve the device until closed. This prevents any other instances from retrieving data from the Phidget, including other programs. Every Phidget object in Max will automatically try to connect to and reserve the Phidget for itself. As long as a MaxMSP Phidget program is running, it will continuously try to connect to a Phidget, even trying to reconnect if it gets disconnected.
When the instance is created as with the Interface Kit above, normally it will make a connection to the first device of its type it can find. The Phidget object can also be declared with a serial number to open a specific Phidget Interface Kit instead:
![]()
Using a Phidget over a Network
The one connection per device limit does not apply when using the Phidget WebService. In MaxMSP, we can use this to our advantage in order to have multiple programs access one Phidget, or to simply use a Phidget remotely.
To use the WebService, first the Phidget needs to be plugged in to a computer that has the WebService turned on within your local network. (For information on how to do this, see the Phidget WebService page in the section on how to use the WebService for your operating system). Then, in MaxMSP, we can change the open "object" text for various types of opening over a network. Many examples are given below.
Open a remote Interface Kit using a Server ID:
PhidgetInterfaceKit remote “Some remote serverID”
Open a remote Interface Kit using IP address and port:
PhidgetInterfaceKit remoteip 192.168.2.5 5001
Open a remote Interface Kit with serial number 35569 on serverID “My PC”, with password “pass”:
PhidgetInterfaceKit 35569 remote “My PC” pass
Open a remote Interface Kit with serial number 35569, on any remote server
PhidgetInterfaceKit 35569 remote
Open the Interface Kit remotely on a default-named PhidgetSBC:
PhidgetInterfaceKit remote phidgetsbc
Step Two: Wait for Attachment (plugging in) of the Phidget
Although this is a required step in many of our other languages (and therefore you may be expecting this if coming from another Phidget language), in MaxMSP you do not have to add a specific waitForAttachment block.
Keep in mind, however, that if your Phidget is not responding within your MaxMSP program, it may simply not be plugged in!
Step Three: Do Things with the Phidget
There are two main approaches for retrieving data when working with Phidgets. Data is accessed either by one-time polling, or at a fixed rate via internal timers.
Getting or setting values directly via polling on the Phidget is done through messages linked to the inlet. The object’s inlet can be wired to send commands to the device, and the outlet used to retrieve the results. Setting values on the Phidget is achieved by using the set messages, and some properties can be read with get messages:
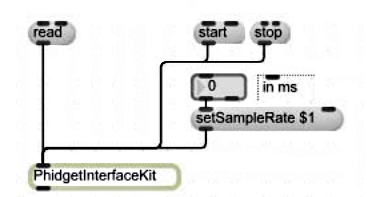
For data, polling occurs through the "read" message. To sample at a fixed rate you use setSampleRate and use the start and stop message. Read will read the data off the Phidget once, while using start will trigger data to be sent or received in periodic intervals. If the sample rate is set to -1, then data output is only triggered on a change:
Phidget-specific data is always given a prefix in Max to allow for their routing. For instance, the digital input states are given the prefix “di” and the analog inputs similarly use “ai”. The specific prefixes used for each Phidget is listed in their respective help file.
Data common to all Phidgets, such as the serial number, is not prefixed.
With the prefixes and common data, the following picture would be an example of how to route and split some of the data for the PhidgetInterfaceKit:

Step Four: Close and Delete
Although this is a required step in many of our other languages (and therefore you may be expecting this if coming from another Phidget language), in MaxMSP you do not have to add a specific close and delete block.
Special Case: Multiple Phidgets
Multiple Phidgets of the same type can easily be used inside a single program, it only requires another Phidget object placed. If two of the same type of Phidget object are placed, the serial number argument should always be specified to ensure that the correct Phidget gets associated with the correct object.
Common Problems and Solutions/Workarounds
Crash: When a patch file is closed in the Max/MSP environment, the program crashes
If in your Max/MSP environment, you have more patches(of the same Phidget object) than you have of the actual hardware device, the Max/MSP environment may crash. This is due to the fact that a single Phidget Max/MSP object only corresponds to a single Phidget device hardware. For example, your Max/MSP environment may experience unexpected behavior while you have one PhidgetInterfaceKit device connected to the computer, but you have a two seperate patches opened with a single PhidgetInterfaceKit Max object in each one.
Likely Fix: Please ensure that you do not use more patches(of the same Phidget object) than you have of the actual Phidget device.