|
Notice: This page contains information for the legacy Phidget21 Library. Phidget21 is out of support. Bugfixes may be considered on a case by case basis. Phidget21 does not support VINT Phidgets, or new USB Phidgets released after 2020. We maintain a selection of legacy devices for sale that are supported in Phidget21. We recommend that new projects be developed against the Phidget22 Library.
|
Language - LabVIEW: Difference between revisions
| Line 69: | Line 69: | ||
====Write Your Own Code==== | ====Write Your Own Code==== | ||
When you are building a project from scratch, or adding Phidget function calls to an existing project, you'll need to configure your development environment to properly link the Phidget | When you are building a project from scratch, or adding Phidget function calls to an existing project, you'll need to configure your development environment to properly link the Phidget library. To begin: | ||
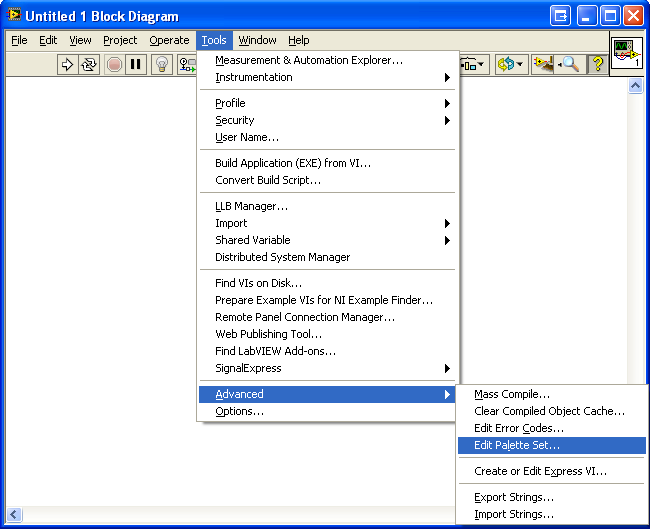
1. | 1. Navigate to {{Code|Tools → Advanced → Edit Palette Set}} to modify the functions palette. | ||
[[File: | [[File:LabVIEW Win Functions Palette 1.PNG|link=|alt=Edit Function Palette]] | ||
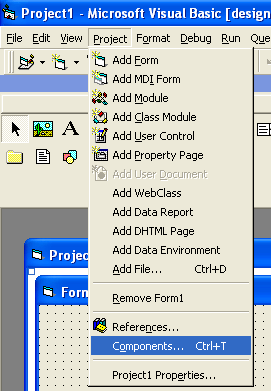
2. Next, navigate to Project → Components to add the Phidget ActiveX objects into your project. | 2. Next, navigate to Project → Components to add the Phidget ActiveX objects into your project. | ||
Revision as of 15:44, 22 March 2012
![]() LabVIEW ..., developed by National Instruments is a ...
LabVIEW ..., developed by National Instruments is a ...
Introduction
If this is your first time working with a Phidget, we suggest starting with the Getting Started page for your specific device. This can be found in the user guide for your device. That page will walk you through installing drivers and libraries for your operating system, and will then bring you back here to use LabVIEW specifically.
LabVIEW is capable of using the complete Phidget API, including events. We also provide example code in LabVIEW for all Phidget devices.
LabVIEW can be developed with Windows. OS X and Linux are unsupported as Phidgets have not been tested on those systems..
You can compare LabVIEW with our other supported languages.
Quick Downloads
Just need the Visual Basic 6.0 documentation, drivers, libraries, and examples? Here they are:
Documentation
Example Code
- Example Code for 32 bit systems on Windows, OS X, and Linux
- Example Code for 64 bit systems on Windows only
Libraries and Drivers
- 32-bit Windows Drivers Installer
- 64-bit Windows Drivers Installer
- Windows Driver and Library Files (Zipped)
- OS X Drivers Installer
- Linux Libraries (Source Code)
Getting started with LabVIEW
If you are new to writing code for Phidgets, we recommend starting by running, then modifying existing examples. This will allow you to:
- Make sure your libraries are properly linked
- Go from source code to a test application as quickly as possible
- Ensure your Phidget is hooked up properly
Windows(2000/XP/Vista/7)
Description of Library Files
LabVIEW programs on Windows depend on two files, which the installers in Quick Downloads put onto your system:
phidget21.dllcontains the actual Phidget library, which is used at run-time. By default, it is placed inC:\Windows\System32.
If you do not want to use our installer, you can download the phidget21.dll and manually install it where you want; refer to our Manual Installation Instructions.
We include instructions on using our examples and writing your own code.
Use Our Examples
To run the examples, you first download the examples found in the Quick Downlods section and unpack them into a folder. Here, you will find the examples folder, which contains vi programs for all the devices. Each vi example demonstrate the usage of a few of the device's properties. To get a broader understanding of the device, you should take a look at all the vi examples inside the directory for your device. If you aren't sure what the software example for your device is called, check the software object listed in the Getting Started guide for your device.
1. Inside the examples folder, navigate to the directory for your device.
2. Open up any .vi of your choice in LabVIEW. In this section, the Sensor to Output Example.vi of the PhidgetInterfaceKit examples will be used.
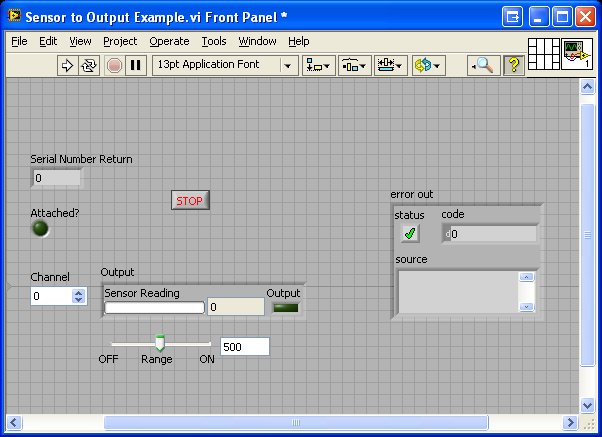
You will see the front panel of the example. The front panel shows the user interface of the vi program.
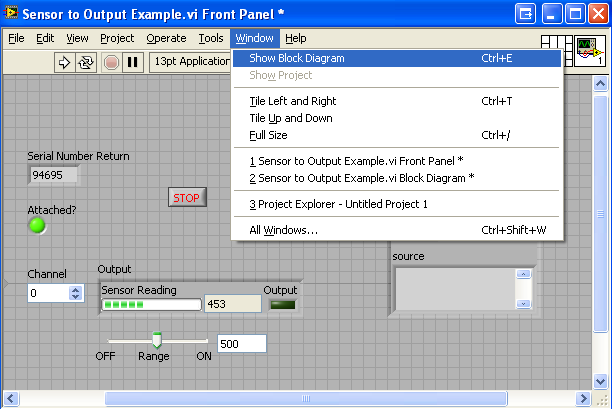
2. Next, let us take a look at the block diagram by navigating to Window → Show Block Diagram.
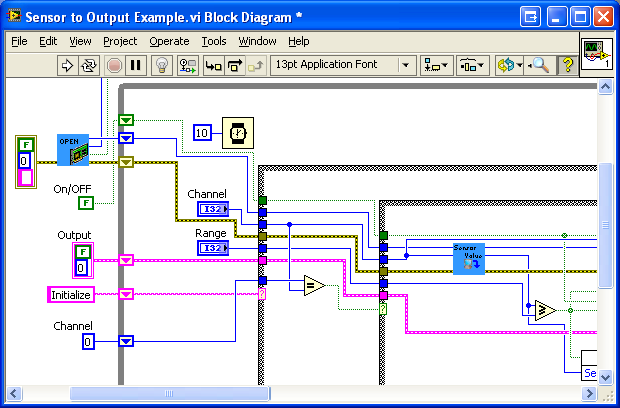
The block diagram shows the logic of the application.
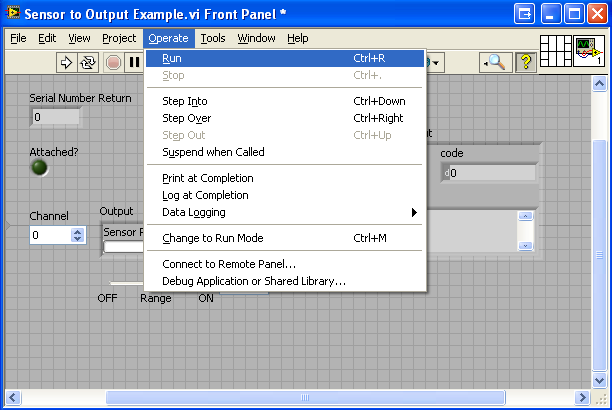
3. The only thing left to do is to run the examples! Navigate to Operate → Run.
4. The application will now run.
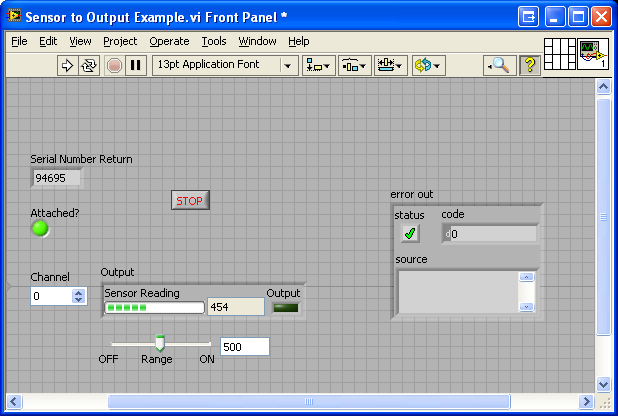
You can determine that your device is connected to your application if you see the indicator for attached turn green and the correct serial number is displayed. These features are available in most of the example vis' we provide.
5. When you are ready to terminate the application, click on the ![]() button to release the hold on the device. Please keep in mind that the application may not terminate properly if you stop it by clickking on
button to release the hold on the device. Please keep in mind that the application may not terminate properly if you stop it by clickking on Operate → Stop.
Once you have the LabVIEW examples running, we have a teaching section below to help you follow them.
Write Your Own Code
When you are building a project from scratch, or adding Phidget function calls to an existing project, you'll need to configure your development environment to properly link the Phidget library. To begin:
1. Navigate to Tools → Advanced → Edit Palette Set to modify the functions palette.
2. Next, navigate to Project → Components to add the Phidget ActiveX objects into your project.
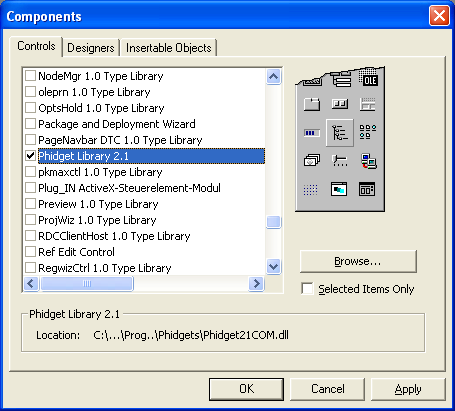
3. The Components menu will show up. Browse for Phidget21COM.dll and add it. By default, it is placed in C:\Program Files\Phidgets. Accept the changes.
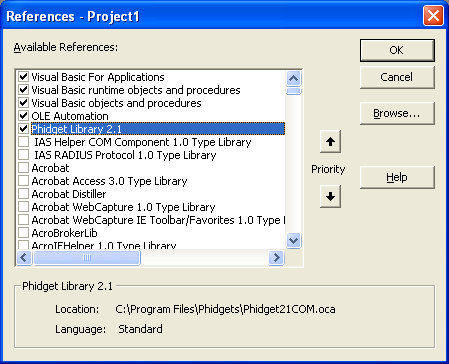
4. Navigate to Project → References and ensure that the Phidget COM library is selected.
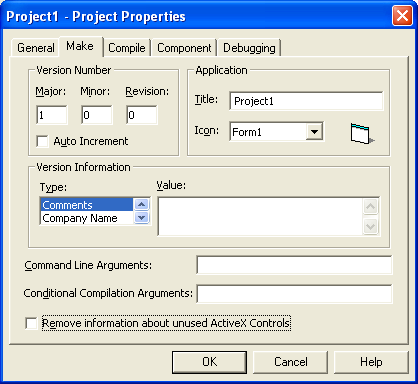
5. Navigate to Project → Project1 Properties, select the Make tab and ensure that the Remove information about unused ActiveX Controls checkbox is unchecked.
6. Then, you will need to declare and initialize the Phidget ActiveX object for your device.
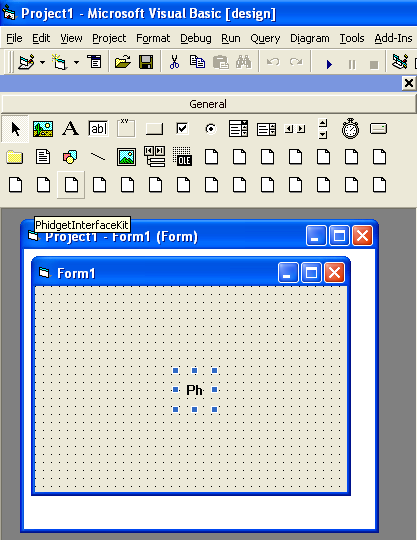
The simplest method is to place the Phidget ActiveX object from the toolbox directly onto your form. If the toolbox is not present on your screen, navigate to View → Toolbox to show the toolbar. Next, find the ActiveX object for your device in the toolbox, and double click it to add it to the form.
Alternatively, you can dynamically create the Phidget ActiveX object in code. For example, for an PhidgetInterfaceKit, you would type:
Dim WithEvents PhidgetInterfaceKit As PhidgetInterfaceKit

Private Sub Form_Load()
   ...
   Set PhidgetInterfaceKit = Controls.Add("Phidget21COM.PhidgetInterfaceKit", "PhidgetInterfaceKit")
   ...
End Sub
The object name for each type of Phidget is listed in the COM API Manual. Please see the examples on how to add a reference to your particular Phidget.
The project now has access to the Phidget function calls and you are ready to begin coding.
The same teaching section which describes the examples also has further resources for programming your Phidget.
Follow the Examples
By following the instructions for your operating system and compiler above, you probably now have a working example and want to understand it better so you can change it to do what you want. This teaching section has resources for you to learn from the examples and write your own.
Next comes our API information, with syntax for all of our functions:
- COM API Manual (This is the complete set of functions you have available for all Phidgets)
- Device Specific APIs - The one for your Phidget can be found in its user guide.
To learn the details behind opening, configuring, using, and closing your Phidget, try the General Phidget Programming page. That page also describes using the Phidget in an event-driven manner and in a traditional manner, both of which are available in Visual Basic 6.0.
Example Flow
The Hello World example has this general structure so you can follow along. We also have an in-depth general introduction to writing Phidget code (like open, read data, etc), as well as the COM API Manual for specific syntax:
|
// ----- Event and Other Functions ----- Create any Language-Specific Functions (exception handling) Create General Attach, Detach, and Error Handling Functions:
|
In Visual Basic 6.0, you can name these event functions whatever you like. You will then pass them as function pointers to the Phidget library below in the Main Code section. This hooks them into the actual events when they occur. | |
|
// ----- Main Code -----
Close Device Delete Device
|
Creating a Phidget software object in Visual Basic 6.0 is specific to the Phidget. For a Phidget Spatial, for example, this would involve creating a PhidgetSpatial object. The examples show how to do this and other API functions |
Common Problems and Solutions/Workarounds
Known Issues:
Phidgets do not always work cleanly in Labview. Sometimes they do not appear, sometimes they work veeerrryyy slowly. No known fixes yet, hopefully soon.