|
Notice: This page contains information for the legacy Phidget21 Library. Phidget21 is out of support. Bugfixes may be considered on a case by case basis. Phidget21 does not support VINT Phidgets, or new USB Phidgets released after 2020. We maintain a selection of legacy devices for sale that are supported in Phidget21. We recommend that new projects be developed against the Phidget22 Library.
|
Language - LiveCode
| LiveCode is a high level programming language, developed by RunRev that draws on English-like syntax for rapid application development. |
Introduction
If this is your first time working with a Phidget, we suggest starting with the Getting Started page for your specific device. This can be found in the user guide for your device. That page will walk you through installing drivers and libraries for your operating system, and will then bring you back here to use LiveCode specifically.
LiveCode is capable of using only the Phidget Interface Kit API, including events. We also provide example code in LiveCode for the Phidget Interface Kit.
LiveCode can be developed with Windows and OS X .
If you wish to use other devices with LiveCode, we have a guide providing instructions to do so.
You can compare LiveCode with our other supported languages.
Quick Downloads
Just need the LiveCode documentation, drivers, libraries, and examples? Here they are:
Documentation
Example Code
Libraries and Drivers
- LiveCode Library Libraries (Windows)
- LiveCode Library Libraries (OS X)
- 32-bit Windows Drivers Installer
- 64-bit Windows Drivers Installer
- Windows Driver and Library Files (Zipped)
- OS X Drivers Installer
Getting started with LiveCode
If you are new to writing code for Phidgets, we recommend starting by running, then modifying existing examples. This will allow you to:
- Make sure your libraries are properly linked
- Go from source code to a test application as quickly as possible
- Ensure your Phidget is hooked up properly
Instructions are divided up by operating system. Choose:
Windows (XP/Vista/7/8)
Description of Library Files
LiveCode on Windows depend on three files. The installers in the Quick Downloads section put only the phidget21.dll into your system. You will need to manually put the remaining two files into your system
phidget21.dllcontains the actual Phidget library, which is used at run-time. By default, it is placed inC:\Windows\System32.phidgets_livecode.dllis the Phidget library for LiveCode. It should be placed in the LiveCode User Extensions folder. More information on its usage will be provided in the Use Our Examples section.Externals.txtlets LiveCode know the name of the Phidget LiveCode library as well as the name of its correspondingphidgets_livecode.dll. More information on its usage will be provided in the Use Our Examples section.
If you do not want to use our installer, you can download the phidget21.dll and manually install it where you want; refer to our Manual Installation Instructions.
Use Our Examples
Currently, the only device we support and have examples for is the PhidgetInterfaceKit. In particular, the examples were written with the Phidget Interface Kit in mind. If you have a different PhidgetInterfaceKit, you will need to modify the example to meet the number of digital inputs, digital outputs, and analog inputs that your device support.
To run the examples,
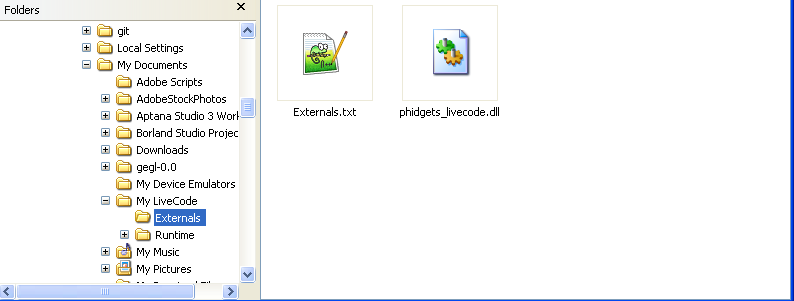
1. Download the Phidget LiveCode library and extract it into a folder. Here, you will find two files inside the Windows folder: phidgets_livecode.dll and Externals.txt.
2. Open up the LiveCode environment.
3. Go to Edit → Preferences.

4. In the Files & Memory tab, locate the User Extensions field. This is the path where the Phidget LiveCode library need to be placed.
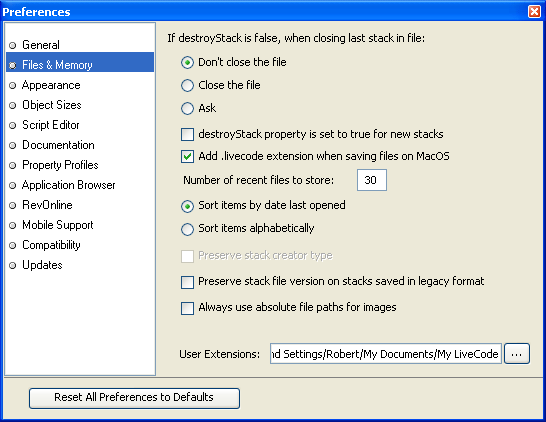
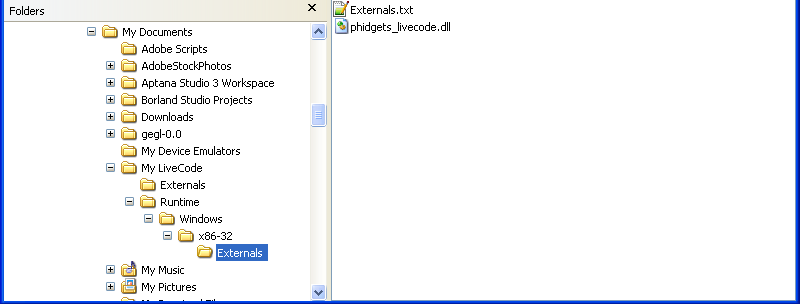
5. Traverse to the User Extensions folder in Windows Explorer. Create a folder named Externals if it does not already exist. Place phidgets_livecode.dll and Externals.txt inside the Externals folder.
6. Download the examples and unpack them into a folder. Navigate to the LiveCode/InterfaceKit Example folder, and open InterfaceKit-full.rev in LiveCode. These examples were written in LiveCode 4.5, but will also work with other versions.
7. The example will be running in Pointer Tool mode.
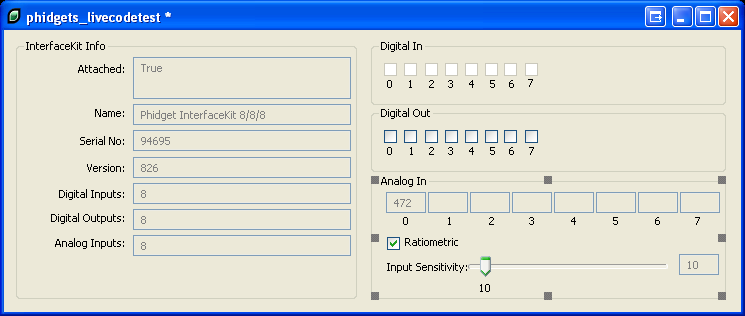 ?
?
8. Switch to the Browser Tool if you want to control GUI elements such as buttons, and scroll bars.

9. Once you have the LiveCode example running, we have a teaching section below to help you follow them.
Write Your Own Code
When you are building a project from scratch, or adding Phidget function calls to an existing project, you'll need to configure your development environment to properly link the Phidgets LiveCode library. To begin:
1. Ensure that the phidgets_livecode.dll and Externals.txt are inside the User Extensions folder, as described in the Use Our Examples section.
2. Generate a new Mainstack.

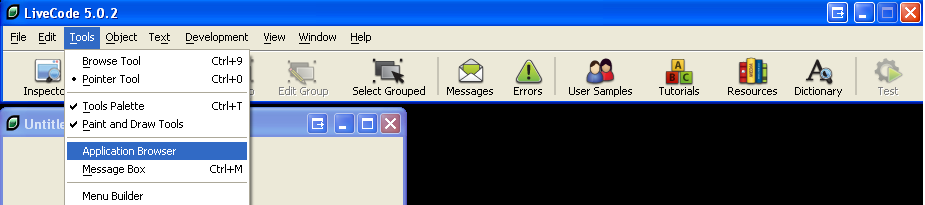
3. Open up the Application Browser.
4. Edit the script of the mainstack, Untitled 1.
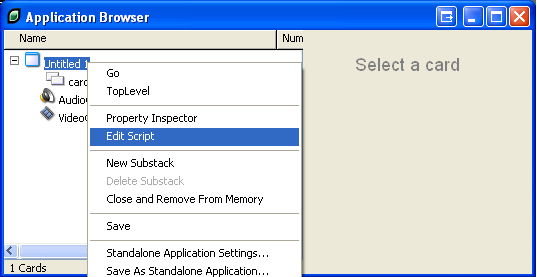
5. You will need to tell LiveCode to reference the Phidget LiveCode library. Copy the following into the script of the mainstack:
  on preOpenStack
    if the short name of the owner of the target is the short name of me and \
        "phidgets_livecodeExternalWrapper" is not among the lines of the stacksInUse then
      set the visible of the templateStack to false
      set the name of the templateStack to "phidgets_livecodeExternalWrapper"
      set the externals of the templateStack to $EXTERNAL_LIBRARY
      create stack
      start using stack "phidgets_livecodeExternalWrapper"
    end if
  end preOpenStack
The project now has access to the Phidget function calls and you are ready to begin coding.
The same teaching section which describes the examples also has further code snippets programming your Phidget.
Creating Standalone Applications
When you are finished coding, and want to create an executable, you will have to inform LiveCode to package the Phidget LiveCode library along with the executable.
- Place the
phidgets_livecode.dllandExternals.txtinside theRuntimefolder of your LiveCode User Extensions.
- Notice that the files are placed in a hierarchical structure of folders. Please see RunRev for more details regarding setting up this hierarchical structure for the
Runtimefolder.
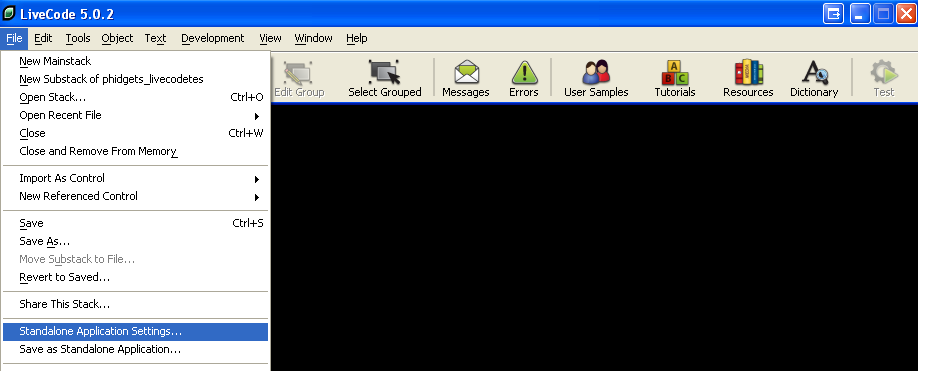
- Click on File → Standalone Application Settings.
- In the
Script Librariesscroll box, please selectphidgets_livecode
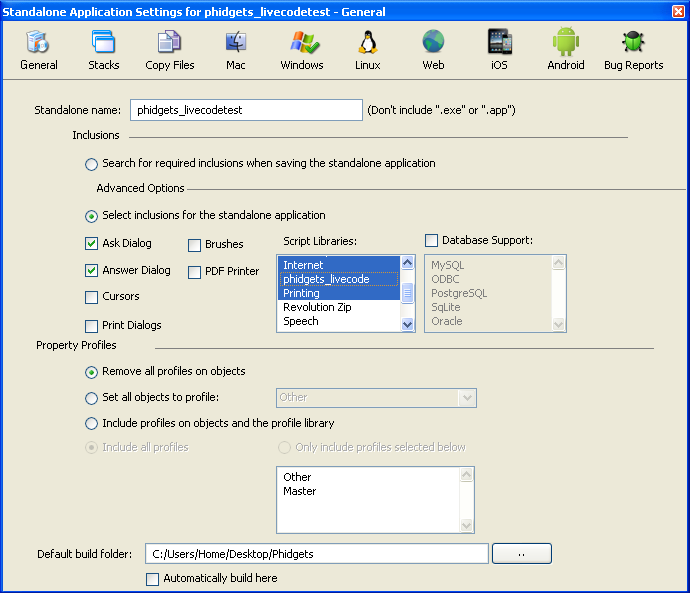
- Then, navigate to the directory of the application you created. Here, you will see a folder named
Externals. Placephidgets_livecode.dllin this directory.
Now, the application can be used to control Phidgets.
OS X
LiveCode has excellent support on OS X.
The first step in using LiveCode on Mac is to install the Phidget libraries. Compile and install them as explained on the OS - OS X page, which also describes the different Phidget files, their installed locations, and their roles....
Libraries
Running Phidgets with LiveCode
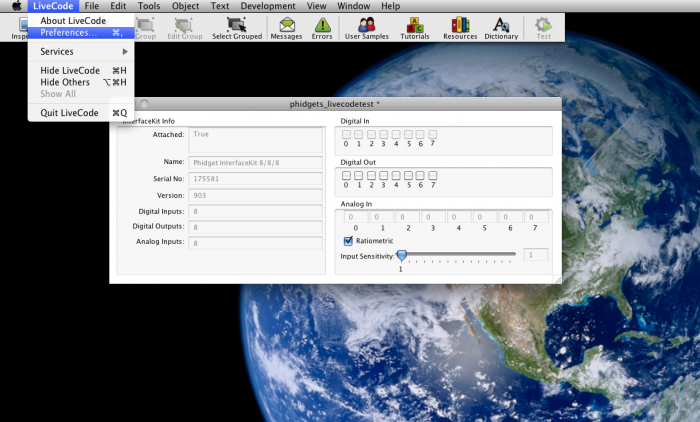
Once the LiveCode environment is installed, the steps to run actual code and create your own are nearly identical to the steps on Windows. Please refer to that section for a detailed walk through on getting our sample code running as well as writing your own code. The only significant difference is setting the Phidget's library up. On a Windows machine the Preferences menu is under "Edit", on OS X it is under "LiveCode" as can be seen in the following image:
Follow the Examples
By following the instructions for your operating system above, you probably now have a working Interface Kit example and want to understand it better so you can change it to do what you want. This teaching section has resources for you to learn from the examples and write your own.
Your main reference for writing LiveCode code will be our LiveCode API information, with syntax for all of our functions:
- LiveCode API (This is the complete set of functions you have available for all Phidgets)
- Device Specific APIs - The one for your Phidget can be found in its user guide.
To learn the details behind opening, configuring, using, and closing your Phidget, try the General Phidget Programming page. That page also describes using the Phidget in an event-driven manner and in a traditional manner, both of which are available in LiveCode.
We include code snippets as well as a section on adapting our libraries to use other Phidgets within LiveCode
Code Snippets
The LiveCode libraries does not implement the full Phidget API - some function calls and Phidget classes are not be supported. Please refer to the LiveCode API manual for a list of supported classes and functions.
Note that before you write any of this code, you will have to edit the mainstack within Live Code so it can access the Phidget. Please refer to the Write Your Own Code section for details.
Step One: Initialize and Open
The Phidget object will need to be declared and opened. For example, we can declare and open an instance of a PhidgetInterfaceKit inside our script with:
//Declare a variable to store the InterfaceKit object
global ifKit
//Create the InterfaceKit object and store it in the variable, “ifKit”
get phidgetsInterfaceKit_create("ifKit")
get phidgets_open(ifKit, -1)	 //-1 to open any Phidget
Step Two: Wait for Attachment (plugging in) of the Phidget
To use the Phidget, it must be plugged in (attached). We handle this in code after the open call. We can handle this by using event driven programming and tracking the AttachEvents and DetachEvents, or we can handle this by calling waitForAttachment. This function works for any Phidget. WaitForAttachment will block indefinitely until a connection is made to the Phidget, or an optional timeout is exceeded:
get phidgets_waitForAttachment(ifKit, 1000)
One important thing to remember is that when working with Phidgets, a local connection will reserve the device until closed. This means only one program can access the Phidget locally.
Step Three: Do Things with the Phidget
We recommend the use of event driven programming when working with Phidgets. We can setup an event handler with the following code:
get phidgetsInterfaceKit_set_OnSensorChange_Handler(ifKit, “SensorChangeHandler”)
Then, the SensorChangeHandler command is defined as follows:
command SensorChangeHandler ifKit pIndex pValue
  put "Sensor#: " & pIndex & " , Value: " & pValue & return after field "currSensorValues"
end SensorChangeHandler
In this function, the code inside SensorChangeHandler will get executed every time the PhidgetInterfaceKit reports a change on one of its analog inputs. Please refer to the LiveCode API manual for a full list of events and their usage.
Most values can be also read directly as an alternative to event driven programming. Simply use the LiveCode API functions, such as phidgetsInterfaceKit_getSensorValue for PhidgetInterfaceKits.
repeat with currSensor=0 to 7
    local sensorValue
    get phidgetsInterfaceKit_getSensorValue(ifKit, currSensor, “sensorValue”)
    put "Sensor: " & currSensor & ", Value: " & sensorValue into
    sensorValueList[currSensor]
end repeat
combine sensorValueList using return
put sensorValueList into field "sensorValueField"
Above, phidgetsInterfaceKit_getSensorValue copies the sensor value into the variable "sensorValue", and places the value in the field "sensorValueField".
Step Four: Close and Delete
At the end of your program make sure to close and delete (release) the Phidget:
get phidgets_close(ifKit)
get phidgets_delete(ifKit)
Working with multiple Interface Kits
Multiple Interface Kit Phidgets can easily be run inside the same program. In our case, it requires another instance of a PhidgetInterfaceKit to be defined and initialized. The new instance can be set up, opened and used in the same process as the previous one. If the application needs to distinguish between the devices, open can be called with the serial number of a specific Phidget.
Other Phidgets
At this time, only the PhidgetInterfaceKit 8/8/8 is supported. For more information on how you can leverage LiveCode with other Phidget devices, please refer to the Extending LiveCode to Other Phidgets section.
Extending LiveCode to Other Phidgets
The Phidgets LiveCode library was developed from a C++ external wrapper and allows the PhidgetInterfaceKit to be programmable in LiveCode. It is possible to extend this external to other Phidgets as well. The goal of this section is to equip the reader with knowledge so that they can understand the relationship between LiveCode and the Phidgets framework. It is intended to provide guidance for readers who wish to extend LiveCode to other Phidgets. This guide uses C++, Microsoft Visual Studio 2005(for Windows XP SP3), XCode 3.2.4(for OS X 10.6.4), LiveCode 4.5 IDE and it is assumed that the reader has a solid understanding of these technologies. It will also help if you are familiar with programming with Phidgets in C/C++. For your reference, the Visual Studio and XCode project solutions for the Phidget LiveCode library are provided in the LiveCode examples
The first step is to download LiveCode Externals Creator SDK from RunRev. Run the SDK, select C++ as the language, enter the project name, select the platform and specify the LiveCode installation path. Hit generate to create a skeleton project for the external.
The next step is to setup the environment to allow for access to the Phidget function call.
In Visual Studio, you will need the latest Phidget Windows library and header - these are installed into C:\Program Files\Phidgets by default if you ran the Phidgets installer. Place the phidget21.lib and phidget21.h in the Visual Studio project directory. Be sure to open the properties window, navigate to Configuration Properties → Linker → Input and add phidget21.lib to the additional dependencies section. Also, include a reference to the library header in the source code.
In XCode, open the newly created .xcodeproj project into XCode. Add the Phidget framework to the project and include the a reference to the library header in the source code.
Now, we are ready to create external functions. LiveCode will have to acknowledge the existence of any external function. Function declarations are placed inside the USER DECLARATIONS section of the the code. Here, a call to the function phidgetsInterfaceKit_create in LiveCode will be mapped to a call to the C++ function,phidgetsInterfaceKit_create:
EXTERNAL_DECLARE_FUNCTION("phidgetsInterfaceKit_create", phidgetsInterfaceKit_create)
For example, LiveCode will use the following lines of code to call the external function phidgetsInterfaceKit_create.
  local ifKit
  get phidgetsInterfaceKit_create("ifKit")  --"ifKit" is the name of the variable phid
The result of get phidgetsInterfaceKit_create("ifKit") will be 0 or the error code depending on whether the external function succeeded or failed, respectively.
Now, we implement the phidgetsInterfaceKit_create C++ function.
  void phidgetsInterfaceKit_create(char *p_arguments[], int p_argument_count, char **r_result, Bool *r_pass, Bool *r_err)
  {
    char outcome_str[8];
    CPhidgetInterfaceKitHandle ifKit = (CPhidgetInterfaceKitHandle) strtoul(p_arguments[0], NULL, 16);
    int outcome=CPhidgetInterfaceKit_create(&ifKit);
    if(outcome==0){
      char str[90];
      int t_success;
      // Converts to Hexadecimal format
      sprintf(str,"%08x",ifKit);
      // Passes back to LiveCode a reference of the InterfaceKit handle
      SetVariable(p_arguments[0], str, &t_success);
    }
    sprintf(outcome_str, "%d", outcome);
    *r_result = strdup(outcome_str);
    *r_err = False;
    *r_pass = False;
    return;
  }
As you can see, this function follows the same format as a typical external function. p_arguments[] stores the arguments that are passed from the LiveCode function. First, we allocate memory to store a CPhidgetInterfaceKitHandle and store its address in ifKit. Next, we call the C function CPhidgetInterfaceKit_create, create the PhidgetInterfaceKit handle and return the error code to outcome. If outcome is 0, the address of ifKit is converted into hexadecimal form. The hexadecimal form is then stored in the LiveCode variable ifKit, so that LiveCode has a reference to the newly created InterfaceKit handle. Lastly, the result of this external function is stored in *r_result, which is passed back as the return value for the LiveCode function.
It is also possible to implement Phidgets events with LiveCode. We will implement the phidgetsInterfaceKit_set_OnSensorChange_Handler function. Again, we declare the existence of the function.
EXTERNAL_DECLARE_FUNCTION("phidgetsInterfaceKit_set_OnSensorChange_Handler", phidgetsInterfaceKit_set_OnSensorChange_Handler)
In LiveCode, we use the following code to call the external function.
get phidgetsInterfaceKit_set_OnSensorChange_Handler(ifKit, "sensorChange")
and sensorChange is the name of the LiveCode command to be called whenever a digital input changes. This command must be in the script of the card that called phidgetsInterfaceKit_set_OnSensorChange_Handler or its stack. The form of the command is as follow:
  command sensorChange phid pIndex pValue
    ...
  end sensorChange
Now, we implement the phidgetsInterfaceKit_set_OnSensorChange_Handler C++ function
  void phidgetsInterfaceKit_set_OnSensorChange_Handler(char *p_arguments[], int p_argument_count, char **r_result, Bool *r_pass, Bool *r_err)
  {
    CPhidgetInterfaceKitHandle ifKit = (CPhidgetInterfaceKitHandle)strtoul(p_arguments[0], NULL, 16);
    char* str=(char *)malloc(90);
    str=strdup(p_arguments[1]);
    int outcome=CPhidgetInterfaceKit_set_OnSensorChange_Handler((CPhidgetInterfaceKitHandle)ifKit, &SensorChangeHandler, str);
    returnOutcome(outcome, r_result, r_pass, r_err);
  }
and the callback function
  int __stdcall SensorChangeHandler(CPhidgetInterfaceKitHandle ifKit, void *usrptr, int Index, int Value)
  {
    int t_success;
    char * scmMsg;
    scmMsg=NULL;
    scmMsg = (char *)malloc(512);
    sprintf(scmMsg, "send \"%s %08x, %d, %d\" to current card", (char *)usrptr, ifKit, Index, Value);
    SendCardMessage(scmMsg, &t_success);
    if (scmMsg != NULL)
      free(scmMsg);
    return 0
  }
Note: For OS X, __stdcall is not needed.
Here, we use SendCardMessage to run the LiveCode command sensorChange. The message will be passed to the card that called phidgetsInterfaceKit_set_OnSensorChange_Handler before passing through the stack in the message hierarchy. Other Phidgets and functions can be extended in a similar manner. The C/C++ API Manual contains calls and events for every type of Phidget.
Common Problems and Solutions/Workarounds
None at this time.