|
Notice: This page contains information for the legacy Phidget21 Library. Phidget21 is out of support. Bugfixes may be considered on a case by case basis. Phidget21 does not support VINT Phidgets, or new USB Phidgets released after 2020. We maintain a selection of legacy devices for sale that are supported in Phidget21. We recommend that new projects be developed against the Phidget22 Library.
|
3060 User Guide
| |
| Go to this device's product page |
Getting Started
Checking the Contents
You should have received:
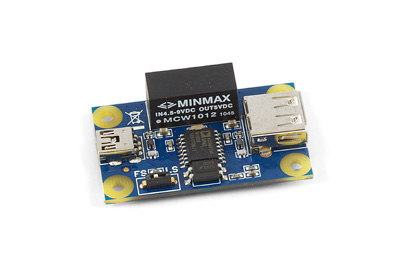
- A 3060 - USB Isolator
Connection Examples
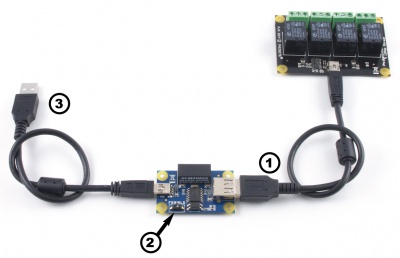
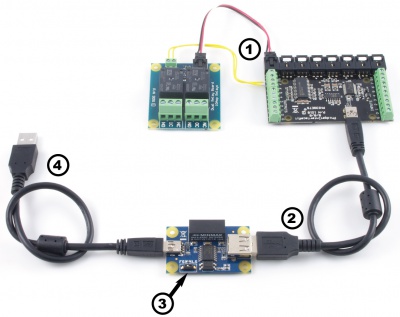
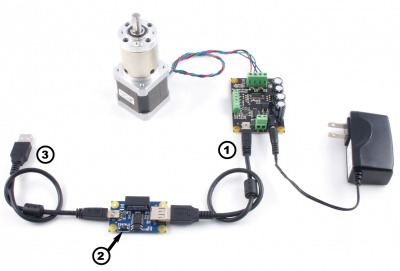
The USB Isolator is designed to protect your PC from harmful voltage that can flow from attached devices to your PC through the USB cable. The isolator is inserted between the Phidgets board and your PC. Using the isolator you can protect your PC from relays, motor controllers, LED controllers, etc. Any system that includes external power supplies, motors, ... etc is subject to potentially harmful voltage flowing into your PC. The USB Isolator can also be used to eliminate problems caused by ground “voltage” differences between USB Host and USB devices. Here are some examples showing how to connect the USB Isolator.
|
Relays: 1014 - PhidgetInterfaceKit 0/0/4 (Low Speed) |
||
|
|
|
Relays: 3051 - Dual Relay Board 3052 - SSR Relay Board 2.5A 3053 - Dual SSR Relay Board 3054 - SSR Relay Board 0.5A |
||
|
|
|
Motor Controllers: 1061 - PhidgetAdvancedServo 8-Motor (Full speed) 1062 - PhidgetStepper Unipolar 4-Motor (Full speed) 1063 - PhidgetStepper Bipolar 1-Motor (Full speed) 1064 - PhidgetMotorControl HC (Low Speed) 1066 - PhidgetAdvancedServo 1-Motor (Full Speed) |
||
|
|
Note: The 1067 - PhidgetStepper Bipolar HC is already isolated, and does not need a 3060.
Technical Details
Improving System Stability through Isolation
USB assumes that the USB host and USB device are operating at almost exactly the same ground “voltage”. If there is a substantial difference in voltage between the host and device, the USB connection will not be reliable.
Problem With Power Supplies
As USB current travels back to the host, this current flow acts on the resistance of the cable to produce a slight voltage. USB is designed such that during normal operation, this won’t cause problems. However, if there are other sources of current, for example, a power supply powering a motor controller, and this power supply is on the same ground as the USB host, some of the current will flow back to the power supply through the USB cable. Often, this can be controlled by using heavy wire between the power supply and the motor controller to “encourage” the current to take the path of least resistance, but some current will still flow on the USB cable. USB Isolation is the ultimate solution to this, as no extra current can flow on the USB cable.
For more information on how these ground loops work, check the Electricity Primer.
Thermocouples, pH sensors
If the USB device has to operate at a different ground than the USB host, isolation is the only option. For example, if a thermocouple attached to a PhidgetTemperatureSensor is electrically connected to something that produces voltage - for example, a battery terminal, isolation is necessary to prevent destructive short circuits. Another common example is a PH Sensor in an electrically “active” tank. Even the presence of insulated electrical motors in the solution will affect the water. If the PH measurement electronics are allowed to float with the voltage of the water by isolating them from the USB host ground, measurements can still be taken. If they are not isolated, the weak short circuit between the water and the USB host will easily override the subtle PH signals being measured.
PhidgetAnalog
Another example is using the PhidgetAnalog to produce a voltage feeding into an external device. Unless this device can be easily set up to share the same ground with the USB host, current produced by the difference in ground between the two systems will flow, causing malfunction in some applications. By using the USB isolator, the PhidgetAnalog will happily function at the ground of the device it’s producing the signal for.
Protecting your PC
The USB isolator can also be used as extra protection against basic wiring errors. There is little physical protection on USB, and wiring errors have been known to blow up USB ports or motherboards. Not all systems require the USB isolator. The 1064 PhidgetMotorControl has built in isolation, so further isolation would be a waste of money.
Selecting the USB speed
The USB Isolator supports both Low-Speed (1.5Mbits/s) and Full-Speed (12Mbits/s) through a small toggle switch mounted on the board. Here are the USB speed setting for the current version of our USB boards. If the device you're using is not listed, and is not specified for a specific speed, try both settings to determine which is better for that device.
| Low Speed | Full Speed |
| 1012 - PhidgetInterfaceKit 0/16/16 | 1002 - PhidgetAnalog 4-Output |
| 1014 - PhidgetInterfaceKit 0/0/4 | 1010 - PhidgetInterfaceKit 8/8/8 Mini-Format |
| 1015 - PhidgetLinearTouch | 1011 - PhidgetInterfaceKit 2/2/2 |
| 1016 - PhidgetCircularTouch | 1018 - PhidgetInterfaceKit 8/8/8 |
| 1017 - PhidgetInterfaceKit 0/0/8 | 1019 - PhidgetInterfaceKit 0/0/8 w/6 Port Hub |
| 1023 - PhidgetRFID | 1024 - PhidgetRFID Read/Write |
| 1052 - PhidgetEncoder | 1031 - PhidgetLED-64 Advanced |
| 1057 - PhidgetEncoder HighSpeed | 1032 - PhidgetLED-64 Advanced |
| 1059 - PhidgetAccelerometer 3-Axis | 1040 - PhidgetGPS |
| 1041 - PhidgetSpatial 0/0/3 Basic | |
| 1042 - PhidgetSpatial 3/3/3 Basic | |
| 1043 - PhidgetSpatioal Precision 0/0/3 High Resolution | |
| 1044 - PhidgetSpatial Precision 3/3/3 High Resolution | |
| 1045 - PhidgetTemperatureSensor IR | |
| 1046 - PhidgetBridge 4-Input | |
| 1047 - PhidgetEncoder HighSpeed 4-Input | |
| 1048 - PhidgetTemperatureSensor 4-Input | |
| 1049 - PhidgetSpatial 0/0/3 | |
| 1051 - PhidgetTemperatureSensor 1-Input | |
| 1055 - PhidgetIR | |
| 1056 - PhidgetSpatial 3/3/3 | |
| 1061 - PhidgetAdvancedServo 8-Motor | |
| 1062 - PhidgetStepper Unipolar 4-Motor | |
| 1063 - PhidgetStepper Bipolar 1-Motor | |
| 1066 - PhidgetAdvancedServo 1-Motor | |
| 1067 - PhidgetStepper Bipolar HC | |
| 1072 - PhidgetSBC2 | |
| 1073 - PhidgetSBC3 (High Speed) | |
| 1203 - PhidgetTextLCD White : Integrated 8/8/8 |
Product History
| Date | Board Revision | Device Version | Comment |
|---|---|---|---|
| May 2011 | 0 | N/A | Product Release |