|
Notice: This page contains information for the legacy Phidget21 Library. Phidget21 is out of support. Bugfixes may be considered on a case by case basis. Phidget21 does not support VINT Phidgets, or new USB Phidgets released after 2020. We maintain a selection of legacy devices for sale that are supported in Phidget21. We recommend that new projects be developed against the Phidget22 Library.
|
1204 User Guide
| |
| Go to this device's product page |
Getting Started
Checking the Contents
|
You should have received:
|
In order to test your new Phidget you will also need:
| |
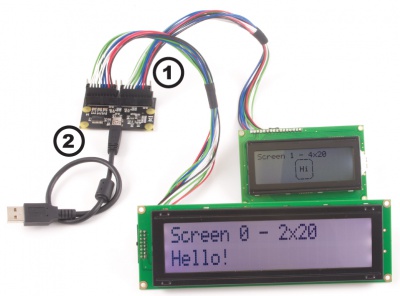
Connecting the Pieces
|
| |
Testing Using Windows 2000 / XP / Vista / 7
Make sure you have the current version of the Phidget library installed on your PC. If you don't, follow these steps:
- Go to the Quick Downloads section on the Windows page
- Download and run the Phidget21 Installer (32-bit, or 64-bit, depending on your system)
- You should see the
 icon on the right hand corner of the Task Bar.
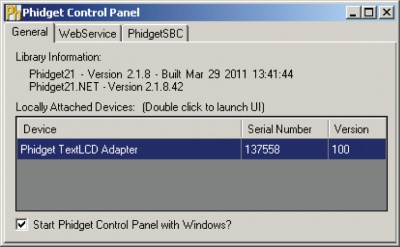
Running Phidgets Sample Program
Double clicking on the ![]() icon loads the Phidget Control Panel; we will use this program to ensure that your new Phidget works properly.
icon loads the Phidget Control Panel; we will use this program to ensure that your new Phidget works properly.
The source code for the TextLCD-full sample program can be found in the quick downloads section on the C# Language Page. If you'd like to see examples in other languages, you can visit our Languages page.
Updating Device Firmware
If an entry in this list is red, it means the firmware for that device is out of date. Double click on the entry to be given the option of updating the firmware. If you choose not to update the firmware, you can still run the example for that device after refusing.
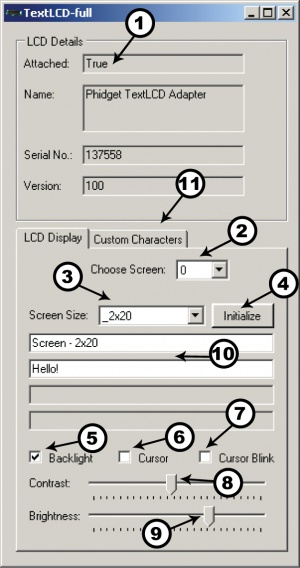
|
Double Click on the |
| |
|
LCD Display Tab
|
| |
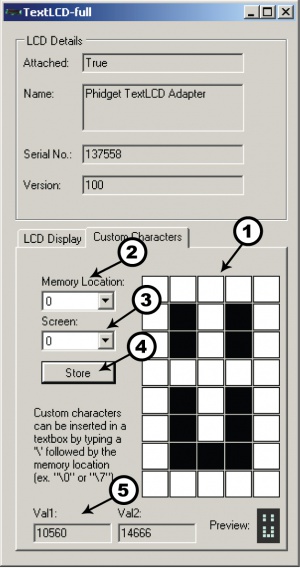
Custom Characters Tab
|
|
Testing Using Mac OS X
- Go to the Quick Downloads section on the Mac OS X page
- Download and run the Phidget OS X Installer
- Click on System Preferences >> Phidgets (under Other) to activate the Preference Pane
- Make sure that the is properly attached.
- Double Click on in the Phidget Preference Pane to bring up the Sample program. This program will function in a similar way as the Windows version.
Using Linux
For a step-by-step guide on getting Phidgets running on Linux, check the Linux page.
Using Windows Mobile / CE 5.0 / CE 6.0
For a step-by-step guide on getting Phidgets running on Windows CE, check the Windows CE page.
Technical Details
Introduction
Liquid Crystal Displays are display devices used to convey information through arrangements of pixels. Graphic and Text LCDs are the most common types available for electronic products. The 1204 supports the following screen sizes (lines x characters): 1x8, 2x8, 1x16, 2x16, 4x16, 2x20, 4x20, 2x24, 1x40, 2x40, 4x40. Please note that your program has no way of automatically detecting the size of the attached screen, so you need to set the screen size with call from the API in order to have text strings display properly.
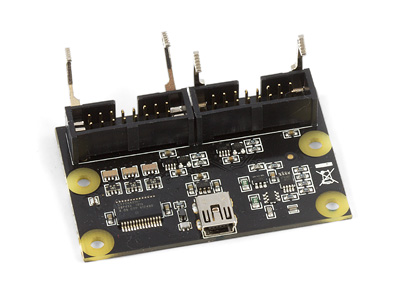
Connector
Below is a pinout diagram for the connector on the 1204, with descriptions of each pin. Remember to use the end of the cable with the larger connector with the 1204 if you want the wire colors to be consistent with the diagram.
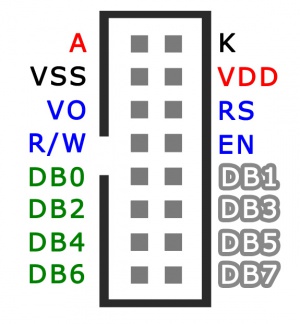
- A: LED Anode (+)
- K: LED Cathode (-)
- VSS: Board Ground
- VDD: Supply Voltage (5V)
- VO: LCD Operating Voltage
- RS: Register Selector
- R/W: Read/Write Signal
- DB0-DB7: Data Bus Lines
Text LCDs

Text LCDs display full text strings set in software. Since text characters are defined from the ASCII standard library, other ASCII standard set characters and glyphs can also be sent to the text LCD. This can be done easily by using unicode characters within your text string. In C#, this may look something like this:
tLCD.rows[0].DisplayString = "Apple starts with \u0041";
In this example, the string \u indicates that a unicode character follows, and the unicode character 0041 (which references the hexadecimal character code 0x41) represents the capital letter A. After the LCD converts the unicode character, the above example would cause the LCD screen to read Apple starts with A. A chart of all ASCII standard set character codes is available here.
Custom Characters
Custom characters can also be generated for the PhidgetTextLCD. A custom character can be any arrangement of pixels within the space allotted for a single character. Single characters are made up of pixels arranged in a grid 5 pixels wide by 8 pixels high. Once generated, custom characters can be stored in any one of eight volatile memory locations on the PhidgetTextLCD, and can be recalled with a simple API command from software. When custom characters are designed, a formula is used to change the pixel design into a pair of numerical values. The first value relates to the design of the top 4 rows of the character, and the second value relates to the design of the bottom 4 rows of the character. Unlike the unicode characters used in the Special Characters section above, the calculated number is not in hexadecimal format but is an integer value up to six characters in length. The calculation for custom characters can be done by hand, or can be completed for you by using the form available at www.phidgets.com/documentation/customchar.html. Done by hand, each integer value represents the sum of two to the power of each individual on-pixel’s location within that integer-value’s half of the character. Pixels not turned on are valued at zero. For example, a custom character happy-face with pixels 6, 8, 11 and 13 in the upper half turned on, pixels 1, 3, 6, 8, 11, 12 and 13 in the lower half turned on, and all other pixels turned off, would result in the following integer values.

These two values are then stored in one of eight memory locations (CG-RAM 0 to 7) on the PhidgetTextLCD by using the Set Custom Character method in software. In C#, this may look something like this:
tLCD.customCharacters[0].setCustomCharacter(10560, 14666)
Once stored, characters can be recalled into a text string by either using the unicode value for the location as referenced in the ASCII Chart or by using the String Code method from the API. Examples in C# of both methods are shown below:
tLCD.rows[0].DisplayString = "I am happy \u0008";
tLCD.rows[0].DisplayString = "I am happy " + tLCD.customCharacters[0].StringCode;
API
We document API Calls specific to this product in this section. Functions common to all Phidgets and functions not applicable to this device are not covered here. This section is deliberately generic. For calling conventions under a specific language, refer to the associated API manual in the Quick Downloads section for that language. For exact values, refer to the device specifications.
Enums
enum {
- PHIDGET_TEXTLCD_SCREEN_NONE,
- PHIDGET_TEXTLCD_SCREEN_1x8,
- PHIDGET_TEXTLCD_SCREEN_2x8,
- PHIDGET_TEXTLCD_SCREEN_1x16,
- PHIDGET_TEXTLCD_SCREEN_2x16,
- PHIDGET_TEXTLCD_SCREEN_4x16,
- PHIDGET_TEXTLCD_SCREEN_2x20,
- PHIDGET_TEXTLCD_SCREEN_4x20,
- PHIDGET_TEXTLCD_SCREEN_2x24,
- PHIDGET_TEXTLCD_SCREEN_1x40,
- PHIDGET_TEXTLCD_SCREEN_2x40,
- PHIDGET_TEXTLCD_SCREEN_4x40,
} ScreenSizes This is a list of the supported screen sizes. The 4x40 screen is a special case because it requires both of the enable lines - so when it is attached, it must be setup on screen 0, and screen 1 cannot be used.
Properties
int Screen [get,set]
- Gets / sets the active screen. All other API calls depend on this being called first to select the screen that subsequent calls affect. When making calls from multiple threads, selecting the screen should be synchronized with setting screen properties in order to avoid having messages go to the wrong display.
int RowCount [get]
- Returns the number of rows of text supported by the active TextLCD display. This will depend on the set screen size, and defaults to 0.
int ColumnCount [get]
- Returns the number of columns of text per row supported by the active TextLCD display. This will depend on the set screen size, and defaults to 0.
int ScreenCount [get] : Constant = 2
- Returns the number of screens supported by the TextLCD.
ScreenSizes ScreenSize [get,set]
- Gets / sets the screen size for the active TextLCD display. The TextLCD Adapter supports a pre-defined set ofscreen sizes to choose from. By default, both screens are set to PHIDGET_TEXTLCD_SCREEN_NONE, and this function must always be called before trying to write text to a display.
bool Backlight [get,set]
- Gets / sets the state of the active TextLCD display backlight. The backlight is disabled by default when the TextLCD is first plugged in.
int Brightness [get,set]
- Gets / sets the brightness of the active TextLCD backlight. The default brightness is 255 (100%). The valid brightness range is 0-255 (0%-100%).
int Contrast [get,set]
- Gets / sets the contrast of the active TextLCD display. The required contrast will vary greatly between different LCDs, so this will have to be set specifically for whatever LCDs are selected.
bool CursorOn [get,set]
- Gets / sets the state of the cursor on the active TextLCD display. When enabled, a cursor (displayed as an underline) will be displayed on the last row written to, at the end of the written text. By default, this is disabled.
bool CursorBlink [get,set]
- Gets / sets the state of the cursor blink on the active TextLCD display. When enabled, a flashing box appears on the last row written to, at the end of the written text. By default, this is disabled.
string DisplayString(int rowIndex) [set]
- Displays text on the selected row of the active TextLCD display. If the string is shorter then the ColumnCount, it is padded out with spaces - thus completely clearing any previously displayed text.
char DisplayCharacter(int rowIndex, int columIndex) [set]
- Displays a singled character on the specified row at the specified column index of the active TextLCD display. This will not affect any of the other characters already being displayed.
Functions
void setCustomCharacter(int index, int value1, int value2)
- Sets up a custom character at the selected index on the active TextLCD display. Valid index range is 0-7 for .Net and Python and 8-15 for all other languages; this allows for 8 custom characters. These custom characters can be displayed by passing their character code (0-7) or (8-15) as part of a DisplayString. For determining the value1 and value2, see the technical section.
void initialize()
- Initializes the active TextLCD display. This runs an initialization routine which sets up and clears the display. This can be used for activating a display that was plugged in after the TextLCD Adapter was attached, to clear the display after setting / changing the screen size, and to re-initialize a display if it has become corrupted (display won’t work anymore).
Product History
| Date | Board Revision | Device Version | Comment |
|---|---|---|---|
| August 2011 | 0 | 100 | Product Release, requires phidget21 2.1.8+ |
| August 2011 | 0 | 101 | getLabelString fixed for labels longer than 7 characters |