|
Notice: This page contains information for the legacy Phidget21 Library. Phidget21 is out of support. Bugfixes may be considered on a case by case basis. Phidget21 does not support VINT Phidgets, or new USB Phidgets released after 2020. We maintain a selection of legacy devices for sale that are supported in Phidget21. We recommend that new projects be developed against the Phidget22 Library.
|
1065 User Guide
| |
| Go to this device's product page |
Getting Started
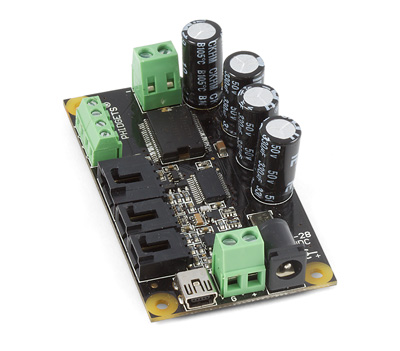
Checking the Contents
|
You should have received:
|
In order to test your new Phidget you will also need:
| |
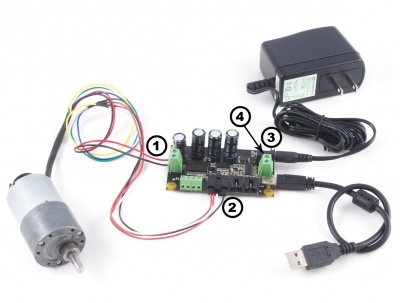
Connecting the Pieces
|
| |
Testing Using Windows 2000 / XP / Vista / 7
Make sure you have the current version of the Phidget library installed on your PC. If you don't, follow these steps:
- Go to the Quick Downloads section on the Windows page
- Download and run the Phidget21 Installer (32-bit, or 64-bit, depending on your system)
- You should see the
 icon on the right hand corner of the Task Bar.
Running Phidgets Sample Program
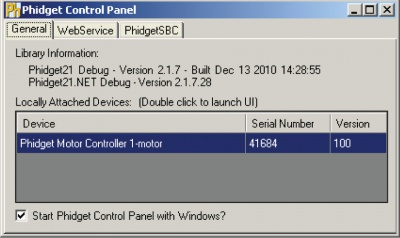
Double clicking on the ![]() icon loads the Phidget Control Panel; we will use this program to ensure that your new Phidget works properly.
icon loads the Phidget Control Panel; we will use this program to ensure that your new Phidget works properly.
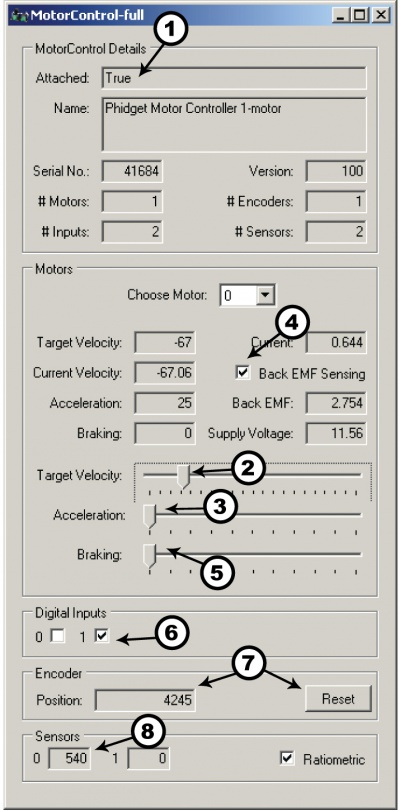
The source code for the MotorControl-full sample program can be found in the quick downloads section on the C# Language Page. If you'd like to see examples in other languages, you can visit our Languages page.
Updating Device Firmware
If an entry in this list is red, it means the firmware for that device is out of date. Double click on the entry to be given the option of updating the firmware. If you choose not to update the firmware, you can still run the example for that device after refusing.
|
Double Click on the |
| |
|
|
Testing Using Mac OS X
- Go to the Quick Downloads section on the Mac OS X page
- Download and run the Phidget OS X Installer
- Click on System Preferences >> Phidgets (under Other) to activate the Preference Pane
- Make sure that the Phidget MorotControl 1-Motor is properly attached.
- Double Click on Phidget MorotControl 1-Motor in the Phidget Preference Pane to bring up the MotorControl-full Sample program. This program will function in a similar way as the Windows version.
Using Linux
For a step-by-step guide on getting Phidgets running on Linux, check the Linux page.
Using Windows Mobile / CE 5.0 / CE 6.0
For a step-by-step guide on getting Phidgets running on Windows CE, check the Windows CE page.
Technical Details
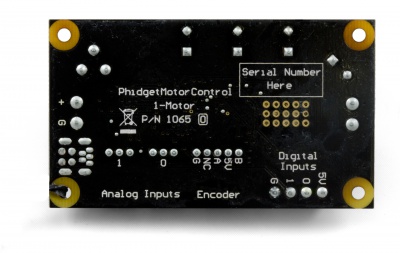
Connections
The ports and terminal blocks on this board are labelled on the underside to save space:
Further Reading
For more information on the analog inputs on the 1065, check the Analog Input Primer.
For more information about encoders, check the Encoder Primer.
For more information about DC motors and how to control them, check the DC Motor and Controller Primer.
API
We document API Calls specific to this product in this section. Functions common to all Phidgets and functions not applicable to this device are not covered here. This section is deliberately generic. For calling conventions under a specific language, refer to the associated API manual in the Quick Downloads section for that language. For exact values, refer to the device specifications.
Functions
int MotorCount() [get] : Constant = 1
- Returns the number of Motors that can be controlled by this PhidgetMotorControl.
double Velocity (int MotorIndex) [get,set]
- Velocity is the percentage of time the motor is being powered for. The PhidgetMotorControl rapidly switches power to the motor on/off. Velocity can be set between –100 and +100. –100 corresponds to the motor being driven 100% of the time in reverse, +100 driven 100% of the time forward. When velocity is 0, the motor is controlled by the Braking property, which defaults to 0%.
double Acceleration (int MotorIndex) [get,set]
- Returns how fast a motor will be accelerated between given velocities. The valid range is between AccelerationMax and AccelerationMin. Acceleration is in %(duty cycle)/s.
double AccelerationMax (int MotorIndex) [get] : Constant = 6250% Duty Cycle/s
- Returns the maximum acceleration that a motor will accept, or return, in %(duty cycle)/s.
double AccelerationMin (int MotorIndex) [get] : Constant = 24.51% Duty Cycle/s
- Returns the minimum acceleration that a motor will accept, or return, in %(duty cycle)/s.
double Current(int MotorIndex) [get]
- Gets the current usage of a motor, in Amps.
bool BackEMFSensingState(int MotorIndex) [get,set]
- Gets/Sets the back-EMF sensing state for a motor. When back-EMF sensing is enabled, the motor will coast (freewheel) 5% of the time while the back EMF measurement is taken (800us every 16ms). Therefore at a velocity of 100%, the motor is only powered 95% of the time. By default, this is disabled.
double BackEMF(int MotorIndex) [get]
- Gets the back-EMF measurement for a motor, in Volts. This is only available if BackEMFSensingState is set to true. Back-EMF generally corresponds roughly to true motor velocity - see technical section for details.
double Braking(int MotorIndex) [get,set]
- Gets/sets the braking amount for a motor at rest, with a range of 0-100%. Braking is only active when the motor velocity is 0. By default, braking is 0%, allowing the motor to coast (free-wheel). The holding strength of a braked motor depends on the motor, but is generally quite low.
double SupplyVoltage() [get]
- Gets the board supply voltage, in Volts.
int InputCount() [get] : Constant = 2
- Returns the number of digital inputs.
bool InputState(int InputIndex) [get]
- Returns the state of a digital input. True means that the input is activated, and False indicated the default state.
int EncoderCount() [get] : Constant = 1
- Returns the number of encoder inputs.
int EncoderPosition(int EncoderIndex) [get,set]
- Sets/gets the current encoder position of an encoder. Note that precision is 1/4 of that supported by the PhidgetEncoders 1047 and 1057 - see the technical section for more information.
int SensorCount() [get] : Constant = 2
- Returns the number of analog sensor inputs.
int SensorValue(int SensorIndex) [get]
- Gets the current value for a sensor input. Range is 0-1000.
int SensorRawValue(int SensorIndex) [get]
- gets the raw 12-bit value for a sensor input. Range is 0-4096.
bool Ratiometric() [get,set]
- Gets/sets the ratiometric state for the analog sensor inputs. Defaults to true.
Events
OnVelocityChange(int MotorIndex, double Velocity) [event]
- An event issued when the velocity a motor is being driven at changes.
OnCurrentChange(int MotorIndex, double Current) [event]
- An event issued whenever the current consumed by a motor changes.
OnCurrentUpdate(int MotorIndex, double Current) [event]
- An event containing current consumption information for a motor, which is issued at a set interval of 8ms. This is generally used for PID torque control.
OnBackEMFUpdate(int MotorIndex, double BackEMF) [event]
- An event containing the back-EMF value for a motor, which is issued at a set interval of 16ms, when back-EMF sensing is enabled. This is generally used for PID velocity control.
OnInputChange(int InputIndex, bool State) [event]
- An event issued when the state of a digital input changes.
OnEncoderPositionChange(int EncoderIndex, int Time, int PositionChange) [event]
- An event issued when the position of an encoder changes. Time is in 1/3ms and represents the amount of time in which PositionChange counts occurred.
OnEncoderPositionUpdate(int EncoderIndex, int PositionChange) [event]
- An event containing position change information for an encoder, which is issued at a set interval of 8ms, regardless of whether the position has changed. This is generally used for PID velocity and/or position control.
OnSensorUpdate(int SensorIndex, int SensorValue) [event]
- An event containing sensor value information for sensors plugged into the Analog Inputs, which is issued at a set interval of 8ms. This may be used for PID control loops depending on the type of sensor being used.
OnError(int ErrorCode, String ErrorDescription) [event]
- The PhidgetMotorControl 1-Motor will throw error events under certain circumstances:
- ErrorCode = EEPHIDGET_WRAP - The position value for an encoder is wrapping around (between 2147483647 and -2147483648).
- ErrorCode = EEPHIDGET_PACKETLOST - A packet of data has been lost. This should be taken into consideration when the Update events are being used, as a gap will be present in the data - 8ms/packet lost error event.
- ErrorCode = EEPHIDGET_OVERTEMP - An over-temperature, or short-circuit condition has occurred. The output will be clamped at 5-8 Amps.
- ErrorCode = EEPHIDGET_BADPOWER - The supply voltage is too low or too high. This is thrown if the voltage is <=7V, or >=34V. There are several different messages depending on how far out of spec the voltage is. Quick load/velocity changes can cause spike in the supply voltage - if these spikes exceed 40V, the motor is automatically placed in 100% braking - braking ends when the supply voltage falls to <38V. When error states have ended, there will be an error event with the EEPHIDGET_OK code.See the ErrorDescription string for specific error details.
C and .NET based APIs only:
OnIndexChange(int EncoderIndex, int IndexPosition) [event]
- An event that is issued whenever there is a pulse on the index pin. (Note: Many encoders do not support the index channel and leave the index pin unconnected)
Product History
| Date | Board Revision | Device Version | Comment |
|---|---|---|---|
| June 2011 | 0 | 100 | Product Release |
| June 2011 | 0 | 101 | getLabelString fixed for labels longer than 7 characters |