|
Notice: This page contains information for the legacy Phidget21 Library. Phidget21 is out of support. Bugfixes may be considered on a case by case basis. Phidget21 does not support VINT Phidgets, or new USB Phidgets released after 2020. We maintain a selection of legacy devices for sale that are supported in Phidget21. We recommend that new projects be developed against the Phidget22 Library.
|
1064 User Guide
| |
| Go to this device's product page |
Getting Started
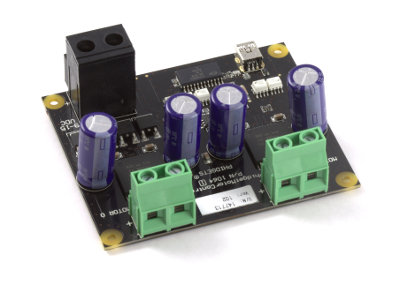
Checking the Contents
|
You should have received:
|
In order to test your new Phidget you will also need:
| |
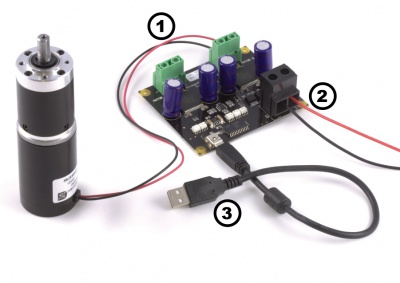
Connecting the Pieces
|
| |
Testing Using Windows 2000 / XP / Vista / 7
Make sure you have the current version of the Phidget library installed on your PC. If you don't, follow these steps:
- Go to the Quick Downloads section on the Windows page
- Download and run the Phidget21 Installer (32-bit, or 64-bit, depending on your system)
- You should see the
 icon on the right hand corner of the Task Bar.
Running Phidgets Sample Program
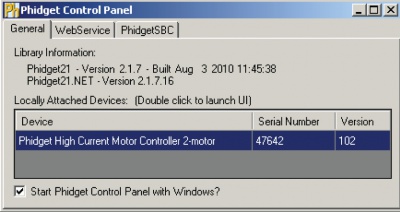
Double clicking on the ![]() icon loads the Phidget Control Panel; we will use this program to ensure that your new Phidget works properly.
icon loads the Phidget Control Panel; we will use this program to ensure that your new Phidget works properly.
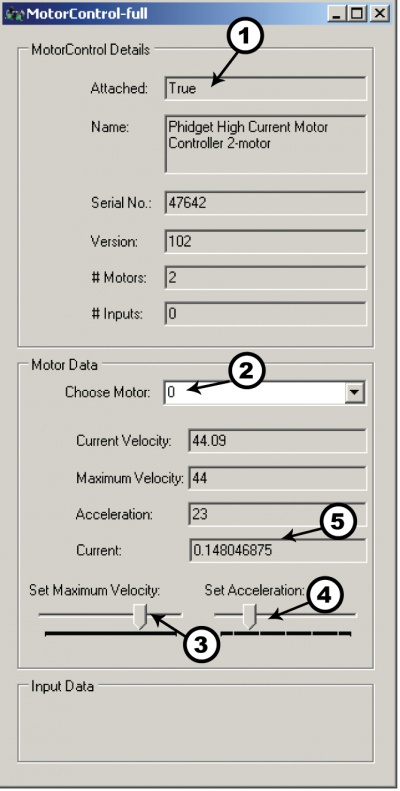
The source code for the MotorControl-full sample program can be found in the quick downloads section on the C# Language Page. If you'd like to see examples in other languages, you can visit our Languages page.
Updating Device Firmware
If an entry in this list is red, it means the firmware for that device is out of date. Double click on the entry to be given the option of updating the firmware. If you choose not to update the firmware, you can still run the example for that device after refusing.
|
Double Click on the |
| |
|
|
Testing Using Mac OS X
- Go to the Quick Downloads section on the Mac OS X page
- Download and run the Phidget OS X Installer
- Click on System Preferences >> Phidgets (under Other) to activate the Preference Pane
- Make sure that the Phidget High Current Motor Controller 2-motor is properly attached.
- Double Click on Phidget High Current Motor Controller 2-motor in the Phidget Preference Pane to bring up the MotorControl-full Sample program. This program will function in a similar way as the Windows version.
Using Linux
For a step-by-step guide on getting Phidgets running on Linux, check the Linux page.
Using Windows Mobile / CE 5.0 / CE 6.0
For a step-by-step guide on getting Phidgets running on Windows CE, check the Windows CE page.
Technical Details
For more information about DC motors and how to control them, check the DC Motor and Controller Primer.
API
We document API Calls specific to this product in this section. Functions common to all Phidgets and functions not applicable to this device are not covered here. This section is deliberately generic. For calling conventions under a specific language, refer to the associated API manual in the Quick Downloads section for that language. For exact values, refer to the device specifications.
Functions
int MotorCount() [get] : Constant = 2
- Returns the number of Motors that can be controlled by this PhidgetMotorControl.
double Velocity (int MotorIndex) [get,set]
- Velocity is the pulse-width modulation duty cycle of the motor (the percentage of time the motor is being powered). The PhidgetMotorControl rapidly switches power to the motor on/off. Velocity can be set between –100 and +100. –100 corresponds to the motor being driven 100% of the time in reverse, +100 driven 100% of the time forward. 0 is off.
double Acceleration (int MotorIndex) [get,set]
- Returns how fast a motor will be accelerated between given velocities. The valid range is between AccelerationMax and AccelerationMin. This parameter is currently measured in percent, where 100% is the fastest velocity ramping available.
double AccelerationMax (int MotorIndex) [get] : Constant
- Returns the maximum acceleration that a motor will accept, or return.
double AccelerationMin (int MotorIndex) [get] : Constant
- Returns the minimum acceleration that a motor will accept, or return.
double Current (int MotorIndex) [get] : Amps
- Returns the current being consumed by a motor.
Events
OnMotorChange(int MotorIndex, double Velocity) [event]
- An event issued when the velocity a motor is being driven at changes.
OnCurrentChange(int MotorIndex, double Current) [event]
- An event issued when the current being conusmed by a motor changes.
Product History
| Date | Board Revision | Device Version | Comment |
|---|---|---|---|
| October 2007 | 0 | 100 | Product Release |
| May 2009 | 0A | 101 | Improved PWM Opto-isolators |
| May 2009 | 0A | 102 | Fixed acceleration bug |
| July 2011 | 1 | 102 | Switch to Mini-USB connector |