|
Notice: This page contains information for the legacy Phidget21 Library. Phidget21 is out of support. Bugfixes may be considered on a case by case basis. Phidget21 does not support VINT Phidgets, or new USB Phidgets released after 2020. We maintain a selection of legacy devices for sale that are supported in Phidget21. We recommend that new projects be developed against the Phidget22 Library.
|
1015 User Guide
| |
| Go to this device's product page |
Getting Started
Checking the Contents
|
You should have received:
|
||
Connecting the Pieces
|

| |
Testing Using Windows 2000 / XP / Vista / 7
Make sure you have the current version of the Phidget library installed on your PC. If you don't, follow these steps:
- Go to the Quick Downloads section on the Windows page
- Download and run the Phidget21 Installer (32-bit, or 64-bit, depending on your system)
- You should see the
 icon on the right hand corner of the Task Bar.
Running Phidgets Sample Program
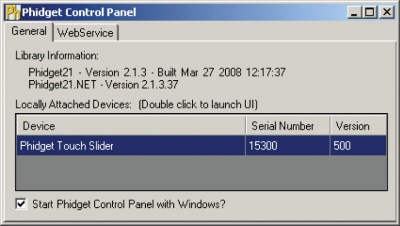
Double clicking on the ![]() icon loads the Phidget Control Panel; we will use this program to ensure that your new Phidget works properly.
icon loads the Phidget Control Panel; we will use this program to ensure that your new Phidget works properly.
The source code for the InterfaceKit-full sample program can be found in the quick downloads section on the C# Language Page. If you'd like to see examples in other languages, you can visit our Languages page.
Updating Device Firmware
If an entry in this list is red, it means the firmware for that device is out of date. Double click on the entry to be given the option of updating the firmware. If you choose not to update the firmware, you can still run the example for that device after refusing.
|
Double Click on the |
| |
|
|
Testing Using Mac OS X
- Go to the Quick Downloads section on the Mac OS X page
- Download and run the Phidget OS X Installer
- Click on System Preferences >> Phidgets (under Other) to activate the Preference Pane
- Make sure that the PhidgetLinearTouch is properly attached.
- Double Click on PhidgetLinearTouch in the Phidget Preference Pane to bring up the InterfaceKit-full Sample program. This program will function in a similar way as the Windows version.
Using Linux
For a step-by-step guide on getting Phidgets running on Linux, check the Linux page.
Using Windows Mobile / CE 5.0 / CE 6.0
For a step-by-step guide on getting Phidgets running on Windows CE, check the Windows CE page.
Technical Details
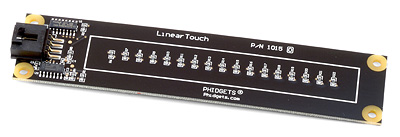
The PhidgetLinearTouch is actually a capacitive-charge sensor, detecting changes in the capacitance between the on-board electrodes and the object making contact. The side of the circuit board opposite the connector and components is the side intended for contact. The internal sensor used for charge-detection is a Quantum Research Group QT401 Sensor.
Device Inputs
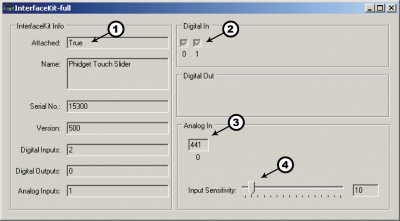
The PhidgetLinearTouch appears to the Phidget software libraries as an InterfaceKit. Sliding a finger along the touch sensor varies the Analog Input 0 value from 0 to 1000 in approximately 125 discrete steps. When the finger is removed, the final measured value is retained. Two Digital Inputs are also utilized to convey additional information: Digital Input 0 appears True when contact is made with the electrodes on the Phidget, and Digital Input 1 appears True when a finger or contacting object comes in close proximity to the electrodes. The two Digital Inputs are intended to be used as a quality measure, allowing the developer to trust the Analog Input value only when both Digital Inputs are true.
| Input | Range | Description |
|---|---|---|
| Analog Input 0 | 0 - 1000 | Analog value representing touch position |
| Digital Input 0 | True/False | True indicates physical contact with electrode |
| Digital Input 1 | True/False | True indicates proximity to electrodes |
For many projects it is required that the highest and lowest available values be more readily accessible than the full range. The PhidgetLinearTouch board has been designed so that the end-zones of the touch area have a greater contact area, allowing for effective maximum/minimum value control. If it is desired to use the touch slider as an array of buttons, or a combination of an array of buttons and a smaller slide-touch area, one must only interpret specific sub-ranges of sensor values differently in software depending upon the intended use. If sub-ranges of values are to be used as buttons, it is recommended that a small range of sensor values be left between the subranges where a null-response is observed.
Dielectric Separation
The PhidgetLinearTouch has been left without components on the contact side so that it may be mounted behind a sheet of glass or plastic. The recommended thickness of separation material is 1/8 inch. Silicon adhesive is recommended when attaching the Phidget to the material; standing the PhidgetLinearTouch off or creating space between the separation material and the Phidget can cause false-triggering to occur. It should be noted that materials thicker than 1/8” may work, but will require a larger surface area of contact to ensure proper triggering (i.e.: two fingers instead of one).
API
We document API Calls specific to this product in this section. Functions common to all Phidgets and functions not applicable to this device are not covered here. This section is deliberately generic. For calling conventions under a specific language, refer to the associated API manual in the Quick Downloads section for that language. For exact values, refer to the device specifications.
Functions
int InputCount() [get] : Constant = 2
- Returns the number of digital inputs supported. Please refer to the Device Inputs section for details on the abstractions used on the 1015.
bool InputState(int InputIndex) [get]
- Returns the state of a particular digital input.
int SensorCount() [get] : Constant = 1
- Returns the number of sensors (Analog Inputs) supported by this PhidgetInterfaceKit. Intrepreted together with the digital inputs, this represents the positiion of the user’s finger on the slider.
int SensorValue(int SensorIndex) [get]
- Returns the sensed value of a particular Analog Input. Please refer to the Device Inputs section for details on the abstractions used on the 1015.
double SensorChangeTrigger (int SensorIndex) [get,set]
- Returns the change trigger for an analog input. This is the ammount that an inputs must change between successive SensorChangeEvents. This is based on the 0-1000 range provided by getSensorValue. This value is by default set to 10.
Events
OnInputChange(int InputIndex, bool State) [event]
- An event that is issued when the state of a digital input changes.
OnSensorChange(int SensorIndex, int SensorValue), [event]
- An event that is issued when the returned value from an Analog Input varies by more than the SensorChangeTrigger property.
Product History
| Date | Board Revision | Device Version | Comment |
|---|---|---|---|
| August 2005 | 0 | 100 (500) | Product Release |
| October 2006 | 0 | 101 | Encore II |