|
|
| (120 intermediate revisions by 8 users not shown) |
| Line 1: |
Line 1: |
| [[Category:OS]] | | [[Category:OS]] |
| [[File:Icon-iOS.png|64x64px|link=OS - Windows]]iOS is a mobile OS used on smartphones and tablet computers.
| | {| |
| | |style="vertical-align:middle; width: 60%;"| |
| | ==Getting Started with iOS== |
| | Welcome to using Phidgets with iOS! |
|
| |
|
| __TOC__
| | If you haven't already, check out the [[:Category:UserGuide|user guide]] for your device. If you are ready to go, the first step to creating an iOS application with Phidgets is downloading the Phidget libraries on your macOS development machine! |
| | |{{TOC limit|3}} |
| | |} |
| | ==Download== |
| | The Phidget libraries for iOS development are available here: |
| | *[https://cdn.phidgets.com/downloads/phidget22/libraries/ios/Phidget22_iOS.zip iOS Libraries] |
|
| |
|
| Phidgets are designed to run on devices with an iOS version of 3.0 or later. It is strontly recommended that your device have the latest iOS version installed. | | Download and unpack the libraries. You will need to reference these files from your Xcode project in order to use Phidgets. This step is covered in detail after you select your programming language below. If you need to access older versions of the libraries, [https://www.phidgets.com/downloads/phidget22/libraries/ios/ click here]. |
|
| |
|
| ==Getting Started (Libraries and Drivers)== | | ==Network Server== |
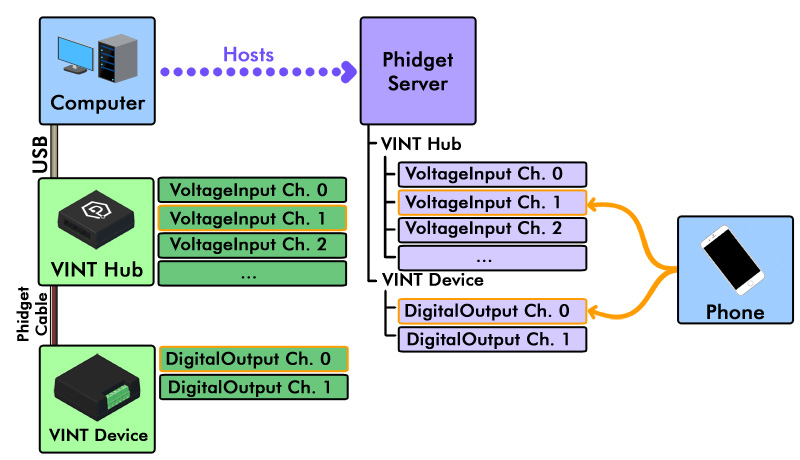
| | Phidgets cannot be connected directly to iOS devices, therefore, in order to use Phidgets with your iOS device, you must have a host computer that is running the Phidget Network Server. |
|
| |
|
| If this is your first Phidget, we highly recommend working through the Getting Started guide [[Device List|for your specific Phidget device]]. If you already have the [[File:Ph.jpg]] icon in your task bar and know how to use it, then you've already followed the guide and are ready to learn more about the control panel, the Phidget Webservice, and more - all specific to Windows.
| | [[Image:iOS-connection.jpg|link=]] |
|
| |
|
| If you are already a pro, and just want the drivers:
| | *Host computer: the computer that is physically connected to the Phidgets via USB and is running the Phidget Network Server. |
| | *Client computer: a computer running a Phidgets application that accesses Phidgets connected to the host computer. When developing for iOS, your iOS device acts as the client. |
|
| |
|
| *[http://www.phidgets.com/downloads/libraries/Phidget-x86_2.1.8.20111028.exe 32 Bit]
| |
| *[http://www.phidgets.com/downloads/libraries/Phidget-x64_2.1.8.20111028.exe 64 Bit]
| |
|
| |
|
| | The next step is to install the Phidget libraries on your host computer, and get the Phidget Network Server up and running. Start by following the ''Getting Started'' guide, and continue with the ''Network Server'' guide. When you are done, come back and finish this guide! |
| | *[[OS - Windows#Phidget Network Server| Windows]] |
| | *[[OS - OS X#Phidget Network Server| macOS]] |
| | *[[OS - Linux#Phidget Network Server| Linux]] |
| | *[[OS - Phidget SBC#Phidget Network Server| Phidget Single Board Computer]] |
|
| |
|
| For special cases where you want to install the Phidget libraries without the installer, please see the [[#Advanced Uses | Advanced Uses]] section.
| | ==Programming== |
| *[http://www.phidgets.com/downloads/libraries/Phidget21-windevel_2.1.8.20110615.zip Phidget21 Libraries] (32-Bit and 64-Bit development files without an installer)
| | Now that you have everything set up, all you have to do is code! Select from one of the following programming languages to get started: |
| *[http://www.phidgets.com/Drivers_Info.html#windows Software License]
| |
|
| |
|
| ===Installing===
| | * [[Language - Objective C#iOS|Objective C]] |
| | | * [[Language - Swift#iOS|Swift]] |
| The Phidget installer requires that your system has .NET framework 2.0 or higher. The .NET framework can be downloaded from [http://www.microsoft.com/net Microsoft]. If you do not have the .NET framework 2.0 or later installed, you can still use Phidgets. However, you won't be able to use the installer, and will have to manually install the Phidget libraries. Please see the [[#Advanced Uses | Advanced Uses]] section.
| |
| | |
| To install the libraries, follow these steps:
| |
| | |
| 1. Download one of the Phidget installer for your system, depending on whether your system is 32 or 64-bit.
| |
| *[http://www.phidgets.com/downloads/libraries/Phidget-x86_2.1.8.20120216.exe 32-bit]
| |
| *[http://www.phidgets.com/downloads/libraries/Phidget-x64_2.1.8.20120216.exe 64-bit]
| |
| | |
| 2. Open up the installer, and proceed through the wizard.
| |
| | |
| [[File:Windows Install.PNG|link=|alt=Windows Install]]
| |
| | |
| Please note that by default, the installer places the [[#Description of Library files | Phidget libraries]] in {{Code|C:\Program Files\Phidgets}}.
| |
| | |
| 3. Once the installation is complete, you are ready to program with Phidgets.
| |
| | |
| For a description of what was installed onto your system, please see the [[#Description of Library files | Description of Library Files}} section.
| |
| | |
| Proceed onto to the [[#Phidget Control Panel | next]] section where the Phidget Control Panel will be discussed.
| |
| | |
| ====Phidget Control Panel====
| |
| | |
| The Phidget Control Panel is a tool to quickly determine whether your system is able to control Phidgets, and also act as a debugging tool.
| |
| | |
| Once the Phidget libraries are installed using the installer, you should see the [[File:Ph.jpg]] icon in the taskbar. Double click on it to bring up the Phidget Control Panel. If the icon does not appear, just find and open the the Phidget Control Panel from the start menu.
| |
| | |
| [[File:Windows ControlPanel General.PNG|link=|alt=Windows Control Panel General]]
| |
| | |
| The general tab shows the list of Phidgets currently physically attached to the computer. You can also view the currently installed Phidget library version, as well as having the option to choose whether the Phidget Control Panel is to be started up automatically once Windows boots up. You can double click on a Phidget device to open up an example program for the device.
| |
| | |
| [[File:Windows ControlPanel Example.PNG|link=|alt=Windows Control Panel Example]]
| |
| | |
| In the above screenshot, the RFID example was opened. These examples are intended for demonstration and debugging purposes. If you have not yet already, please see the '''Getting Started''' guide [[Device List|for your device]]. It is important to keep in mind that when an example Phidget application is opened from the Phidget Control Panel, it holds a lock on the Phidget. This prevents any other program from accessing the Phidget. Please ensure that this example application is closed(the Phidget Control Panel can still be running) when you are running your own applications.
| |
| | |
| The next tab is the {{Code|WebService}} tab, which allows you to control Phidgets over a network. There are four sub-tabs. The first sub-tab is the {{Code|Setup}} tab.
| |
| | |
| [[File:Windows ControlPanel WebService Setup Running.PNG|link=|alt=Windows Control Panel WebService Setup]]
| |
| | |
| Here, you can start and stop the Webservice. Details are provided in the [[#Webservice | Webservice]] section. You can also determine whether the Phidget Webservice is currently running. There is also a check box that you can select to turn on verbose output, which will display useful troubleshooting information for the Webservice.
| |
| | |
| The next sub-tab is the {{Code|Output}} tab, which provides useful debugging information while you are using the Webservice. This tab will only show up if the verbose output option is selected in the previous tab.
| |
| | |
| [[File:Windows ControlPanel WebService Output.PNG|link=|alt=Windows Control Panel WebService Output]]
| |
| | |
| The {{Code|Dictionary}} sub-tab comes next; it lists all the key-value pairs that gets created when the Webservice runs. More information is provided in the [[General Phidget Programming#Using the Dictionary|Dictionary]] section of the [[General Phidget Programming|General Phidget Programming]] page.
| |
| | |
| [[File:Windows ControlPanel WebService Dictionary.PNG|link=|alt=Windows Control WebService Dictionary]]
| |
| | |
| The {{Code|Bonjour}} sub-tab gives a list of all currently attached Phidgets that are connected to the Webservice. This tab will only appear if you have [http://www.apple.com/support/downloads/bonjourforwindows.html Bonjour] installed onto your system. You can also double click on the Phidget to connect to it over the network using one or more computers, and still use the Phidget on the computer it is directly connected to.
| |
| | |
| [[File:Windows ControlPanel WebService Bonjour.PNG|link=|alt=Windows Control Panel WebService Bonjour]]
| |
| | |
| The last tab is the {{Code|PhidgetSBC}} tab, which displays the complete list of PhidgetSBCs connected to the network. You can double click on the PhidgetSBC to bring up the PhidgetSBC Adminstration Console. This tab will be enabled if you have [http://www.apple.com/support/downloads/bonjourforwindows.html Bonjour] installed onto your system.
| |
| | |
| [[File:Windows ControlPanel WebService PhidgetSBC.PNG|link=|alt=Windows Control Panel WebService PhidgetSBC]]
| |
| | |
| ===Checking===
| |
| | |
| To confirm the libraries were installed and work correctly, you can check both the hardware and software sides of the interface. It is worth checking the software side first, because if it works then you know the hardware side is also okay.
| |
| | |
| ====Software====
| |
| | |
| If you have the Phidgets library installed on your system, you can verify that the software side is working by seeing if the Phidget device is listed in the {{Code|General}} tab of the Phidget Control Panel.
| |
| | |
| [[File:Windows_ControlPanel_General.PNG|link=|alt=Windows Control Panel General]]
| |
| | |
| The above screenshot shows that a PhidgetRFID and a PhidgetInterfaceKit are attached to the computer. If the Phidget is plugged into a USB port and you are not able to see that the Phidget is in the list, there may be a hardware issue. Please see the [[#Hardware| hardware]] section for more details.
| |
| | |
| ====Hardware====
| |
| | |
| You can verify that your computer detects that the Phidget is plugged in through a USB connection by going to the Windows Device Manager.
| |
| On Windows XP, you can access the Device Manager by right clicking on {{Code|My Computer}}, and selecting {{Code|Device Manager}} under the {{Code|Hardware}} tab. The Device Manager window will open.
| |
| | |
| [[File:WindowsXP DeviceManager.PNG|link=|alt=Windows Device Manager]]
| |
| | |
| Under the {{Code|Human Interface Devices}} heading, you can view whether your computer detects that the Phidget is connected through the USB if it is in the list. There should be a {{Code|HID-compliant device}} and a {{Code|USB Human Interface Device}} entry for every Phidget that is attached to the computer. Please note that there is currently no way of directly determining which entry belongs to which Phidget. A simple way of verifying which entry belongs to which Phidget is to simply connect or disconnect the Phidget from the USB port of the computer. The list will automatically refresh to show the updated list of all connected USB devices.
| |
| | |
| If you don't see the the Phidget in the list, then take a look at the [[#Troubleshooting|troubleshooting]] section below, as well as the '''Communications''' section of our [[General Troubleshooting#Communications Troubleshooting|general troubleshooting page]].
| |
| | |
| ====Troubleshooting====
| |
| | |
| If the examples '''do not''' work but USB '''does''' work (i.e. your computer can consistently see the device in the [[#Hardware|hardware]]), take a moment to check the basics:
| |
| * You are using Windows 2000 or newer.
| |
| * The Phidget Control Panel require that you have .NET framework 2.0 or newer.
| |
| * No other programs, drivers, or processes are using that USB port in software
| |
| * The Phidget libraries are the latest version (visit the [[#Getting Started (Libraries and Drivers)| getting started section]] to download them)
| |
| * Some drivers or software will sometimes mistakenly claim Phidget devices when waiting on some hardware to be connected. Please see the section: [[Communication Protocols#Issue: Some third party software prevents communications with Phidgets|third party software prevents communications with Phidgets]] for more information.
| |
| | |
| * Check the [[#Common Problems and Solutions|common problems]] section below, some specific combinations can cause problems
| |
| | |
| If your problem doesn't seem to be fixed by these steps, make sure that the Phidget is seen '''consistently''' by USB (if it is erratic, try our [[General Troubleshooting|general troubleshooting guide]]). If you are still having problems after using the troubleshooting guide, please [[Contact Information|ask us]]!
| |
| | |
| ==Programming Languages==
| |
| | |
| After you have installed the drivers above, you should pick a programming language, install libraries, and run the examples for that specific language.
| |
| | |
| Phidgets’ philosophy is that you do not have to be an electrical engineer in order to do projects that use devices like sensors, motors, motor controllers, and interface boards. All you need to know is how to program.
| |
| | |
| On Windows, we recommend the following languages:
| |
| | |
| *[[Language - C Sharp|C#]]
| |
| *[[Language - C/C++|C/C++]]
| |
| *[[Language - Flash AS3|Flash AS3]]
| |
| *[[Language - Java|Java]]
| |
| *[[Language - LabVIEW|LabView]]
| |
| *[[Language - Max/MSP|Max/MSP]]
| |
| *[[Language - Python|Python]]
| |
| *[[Language - Ruby|Ruby]]
| |
| *[[Language - Visual Basic .NET|Visual Basic .NET]]
| |
| *[[Language - Visual Basic 6.0|Visual Basic 6.0]]
| |
| | |
| You can also use these languages, but they do not support [[General Phidget Programming#Event Driven Code | event driven code]], and must use [[General Phidget Programming#Logic Code | logic code]] only:
| |
| | |
| *[[Language - MATLAB|MATLAB]]
| |
| *[[Language - Simulink|Simulink]]
| |
| | |
| The following languages are also supported, but to to a lack of demand, they full API is not implemented. Please refer to the specific language for more information on what features are unsupported.
| |
| *[[Language - Delphi|Delphi]]
| |
| *[[Language - Visual Basic for Applications|Visual Basic for Applications]]
| |
| *[[Language - Visual Basic Script|Visual Basic Script]]
| |
| *[[Language - LiveCode|LiveCode]]
| |
| *[[Language - Adobe Director|Adobe Director]]
| |
| *[[Language - AutoIt|AutoIt]]
| |
| | |
| ==Webservice==
| |
| | |
| The Phidget Webservice allows you to remotely control a Phidget over a network.
| |
| | |
| Drivers for the Phidget Webservice on Windows are already included in the [[#Getting Started (Libraries and Drivers) | Drivers]] above. If you have a [[File:Ph.jpg]] icon in your taskbar, you already have the Webservice drivers installed.
| |
| | |
| You can connect to a Phidget hosted on another computer if you know the IP address of the host computer. Phidgets optionally supports the use of mDNS, which allows Phidgets to be found and opened on the network by a server id instead of an IP address and port. When using a server id, both the client and server will need to be running an implementation of zero configuration networking. The Phidget Webservice takes advantage [http://www.apple.com/support/downloads/bonjourforwindows.html Bonjour] software. It is a tool, developed by Apple to locate devices such as Phidgets, and printers. It allows you to connect to a Phidget over the Webservice while specifying the server id. Alternatively, an IP address and port can be supplied to connect to a Phidget over the Webservice. If you do not have Bonjour installed on your system, you will have to use the second method to connect to a Phidget.
| |
| | |
| This section helps you install, check, and use the Webservice on Windows, but we also have an overview of the [[Phidget Webservice]] in general.
| |
| | |
| ===Turning the Webservice On and Off===
| |
| | |
| There are two methods that can be used to turn the Webservice on and off. The first method is through the Phidget Control Panel. In the {{Code|Webservice}} tab, you can start, restart or stop the Webservice. You can also choose to have the Webservice start up automatically upon Windows boot up by selecting {{Code|Automatic}} as the {{Code|Startup Type}}. By leaving the {{Code|Startup Type}} as {{Code|Manual}}, you will have to manually turn the Webservice on everytime you wish to use it.
| |
| | |
| [[File:Windows ControlPanel WebService Setup Stopped.PNG|link=|alt=Windows Control Panel WebService Setup]]
| |
| | |
| The second method of turning the Webservice on and off is through command line. If you used our installer, the Webservice utility is automatically installed in {{Code|C:\Program Files\Phidgets\PhidgetWebservice21.exe}}.
| |
| | |
| You can get command line help with {{Code|PhidgetWebservice21.exe}} using the -h option:
| |
| | |
| <div class="source">
| |
| <syntaxhighlight lang=bash>
| |
| PhidgetWebservice21 -h
| |
| </syntaxhighlight>
| |
| | |
| <syntaxhighlight lang=text>
| |
| 'phidgetwebservice21' is a Phidget and Dictionary server from Phidgets Inc. See www.phidgets.com for more information.
| |
| Usage: phidgetwebservice21 [OPTION]
| |
| All parameters are optional. The default parameters are: port=5001, ServerName=(Computer Name) and no password
| |
| | |
| Options:
| |
| -p Port
| |
| -n Server Name
| |
| -P Password
| |
| -v Debug mode
| |
| -h Display this help
| |
| </syntaxhighlight>
| |
| </div>
| |
| | |
| To find the defaults used by {{Code|phidget21webservice}}, the command line is the fastest way to learn the default server name and IP address of your computer:
| |
| *For the default server name, type {{Code|hostname}} in the command line.
| |
| *For your IP address, type {{Code|ipconfig -all}} in the command line.
| |
| **A line in the return text, will say something like {{Code|192.168.2.198}}, which is your IP.
| |
| | |
| Here are some example usage. The Windows command line is used. Traverse to the Phidget installation directory(By default, it is located in {{Code|C:\Program Files\Phidgets}}).
| |
| | |
| To start the Webservice with default parameters:
| |
| <div class="source">
| |
| <syntaxhighlight lang=bash>
| |
| PhidgetWebservice21.exe
| |
| </syntaxhighlight>
| |
| </div>
| |
| | |
| To start the Webservice with a server name of {{Code|myServer}}:
| |
| <div class="source">
| |
| <syntaxhighlight lang=bash>
| |
| PhidgetWebservice21.exe -n myServer
| |
| </syntaxhighlight>
| |
| </div>
| |
| | |
| To stop the Webservice, simply close the command line window or press {{Code|Ctrl}} and {{Code|c}} at the same time in the command line window.
| |
| | |
| ===Using the Webservice===
| |
| | |
| To use a Phidget over the Webservice, you'll want to:
| |
| * Have two different computers connected to the same network. We will call the computer that has the Phidget directly connected to the USB port the host. The client will be the computer that runs a Phidget application to connect to the Phidget attached to the host. Please note that If you only have a single computer, you can also connect to the Phidget over the Webservice. The computer will simply act as both a host and client.
| |
| | |
| * Start the Webservice on the computer that directly connects to the Phidget
| |
| * Run your program on the remote computer that will control the Phidget over the network
| |
| | |
| The easiest way to test these steps on Windows is [http://www.apple.com/support/downloads/bonjourforwindows.html download] and install Bonjour onto both the host and client. Next, we will set up the Webservice and run the Phidget program on the client. Please follow these steps:
| |
| | |
| 1. On the host, open up the Phidget Control Panel and traverse to the {{Code|Setup}} tab of the {{Code|WebService}} section.
| |
| | |
| [[File:Windows ControlPanel WebService Setup Stopped.PNG|link=|alt=Windows Control Panel WebService Setup Stopped]]
| |
| | |
| 2. Leave all fields the way it is, and click on {{Code|Start}} to run the Webservice.
| |
| | |
| 3. You can determine that the Webservice is running by looking at the WebService status at the bottom of the window.
| |
| | |
| [[File:Windows ControlPanel WebService Setup Running.PNG|link=|alt=Windows Control Panel WebService Setup Running]]
| |
| | |
| 4. Ensure that the Phidget is plugged in to the host.
| |
| | |
| 5. On the client's Phidget Control Panel, open up the {{Code|Bonjour}} tab in the {{Code|Webservice}} section. You will see the Phidget that is plugged into the host as one of the entries listed. Double click it to open the example application.
| |
| | |
| [[File:Windows ControlPanel WebService Bonjour Running.PNG|link=|alt=Windows Control Panel WebService Bonjour]]
| |
| | |
| 6. The example application will open up, and you will be able to interact with the Phidget over the Webservice.
| |
| | |
| [[File:Windows ControlPanel Example.PNG|link=|alt=Windows Control Panel Example]]
| |
| | |
| 7. You can confirm that the Webservice was indeed behind this exchange by killing the Webservice process while still allowing the remote program to run. On the host's Phidget Control Panel, traverse to the {{Code|Setup}} tab of the {{Code|Webservice}} section. Hit {{Code|Stop}} to terminate the Webservice.
| |
| | |
| [[File:Windows ControlPanel WebService Setup Running.PNG|link=|alt=Windows Control Panel WebService Setup Running]]
| |
| | |
| 8. Take a look at the example application on the client. Since the application can no longer connect to the Webservice, the attached state of the Phidget is false.
| |
| | |
| [[File:Windows ControlPanel WebService Example Disconnected.PNG|link=|alt=Windows Control Panel WebService Example while Webservice Stopped]]
| |
| | |
| ===Debugging the Webservice===
| |
| | |
| In addition to enabling [[General Phidget Programming#Logging|logging]] in your Phidget code, you can get additional debugging information from the Webservice itself. This additional debugging can be enabled from the {{Code|Enable verbose output}} checkbox in the Phidget Control Panel.
| |
| | |
| [[File:Windows ControlPanel WebService Setup Running.PNG|link=|alt=Windows Control Panel WebService Setup]]
| |
| | |
| The debugging information is shown in the {{Code|Output}} tab.
| |
| | |
| [[File:Windows ControlPanel WebService Output Running.PNG|link=|alt=Windows Control Panel Webservice Output Running]]
| |
| | |
| If you are using the command line approach to start the Webservice, debug information is enabled by specifying the {{Code|-v}} option:
| |
| | |
| <div class="source">
| |
| <syntaxhighlight lang=bash>
| |
| PhidgetWebservice21.exe -v -n "myServer"
| |
| </syntaxhighlight>
| |
| </div>
| |
| | |
| The debugging information is shown command line output.
| |
| | |
| ==Advanced Uses==
| |
| | |
| ===Manual File Installation===
| |
| | |
| The Phidget installer installs the most commonly used files onto your system. However, there may be special cases where you want to install the Phidget libraries without the installers. This section will describe the purpose of each individual file and cover how to manually install and distribute the libraries with your code.
| |
| | |
| ====Description of Library files====
| |
| | |
| * <b>{{Code|phidget21.dll}}</b> contains the actual Phidget library, which is used at run-time. It is also placed in {{Code|C:\Windows\System32}}. | |
| * <b>{{Code|PhidgetWebService21.exe}}</b> is used to control Phidgets remotely across a network using the [[#PhidgetWebservice | PhidgetWebservce]].
| |
| * <b>{{Code|PhidgetWindowsService21.exe}}</b> is a Windows service that controls {{Code|PhidgetWebService21.exe}}.
| |
| * <b>{{Code|phidget21.lib}}</b> is used by your compiler to link to the dll. Your compiler has to know where this file is, by default our installer puts {{Code|phidget21.lib}} into {{Code|C:\Program Files\Phidgets}}, so you can either point your compiler to that location, or copy and link to it in a directory for your project workspace. {{Code|phidget21.lib}} is written to be compatible with most compilers - but your specific compiler may need a different format. Check our documentation for your specific compiler for details. Please note that we provide versions of the {{Code|phidget21.lib}} that are specifically optimized for 32-bit or 64-bit systems. If you are using a 64 bit versions of Windows, the {{Code|phidget21.lib}} is placed in {{Code|C:\Program Files\Phidgets}}; The 32 bit version of {{Code|phidget21.lib}} is placed in {{Code|C:\Program Files\Phidgets\x86}}.
| |
| * <b>{{Code|phidget21.h}}</b> lists all the Phidget API function calls available to your code. Your compiler also has to know where this file is. By default, our installer puts {{Code|phidget21.h}} into {{Code|C:\Program Files\Phidgets}} so you can either point your compiler to that location, or copy and link to it in a directory for your project workspace.
| |
| * <b>{{Code|phidget21.jar}}</b> is an archive containing the Phidgets library, used by the [[Language - Java | Java]] programming language.
| |
| * <b>{{Code|Phidget21.NET.dll}}</b> is the Phidgets library for .NET framework 2.0 or greater. Any .NET language can be used, including [[Language - C Sharp | C#]] , and [[Language - Visual Basic .NET | Visual Basic .NET]].
| |
| * <b>{{Code|Phidget21.NET1.1.dll}}</b> is the Phidgets library for .NET framework 1.1. Any .NET language can be used, including [[Language - C Sharp | C#]] , and [[Language - Visual Basic .NET | Visual Basic .NET]].
| |
| * <b>{{Code|Phidget21.NET.XML}}</b> provides the IntelliSense in-line documentation for the .NET library in Visual Studio.
| |
| * <b>{{Code|Phidget21COM.dll}}</b> is the Component Object Model(COM) library and provides your project access to the Phidget ActiveX objects. This libraries is used by the [[Language - Adobe Director|AdobeDirector]], [[Language - AutoIt|AutoIT]], [[Language - Delphi|Delphi]], [[Language - Visual Basic 6.0|Visual Basic 6.0]], [[Language - Visual Basic for Applications|Visual Basic for Applications]], [[Language - Visual Basic Script|Visual Basic Script]]. | |
| * <b>{{Code|Phidget21Manager.exe}}</b> is a tool to quickly determine whether your system is able to control Phidgets, and also act as a debugging tool.
| |
| * <b>{{Code|Examples}} folder</b> contain example applications that allows you to quickly see if your Phidget is properly configured.
| |
| * <b>{{Code|x86 folder}} folder</b> contain the 32 bit versions of {{Code|phidget21.dll}}, {{Code|phidget21.lib}}, {{Code|Phidget21COM.dll}}. These folder will only appear on 64 bit installations and is useful if you want to code against the 32 bit libraries.
| |
| | |
| ====Special Cases of Library Install====
| |
| | |
| Regardless of what language you will be using to program Phidgets, you will need the {{Code|phidget21.dll}} placed in the {{Code|C:\WINDOWS\system32}} directory. Additional files are needed for the language that you choose. Please refer to the documentation provided by your [[Device List|language]] to determine what files are needed and the steps needed to install them onto your system.
| |
| | |
| You can find the {{Code|phidget21.dll}} in the link below:
| |
| | |
| *[http://www.phidgets.com/downloads/libraries/Phidget21-windevel_2.1.8.20110615.zip Phidget21 Libraries] (32-Bit and 64-Bit development files without an installer)
| |
| | |
| PhidgetWebService21.exe is also provided in the link above.
| |
| | |
| ===Windows in a Virtual Machine===
| |
| | |
| Phidgets can also be used inside a virtual machine. Instructions for VMWare and VirtualBox are provided. Virtual PC is not supported as USB Phidgets requires a virtual platform that supports HID USB Devices. Since Virtual PC does not support HID USB devices, Phidgets may not be used.
| |
| | |
| As always, please ensure that you have the latest Phidget [[#Getting Started (Libraries and Drivers) | drivers]] installed on the virtual machine and that you are using the latest version of your virtual software.
| |
| | |
| <b>VMWare:</b>
| |
| | |
| To enable USB Phidgets, select Virtual Machine -> Removable Devices -> and select the Phidget Input Device -> Connect.
| |
| | |
| <b>VirtualBox</b>
| |
| | |
| To enable USB Phidgets, VirtualBox Guest Additions(Devices -> Install Guest Additions) may need to be installed. Afterwards, click on Devices -> USB Devices and select the Phidget device to enable. The state should go from Busy to Captured. VirtualBox may bring up a new hardware wizard in the host operating system, which has to be installed. Please note that Phidgets with USB hubs(i.e, [[Product - 1019 1 - PhidgetInterfaceKit 8/8/8 w/6 Port Hub|1019]]), are undetectable; Fortunately, Phidgets that are attached to such Phidgets are detectable.
| |
| | |
| ==Common Problems and Solutions==
| |
| | |
| ===Issue: A corrupt installation fails on uninstall or repair===
| |
| Affected Operating Systems: '''Windows'''
| |
| | |
| Solution: If the normal uninstall fails, or for whatever reason, you can choose to remove the Phidgets framework manually.
| |
| Please perform the following:
| |
| # Shut down any programs using the Phidget libraries, including the webservice and the Phidget Control Panel.
| |
| # Delete C:\Program Files\Phidgets\
| |
| # Remove the Phidgets key from the Registry [-HKEY_LOCAL_MACHINE\SYSTEM\CurrentControlSet\Services PhidgetWebservice21].
| |
| | |
| In most cases this is enough to get the installer working again. If you need to remove all traces of
| |
| the Phidgets libraries manually, perform the following additional steps:
| |
| | |
| # Unregister the COM library: regsvr32 /u “C:\Program Files\Phidgets\Phidget21COM.dll”
| |
| # Remove Phidget21.NET and Policy.2.1.Phidget21.NET from C:\Windows\Assembly\
| |
| # Delete ‘C:\Documents and Settings\All Users\Application Data\Phidgets’ (WindowsXP) or ‘C:\Users\All Users\Phidgets’ (Vista).
| |
| # Delete C:\Windows\system32\phidget21.dll
| |
| # Delete Phidgets from the start menu
| |
| # Search for and remove keys mentioning Phidgets from the registry in the following locations:
| |
| :* [HKEY_LOCAL_MACHINE\SOFTWARE\Microsoft\Windows\CurrentVersion\Uninstall\]
| |
| :* [HKEY_LOCAL_MACHINE\SOFTWARE\Classes\Installer\Products\]
| |
| :* [HKEY_LOCAL_MACHINE\SOFTWARE\Microsoft\.NETFramework\AssemblyFolders\Phidgets Inc]
| |
| :* [HKEY_CURRENT_USER\Software\Microsoft\Windows\CurrentVersion\Run\Phidget21Manager]
| |
| :* [HKEY_LOCAL_MACHINE\SOFTWARE\Classes\Installer\Assemblies\Global\]
| |
| | |
| :9. Reboot
| |
| | |
| '''NOTE:''' You can go through the registry and purge any other keys mentioning Phidgets if you still
| |
| have problems, but at this point you should be able to reinstall under most cases. There will also be
| |
| keys relating to the installer, the .NET library and the COM library, but they should not interfere with
| |
| anything.
| |
| | |
| ===Issue: Event data is sporadic/slow/clumped over the webservice===
| |
| Affected Operating Systems: '''Windows'''
| |
| | |
| Windows implements 200ms delayed ACKs for network traffic. When traffic is one-way only - as it is with event data, the data will all arrive in clumps every 200ms because of delayed ACKs.
| |
| | |
| This can be a great drawback for application which rely on low latency event data over the network. (source: http://support.microsoft.com/kb/214397)
| |
| | |
| This delayed ACK behavior can be disabled in windows to decrease event latency as documented here: http://support.microsoft.com/kb/328890
| |
| | |
| In the future, the Phidgets library may implement this differently, but so far we have been unable to match the performance achieved by disabling delayed ACK.
| |
| {{CreativeCommons}}
| |