OS - Windows: Difference between revisions
No edit summary |
|||
| (7 intermediate revisions by 2 users not shown) | |||
| Line 1: | Line 1: | ||
<metadesc>Communicate over USB with sensors, controllers and relays with Phidgets! Program in Windows using a wide variety of programming languages.</metadesc> | |||
[[Category:OS]] | [[Category:OS]] | ||
__TOC__ | __TOC__ | ||
| Line 16: | Line 17: | ||
If you need Phidget21 libraries, [{{SERVER}}/downloads/phidget21/libraries/windows/ click here]. | If you need Phidget21 libraries, [{{SERVER}}/downloads/phidget21/libraries/windows/ click here]. | ||
==Getting | ==Getting Started with Windows== | ||
Welcome to using Phidgets with Windows. If you are ready to go, the first step in creating Windows applications with Phidgets is installing our libraries! | Welcome to using Phidgets with Windows. If you are ready to go, the first step in creating Windows applications with Phidgets is installing our libraries! | ||
| Line 29: | Line 30: | ||
The libraries are now installed on your machine. Next, let's verify that | The libraries are now installed on your machine. Next, let's verify that they are working properly. | ||
===Verify=== | ===Verify=== | ||
| Line 57: | Line 58: | ||
''Great choices for beginners:'' | ''Great choices for beginners:'' | ||
*[[Language - C Sharp|C#]] | *[[Language - C Sharp|C#]] | ||
*[[Language - C | *[[Language - C|C]] | ||
*[[Language - Java|Java]] | *[[Language - Java|Java]] | ||
*[[Language - Python|Python]] | *[[Language - Python|Python]] | ||
| Line 70: | Line 71: | ||
The Phidget Network Server is an extremely useful tool that allows you to remotely control Phidgets over your network. If you haven't already, check out the [[Phidget Network Server]] page for a complete overview. | The Phidget Network Server is an extremely useful tool that allows you to remotely control Phidgets over your network. If you haven't already, check out the [[Phidget Network Server]] page for a complete overview. | ||
===Try it | ===Try it Out!=== | ||
In order to try the Phidget Network Server out, first download and install [https://www.apple.com/support/downloads/bonjourforwindows.html Bonjour for Windows] on your host computer and your client computer. | In order to try the Phidget Network Server out, first download and install [https://www.apple.com/support/downloads/bonjourforwindows.html Bonjour for Windows] on your host computer and your client computer. | ||
*'''Host computer:''' the computer that is physically connected to the Phidgets via USB and is running the Phidget Network Server. | *'''Host computer:''' the computer that is physically connected to the Phidgets via USB and is running the Phidget Network Server. | ||
| Line 106: | Line 107: | ||
Note the label in the example indicating a remote connection. This means the example is using the Phidget Network Server in order to communicate with the device. | Note the label in the example indicating a remote connection. This means the example is using the Phidget Network Server in order to communicate with the device. | ||
===What's | ===What's Next?=== | ||
Now that you have seen the Phidget Network Server in action, you may be interested in implementing an application that takes advantage of all it's features. Luckily, every programming language we support comes with example code on how to do this! Jump to [[#Programming|programming languages]] above. | Now that you have seen the Phidget Network Server in action, you may be interested in implementing an application that takes advantage of all it's features. Luckily, every programming language we support comes with example code on how to do this! Jump to [[#Programming|programming languages]] above. | ||
For more information about the Network Server tab on the Phidget Control Panel, visit the Visit the [[Phidget Control Panel | For more information about the Network Server tab on the Phidget Control Panel, visit the Visit the [[Phidget Control Panel|Phidget Control Panel]] page. | ||
==Advanced Information== | ==Advanced Information== | ||
===Windows XP=== | |||
Because .Net 4.0 doesn't work on Windows XP, the installer for the Phidget22 drivers will not work. Instead, see the [[#Manual_File_Installation|Manual File Installation]] section for installation instructions. | |||
Additionally, the Phidget Control Panel is not supported in Phidget22 under Windows XP, and the pre-compiled examples found under C:/Program Files/Phidgets/Examples will not work. Other code samples found on our language pages will still work, although for C# and VB.Net examples, you'll have to manually change the .Net framework version in the project file from 4 to 3.5 in order to run them. | |||
===Manual File Installation=== | ===Manual File Installation=== | ||
If you would like to perform a manual file installation, first download the library files: | If you would like to perform a manual file installation, first download the library files: | ||
Revision as of 16:10, 3 January 2018
Quick Downloads
Already know what you're doing? Here you go:
Don't want the installer? After downloading the files, be sure to check out the Advanced Information section below.
- Phidget22 Libraries (32-Bit and 64-Bit development files without an installer)
- Software License
If you need older versions of the Phidget22 windows libraries, click here. If you need Phidget21 libraries, click here.
Getting Started with Windows
Welcome to using Phidgets with Windows. If you are ready to go, the first step in creating Windows applications with Phidgets is installing our libraries!
Install
To install our libraries, download the installer for your system:
When prompted, continue with the installation:
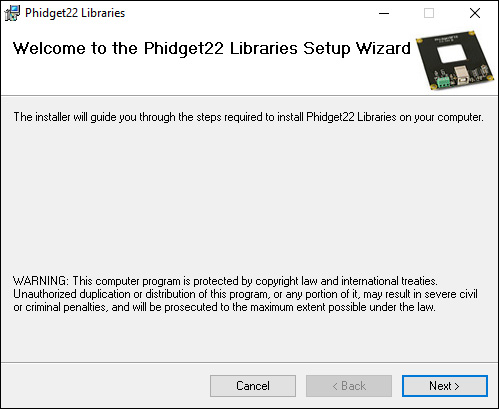
The libraries are now installed on your machine. Next, let's verify that they are working properly.
Verify
The best way to verify that your libraries are working properly is to use the Phidget Control Panel. The control panel is a powerful tool that will help you develop your Phidgets applications. Get started by following the instructions below:
Find the ![]() icon in the taskbar. If it is not there, open up the start menu and search for Phidget Control Panel
icon in the taskbar. If it is not there, open up the start menu and search for Phidget Control Panel
Next, double-click on the Phidgets icon to bring up the Phidget Control Panel. You can now see all the Phidgets that are plugged into your machine, as well as any Phidgets that are on the network:
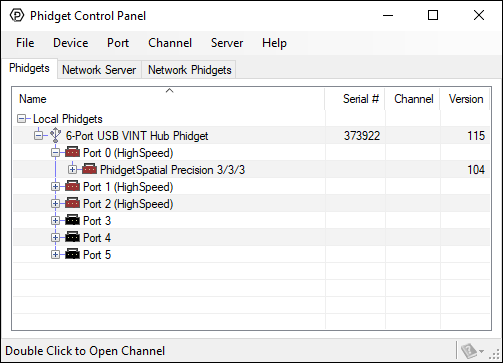
Click on the + beside a device to expand it so that you can see all available channels. Double-click on one of these channels to open up a window that lets you interact with it.:
The Phidget Control Panel can be used for testing devices, updating firmware, enabling a Phidget Network Server, and more! Visit the Phidget Control Panel page for more information.
Your Phidget is now able to communicate with your development machine. The next step is selecting a programming language so you can start to write some code!
Programming
Ready to write some code? Select one of the programming languages below:
Great choices for beginners:
Also supported:
Phidget Network Server
The Phidget Network Server is an extremely useful tool that allows you to remotely control Phidgets over your network. If you haven't already, check out the Phidget Network Server page for a complete overview.
Try it Out!
In order to try the Phidget Network Server out, first download and install Bonjour for Windows on your host computer and your client computer.
- Host computer: the computer that is physically connected to the Phidgets via USB and is running the Phidget Network Server.
- Client computer: a computer running a Phidgets application that accesses Phidgets connected to the host computer.
If you only have one computer, don't worry, your machine can act as both a host and a client.
Next, open the Phidget Control Panel on your host computer. Do this by double-clicking on the ![]() icon in your taskbar, or, by searching for Phidget Control Panel in the start menu.
Navigate to the Network Server tab, you will see something like this:
icon in your taskbar, or, by searching for Phidget Control Panel in the start menu.
Navigate to the Network Server tab, you will see something like this:
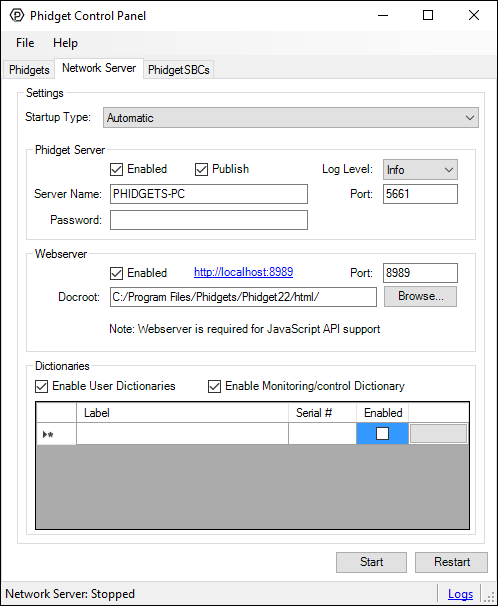
From here, you can start, stop, or restart the Network Server. You can also decide how and when the Network Server will start.
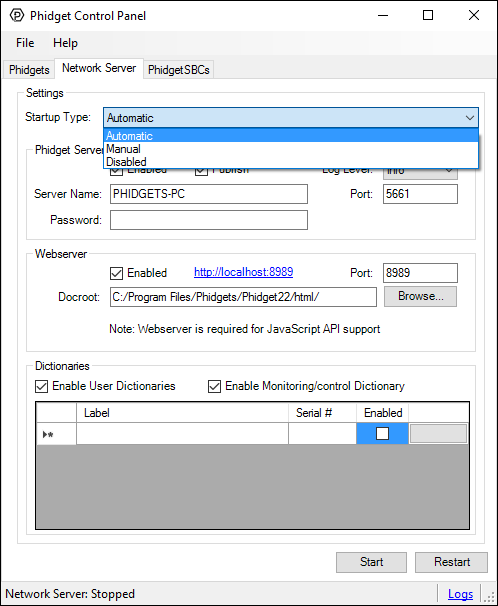
Select Automatic as the startup type from the list and press the start button. By enabling automatic startup, the Network Server will run immediately after Windows boots, so you won't have to manually start it again.
Now that you have the Network Server running on your host computer, the next step will be accessing the Phidgets connected to your host computer from your client computer. Follow the steps below:
Open the Phidget Control Panel on your client computer. You will see something like this:
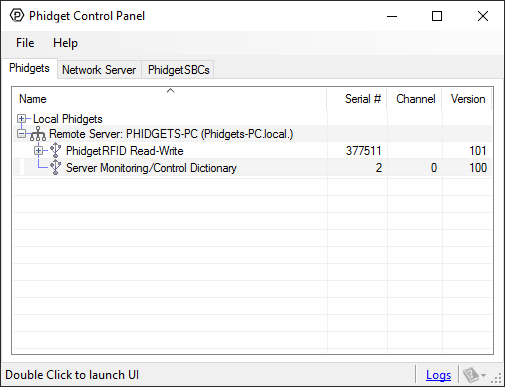
As you can see from the image above, Phidget servers are listed under the following heading:
- Remote Server: Servername (link local address)
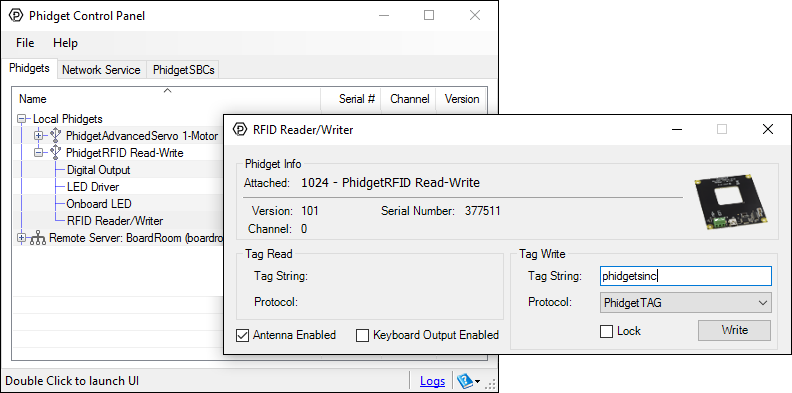
You now have access to the Phidgets that are connected to your host computer. Try double-clicking one of them to bring up an example:
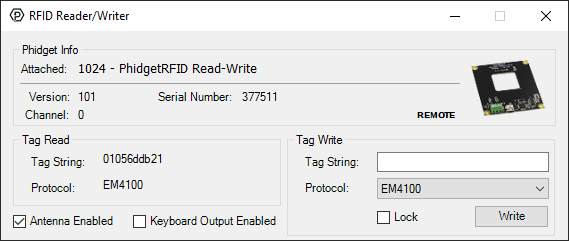
Note the label in the example indicating a remote connection. This means the example is using the Phidget Network Server in order to communicate with the device.
What's Next?
Now that you have seen the Phidget Network Server in action, you may be interested in implementing an application that takes advantage of all it's features. Luckily, every programming language we support comes with example code on how to do this! Jump to programming languages above.
For more information about the Network Server tab on the Phidget Control Panel, visit the Visit the Phidget Control Panel page.
Advanced Information
Windows XP
Because .Net 4.0 doesn't work on Windows XP, the installer for the Phidget22 drivers will not work. Instead, see the Manual File Installation section for installation instructions.
Additionally, the Phidget Control Panel is not supported in Phidget22 under Windows XP, and the pre-compiled examples found under C:/Program Files/Phidgets/Examples will not work. Other code samples found on our language pages will still work, although for C# and VB.Net examples, you'll have to manually change the .Net framework version in the project file from 4 to 3.5 in order to run them.
Manual File Installation
If you would like to perform a manual file installation, first download the library files:
Next, take a look at the table below to see where these files are normally placed:
| C:\Program Files\Phidgets\Phidget22 | |
|---|---|
| File | Description |
| phidget22.dll | contains our library, which is used at run-time. |
| phidget22.lib | is used by your compiler to link to the dll. Your compiler has to know where this file is, by default our installer puts phidget22.lib into C:/Program Files/Phidgets/Phidget22, so you can either point your compiler to that location, or copy and link to it in a directory for your project workspace. phidget22.lib is written to be compatible with most compilers - but your specific compiler may need a different format. |
| x86 Folder | contains the versions of phidget22.lib and phidget22.dll that are optimized for 32-bit systems. This folder will only appear on 64-bit installations and is useful if you want to code against the 32-bit libraries. |
| NetworkServer.exe | is used to control Phidgets remotely over a network using the Phidget Network Server |
| phidget22.h | lists all the API function calls available to you. Your compiler also has to know where this file is. By default, our installer puts phidget22.h into C:\Program Files\Phidgets\Phidget22' so you can either point your compiler to that location, or copy and link to it in a directory for your project workspace. |
| phidget22.jar | is an archive containing the Phidgets library, used by the Java programming language. |
| Phidget22.NET.dll | is the Phidgets library for the .NET framework used by .NET languages such as C# and Visual Basic .NET. |
| Phidget22.NET.XML | provides the IntelliSense in-line documentation for the .NET library in Visual Studio. |
| Phidget22java.dll | is the library for Phidgets in Java. |
| Phidget22Manager.exe | is the Phidget Control Panel, a tool to quickly determine whether your system is able to control Phidgets, and also acts as a debugging tool. |
| C:\Windows\System32 | |
| phidget22.dll | contains our library, which is used at run-time. |
| Phidget22java.dll | is the library for Phidgets in Java. |
| C:\Windows\SysWOW64 | |
| phidget22.dll | contains our library, which is used at run-time. |
Windows in a Virtual Machine
Phidgets can be used inside a virtual machine. Instructions for VMWare and VirtualBox are provided below. Virtual PC is not supported as USB Phidgets requires a virtual platform that supports HID USB Devices and since Virtual PC does not support HID USB devices, Phidgets may not be used.
As always, please ensure that you have the latest libraries installed on the virtual machine and that you are using the latest version of your virtual software.
VMWare:
To enable USB Phidgets, select Virtual Machine -> Removable Devices -> and select the Phidget Input Device -> Connect.
VirtualBox
To enable USB Phidgets, VirtualBox Guest Additions(Devices -> Install Guest Additions) may need to be installed. Afterwards, click on Devices -> USB Devices and select the Phidget device to enable. The state should go from Busy to Captured. VirtualBox may bring up a new hardware wizard in the host operating system, which has to be installed. Please note that Phidgets with USB hubs (for example, the 1019 Interface Kit with 6-port hub), are undetectable; Fortunately, Phidgets that are attached to such Phidgets are detectable.
Note that Windows XP "mode" in Windows 7 does not support Phidgets.
Installing Without an Internet Connection
When running the Phidgets installer it will check for other applications such as .NET. Part of this requires an active internet connection. The downside to this is that even if you have the applications installed already, if you do not have an internet connection you cannot complete the installation process. There is a way around this however which involves extracting the Phidget22 .msi file out of the .exe installer. To do this follow these steps:
- Run the installer.
- Once the installer has started up and you are at the first informational window, navigate to your
Local Disk\Users\"username"\AppData\Local\Temp folder.
- Look for the most recently modified folders. The Phidgets one will not have an obvious title, most likely a seemingly random string of numbers and characters.

- In this example the folder was named "IXP000.tmp" but it may be different for you. In the folder you will find the
Phidget22_x64.msiorPhidget22_x86.msifile. This file can be run to install the Phidgets libraries without needing an internet connection.