OS - Linux: Difference between revisions
mNo edit summary |
No edit summary |
||
| (21 intermediate revisions by 4 users not shown) | |||
| Line 1: | Line 1: | ||
<metadesc>Communicate over USB with sensors, controllers and relays with Phidgets! Program in Linux using a wide variety of programming languages.</metadesc> | |||
[[Category:OS]] | [[Category:OS]] | ||
{| | |||
== | |style="vertical-align:middle; width: 60%;"| | ||
==Getting Started with Linux== | |||
Welcome to using Phidgets with Linux! | |||
If you | If you are ready to go, the first step in creating Linux applications with Phidgets is installing our libraries. | ||
|{{TOC limit|2}} | |||
|} | |||
===Install=== | |||
If your Linux machine is running 32-bit Debian, jump ahead to [[#Debian install | Debian install]]. | |||
== | ====Generic Install==== | ||
To install our libraries, first install libusb-1.0 development libraries. The exact command and package name will vary depending on distribution. For Debian based distributions, including Ubuntu and Mint, the command would be: | |||
<syntaxhighlight lang=bash> | |||
apt-get install libusb-1.0-0-dev | |||
</syntaxhighlight> | |||
====Debian | Next, download and unpack the following files: | ||
To install | *[{{SERVER}}/downloads/phidget22/libraries/linux/libphidget22.tar.gz libphidget22] (Mandatory) | ||
*[{{SERVER}}/downloads/phidget22/libraries/linux/libphidget22extra.tar.gz libphidget22extra] (Optional - needed by NetworkServer and Admin) | |||
*[{{SERVER}}/downloads/phidget22/libraries/linux/libphidget22java.tar.gz libphidget22java] (Optional - Java Libraries) | |||
*[{{SERVER}}/downloads/phidget22/servers/linux/phidget22networkserver.tar.gz phidget22networkserver] (Optional - [[Phidget Network Server]]) | |||
*[{{SERVER}}/downloads/phidget22/tools/linux/phidget22admin.tar.gz phidget22admin] (Optional - Phidget Admin Tool) | |||
Open the README file that is included at the top of each directory. This file will give you important information about how to properly install the files. | |||
Libraries are installed in /usr/local/lib by default. If you run into trouble finding the libraries during linking or at runtime, this probably means that /usr/local/lib is not on the library path for your distribution. | |||
You can handle this in a number of ways: | |||
Specify a different install folder during compile | |||
<syntaxhighlight lang=bash>./configure --prefix=/usr && make && sudo make install</syntaxhighlight> | |||
OR Add /usr/local/lib to the system-wide library path | |||
<syntaxhighlight lang=bash>echo /usr/local/lib >> /etc/ld.so.conf && sudo ldconfig</syntaxhighlight> | |||
OR Add /usr/local/lib in your local shell every time | |||
<syntaxhighlight lang=bash>export LD_LIBRARY_PATH=$LD_LIBRARY_PATH:/usr/local/lib</syntaxhighlight> | |||
The libraries are now installed on your machine. Next, let's verify that they are working properly. Jump ahead to [[#Verify | verifying]]. | |||
====Debian Install==== | |||
To install our libraries on Debian, first enter the following command in the terminal: | |||
<syntaxhighlight lang=bash> | <syntaxhighlight lang=bash> | ||
wget -qO- http://www.phidgets.com/gpgkey/pubring.gpg | apt-key add - | wget -qO- http://www.phidgets.com/gpgkey/pubring.gpg | apt-key add - | ||
| Line 24: | Line 48: | ||
Next, enter the following command if you are running Debian '' | Next, enter the following command if you are running Debian ''stretch'': | ||
<syntaxhighlight lang=bash> | <syntaxhighlight lang=bash> | ||
echo 'deb http://www.phidgets.com/debian | echo 'deb http://www.phidgets.com/debian stretch main' > /etc/apt/sources.list.d/phidgets.list | ||
</syntaxhighlight> | </syntaxhighlight> | ||
If you are running ''squeeze'' (Debian 6), | If you are running ''squeeze'' (Debian 6), ''wheezy'' (Debian 7) or ''jessie'' (Debian 8) simply replace ''stretch'' in the command above with your release. If you are running Ubuntu 16.04, replace ''stretch'' with ''xenial''. | ||
| Line 37: | Line 61: | ||
Finally, install the | Finally, install the Phidget package by entering the command below: | ||
<syntaxhighlight lang=bash> | <syntaxhighlight lang=bash> | ||
apt-get install libphidget22 | apt-get install libphidget22 | ||
</syntaxhighlight> | </syntaxhighlight> | ||
You may also want to apt-get install the following optional packages: | |||
* '''libphidget22-dev''': The C development libraries for Phidget22 | |||
* '''libphidget22extra''': Extra runtime library required for the Network Server and Admin tools | |||
* '''phidget22networkserver''': The [[Phidget Network Server]], which enables use of Phidgets over your network | |||
* '''libphidget22java''': The Java libraries for Phidget22 | |||
* '''phidget22admin''': An administrator utility which helps keep track of who is connected to your Phidgets over the network server | |||
* '''phidget22wwwjs''': The JavaScript libraries for Phidget22. This package also installs the HTML examples which can be accessed through the web interface | |||
The libraries are now installed on your machine. Next, let's verify that they are working properly. | |||
===Verify=== | ===Verify=== | ||
The best way to verify that your libraries are | The best way to verify that your libraries are working properly is to compile and run an example program. | ||
| Line 92: | Line 106: | ||
Your Phidget is now able to communicate with your development machine. The next step is selecting a programming language so you can start to write some code! | Your Phidget is now able to communicate with your development machine. The next step is selecting a programming language so you can start to write some code! | ||
==Programming== | |||
Ready to write some code? Select one of the programming languages below: | Ready to write some code? Select one of the programming languages below: | ||
{{Programming_Languages_Table}} | |||
==Phidget Network Server== | ==Phidget Network Server== | ||
The Phidget Network Server is an extremely useful | The Phidget Network Server is an extremely useful tool that allows you to remotely control Phidgets over your network. If you haven't already, check out the [[Phidget Network Server]] page for a complete overview. | ||
===Try it | ===Try it Out!=== | ||
In order to try the Phidget Network Server out, you will need a host computer, and a client computer with the Phidget libraries installed: | In order to try the Phidget Network Server out, you will need a host computer, and a client computer with the Phidget libraries installed: | ||
*Host computer: the computer that is physically connected to the Phidgets via USB and is running the Phidget Network Server. | *'''Host computer:''' the computer that is physically connected to the Phidgets via USB and is running the Phidget Network Server. | ||
*Client computer: a computer running a Phidgets application that accesses Phidgets connected to the host computer. | *'''Client computer:''' a computer running a Phidgets application that accesses Phidgets connected to the host computer. | ||
If you only have one computer, don't worry, your machine can act as both a host and a client. | If you only have one computer, don't worry, your machine can act as both a host and a client. | ||
| Line 145: | Line 152: | ||
phidget22admin -s | phidget22admin -s | ||
</syntaxhighlight> | </syntaxhighlight> | ||
[[File:Linux_networkserver_phidgetadmin.PNG|link=|center]] | [[File:Linux_networkserver_phidgetadmin.PNG|link=|center|850px]] | ||
| Line 157: | Line 164: | ||
This command will list all remote Phidgets on the network. Confirm that you can see the Phidgets attached to your host computer | This command will list all remote Phidgets on the network. Confirm that you can see the Phidgets attached to your host computer: | ||
[[File:Linux_networkserver_phidadminlist.PNG|link=|center]] | [[File:Linux_networkserver_phidadminlist.PNG|link=|center]] | ||
===Run Phidget Network Server on | ===Run Phidget Network Server on Boot=== | ||
If you would like the Network Server to run automatically when your computer boots, take a look at [{{SERVER}}/?view=articles&article=Daemon1 this project]. | If you would like the Network Server to run automatically when your computer boots, take a look at [{{SERVER}}/?view=articles&article=Daemon1 this project]. | ||
===What's next?=== | |||
Now that you have seen the Network Server in action, you may be interested in implementing an application that takes advantage of all it's features. Luckily, every programming language we support comes with example code on how to do this! Jump to [[#Programming|programming languages]] above. | |||
For more information about the Network Server tab on the Phidget Control Panel, visit the Visit the [[Phidget Control Panel#macOS|Phidget Control Panel]] page. | |||
==Advanced Information== | ==Advanced Information== | ||
===Setting udev Rules=== | |||
If you don't want to be using ''sudo'' to run Phidget programs (including the Network Server) forever, you will want to create a udev rule to allow yourself access to the Phidget when you are not root. | |||
Udev has an easy way to set the owner and permissions of the USB interface of the Phidget - it finds all devices that match a given set of rules, and applies new traits to them. But you need to give udev something to match in order to apply the new settings. Here, we will tell udev to match the vendor code for Phidgets, Inc. | |||
We recommend that you use the rules file included in the library download you have already installed. Check the README file included in that download for information on how exactly to install it, or continue reading here. | |||
The rules for udev are kept in files in ''/etc/udev/rules.d'' and are traditionally grouped into order of running (10 runs before 20, 30, etc) and device type (cd, network, etc). There should be one or more files in there already. Simply find the file named ''99-libphidget22.rules'' included with our library files, and move it into ''/etc/udev/rules.d''. | |||
Strictly speaking, the files run in lexical order (i.e. the order they're listed when you use the ''ls'' command). A device can match many rules, and all will apply (if possible). If conflicting rules are found, the first rule found is followed. | |||
===Older Versions=== | |||
If you need older versions of the Phidget22 Linux libraries, [{{SERVER}}/downloads/phidget22/libraries/linux/libphidget22/ click here]. | |||
If you need Phidget21 Linux Libraries, [{{SERVER}}/downloads/phidget21/libraries/linux/libphidget/ click here]. | |||
Revision as of 18:47, 31 October 2018
Getting Started with LinuxWelcome to using Phidgets with Linux! If you are ready to go, the first step in creating Linux applications with Phidgets is installing our libraries. |
Install
If your Linux machine is running 32-bit Debian, jump ahead to Debian install.
Generic Install
To install our libraries, first install libusb-1.0 development libraries. The exact command and package name will vary depending on distribution. For Debian based distributions, including Ubuntu and Mint, the command would be:
apt-get install libusb-1.0-0-dev
Next, download and unpack the following files:
- libphidget22 (Mandatory)
- libphidget22extra (Optional - needed by NetworkServer and Admin)
- libphidget22java (Optional - Java Libraries)
- phidget22networkserver (Optional - Phidget Network Server)
- phidget22admin (Optional - Phidget Admin Tool)
Open the README file that is included at the top of each directory. This file will give you important information about how to properly install the files.
Libraries are installed in /usr/local/lib by default. If you run into trouble finding the libraries during linking or at runtime, this probably means that /usr/local/lib is not on the library path for your distribution.
You can handle this in a number of ways:
Specify a different install folder during compile
./configure --prefix=/usr && make && sudo make install
OR Add /usr/local/lib to the system-wide library path
echo /usr/local/lib >> /etc/ld.so.conf && sudo ldconfig
OR Add /usr/local/lib in your local shell every time
export LD_LIBRARY_PATH=$LD_LIBRARY_PATH:/usr/local/lib
The libraries are now installed on your machine. Next, let's verify that they are working properly. Jump ahead to verifying.
Debian Install
To install our libraries on Debian, first enter the following command in the terminal:
wget -qO- http://www.phidgets.com/gpgkey/pubring.gpg | apt-key add -
Next, enter the following command if you are running Debian stretch:
echo 'deb http://www.phidgets.com/debian stretch main' > /etc/apt/sources.list.d/phidgets.list
If you are running squeeze (Debian 6), wheezy (Debian 7) or jessie (Debian 8) simply replace stretch in the command above with your release. If you are running Ubuntu 16.04, replace stretch with xenial.
Update your package lists:
apt-get update
Finally, install the Phidget package by entering the command below:
apt-get install libphidget22
You may also want to apt-get install the following optional packages:
- libphidget22-dev: The C development libraries for Phidget22
- libphidget22extra: Extra runtime library required for the Network Server and Admin tools
- phidget22networkserver: The Phidget Network Server, which enables use of Phidgets over your network
- libphidget22java: The Java libraries for Phidget22
- phidget22admin: An administrator utility which helps keep track of who is connected to your Phidgets over the network server
- phidget22wwwjs: The JavaScript libraries for Phidget22. This package also installs the HTML examples which can be accessed through the web interface
The libraries are now installed on your machine. Next, let's verify that they are working properly.
Verify
The best way to verify that your libraries are working properly is to compile and run an example program.
First, download and unpack this C example:
Next, open the terminal at the example location. Compile the example by entering the following command:
gcc HelloWorld.c -o HelloWorld -lphidget22
Run the HelloWorld example:
./HelloWorld
Your terminal should look something like this:
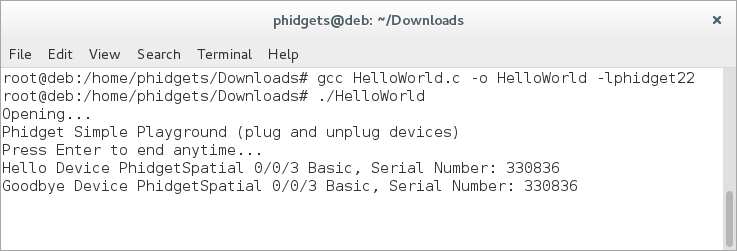
The HelloWorld program will simply communicate when a Phidget has been attached or detached, as can be seen in the image above.
Your Phidget is now able to communicate with your development machine. The next step is selecting a programming language so you can start to write some code!
Programming
Ready to write some code? Select one of the programming languages below:
Phidget Network Server
The Phidget Network Server is an extremely useful tool that allows you to remotely control Phidgets over your network. If you haven't already, check out the Phidget Network Server page for a complete overview.
Try it Out!
In order to try the Phidget Network Server out, you will need a host computer, and a client computer with the Phidget libraries installed:
- Host computer: the computer that is physically connected to the Phidgets via USB and is running the Phidget Network Server.
- Client computer: a computer running a Phidgets application that accesses Phidgets connected to the host computer.
If you only have one computer, don't worry, your machine can act as both a host and a client.
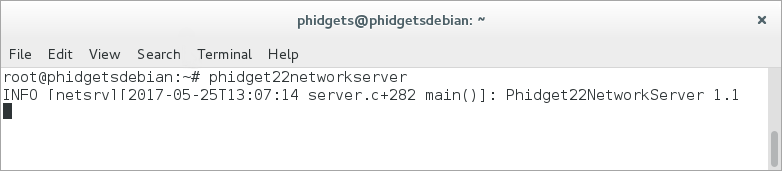
Next, open the terminal on the host computer and type in the following command to run the Network Server in the terminal:
phidget22networkserver
Or, as a daemon:
phidget22networkserver -D
The Network Server is now running on your machine with the default configuration. If you would like to change the Network Server configuration, you can do so by modifying the following file:
- /etc/phidgets/phidget22networkserver.pc
You can also simply point towards your own configuration file with the following command:
phidget22networkserver -c /path/to/configuration/file
Now that you have the Network Server running on your host computer, the next step will be accessing the Phidgets connected to your host computer from your client computer. Follow the steps below:
Open the terminal on the client computer and type in the following command (if you are using a single machine, simply open a new terminal session and continue):
phidget22admin -s

This will list all of the Phidget Servers on your network. Confirm that you can see the Network Server running on your host computer.
After you have confirmed your Network Server is running, type in the following command:
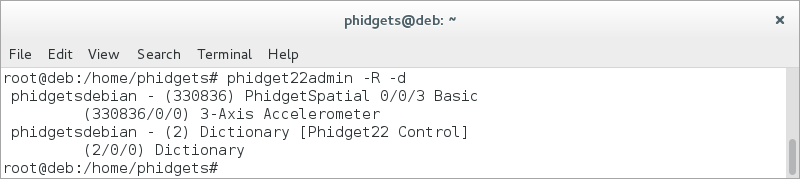
phidget22admin -R -d
This command will list all remote Phidgets on the network. Confirm that you can see the Phidgets attached to your host computer:
Run Phidget Network Server on Boot
If you would like the Network Server to run automatically when your computer boots, take a look at this project.
What's next?
Now that you have seen the Network Server in action, you may be interested in implementing an application that takes advantage of all it's features. Luckily, every programming language we support comes with example code on how to do this! Jump to programming languages above.
For more information about the Network Server tab on the Phidget Control Panel, visit the Visit the Phidget Control Panel page.
Advanced Information
Setting udev Rules
If you don't want to be using sudo to run Phidget programs (including the Network Server) forever, you will want to create a udev rule to allow yourself access to the Phidget when you are not root.
Udev has an easy way to set the owner and permissions of the USB interface of the Phidget - it finds all devices that match a given set of rules, and applies new traits to them. But you need to give udev something to match in order to apply the new settings. Here, we will tell udev to match the vendor code for Phidgets, Inc.
We recommend that you use the rules file included in the library download you have already installed. Check the README file included in that download for information on how exactly to install it, or continue reading here.
The rules for udev are kept in files in /etc/udev/rules.d and are traditionally grouped into order of running (10 runs before 20, 30, etc) and device type (cd, network, etc). There should be one or more files in there already. Simply find the file named 99-libphidget22.rules included with our library files, and move it into /etc/udev/rules.d.
Strictly speaking, the files run in lexical order (i.e. the order they're listed when you use the ls command). A device can match many rules, and all will apply (if possible). If conflicting rules are found, the first rule found is followed.
Older Versions
If you need older versions of the Phidget22 Linux libraries, click here.
If you need Phidget21 Linux Libraries, click here.