Language - Java: Difference between revisions

From Phidgets Support
No edit summary
 
(248 intermediate revisions by 10 users not shown)
Line 1: Line 1:
[[File:icon-Java.png|64x64px|link=Language - C Sharp]]Java is a modern, object-oriented programming language developed by Oracle.
[[Category:Language]]
__NOTOC__


__TOC__
We provide support for the Java language in all major operating systems. We also provide instructions on how to get your project started in a number of common development environments. Select your operating system and preferred development environment below, and follow the instructions to get your project running with Phidgets.


==Introduction==
If you do not know which development environment you want to use, or your development environment of choice is not listed, we recommend starting with javac as the simplest path to getting your code running.


{{LanguageSupport|Java|the complete Phidget API, including events|all Phidget devices.|various environments such as <code>javac</code>, NetBeans, and Eclipse}}
Once you have set up your development environment to run with Phidgets, we recommend you follow our guide on [[Phidget Programming Basics]]. The guide will showcase the fundamentals of programming with Phidgets, with examples in Java.


==Quick Downloads==
== Setup Guide ==


Just need the Java drivers, libraries, and examples?  Here they are:
<div class="phd-deck-sequence">
{{PT3_JAVA_CHOOSE}}{{PT3_JAVA_WIN_JAVAC}}{{PT3_JAVA_MAC_JAVAC}}{{PT3_JAVA_LNX_JAVAC}}{{PT3_JAVA_SBC_JAVAC}}{{PT3_JAVA_WIN_NETBEANS}}{{PT3_JAVA_MAC_NETBEANS}}{{PT3_JAVA_LNX_NETBEANS}}{{PT3_JAVA_WIN_ECLIPSE}}{{PT3_JAVA_MAC_ECLIPSE}}{{PT3_JAVA_LNX_ECLIPSE}}{{PT3_JAVA_ANDROID_AS}}
</div>


Java API Documentation:
== Quick Downloads ==
*[http://www.phidgets.com/documentation/JavaDoc.zip C# API Manual Download] or [http://www.phidgets.com/documentation/web/javadoc/index.html (HTML online version)]
*[[General API]] (more help on functions common to all Phidgets)
*[[Device List | Device Specific APIs]] (more help on functions specific to your Phidget)


Java Example Code:
If you already know what you're doing and just need the files, you can find them all below.


*[http://www.phidgets.com/downloads/examples/JavaJNI_2.1.8.20111220.zip Java Example Code]
=== Documentation ===


Libraries and Drivers:
*{{Phidget22API}}  (select Java from the drop-down menu)
*[http://www.phidgets.com/downloads/libraries/phidget21jar_2.1.8.20111220.zip phidget21.jar]
*[http://www.phidgets.com/downloads/libraries/Phidget-x86_2.1.8.20111220.exe 32 bit Windows (drivers, with libraries)]
*[http://www.phidgets.com/downloads/libraries/Phidget-x64_2.1.8.20111220.exe 64 bit Windows (drivers, with libraries)]
*[http://www.phidgets.com/downloads/libraries/libphidget_2.1.8.20111028.tar.gz General Linux Libraries] ([[OS - Linux | Linux Library Setup Instructions]])
*[http://www.phidgets.com/downloads/libraries/Phidget_2.1.8.20111103.dmg General Mac OSX Libraries] ([[OS - Mac OS X | Mac OS X Library Setup Instructions]])


==Getting started with Java==
=== Example Code ===


If you are new to writing code for Phidgets, we recommend starting by running, then modifying existing examples. This will allow you to:
*{{SampleCode|Java|Java Examples}}
{{ExampleCodeReasons}}
 
Instructions are divided up by operating system. Choose:
*[[#Windows(2000/XP/Vista/7)|Windows 2000 / XP / Vista / 7]]
*[[#Mac OS X |Mac OS X]]
*[[#Linux | Linux]] (including PhidgetSBC)
 
==Windows(2000/XP/Vista/7)==


===Libraries===
===Libraries===
*[http://www.phidgets.com/downloads/libraries/phidget21jar_2.1.8.20111220.zip phidget21.jar]
===Description===
Java programs on Windows depend on the following files, which the installers above put onto your system:
* <b><code>phidget21.dll</code></b> contains the actual Phidgets library, which is used at run-time.  If you used our installer, it's already correctly placed in <code>C:\Windows\System32</code>.  It can be manually installed - check our [[Manual Installation instructions]].
You will also need one of the following two files, depending on the .NET framework version you are targeting:
* <b><code>phidget21.jar</code></b> is the Phidgets library for JDK <i><b>1.4.2</b></i> or higher. Your compiler has to know where this file is. By default, our installer puts this file into <code>C:\Program Files\Phidgets</code>. So, you can either point your compiler to that location, or copy and link to it in a directory for your project workspace. For more information, please see the section for your specific compiler/environment. If you do not want to use our installer, you can get the file [[#Libraries | here]].
Running the examples and writing your own code can be fairly compiler-specific, so we include instructions for each compiler below.
===NetBeans===
Please start by downloading the Java Examples.  The full examples were written in NetBeans. But Eclipse will easily open it.
*[http://www.phidgets.com/downloads/examples/JavaJNI_2.1.8.20111220.zip Java Examples]
=====Use Our Examples=====
To run the examples, you first download them [[#Command line|from above]] and unpack them into a folder.  To load all projects in Visual Studio, go to File | Open | Project, and open <code>AllExamples/AllExamples.sln</code> or <code>AllExamples/AllExamples_vs2008.sln</code> for Visual Studio 2005 and 2008, respectively.
If you are opening the Phidget examples in Visual Studio 2010, you will need to go through the Visual Studio Conversion Wizard to convert the 2005 or 2008 project.
<br/><br/>[[File:VS2005 Conversion Wizard.PNG]]<br/><br/>
This will load all of the examples available for C#, and then you can set your main project to be the one that matches your device.  If you aren't sure what the software example for your device is called, check the software object listed in the [[Device List | Getting Started guide for your device]].
The only thing left to do is to run the examples! Click on Debug -> Start Debugging. Please note that the projects, by default try to find the <code>Phidget21.NET.dll</code> in the <code>C:\Program Files\Phidgets</code>. If you have it installed in another location, please change the path accordingly. If you are receiving an error message regarding that the namespace Phidgets cannot be found, please re-add the reference to <code>Phidget21.NET.dll</code>. Please see the [[#Write Your Own Code | next section]] for details.
<br/><br/>
[[File:CSharp VS2005 Run.PNG ‎]]
<br/><br/>
Once you have the C# examples running, we have a [[#Follow The Examples|teaching section]] below to help you follow them.
=====Write Your Own Code=====
When you are building a project from scratch, or adding Phidget function calls to an existing project, you'll need to configure your compiler / development environment to properly link the Phidget C# libraries. To begin:
* Generate a new Visual C# Windows Applications project with a descriptive name such as PhidgetTest.
<br/>[[File:CSharp VS2005 New Project.PNG ]]
<br/>
* Add a reference to the .NET Phidgets lilbrary.
<br/>[[File:CSharp VS2005 Add Reference.PNG ]]<br/>
* Under the .NET tab, select <code>Phidget21.NET.dll</code>.
If you used our installer, these files are installed in <code>C:\Program Files\Phidgets</code>, by default. If it does not appear in this list, then you can browse to the Phidget Framework installation directory and add the file.
<br/>[[File:CSharp VS2005 Add Reference 2.PNG ]]<br/><br/>
Then, in your code, you will need to include the Phidget library:
<div style="background-color: #f3f3f3; border-color: #1c9edb; border-width:1px; border-style: dashed;">
<font size="3">
<source lang=cpp>
  using Phidgets;
  using Phidgets.Events;
  </source>
</font>
</div>
The project now has access to the Phidget21 function calls and you are ready to begin coding.
The same [[#Follow The Examples|teaching section]] which describes the examples also has further resources for programming your Phidget.
===Java===
This section will provide instructions on how to compile using the <code>javac</code> compiler. Start by downloading the Java Examples.
*[http://www.phidgets.com/downloads/examples/JavaJNI_2.1.8.20111220.zip Java Examples]
=====Use Our Examples=====
Download the examples [[#Java|from above]] and unpack them into a folder. Here, you can find example programs for all the devices. If you aren't sure what the software example for your device is called, check the software object listed in the [[Device List | Getting Started guide for your device]]. Please only use the simple examples.
<br/>
Ensure that the <code>phidget21.jar</code> is in the same directory as the source code.
To compile:
<br/>[[File:Java Compile.PNG]]<br/>
This will create Java bytecode in the form of <code>.class</code> files. Type the following to run the program:
<br/>[[File:Java Run.PNG]]<br/>
If you wish, you can compile the project as a <code>.jar</code> so there are fewer files to maintain. The [[http://www.oracle.com/java Java SDK]] provides the <code>jar</code> utility which packages all the <code>.class</code> files into a single <code>.jar</code> file.
To begin, you will have to provide a Manifest file to indicate the program entry point. With your favourite text editor, create a new file with the following content:
Manifest-Version: 1.0
Class-Path: phidget21.jar
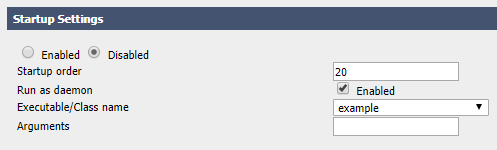
Main-Class: example
 
Ensure that the file ends in a new line or a carriage return.
Save the file as <code>example.mf</code> and place it in the same directory as the other <code>.class</code> files.
Next, create the .<code>jar</code> with:
[[File:Java Create Jar.PNG]]<br/>
Afterwards, you can run the <code>.jar</code> with:
[[File:Java Create Run Jar.PNG]]<br/>
Once you have the Java examples running, we have a [[#Follow The Examples|teaching section]] below to help you follow them.
=====Write Your Own Code=====
When you are building a project from scratch, or adding Phidget function calls to an existing project, you'll need to configure your compiler / development environment to properly link the Phidget C# libraries. Please see the [[#Use Our Examples 3 | previous section]] for instructions.
In your code, you will need to include the Phidget library:
<div style="background-color: #f3f3f3; border-color: #1c9edb; border-width:1px; border-style: dashed;">
<font size="3">
<source lang=java>
  import com.phidgets.*;
  import com.phidgets.event.*;
  </source>
</font>
</div>
The project now has access to the Phidget21 function calls and you are ready to begin coding.
The same [[#Follow The Examples|teaching section]] which describes the examples also has further resources for programming your Phidget.
===Eclipse===
Start by downloading the C# Examples. These examples were written in Visual Studio 2005 and 2008, but are also compatible with MonoDevelop.
*[http://www.phidgets.com/downloads/examples/CSharp_2.1.8.20110615.zip C# Eamples]
=====Use Our Examples=====
Download the examples [[#MonoDevelop|from above]] and unpack them into a folder. Here, you can find example programs for all the devices. If you aren't sure what the software example for your device is called, check the software object listed in the [[Device List | Getting Started guide for your device]]. If you are running under the .NET framework, you can use either the full or simple examples. Otherwise, if you are running under the Mono framework, please only use the simple examples. The full examples uses Windows Forms, which is not completely compatible with Mono's Gtk#.
<br/>
To run the examples, you first download them from above and unpack them into a folder. To load all projects in MonoDevelop, go to File | Open, and open <code>AllExamples/AllExamples.sln</code>
This will load all of the examples available for C#, and then you can set your main project to be the one that matches your device. If you aren't sure what the software example for your device is called, check the software object listed in the Getting Started guide for your device.
<br/>[[File:CSharp MonoDevelop Win Start Up.PNG]]<br/>
The only thing left to do is to run the examples! Right click the project, and click on <code>Run With</code> and select the target framework. Please note that the projects, by default try to find the <code>Phidget21.NET.dll</code> in the <code>C\Program Files\Phidgets</code>. If you have it installed in another location, please change the path accordingly. If you are receiving an error message regarding that the namespace Phidgets cannot be found, please re-add the reference to <code>Phidget21.NET.dll</code>. Please see the next section for details.
<br/><br/>[[File:CSharp MonoDevelop Win Run As.PNG]]<br/><br/>
Once you have the C# examples running, we have a [[#Follow The Examples|teaching section]] below to help you follow them.
=====Write Your Own Code=====
When you are building a project from scratch, or adding Phidget function calls to an existing project, you'll need to configure your compiler / development environment to properly link the Phidget C# libraries. To begin:
* Create a new C# empty project with a descriptive name such as PhidgetTest.
<br/>[[File:CSharp MonoDevelop Win New Project.PNG]]<br/>
* Add a reference to the .NET library.
<br/>[[File:CSharp MonoDevelop Win Reference.PNG ]]<br/>
* Select <code>Phidget21.NET.dll</code>. If you used our installer, by default, this file is placed in <code>C:\Program Files\Phidgets</code>. If it is in another location, please change the path accordingly.
<br/>[[File:CSharp MonoDevelop Win Reference 2.PNG ]]<br/>
Then, in your code, you will need to include the Phidget library:
<div style="background-color: #f3f3f3; border-color: #1c9edb; border-width:1px; border-style: dashed;">
<font size="3">
<source lang=cpp>
  using Phidgets;
  using Phidgets.Events;
  </source>
</font>
</div>
The project now has access to the Phidget21 function calls and you are ready to begin coding.
The same [[#Follow The Examples|teaching section]] which describes the examples also has further resources for programming your Phidget.
==Mac OS X==
C# has excellent support on Mac OS X through the Mono framework.
The first step in using C# on Mac is to install the Phidget libraries.  Compile and install them as explained on the [[Device List|getting started guide for your device]].  Then, the [[OS - Mac OS X]] page also describes the different Phidget files, their installed locations, and their roles....
==Linux==
C# has support on Linux through the Mono framework. 
The first step in using C# on Linux is to install the Phidget libraries.  Compile and install them as explained on the main [[OS - Linux | Linux page]].  That Linux page also describes the different Phidget files, their installed locations, and their roles.
==Follow The Examples==
By following the instructions for your operating system and compiler above, you probably now have a working example and want to understand it better so you can change it to do what you want.  This teaching section has resources for you to learn from the examples and write your own.
Next, comes our API information.  These resources outline the C# Phidget functions:
{{UsingAPhidgetInCodeGeneral|both of which are available in C#|[http://www.phidgets.com/documentation/Phidget21.NET.zip C# API]}}
===Example Flow===
{{ExamplePseudocode|In C#, you can name these '''event''' functions whatever you like.  You will then pass them as function pointers to the Phidget library below in the Main Code section.  This hooks them into the actual events when they occur. <br>
In the example code, the event functions common to all Phidgets are called things like '''AttachHandler()''' and '''DetachHandler()''', etc.<br><br>
Some event functions will be specific to each device, like when a tag is read on an RFID board, or when a sensor value changes on an Interface Kit.
Other functions are given in the examples to show you more detail on using your Phidget.  For example, '''DeviceInitialize()''' will show what needs to be set up for your Phidget before using it.
|Creating a Phidget software object in C# is specific to the Phidget.  For a Phidget Spatial, for example, this would involve creating a <code>Spatial</code> object.  The examples show how to do this and other API functions.<br><br>
The object provides device specific methods and properties which are available from the API for your specific Phidget.|
[http://www.phidgets.com/documentation/Phidget21.NET.zip C# API]}}
==Common Problems and Solutions/Workarounds==


Here you can put various frequent problems and our recommended solutions.
*[https://cdn.phidgets.com/downloads/phidget22/libraries/any/Phidget22Java.zip phidget22.jar]
{{AllQuickDownloads}}

Latest revision as of 22:07, 17 October 2023


We provide support for the Java language in all major operating systems. We also provide instructions on how to get your project started in a number of common development environments. Select your operating system and preferred development environment below, and follow the instructions to get your project running with Phidgets.

If you do not know which development environment you want to use, or your development environment of choice is not listed, we recommend starting with javac as the simplest path to getting your code running.

Once you have set up your development environment to run with Phidgets, we recommend you follow our guide on Phidget Programming Basics. The guide will showcase the fundamentals of programming with Phidgets, with examples in Java.

Setup Guide

Java - Select Development Environment

Select your Development Environment:

Windows

MacOS

Linux

PhidgetSBC

Android

Language - Java

Windows with Javac

Welcome to using Phidgets with Java! By using Java, you will have access to the complete Phidget22 API, including events.

Javac is a command line-based compiler for java programs that compiles java code into bytecode class files.

Requirements

First, make sure you have the following installed:

● Phidgets Drivers for Windows (see Part 1 of this user guide)

● The Java Development Kit from Oracle

Finding Code Samples

To find the code sample to use for your Phidget, navigate to the Code Samples page and select your device from the drop-down menu.

Once you select your device, the code sample generator will give you a working code sample, and a selection of options to customize it to your needs.

Using the Code Samples

If it's unclear what any of the options do, click on the nearby '?' for more info.

Once you've made your selections, click the Download Example button to download a sample Java file.

Setting up a New Project

Whether you are running our examples or adding Phidget functionality to an existing project, you'll need to configure your development environment to properly link the Phidget Java library.

The easiest way to allow Java to access the Phidgets Java library is to place a copy of phidget22.jar in the same folder as your program. We recommend you copy phidget22.jar from the following location:

C:\Program Files\Phidgets\Phidget22\phidget22.jar

Your folder should look something like this:

Compile and Run

Once you are ready to run your program, open the command prompt at the folder location. Next, enter the following command in the command prompt:

javac -classpath .;phidget22.jar example.java

Finally, enter the following command to run the program:

java -classpath .;phidget22.jar example

The project is now using Phidgets!

What's Next?

Now that you've set up Phidgets in your programming environment, you should read our guide on Phidget Programming Basics to learn the fundamentals of programming with Phidgets.

Continue reading below for advanced information and troubleshooting for your device.

«
»

Language - Java

MacOS with Javac

Welcome to using Phidgets with Java! By using Java, you will have access to the complete Phidget22 API, including events.

Javac is a command line-based compiler for java programs that compiles java code into bytecode class files.

Requirements

First, make sure you have the following installed:

● Phidgets Drivers for MacOS (see Part 1 of this user guide)

● The Java Development Kit from Oracle

● A copy of phidget22.jar

Finding Code Samples

To find the code sample to use for your Phidget, navigate to the Code Samples page and select your device from the drop-down menu.

Once you select your device, the code sample generator will give you a working code sample, and a selection of options to customize it to your needs.

Using the Code Samples

If it's unclear what any of the options do, click on the nearby '?' for more info.

Once you've made your selections, click the Download Example button to download a sample Java file.

Setting up a New Project

Whether you are running our examples or adding Phidget functionality to an existing project, you'll need to configure your development environment to properly link the Phidget Java library.

The easiest way to allow Java to access the Phidgets Java library is to place a copy of phidget22.jar in the same folder as your program:

Compile and Run

Once you are ready to run your program, open the terminal at the folder location. Next, enter the following command in the terminal:

javac -classpath .:phidget22.jar example.java

Finally, enter the following command to run the program:

java -classpath .:phidget22.jar example

The project is now using Phidgets!

What's Next?

Now that you've set up Phidgets in your programming environment, you should read our guide on Phidget Programming Basics to learn the fundamentals of programming with Phidgets.

Continue reading below for advanced information and troubleshooting for your device.

«
»

Language - Java

Linux with Javac

Welcome to using Phidgets with Java! By using Java, you will have access to the complete Phidget22 API, including events.

Javac is a command line-based compiler for java programs that compiles java code into bytecode class files.

Requirements

First, make sure you have the following installed:

● Phidgets Drivers for Linux (see Part 1 of this user guide)

● The Java Development Kit from Oracle

● A copy of phidget22.jar

Installing Java

In order to use Java, you will need to download and install the JDK. You can do this by entering the following command in the terminal (where VERSION is replaced with your preferred version number):

apt-get install openjdk-VERSION-jdk

Before continuing, ensure your JDK version matches your JRE version:

javac -version
java -version

Finding Code Samples

To find the code sample to use for your Phidget, navigate to the Code Samples page and select your device from the drop-down menu.

Once you select your device, the code sample generator will give you a working code sample, and a selection of options to customize it to your needs.

Using the Code Samples

If it's unclear what any of the options do, click on the nearby '?' for more info.

Once you've made your selections, click the Download Example button to download a sample Java file.

Setting up a New Project

Whether you are running our examples or adding Phidget functionality to an existing project, you'll need to configure your development environment to properly link the Phidget Java library.

The easiest way to allow Java to access the Phidgets Java library is to place a copy of phidget22.jar in the same folder as your program:

Compile and Run

Once you are ready to run your program, open the terminal at the folder location. Next, enter the following command in the terminal:

javac -classpath .:phidget22.jar example.java

Finally, enter the following command to run the program:

java -classpath .:phidget22.jar example

The project is now using Phidgets!

What's Next?

Now that you've set up Phidgets in your programming environment, you should read our guide on Phidget Programming Basics to learn the fundamentals of programming with Phidgets.

Continue reading below for advanced information and troubleshooting for your device.

«
»

Language - Java

PhidgetSBC with Javac

Welcome to using Phidgets with Java! By using Java, you will have access to the complete Phidget22 API, including events.

Javac is a command line-based compiler for java programs that compiles java code into bytecode class files.

Requirements

If you haven't already, check out the user guide in order to set up the following:

● Networking

● Administrator password


This guide will cover development using an external machine. For development using the SBC itself, go back and select Javac - Linux as your environment.

Introduction

To begin, this video will help you get started:

Developing With An External Computer

There are two main ways in which you can access your SBC from an external computer:

● SBC Web Interface

● Secure Shell (SSH)


Since the SBC User Guide covers the web interface in detail, this guide will cover SSH.

SSH

If you are unfamiliar with SSH, it is a simple yet powerful tool that allows you to log into a remote machine in order to execute commands. You can also transfer files using the associated SCP tool.

In order to use SSH, you need the following:

● The SBC's IP address (e.g. 192.168.3.195) or the link local address (e.g. phidgetsbc.local)

● The administrator password

● SSH enabled on the SBC

SSH

You can enable SSH on the SBC Web Interface as shown below:

SSH on Windows

To use SSH on Windows, we recommend PuTTY. Use the images below as a guide for configuring PuTTY (use the IP address or the link local address interchangeably):

SSH on Windows

After clicking open, simply login as root and provide the administrator password:

To transfer files between your SBC and Windows machine, we recommend either of these programs:

WinSCP

PuTTY PSCP

You will follow a similar process to access the SBC as described for SSH.

SSH on Linux and macOS

SSH is available on Linux and macOS by default. To run SSH, open the terminal and type:

ssh root@phidgetsbc.local

Or, something like this (you will need to know the IP address of your SBC):

ssh root@192.168.3.195

You will then be prompted for the password in order to gain access to the SBC:

SSH on Linux and macOS

To copy a file from the SBC to your development machine using SCP, open the terminal and type:

scp root@phidgetsbc.local:/path/to/source /path/to/destination

You can reverse this if you want to transfer a file from your development machine to your SBC:

scp /path/to/source root@phidgetsbc.local:/path/to/destination

Installing Packages For Development

The simplest way to set up Java on the SBC is via the install buttons on located on the SBC Web Interface (System->Packages). Check Include full Debian Package Repository before installing.

You will need to run commands on the SBC to install support for Python. You can either use SSH to issue the commands, or you can connect directly to the SBC via a monitor and keyboard.

Installing Packages For Development

When developing for Java, ensure your development machine and your SBC have the same version of Java. Check your Java version by entering this command:

java -version

If you need to update the version of Java on your SBC, use the following commands:

apt-get install default-jre-headless
su
update-alternatives --config java

You're now ready to begin programming! Continue through this guide for code examples and directions on where to go next.

Finding Code Samples

To find the code sample to use for your Phidget, navigate to the Code Samples page and select your device from the drop-down menu.

Once you select your device, the code sample generator will give you a working code sample, and a selection of options to customize it to your needs.

Using the Code Samples

If it's unclear what any of the options do, click on the nearby '?' for more info.

Once you've made your selections, click the Download Example button to download a sample Java file.

Setting up a New Project

When you are building a project from scratch, or adding Phidget functionality to an existing project, you'll need to configure your development environment to properly link the Phidget Java library.

When developing on an external computer, you will write, compile, and test your programs on that machine. When you are ready, you will then upload your programs to the SBC to run them.

Setting up a New Project

Once your code is written, follow these steps to get your program running on the SBC:

1. Place phidget22.jar on your development machine in a directory that you will use to compile your Java files.

2. Compile your ProgramName.java file. If you are using a Windows machine, type the following into the command prompt:

javac -classpath .;phidget22.jar ProgramName.java

3. If you are using a Linux or macOS machine, type the following into the terminal:

javac -classpath .:phidget22.jar ProgramName.java

You should now have a number of .class files in your project directory

Setting up a New Project

4. Using the SBC Web Interface, create a new project:

Setting up a New Project

5. Transfer all the .class files from the development machine to the SBC, either using the SBC Web Interface or a tool like WinSCP.

The project directory will be:

/usr/userapps/ProjectName

Setting up a New Project

6. Use SSH to access the SBC terminal and go to the project folder:

cd /usr/userapps/ProjectName

You can now run the program with the command:

java ExampleName

Success! The program is running on your SBC.

Running a Program Automatically

Click on the sections below for various automation options:

-----

Running a Program from the SBC Web Interface

To quickly test whether a program can be run automatically, you can try starting it from the SBC Web Interface.

1. To start the program, navigate to Projects->ProjectName->Startup Settings in the SBC Web Interface.

2. Select your program in the drop-down menu labeled Executable/Class Name.


3. Click the Start button on the SBC web interface.


4. You'll note that as it runs, there are two links below the Stop button which can be used to view the program output:

  • stdout: view the program output like you would in a terminal or command prompt
  • stderr: view the program error output

Run on Boot

Running on boot ensures that your program will never miss an event. As long as the SBC is running, your code will be running. This section assumes you have written and compiled your program on an external computer, and have uploaded it to the SBC Web Interface.


To have your program run on boot, navigate to Projects->ProjectName->Startup Settings in the SBC Web Interface. After selecting your project, copy the settings from the image below:


We will review some of the options that are shown in the image above:

  • Startup Order: lower numbers boot first. Booting later means more programs are available for use, booting earlier means other programs can use your program.
  • Run as a daemon: starts the program as a daemon. Unless you have explicitly written your program as a daemon, leave this checked, or else your SBC may hang on boot.
  • Executable/Class name: your main Java class or C file.
  • Arguments: any command line arguments the program needs.

After saving your changes, your program will run automatically whenever your SBC boots.


Run on a Schedule

Running your program on a schedule allows you to perform your task once a week, or once a minute without worrying about memory management issues or instability problems that may arise. It executes, and then gets cleaned up. To run your program on a schedule, we recommend using Cron. Cron can automatically schedule programs (known as jobs, or cron jobs). Cron simply reads a crontab file and runs whatever programs are listed, with whatever timing they are listed with. Cron runs continuously in the background, but the cron jobs only run as long as they naturally would, and then they exit.


Let's set up your first cron job. We will use nano to edit the crontab file, but feel free to use whatever editor you prefer.


First, set your editor to nano:

export EDITOR=nano

Next, edit your crontab file:

crontab -e

Finally, schedule your cron job:

#cron job that will run at 5AM every week:
0 5 * * 1 /root/code/myprogram argument1


After entering your task, simply save and exit the file.


What's Next?

Now that you've set up Phidgets in your programming environment, you should read our guide on Phidget Programming Basics to learn the fundamentals of programming with Phidgets.

Continue reading below for advanced information and troubleshooting for your device.

«
»

Language - Java

Windows with NetBeans

Welcome to using Phidgets with Java! By using Java, you will have access to the complete Phidget22 API, including events.

NetBeans is an IDE used to write, compile, and run Java applications.

Requirements

First, make sure you have the following installed:

● Phidgets Drivers for Windows (see Part 1 of this user guide)

● The Java Development Kit from Oracle

Setting up a New Project

Whether you are running our examples or adding Phidget functionality to an existing project, you'll need to configure your development environment to properly link the Phidget Java library.

To start, open NetBeans and create a new project. Select Java Application then click Next:

Setting up a New Project

If necessary, download and activate the recommended features:

Setting up a New Project

Follow the steps to install the plugins:

Setting up a New Project

Give your project a name and finish creating the project:

Setting up a New Project

Next, add a reference to phidget22.jar by right-clicking on the libraries folder:

Setting up a New Project

You can find phidget22.jar at the following location:

C:\Program Files\Phidgets\Phidget22\phidget22.jar

Your project now has access to Phidgets!

Finding Code Samples

To find the code sample to use for your Phidget, navigate to the Code Samples page and select your device from the drop-down menu.

Once you select your device, the code sample generator will give you a working code sample, and a selection of options to customize it to your needs.

Using the Code Samples

If it's unclear what any of the options do, click on the nearby '?' for more info.

Once you've made your selections, click the copy button and paste the code into your new project.

Be sure to change the name of the top class to match the name of the file in your project.

What's Next?

Now that you've set up Phidgets in your programming environment, you should read our guide on Phidget Programming Basics to learn the fundamentals of programming with Phidgets.

Continue reading below for advanced information and troubleshooting for your device.

«
»

Language - Java

MacOS with NetBeans

Welcome to using Phidgets with Java! By using Java, you will have access to the complete Phidget22 API, including events.

NetBeans is an IDE used to write, compile, and run Java applications.

Requirements

First, make sure you have the following installed:

● Phidgets Drivers for MacOS (see Part 1 of this user guide)

● The Java Development Kit from Oracle

● You will need a copy of phidget22.jar

Setting up a New Project

Whether you are running our examples or adding Phidget functionality to an existing project, you'll need to configure your development environment to properly link the Phidget Java library.

To start, open NetBeans and create a new project. Select Java Application then click Next:

Setting up a New Project

Give your project a name and finish creating the project:

Setting up a New Project

Next, add a reference to the phidget22.jar you downloaded above by right-clicking on the libraries folder:

The project now has access to Phidgets.

Finding Code Samples

To find the code sample to use for your Phidget, navigate to the Code Samples page and select your device from the drop-down menu.

Once you select your device, the code sample generator will give you a working code sample, and a selection of options to customize it to your needs.

Using the Code Samples

If it's unclear what any of the options do, click on the nearby '?' for more info.

Once you've made your selections, click the copy button and paste the code into your new project.

Be sure to change the name of the top class to match the name of the file in your project.

What's Next?

Now that you've set up Phidgets in your programming environment, you should read our guide on Phidget Programming Basics to learn the fundamentals of programming with Phidgets.

Continue reading below for advanced information and troubleshooting for your device.

«
»

Language - Java

Linux with NetBeans

Welcome to using Phidgets with Java! By using Java, you will have access to the complete Phidget22 API, including events.

NetBeans is an IDE used to write, compile, and run Java applications.

Requirements

First, make sure you have the following installed:

● Phidgets Drivers for Linux (see Part 1 of this user guide)

● The Java Development Kit from Oracle

● You will need a copy of phidget22.jar

Setting up a New Project

Whether you are running our examples or adding Phidget functionality to an existing project, you'll need to configure your development environment to properly link the Phidget Java library.

To start, open NetBeans and create a new project. Select Java Application then click Next:

Setting up a New Project

Give your project a name and finish creating the project:

Setting up a New Project

Next, add a reference to phidget22.jar by right-clicking on the libraries folder:

Setting up a New Project

Locate phidget22.jar and click OK.

The project now has access to Phidgets.

Finding Code Samples

To find the code sample to use for your Phidget, navigate to the Code Samples page and select your device from the drop-down menu.

Once you select your device, the code sample generator will give you a working code sample, and a selection of options to customize it to your needs.

Using the Code Samples

If it's unclear what any of the options do, click on the nearby '?' for more info.

Once you've made your selections, click the copy button and paste the code into your new project.

Be sure to change the name of the top class to match the name of the file in your project.

What's Next?

Now that you've set up Phidgets in your programming environment, you should read our guide on Phidget Programming Basics to learn the fundamentals of programming with Phidgets.

Continue reading below for advanced information and troubleshooting for your device.

«
»

Language - Java

Windows with Eclipse

Welcome to using Phidgets with Java! By using Java, you will have access to the complete Phidget22 API, including events.

Eclipse is an IDE used to write, compile, and run Java applications.

Requirements

First, make sure you have the following installed:

● Phidgets Drivers for Windows (see Part 1 of this user guide)

● The Java Development Kit from Oracle

Setting up a New Project

To start, open Eclipse and create a new Java project. Give it a name and click Next:

Setting up a New Project

On the Libraries tab, click Add External JARs and add phidget22.jar to your project as an external jar:

Setting up a New Project

Create a new Class in your project:

Setting up a New Project

Name the class, and be sure to check the public static void main box.

Your project now has access to Phidgets!

Finding Code Samples

To find the code sample to use for your Phidget, navigate to the Code Samples page and select your device from the drop-down menu.

Once you select your device, the code sample generator will give you a working code sample, and a selection of options to customize it to your needs.

Using the Code Samples

If it's unclear what any of the options do, click on the nearby '?' for more info.

Once you've made your selections, click the copy button and paste the code into your new project.

Be sure to change the name of the top class to match the name of the file in your project.

What's Next?

Now that you've set up Phidgets in your programming environment, you should read our guide on Phidget Programming Basics to learn the fundamentals of programming with Phidgets.

Continue reading below for advanced information and troubleshooting for your device.

«
»

Language - Java

MacOS with Eclipse

Welcome to using Phidgets with Java! By using Java, you will have access to the complete Phidget22 API, including events.

Eclipse is an IDE used to write, compile, and run Java applications.

Requirements

First, make sure you have the following installed:

● Phidgets Drivers for MacOS (see Part 1 of this user guide)

● The Java Development Kit from Oracle

● You will need a copy of phidget22.jar

Setting up a New Project

To start, open Eclipse and create a new Java project. Give it a name and click Next:

Setting up a New Project

On the Libraries tab, click Add External JARs and add phidget22.jar to your project as an external jar:

Setting up a New Project

Create a new Class in your project:

Setting up a New Project

Name the class, and be sure to check the public static void main box.

Your project now has access to Phidgets!

Finding Code Samples

To find the code sample to use for your Phidget, navigate to the Code Samples page and select your device from the drop-down menu.

Once you select your device, the code sample generator will give you a working code sample, and a selection of options to customize it to your needs.

Using the Code Samples

If it's unclear what any of the options do, click on the nearby '?' for more info.

Once you've made your selections, click the copy button and paste the code into your new project.

Be sure to change the name of the top class to match the name of the file in your project.

What's Next?

Now that you've set up Phidgets in your programming environment, you should read our guide on Phidget Programming Basics to learn the fundamentals of programming with Phidgets.

Continue reading below for advanced information and troubleshooting for your device.

«
»

Language - Java

Linux with Eclipse

Welcome to using Phidgets with Java! By using Java, you will have access to the complete Phidget22 API, including events.

Eclipse is an IDE used to write, compile, and run Java applications.

Requirements

First, make sure you have the following installed:

● Phidgets Drivers for Linux (see Part 1 of this user guide)

● The Java Development Kit from Oracle

● You will need a copy of phidget22.jar

Setting up a New Project

To start, open Eclipse and create a new Java project. Give it a name and click Next:

Setting up a New Project

On the Libraries tab, click Add External JARs and add phidget22.jar to your project as an external jar:

Setting up a New Project

Create a new Class in your project:

Setting up a New Project

Name the class, and be sure to check the public static void main box.

Your project now has access to Phidgets!

Finding Code Samples

To find the code sample to use for your Phidget, navigate to the Code Samples page and select your device from the drop-down menu.

Once you select your device, the code sample generator will give you a working code sample, and a selection of options to customize it to your needs.

Using the Code Samples

If it's unclear what any of the options do, click on the nearby '?' for more info.

Once you've made your selections, click the copy button and paste the code into your new project.

Be sure to change the name of the top class to match the name of the file in your project.

What's Next?

Now that you've set up Phidgets in your programming environment, you should read our guide on Phidget Programming Basics to learn the fundamentals of programming with Phidgets.

Continue reading below for advanced information and troubleshooting for your device.

«
»

Language - Java

Android with Android Studio

Welcome to using Phidgets with Java! By using Java, you will have access to the complete Phidget22 API, including events.

Android Studio is a graphical IDE for Android java programs.

Creating A New Project

When you are building a project from scratch, or adding Phidget functionality to an existing project, you'll need to configure your development environment to properly link the Phidget Java libraries for Android Java.

To start, create a new project in Android Studio:

Creating A New Project

Once you have a new project, be sure to switch the side bar to Project view.

Creating A New Project

Next, download the Phidget22 Android Java libraries, extract the contents, and open the resulting folder.

Creating A New Project

Copy the .jar files into the app/libs/ folder of your project. If you are only going to use network Phidgets in your app, then you don't need to copy Phidget22usb.jar into your project.

Right click the jar files you just copied and select Add As Library.

Creating A New Project

Create a directory called jnilibs under app/src/main

Creating A New Project

Copy the remaining folders from the Phidget22 library (containing versions of libphidget22java.so) into the directory you just created.

Creating A New Project

To allow the use of the network and/or USB connections, the following lines must be added to your AndroidManifest.xml file:

<!-- Required for network access -->
<uses-permission android:name="android.permission.INTERNET" />

<!-- Required for USB access -->
<uses-feature android:name="android.hardware.usb.host" />

Finally, to import the Phidget22 library into your code, add the following line to the rest of your imports:

import com.phidget22.*;

The project now has access to Phidgets. Next, we'll walk through the steps for writing your own code.

Write Code

By following the instructions for your operating system and compiler above, you now have working examples and a project that is configured. This teaching section will help you understand how the examples were written so you can start writing your own code.

Your main reference for writing Android Java code will be:

● The Phidget22 API

● The Java example code

Write Code

Step One: Initialize and Open

You will need to declare your Phidget object in your code. For example, we can declare a digital input object like this:

DigitalInput device;

Next, we need to initialize the method(s) that the Android device can communicate with the Phidget. This is done either by enabling Network Server Discovery, and/or allowing direct USB connections as follows:

//Enable server discovery to list remote Phidgets
this.getSystemService(Context.NSD_SERVICE);
Net.enableServerDiscovery(ServerType.DEVICE_REMOTE);

//Allow direct USB connection of Phidgets
com.phidget22.usb.Manager.Initialize(this);

Write Code

To support remote (network) Phidgets on Android API versions earlier than API version 16, or to connect to Phidget Network Servers with passwords, you will need to add the specific server to your program:

//Add a specific network server to communicate with Phidgets remotely
Net.addServer("ServerName", "192.168.1.105", 5661, "password", 0);

After the connection methods are established, the Phidget object needs to be initialized and opened:

device = new DigitalInput();
device.open();

Write Code

Although we are not including it on this page, you should include error handling for all Phidget functions. Here is an example of the previous code with error handling:

try{
    device = new DigitalInput();
    device.open();
}catch (PhidgetException e) {
    e.printStackTrace();
}

For more information on error handling with Phidgets, see this page.

Write Code

Step Two: Wait for Attachment (plugging in) of the Phidget

Simply calling open does not guarantee you can use the Phidget immediately. To use a Phidget, it must be plugged in (attached). We can handle this by using event driven programming and tracking the attach events. Alternatively, we can modify our code so we wait for an attachment:

ch = new DigitalInput();
ch.open(5000); //wait for attach for 5 seconds, if not time out

Waiting for attachment will block indefinitely until a connection is made, or until the timeout value is exceeded.

Write Code

To use events, we have to modify our code:

ch = new DigitalInput();
device.addAttachListener(new AttachListener() {
    public void onAttach(final AttachEvent attachEvent) {
        AttachEventHandler handler = new AttachEventHandler(device);
        synchronized(handler)
        {
            runOnUiThread(handler);
            try {
                handler.wait();
            } catch (InterruptedException e) {
                e.printStackTrace();
            }
        }
    }
});
ch.open();

Write Code

Next, we have to declare the function that will be called when an attach event is fired - in this case the function AttachEventHandler will be called.

class AttachEventHandler implements Runnable { 
    Phidget device;

    public AttachEventHandler(Phidget device) {
        this.device = device;
    }

    public void run() {
        TextView attachedTxt = (TextView) findViewById(R.id.attachedTxt);
        attachedTxt.setText("Attached");

        //notify that we're done
        synchronized(this)
        {
	    this.notify();
        }
    }
}

Write Code

Step Three: Do Things with the Phidget

We recommend the use of event driven programming when working with Phidgets. In a similar way to handling an attach event as described above, we can also add an event handler for a state change event:

ch = new DigitalInput();
device.addStateChangeListener(new DigitalInputStateChangeListener() {
	public void onStateChange(DigitalInputStateChangeEvent stateChangeEvent) {
        DigitalInputStateChangeEventHandler handler = 
            new DigitalInputStateChangeEventHandler(device, stateChangeEvent);
	runOnUiThread(handler);
    }
});
ch.open();

This code will connect a function and an event. In this case, the DigitalInputStateChangeEventHandler function will be called when there has been a change to the devices input.

Write Code

Next, we need to create the DigitalInputStateChangeEventHandler function itself:

class DigitalInputStateChangeEventHandler implements Runnable {
    Phidget device;
    DigitalInputStateChangeEvent stateChangeEvent;

    public DigitalInputStateChangeEventHandler(Phidget device,
       DigitalInputStateChangeEvent stateChangeEvent)
    {
        this.device = device;
        this.stateChangeEvent = stateChangeEvent;
    }

    public void run() {
        CheckBox stateBox = (CheckBox) findViewById(R.id.stateBox);
        stateBox.setChecked(stateChangeEvent.getState());
    }
}

If events do not suit your needs, you can also poll the device directly for data using code like this:

boolean state = ch.getState();

Write Code

Step Four: Close and Delete

At the end of your program, be sure to close your device.

ch.close();

Once the device is closed, to completely clean up after using Phidgets, you must uninitialize the USB connection as follows:

//Disable USB connection to Phidgets
com.phidget22.usb.Manager.Uninitialize();

What's Next?

Now that you've set up Phidgets in your programming environment, you should read our guide on Phidget Programming Basics to learn the fundamentals of programming with Phidgets.

Continue reading below for advanced information and troubleshooting for your device.

Common Problems, Solutions and Workarounds

My Phidget Detached When I Rotated My Phone

You are likely using one of our examples, or handling the opening and closing of Phidgets in a similar way. In either case, chances are you are opening and closing Phidgets in your main activity. This is not recommended for practical applications, as the entire activity can be destroyed and re-created many times through its lifecycle due to configuration changes such as rotating the screen. This is a reality of the Android operating system, and must be addressed in whatever way best suits your application. A good option to keep your Phidgets connected would be to implement a Started Service or a Foreground Service, depending on your application, and open your Phidgets there.

«
»

Quick Downloads

If you already know what you're doing and just need the files, you can find them all below.

Documentation

Example Code

Libraries