|
|
| (76 intermediate revisions by 6 users not shown) |
| Line 1: |
Line 1: |
| | {{#seo:|description=Learn how to use Phidget USB devices with C#.}} |
| [[Category:Language]] | | [[Category:Language]] |
| {{OSLang|[[File:icon-CSharp.png|64x64px|link=|alt=]]|C# is a modern, object-oriented programming language developed by [http://www.microsoft.com Microsoft].}}
| |
| __TOC__
| |
|
| |
|
| ==Introduction== | | ==Get Started== |
| | With the Phidget22.NET library, it's easy to create C# applications that work with Phidget devices. |
|
| |
|
| {{LanguageSupport|C#|the complete Phidget API, including events|all Phidget devices.|the .NET or Mono framework. Both of the frameworks are supported on Windows. For Linux and OS X, only the Mono framework can be used. We provide instructions on how to set up your environment/compilers for [[#Visual Studio 2005/2008/2010 | Visual Studio 2005/2008/2010]], [[#Visual Studio 2003 | Visual Studio 2003]], [[#MonoDevelop | MonoDevelop]] and the [[#Mono | Mono command line compilers]]|}}
| | ==C# Libraries== |
| | ===Nuget Package=== |
| | The Phidget22.NET library is available as a [https://www.nuget.org/packages/Phidget22.NET/ nuget package]. This is the recommend way to install and manage the Phidget22.NET library. |
|
| |
|
| ==Quick Downloads== | | ====macOS Considerations==== |
| {{QuickDownloads|C#| | | Phidget devices running a HID USB stack require the installation of the macOS libraries or the standalone Phidget Control Panel ([{{SERVER}}/docs/OS_-_macOS download here]). |
| {{APIQuickDownloads|http://www.phidgets.com/documentation/Phidget21.NET.zip .NET}}|
| |
| {{ExampleQuickDownloads|http://www.phidgets.com/downloads/examples/CSharp.zip|}}|
| |
| {{ExtraLibraryQuickDownloads|http://www.phidgets.com/downloads/libraries/phidget21-x86.zip|.NET Framework Files|}}
| |
| {{WindowsQuickDownloads}}
| |
| {{MacQuickDownloads}}
| |
| {{LinuxQuickDownloads}}}}
| |
|
| |
|
| ==Getting started with C#==
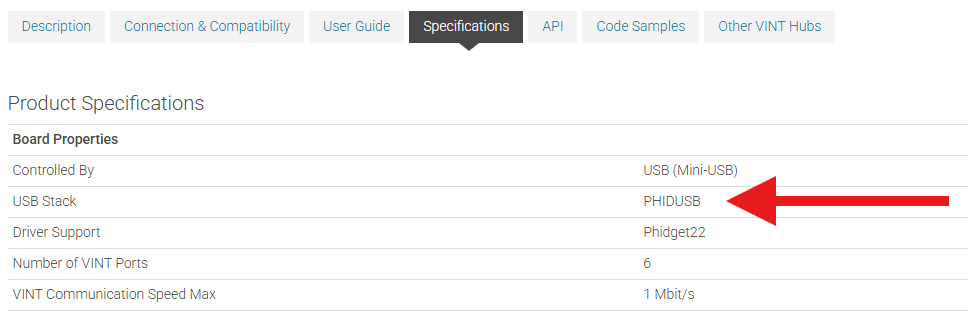
| | To determine what USB stack your Phidget device is on, navigate to the product page and then to the specification tab, and look for the ''USB Stack'' specification. If you are using a VINT device, navigate to the product page for the VINT Hub you are using. |
|
| |
|
| If you are new to writing code for Phidgets, we recommend starting by running, then modifying existing examples. This will allow you to:
| | [[Image:Javascript_networkserver_webusb_spec.png|center|600px|link=https://cdn.phidgets.com/docs/images/8/80/Javascript_networkserver_webusb_spec.png]] |
| {{ExampleCodeReasons}}
| |
|
| |
|
| Instructions are divided up by operating system. Choose:
| | ====Linux Considerations==== |
| *[[#Windows(2000/XP/Vista/7)|Windows 2000 / XP / Vista / 7]]
| | Linux restricts access to USB devices to the root user. To run your .NET application as a regular user, you'll need to [{{SERVER}}/docs/OS_-_Linux#Setting_udev_Rules set up udev rules] on your system. |
| *[[#OS X |OS X]]
| |
| *[[#Linux | Linux]] (including PhidgetSBC)
| |
|
| |
|
| ==Windows (2000/XP/Vista/7)== | | ===Library Files=== |
| | If you would like to manually manage the Phidget22.NET library files, you can download them [https://cdn.phidgets.com/downloads/phidget22/libraries/windows/Phidget22-windevel.zip here]. |
|
| |
|
| ===Description of Library Files=== | | ==Development Environment Configuration== |
| C# programs on Windows depend on the following files, which the installers above put onto your system:
| | ===Visual Studio=== |
| * <b>{{Code|phidget21.dll}}</b> contains the actual Phidget library, which is used at run-time. By default, it is placed in {{Code|C:\Windows\System32}}.
| | {| style="margin:auto;" class="table-no-border mw-collapsible mw-collapsed" |
| You will also need one of the following two files, depending on the .NET framework version you are targeting:
| | |+ '''Instructions''' |
| * <b>{{Code|Phidget21.NET.dll}}</b> is the Phidget library for .NET framework <i><b>2.0</b></i> or higher. Your compiler has to know where this file is. By default, it is placed into {{Code|C:\Program Files\Phidgets}}. You can either point your compiler to that location, or copy and link to it in a directory for your project workspace.
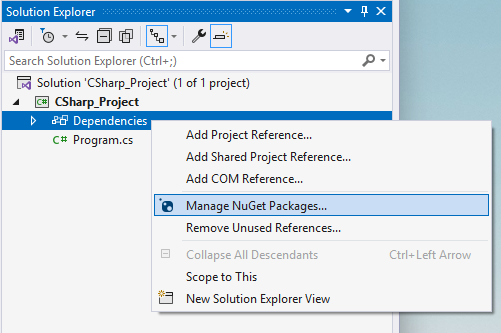
| | | Create your Visual Studio project, and navigate to the '''Solution Explorer'''. From there, right-click on '''Dependencies''' and select '''Manage NuGet Packages...'''|| [[Image:Language_csharp_vs_managenuget.png|center|350px|link=https://cdn.phidgets.com/docs/images/c/cc/Language_csharp_vs_managenuget.png]] |
| * <b>{{Code|Phidget21.NET1.1.dll}}</b> is the Phidget library for .NET framework <i><b>1.1</b></i>. Your compiler has to know where this file is. By default, is is placed into {{Code|C:\Program Files\Phidgets}}. You can either point your compiler to that location, or copy and link to it in a directory for your project workspace.
| | |- |
| You can optionally install the following files:
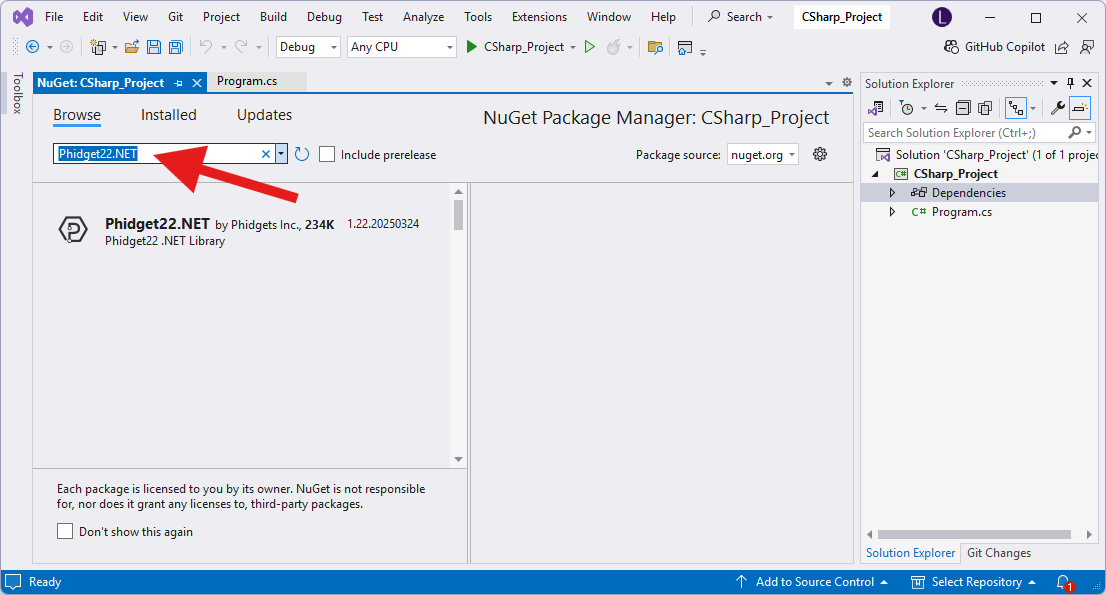
| | | Next, click '''Browse''' and enter '''Phidget22.NET''' in the search bar. || [[Image:Language_csharp_vs_browsenuget.png|center|350px|link=https://cdn.phidgets.com/docs/images/6/61/Language_csharp_vs_browsenuget.png]] |
| * <b>{{Code|Phidget21.NET.XML}}</b> provides the IntelliSense in-line documentation for the .NET library in Visual Studio/MonoDevelop. This documentation is also visible in the Object Browser in Visual Studio. By default, it is placed into {{Code|C:\Program Files\Phidgets}}.
| | |- |
| * <b>{{Code|Policy.2.1.Phidget21.NET.dll}}</b> is the policy assembly for {{Code|Phidget21.NET.dll}}. Our installer places this file in the Global Assembly Cache(GAC) directory. It directs any programs compiled against version 2.1.0 or higher of {{Code|Phidget21.NET.dll}} to use the most recent installed version.
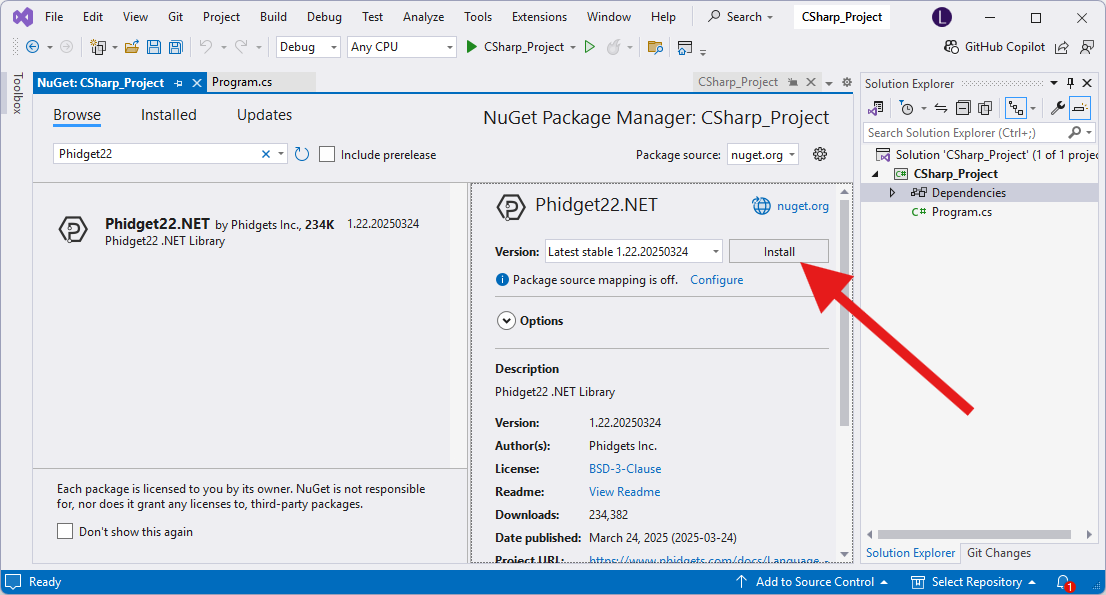
| | | Click on the package and press the '''Install''' button. || [[Image:Language_csharp_vs_installnuget.png|center|350px|link=https://cdn.phidgets.com/docs/images/b/b8/Language_csharp_vs_installnuget.png]] |
| | |- |
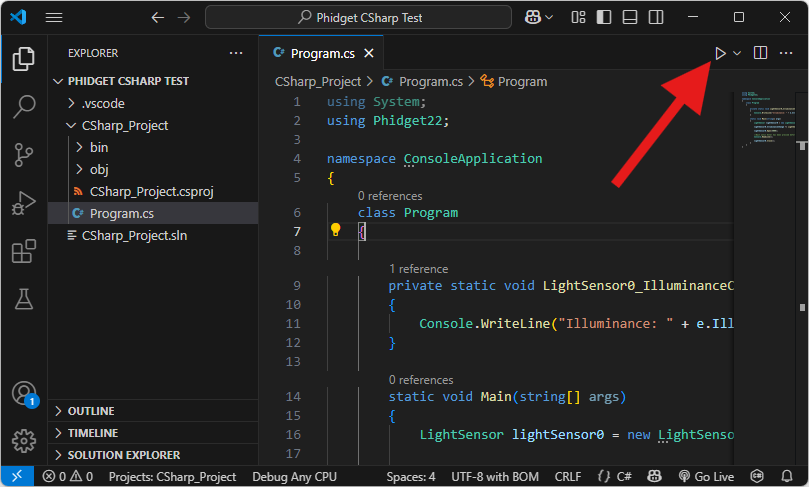
| | | Finally, add your C# code and run it using the button at the top of the screen. || [[Image:Language_csharp_vs_run.png|center|350px|link=https://cdn.phidgets.com/docs/images/5/5a/Language_csharp_vs_run.png]] |
| | |- |
| | |} |
|
| |
|
| If you do not want to use our installer, you can download the five [http://www.phidgets.com/downloads/libraries/Phidget21-windevel.zip files].
| | ===Visual Studio Code=== |
| | {| style="margin:auto;" class="table-no-border mw-collapsible mw-collapsed" |
| | |+ '''Instructions''' |
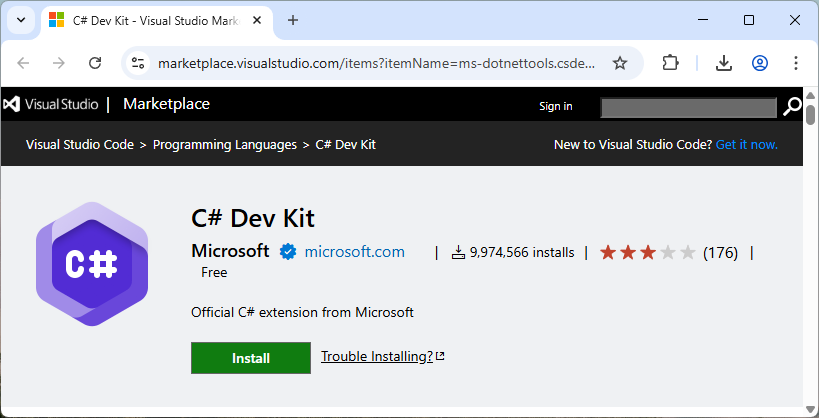
| | | Install the [https://marketplace.visualstudio.com/items?itemName=ms-dotnettools.csdevkit C# Dev Kit extension for Visual Studio Code].|| [[Image:Language_csharp_vscode_installext.png|center|350px|link=https://cdn.phidgets.com/docs/images/b/b8/Language_csharp_vscode_installext.png]] |
| | |- |
| | | Next, create a directory and open it in Visual Studio Code. You can do this by opening Visual Studio Code and selecting '''File > Open Folder...''' || [[Image:Language_csharp_vscode_newfolder.png|center|350px|link=https://cdn.phidgets.com/docs/images/4/43/Language_csharp_vscode_newfolder.png]] |
| | |- |
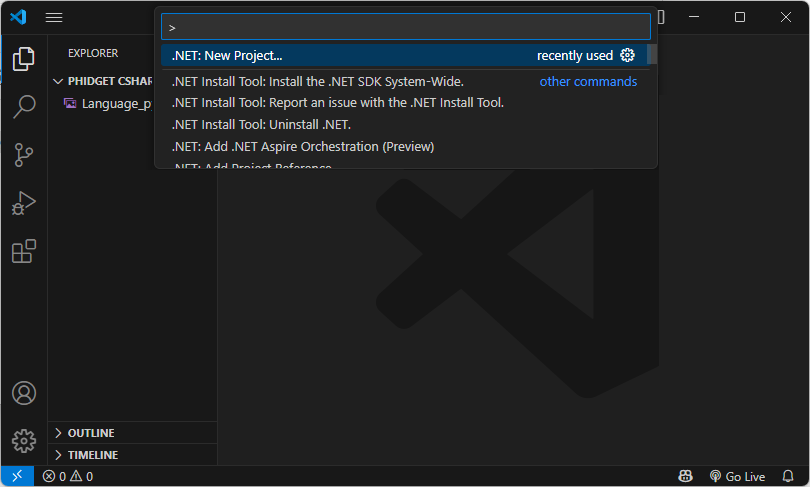
| | | Open the Command Palette (Ctrl + Shift + P), type '''.NET: New Project''', and press Enter. A list of supported project types will appear. || [[Image:Language_csharp_vscode_netnewproject.png|center|350px|link=https://cdn.phidgets.com/docs/images/f/f7/Language_csharp_vscode_netnewproject.png]] |
| | |- |
| | | Select your preferred project type from the list. For this example, we will select '''Console App'''. || [[Image:Language_csharp_vscode_netconsoleapp.png|center|350px|link=https://cdn.phidgets.com/docs/images/b/bc/Language_csharp_vscode_netconsoleapp.png]] |
| | |- |
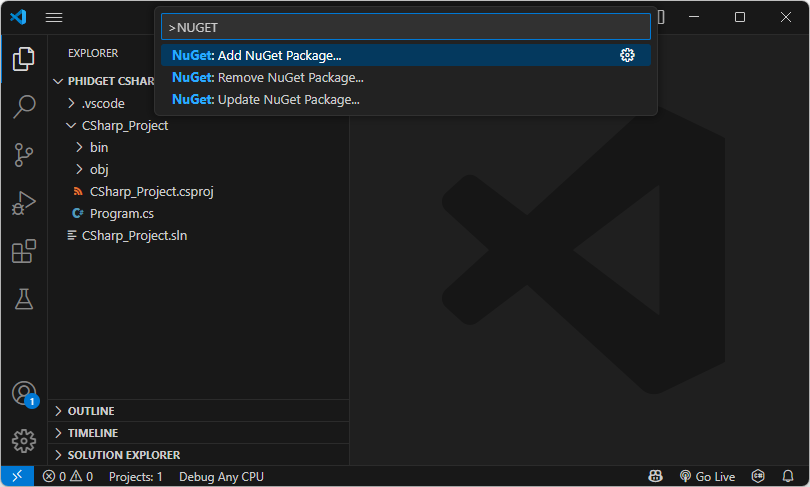
| | | Next, we need to add the Phidget22.NET library using NuGet. Open the Command Palette again (Ctrl + Shift + P), and enter '''NuGet: Add NuGet package...'''. |
| | || [[Image:Language_csharp_vscode_addnugetpackage.png|center|350px|link=https://cdn.phidgets.com/docs/images/2/26/Language_csharp_vscode_addnugetpackage.png]] |
| | |- |
| | | When prompted, enter '''Phidget22.NET''' and install the latest package.<br><br>'''Note''': Ensure you are downloading the latest version which can be seen [{{SERVER}}/?view=changelog here]. Visual Studio Code may incorrectly show an older version as the ''latest'' by default.|| [[Image:Language_csharp_vscode_phidget22net.png|center|350px|link=https://cdn.phidgets.com/docs/images/d/d5/Language_csharp_vscode_phidget22net.png]] |
| | |- |
| | |- |
| | | Finally, add your C# code and run it using the button at the top of the screen. || [[Image:Language_csharp_vscode_runcodepng.png|center|350px|link=https://cdn.phidgets.com/docs/images/d/dc/Language_csharp_vscode_runcodepng.png]] |
| | |- |
| | |} |
|
| |
|
| Running the examples and writing your own code can be fairly compiler-specific, so we include instructions for each compiler below.
| | ===.NET Command-Line Interface (CLI)=== |
| | {| style="margin:auto;" class="table-no-border mw-collapsible mw-collapsed" |
| | |+ '''Instructions''' |
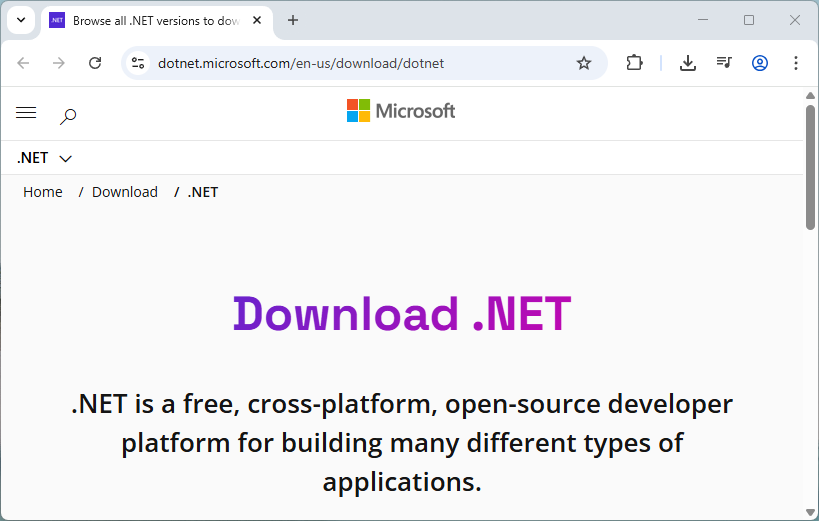
| | | Download and install the latest version of.NET from [https://dotnet.microsoft.com/en-us/download/dotnet Microsoft's .NET download page].|| [[Image:Language_csharp_cli_download.png|center|350px|link=https://cdn.phidgets.com/docs/images/9/90/Language_csharp_cli_download.png]] |
| | |- |
| | | Next, open a command prompt or terminal in a new folder and enter the following command: |
|
| |
|
| ===Visual Studio 2005/2008/2010===
| |
|
| |
| Microsoft makes free versions of Visual Studio available known as Express Editions. The Express editions are suitable for most applications, but are limited in features for more complex applications. Please see [http://www.microsoft.com/visualstudio Microsoft Visual Studio] for more information.
| |
|
| |
| =====Use Our Examples=====
| |
|
| |
| Please start by downloading the [http://www.phidgets.com/downloads/examples/CSharp.zip examples] and unpacking them into a folder. While these examples were written in Visual Studio 2005 and 2008, Visual Studio 2010 will easily open and upgrade them. To load all projects in Visual Studio, go to File → Open → Project, and open {{Code|AllExamples/AllExamples.sln}} or {{Code|AllExamples/AllExamples_vs2008.sln}} for Visual Studio 2005 and 2008, respectively.
| |
|
| |
| If you are opening the Phidget examples in Visual Studio 2010, you will need to go through the Visual Studio Conversion Wizard to convert the 2005 or 2008 project.
| |
|
| |
| [[File:VS2005 Conversion Wizard.PNG|link=|alt=Conversion Wizard]]
| |
|
| |
| The easiest way to confirm that your environment is set up properly will be to compile and run the {{Code|HelloWorld}} C/C++ example.
| |
|
| |
| Start by setting the {{Code|HelloWorld}} project as your start up project.
| |
|
| |
| The only thing left to do is to run the example! Click on Debug → Start Debugging. Please note that the projects, by default try to find the {{Code|Phidget21.NET.dll}} in the {{Code|C:\Program Files\Phidgets}}. If you have it installed in another location, please change the path to the file's location accordingly. If you are receiving an error message regarding that the namespace Phidgets cannot be found, please re-add the reference to {{Code|Phidget21.NET.dll}}. Please see the [[#Write Your Own Code | Write Your Own Code ]] section for details.
| |
|
| |
| [[File:CSharp VS2005 Run.PNG|link=|alt=Run]]
| |
|
| |
| This program will detect for devices that are attached/detached on the computer. Go ahead, and attach or detach your devices! Here is an example output:
| |
|
| |
| [[File:CSharp VS2005 HelloWorld Output.PNG|link=|alt=HelloWorld Output]]
| |
|
| |
| After confirming that the {{Code|HelloWorld}} example is working, you can proceed to run the example for your device. {{FindYourDevice}}
| |
|
| |
| Once you have the C# examples running, we have a [[#Follow the Examples|teaching]] section below to help you follow them.
| |
|
| |
| =====Write Your Own Code=====
| |
|
| |
| When you are building a project from scratch, or adding Phidget function calls to an existing project, you'll need to configure your environment to properly link the Phidget C# libraries. To begin:
| |
|
| |
| 1. Generate a new Visual C# Windows Applications project with a descriptive name such as PhidgetTest.
| |
|
| |
| [[File:CSharp VS2005 New Project.PNG|link=|alt=New Project]]
| |
|
| |
| 2. Add a reference to the Phidget .NET library.
| |
|
| |
| [[File:CSharp VS2005 Add Reference.PNG|link=|alt=Add Reference]]
| |
|
| |
| 3. Under the .NET tab, select {{Code|Phidget21.NET.dll}}.
| |
| If you used our installer, these files are installed in {{Code|C:\Program Files\Phidgets}}, by default. If it does not appear in this list, then you can browse to the Phidget Framework installation directory and add the file.
| |
|
| |
| [[File:CSharp VS2005 Add Reference 2.PNG|link=|alt=Add Reference]]
| |
|
| |
| 4. Then, in your code, you will need to include the Phidget .NET library:
| |
|
| |
| <div class="source">
| |
| <syntaxhighlight lang=csharp>
| |
| using Phidgets;
| |
| using Phidgets.Events;
| |
| </syntaxhighlight>
| |
| </div>
| |
|
| |
|
| |
| The project now has access to the Phidget function calls and you are ready to begin coding.
| |
|
| |
| The same [[#Follow the Examples|teaching ]] section which describes the examples also has further resources for programming your Phidget.
| |
|
| |
| ===Visual Studio 2003===
| |
|
| |
| =====Use Our Examples=====
| |
|
| |
| 1. Download the [http://www.phidgets.com/downloads/examples/CSharp.zip examples] and unpack them into a folder. Here, you can find the HelloWorld example which works with any Phidget. You can also find example programs for all the devices. {{FindYourDevice}}
| |
|
| |
| As the examples were written in newer versions of Visual Studio, Visual Studio 2003 is not able to open the examples. Fortunately, you can import the '''simple examples''' to a Visual Studio 2003 project. It will be difficult to import the full examples as you will need to recreate the GUI components.
| |
|
| |
| 2. Next, a new project will need to be created. Generate a new Visual C# console application project with a descriptive name such as PhidgetTest.
| |
|
| |
| [[File:CSharp_VS2003 New Project.PNG|link=|alt=New Project]]
| |
|
| |
| 3. Add a reference to the Phidget .NET library.
| |
|
| |
| [[File:CSharp_VS2003 Add Reference 1.PNG|link=|alt=Add Reference]]
| |
|
| |
| 4. Under the .NET tab, select {{Code|Phidget21.NET1.1.dll}}. If you used our installer, by default, this file is placed in {{Code|C:\Program Files\Phidgets}}. If it is in another location, please change the path to the file's location accordingly.
| |
|
| |
| [[File:CSharp_VS2003 Add Reference 2.PNG|link=|alt=Add Reference]]
| |
|
| |
| 5. To import the simple example program into your project, please: open up {{Code|Class1.cs}}.
| |
|
| |
| 6. Traverse to the example in Windows Explorer and locate the {{Code|Program.cs}} file.
| |
|
| |
| [[File:CSharp VS2003 Source Code.PNG|link=|alt=Source Code]]
| |
|
| |
| 7. Copy and paste the contents from that file into {{Code|Class1.cs}}.
| |
|
| |
| 8. Comment out the following line as it is not supported in .NET 1.1:
| |
| <div class="source">
| |
| <syntaxhighlight lang=csharp>
| |
| using System.Collections.Generic;
| |
| </syntaxhighlight>
| |
| </div>
| |
|
| |
| [[File:CSharp VS2003 Source Code 2.PNG|link=|alt=Source Code]]
| |
|
| |
| 9. Now, you can run the example. Click on Debug → Start.
| |
|
| |
| [[File:CSharp VS2003 Run.PNG|link=|alt=Run]]
| |
|
| |
| Once you have the C# examples running, we have a [[#Follow the Examples|teaching ]] section below to help you follow them.
| |
|
| |
| =====Write Your Own Code=====
| |
|
| |
| When you are building a project from scratch, or adding Phidget function calls to an existing project, you'll need to configure your development environment to properly link the Phidget .NET library. Please see the [[#Use Our Examples 2 | Use Our Examples ]] section for instructions.
| |
|
| |
| Then, in your code, you will need to include the Phidget .NET library:
| |
| <div class="source">
| |
| <syntaxhighlight lang=csharp>
| |
| using Phidgets;
| |
| using Phidgets.Events;
| |
| </syntaxhighlight>
| |
| </div>
| |
|
| |
| The project now has access to the Phidget function calls and you are ready to begin coding.
| |
|
| |
| The same [[#Follow the Examples|teaching]] section which describes the examples also has further resources for programming your Phidget.
| |
|
| |
| ===Mono===
| |
|
| |
| This section will provide instructions on how to compile using the {{Code|mcs}} compiler. Other compilers such as {{Code|gmcs}}, {{Code|smcs}}, and {{Code|dmcs}} all work in the same way.
| |
|
| |
| =====Use Our Examples=====
| |
|
| |
| Download the [http://www.phidgets.com/downloads/examples/CSharp.zip examples] and unpack them into a folder. Here, you can find the HelloWorld program that will work with any Phidget. You will also find example programs for all the devices. {{FindYourDevice}}.
| |
|
| |
| Please only use the simple examples. The full examples uses Windows Forms, which Mono and the Gtk# toolkit are not completely compatible with. Locate the {{Code|Program.cs}} file as this contains the example source code. Copy the file into your working directory, and rename it to {{Code|example.cs}}.
| |
|
| |
| Place the {{Code|Phidget21.NET.dll}} in the same directory as your source code.
| |
|
| |
| To compile and build an executable, run:
| |
| <div class="source">
| |
| <syntaxhighlight lang=bash>
| |
| mcs /out:example.exe /r:phidget21.NET.dll example.cs
| |
| </syntaxhighlight>
| |
| </div>
| |
|
| |
| If you have the {{Code|Phidget21.NET.dll}} installed in another location, please change the path to the file's location accordingly.
| |
|
| |
| Afterwards, you will have an executable named {{Code|example.exe}} that you can run. Type the following to run the program:
| |
| <div class="source">
| |
| <syntaxhighlight lang=bash>
| |
| mono example.exe
| |
| </syntaxhighlight>
| |
| </div>
| |
|
| |
| Once you have the C# examples running, we have a [[#Follow the Examples|teaching]] section below to help you follow them.
| |
|
| |
| =====Write Your Own Code=====
| |
|
| |
| When you are building a project from scratch, or adding Phidget function calls to an existing project, you'll need to configure your development environment to properly link the Phidget .NET library. Please see the [[#Use Our Examples 3 | Use Our Example ]] section for instructions.
| |
|
| |
| In your code, you will need to include the Phidget .NET library:
| |
|
| |
| <div class="source">
| |
| <syntaxhighlight lang=csharp>
| |
| using Phidgets;
| |
| using Phidgets.Events;
| |
| </syntaxhighlight>
| |
| </div>
| |
|
| |
|
| |
| The project now has access to the Phidget function calls and you are ready to begin coding.
| |
|
| |
| The same [[#Follow the Examples|teaching]] section which describes the examples also has further resources for programming your Phidget.
| |
|
| |
| ===MonoDevelop===
| |
|
| |
| =====Use Our Examples=====
| |
|
| |
| Download the [http://www.phidgets.com/downloads/examples/CSharp.zip examples] and unpack them into a folder. Here, you can find example programs for all the devices, as well as a HelloWorld program that will work with any Phidget. {{FindYourDevice}}
| |
|
| |
| These examples were written in Visual Studio 2005 and 2008, but are also compatible with MonoDevelop.
| |
|
| |
| To load all projects in MonoDevelop, go to File → Open, and open {{Code|AllExamples/AllExamples.sln}}
| |
|
| |
| This will load all of the examples available for C#, and then you can set your main project to be the one that matches your device. If you are running under the .NET framework, you can use either the full or simple examples. Otherwise, if you are running under the Mono framework, please only use the simple examples. The full examples uses Windows Forms, which is not completely compatible with Mono's Gtk#.
| |
|
| |
| [[File:CSharp MonoDevelop Win Start Up.PNG|link=|alt=Start Up Project]]
| |
|
| |
| The only thing left to do is to run the examples! Right click the project, and click on {{Code|Run With}} and select the target framework. Please note that the projects, by default try to find the {{Code|Phidget21.NET.dll}} in the {{Code|C\Program Files\Phidgets}}. If you have it installed in another location, please change the path to the file's location accordingly. If you are receiving an error message regarding that the namespace Phidgets cannot be found, please re-add the reference to {{Code|Phidget21.NET.dll}}. Please see the [[#Write Your Own Code 4 | Write Your Own Code]] section for details.
| |
|
| |
| [[File:CSharp MonoDevelop Win Run As.PNG|link=|alt=Run As]]
| |
|
| |
| Once you have the C# examples running, we have a [[#Follow the Examples|teaching]] section below to help you follow them.
| |
|
| |
| =====Write Your Own Code=====
| |
|
| |
| When you are building a project from scratch, or adding Phidget function calls to an existing project, you'll need to configure your development environment to properly link the Phidget .NET library. To begin:
| |
|
| |
| 1. Create a new C# empty project with a descriptive name such as PhidgetTest.
| |
|
| |
| [[File:CSharp MonoDevelop Win New Project.PNG|link=|alt=New Project]]
| |
|
| |
| 2. Add a reference to the Phidget .NET library.
| |
|
| |
| [[File:CSharp MonoDevelop Win Reference.PNG|link=|alt=Add Reference]]
| |
|
| |
| 3. Select {{Code|Phidget21.NET.dll}}. If you used our installer, by default, this file is placed in {{Code|C:\Program Files\Phidgets}}. If it is in another location, please change the path to the file's location accordingly.
| |
|
| |
| [[File:CSharp MonoDevelop Win Reference 2.PNG|link=|alt=Add Reference]]
| |
|
| |
| 4. Then, in your code, you will need to include the Phidget .NET library:
| |
|
| |
| <div class="source">
| |
| <syntaxhighlight lang=csharp>
| |
| using Phidgets;
| |
| using Phidgets.Events;
| |
| </syntaxhighlight>
| |
| </div>
| |
|
| |
| The project now has access to the Phidget function calls and you are ready to begin coding.
| |
|
| |
| The same [[#Follow the Examples|teaching]] section which describes the examples also has further resources for programming your Phidget.
| |
|
| |
| ==OS X==
| |
|
| |
| The first thing you are going to need to do is install [http://www.mono-project.com/Main_Page Mono] (Note that Mono is only available for Intel Macs and not PowerPC). You will need both the SDK and the runtime.
| |
|
| |
| Then, you will need the Phidget .NET libraries. These are part of the Windows library zip file download:
| |
|
| |
| * [http://www.phidgets.com/downloads/libraries/Phidget21-windevel.zip Phidget Windows Library Zip File]
| |
|
| |
| Extract the library zip file. Descriptions for the files are available on the [[OS - Windows]] page, but for now we only need the {{Code|Phidget21.NET.dll}} file to run the Phidget C# examples in Mono. So remember where you unzipped these Windows libraries - you will need to copy the {{Code|Phidget21.NET.dll}} file into your example directory shortly.
| |
|
| |
| Next, you'll want to download and extract the Phidget C# Examples (For Windows, not for .NET Compact):
| |
|
| |
| * [http://www.phidgets.com/downloads/examples/CSharp.zip C Sharp Examples for Windows]
| |
|
| |
| One more thing needs to be done before you can compile and run the examples. You need to set up a special configuration file so that Mono knows where to find the phidget21.dll. Since Mac does not use dll's you need to redirect it to the appropriate file. Create a new file in the same directory as the example you wish to compile and name it <code>Phidget21.NET.dll.config</code>. Put the following into the file:
| |
|
| |
| <div class="source">
| |
| <syntaxhighlight lang=xml>
| |
| <configuration>
| |
| <dllmap dll="phidget21.dll" target="/Library/Frameworks/Phidget21.framework/Versions/Current/Phidget21" />
| |
| </configuration>
| |
| </syntaxhighlight>
| |
| </div>
| |
|
| |
| All that is left is to compile and run the code. When compiling, you need to link to the Phidget library. As the Phidget21.NET file is an "additional assembly" in C#/Mono, you can link to the assembly using the {{Code|-r}} "reference" switch:
| |
|
| |
| <div class="source">
| |
| <syntaxhighlight lang=bash>
| |
| gmcs Program.cs -r:Phidget21.NET.dll
| |
| </syntaxhighlight>
| |
| </div>
| |
|
| |
| This will compile a {{Code|*.exe}} file - in this case, {{Code|Program.exe}}. This you can then run under Mono:
| |
|
| |
| <div class="source">
| |
| <syntaxhighlight lang=bash>
| |
| mono Program.exe
| |
| </syntaxhighlight>
| |
| </div>
| |
|
| |
| If you will be compiling with an IDE such as GTK# or MonoDevelop, we don't have explicit instructions by IDE for OS X. However, you will probably find the [[#MonoDevelop | MonoDevelop]] section in the Windows portion above useful.
| |
|
| |
| ==Linux==
| |
|
| |
| C# has support on Linux through the Mono framework.
| |
|
| |
| ===Use Our Examples===
| |
|
| |
| The first step in using C# with Phidgets on Linux is to make sure that you have all of Mono installed. Although you probably have already done this if you're a C# programmer, you want to make sure you have all of the packages you'll need. Try:
| |
|
| |
| <div class="source">
| |
| <syntaxhighlight lang=bash> | | <syntaxhighlight lang=bash> |
| sudo apt-get mono-complete
| | dotnet new console |
| </syntaxhighlight> | | </syntaxhighlight> |
| </div>
| |
|
| |
| Next, you'll want to install the main Phidget Libraries. Compile and install them as explained on the main [[OS - Linux | Linux page]]. That Linux page also describes the different Phidget files, their installed locations, and their roles.
| |
|
| |
| Then, you will need the Phidget .NET libraries. These are part of the Windows library zip file download:
| |
|
| |
| * [http://www.phidgets.com/downloads/libraries/Phidget21-windevel.zip Phidget Windows Library Zip File]
| |
|
| |
| Extract the library zip file. Descriptions for the files are available on the [[OS - Windows]] page, but for now we only need the {{Code|Phidget21.NET.dll}} file to run the Phidget C# examples in Mono. So remember where you unzipped these Windows libraries - you will need to copy the {{Code|Phidget21.NET.dll}} file into your example directory shortly.
| |
|
| |
| Next, you'll want to download and extract the Phidget C# Examples (For Windows, not for .NET Compact):
| |
|
| |
| * [http://www.phidgets.com/downloads/examples/CSharp.zip C Sharp Examples for Windows]
| |
|
| |
| To check that your Linux, Phidget, and Mono setup is all working together, you'll want to run the C# examples. Specifically, you'll want to run the ''simple'' C# examples. You can either use the HelloWorld program that will work with any Phidget, or you can find the source code for your device. {{FindYourDevice}}
| |
|
| |
| Let's say you're running the Temperature Sensor example (for the 1048 or 1051). The source code for the example is in the directory:
| |
|
| |
| :{{Code|TemperatureSensorExamples}} → {{Code|TemperatureSensor-simple}} → {{Code|TemperatureSensor-simple}} → {{Code|Program.cs}}
| |
|
| |
| Other examples will be in directories named appropriately for their software object name. Once you have found the example you want to run, copy the {{Code|Phidget21.NET.dll}} file that you unzipped earlier into that example directory where the {{Code|Program.cs}} file is.
| |
|
| |
|
| Then, compile the code. When compiling, you need to link to the Phidget library. As the Phidget21.NET file is an "additional assembly" in C#/Mono, you can link to the assembly using the {{Code|-r}} "reference" switch:
| | || [[Image:Language_csharp_cli_newconsole.png|center|350px|link=https://cdn.phidgets.com/docs/images/3/3a/Language_csharp_cli_newconsole.png]] |
| | |- |
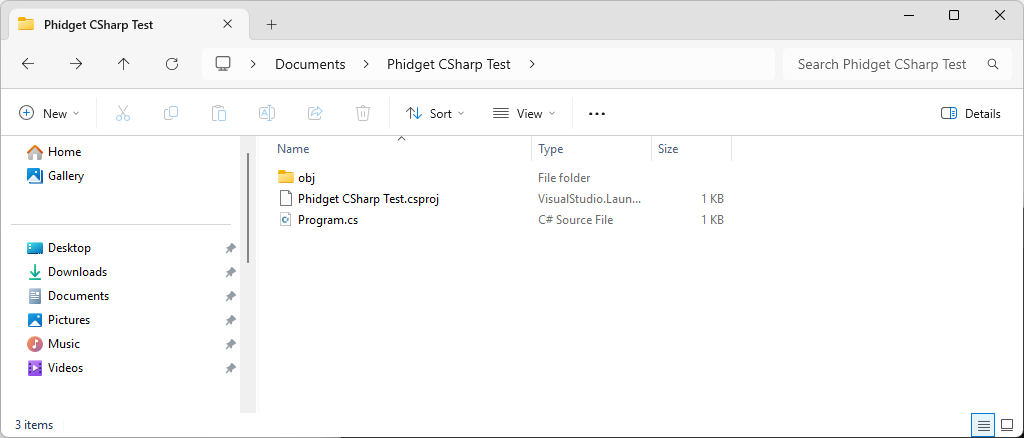
| | | This previous command will create a new console application at the folder location. || [[Image:Language_csharp_cli_newproject.png|center|350px|link=https://cdn.phidgets.com/docs/images/c/cb/Language_csharp_cli_newproject.png]] |
| | |- |
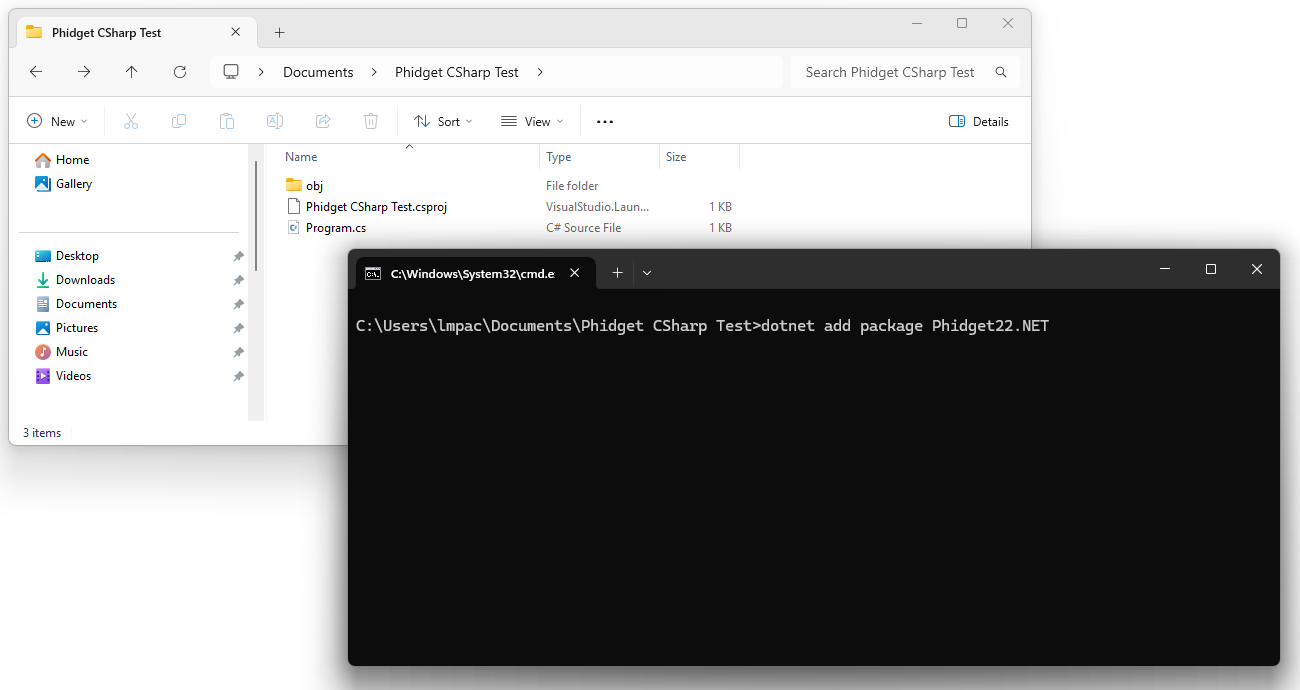
| | | Navigate back to the command prompt or terminal, and add the Phidget22.NET package with the following command: |
|
| |
|
| <div class="source">
| |
| <syntaxhighlight lang=bash> | | <syntaxhighlight lang=bash> |
| gmcs Program.cs -r:Phidget21.NET.dll
| | dotnet add package Phidget22.NET |
| </syntaxhighlight> | | </syntaxhighlight> |
| </div>
| |
|
| |
|
| This will compile a {{Code|*.exe}} file - in this case, {{Code|Program.exe}}. This you can then run under Mono:
| | || [[Image:Language_csharp_cli_addpackage.png|center|350px|link=https://cdn.phidgets.com/docs/images/7/78/Language_csharp_cli_addpackage.png]] |
| | |- |
| | | You can now open the '''Program.cs''' file and add your code. Run the program by entering the following command into your command prompt or terminal: |
|
| |
|
| <div class="source">
| |
| <syntaxhighlight lang=bash> | | <syntaxhighlight lang=bash> |
| sudo mono Program.exe
| | dotnet run |
| </syntaxhighlight>
| |
| </div>
| |
| | |
| Remember that the {{Code|sudo}} is needed unless you have your [[OS - Linux#Setting udev Rules|udev rules set on your Linux system]].
| |
| | |
| If you will be compiling with an IDE such as GTK# or MonoDevelop, we don't have explicit instructions by IDE for Linux. However, you will probably find the [[#MonoDevelop | MonoDevelop]] section in the Windows portion above useful.
| |
| | |
| ===Write Your Own Code===
| |
| | |
| When writing your code from scratch, you start it as you would any C# code on Linux, such as within a text editor like Emacs, Vi, Gedit, or Kate. In your .cs source code file, you must include a reference to the Phidget Library:
| |
| | |
| <div class="source">
| |
| <syntaxhighlight lang=csharp>
| |
| using Phidgets;
| |
| using Phidgets.Events;
| |
| </syntaxhighlight>
| |
| </div>
| |
| | |
| Then, you would compile your completed C# code the same way as the examples above.
| |
| | |
| Mono also has a few different IDEs which you can use to develop code, and these are especially useful if you are doing GUI development. We provide instructions for MonoDevelop - one such IDE - being used [[#MonoDevelop|under Windows]].
| |
| | |
| To learn how to write your own code for your Phidget, and to learn more about our API, we have a [[#Follow the Examples|teaching section]] to help you follow the provided C# examples and which has resources such as the API reference.
| |
| | |
| ==Windows CE==
| |
| | |
| ===Description of Library Files===
| |
| C# programs on Windows depend on the following files, which the installers above put onto your system:
| |
| * <b>{{Code|phidget21.dll}}</b> contains the actual Phidget library, which is used at run-time. By default, it is placed in {{Code|C:\Windows\System32}}.
| |
| You will also need one of the following two files, depending on the .NET framework version you are targeting:
| |
| * <b>{{Code|Phidget21.NET.dll}}</b> is the Phidget library for .NET framework <i><b>2.0</b></i> or higher. Your compiler has to know where this file is. By default, it is placed into {{Code|C:\Program Files\Phidgets}}. You can either point your compiler to that location, or copy and link to it in a directory for your project workspace.
| |
| * <b>{{Code|Phidget21.NET1.1.dll}}</b> is the Phidget library for .NET framework <i><b>1.1</b></i>. Your compiler has to know where this file is. By default, it is placed into {{Code|C:\Program Files\Phidgets}}. You can either point your compiler to that location, or copy and link to it in a directory for your project workspace.
| |
| You can optionally install the following files:
| |
| * <b>{{Code|Phidget21.NET.XML}}</b> provides the IntelliSense in-line documentation for the .NET library in Visual Studio/MonoDevelop. This documentation is also visible in the Object Browser in Visual Studio. By default, it is placed into {{Code|C:\Program Files\Phidgets}}.
| |
| * <b>{{Code|Policy.2.1.Phidget21.NET.dll}}</b> is the policy assembly for {{Code|Phidget21.NET.dll}}. Our installer places this file in the Global Assembly Cache(GAC) directory. It directs any programs compiled against version 2.1.0 or higher of {{Code|Phidget21.NET.dll}} to use the most recent installed version.
| |
| | |
| If you do not want to use our installer, you can download the five [http://www.phidgets.com/downloads/libraries/Phidget21-windevel.zip files].
| |
| | |
| Running the examples and writing your own code can be fairly compiler-specific, so we include instructions for each compiler below.
| |
| | |
| ===Visual Studio 2005/2008/2010===
| |
| | |
| Microsoft makes free versions of Visual Studio available known as Express Editions. The Express editions are suitable for most applications, but are limited in features for more complex applications. Please see [http://www.microsoft.com/visualstudio Microsoft Visual Studio] for more information.
| |
| | |
| =====Use Our Examples=====
| |
| | |
| Please start by downloading the [http://www.phidgets.com/downloads/examples/CSharp.zip examples] and unpack them into a folder. While these examples were written in Visual Studio 2005 and 2008, Visual Studio 2010 will easily open and upgrade them. To load all projects in Visual Studio, go to File → Open → Project, and open {{Code|AllExamples/AllExamples.sln}} or {{Code|AllExamples/AllExamples_vs2008.sln}} for Visual Studio 2005 and 2008, respectively.
| |
| | |
| If you are opening the Phidget examples in Visual Studio 2010, you will need to go through the Visual Studio Conversion Wizard to convert the 2005 or 2008 project.
| |
| [[File:VS2005 Conversion Wizard.PNG|link=|alt=Conversion Wizard]]
| |
| | |
| The easiest way to confirm that your environment is set up properly will be to compile and run the {{Code|HelloWorld}} C/C++ example.
| |
| | |
| Start by setting the {{Code|HelloWorld}} project as your start up project.
| |
| | |
| The only thing left to do is to run the example! Click on Debug → Start Debugging. Please note that the projects, by default try to find the {{Code|Phidget21.NET.dll}} in the {{Code|C:\Program Files\Phidgets}}. If you have it installed in another location, please change the path to the file's location accordingly. If you are receiving an error message regarding that the namespace Phidgets cannot be found, please re-add the reference to {{Code|Phidget21.NET.dll}}. Please see the [[#Write Your Own Code | Write Your Own Code ]] section for details.
| |
| | |
| [[File:CSharp VS2005 Run.PNG|link=|alt=Run]]
| |
| | |
| This program will detect for devices that are attached/detached on the computer. Go ahead, and attach or detach your devices! Here is an example output:
| |
| | |
| [[File:CSharp VS2005 HelloWorld Output.PNG|link=|alt=HelloWorld Output]]
| |
| | |
| After confirming that the {{Code|HelloWorld}} example is working, you can proceed to run the example for your device. {{FindYourDevice}} Please ensure that you have set your start up project to be the one that matches your device before compiling.
| |
| | |
| Once you have the C# examples running, we have a [[#Follow the Examples|teaching]] section below to help you follow them.
| |
| | |
| =====Write Your Own Code=====
| |
| | |
| When you are building a project from scratch, or adding Phidget function calls to an existing project, you'll need to configure your environment to properly link the Phidget C# libraries. To begin:
| |
| | |
| 1. Generate a new Visual C# Windows Applications project with a descriptive name such as PhidgetTest.
| |
| | |
| [[File:CSharp VS2005 New Project.PNG|link=|alt=New Project]]
| |
| | |
| 2. Add a reference to the Phidget .NET library.
| |
| | |
| [[File:CSharp VS2005 Add Reference.PNG|link=|alt=Add Reference]]
| |
| | |
| 3. Under the .NET tab, select {{Code|Phidget21.NET.dll}}.
| |
| If you used our installer, these files are installed in {{Code|C:\Program Files\Phidgets}}, by default. If it does not appear in this list, then you can browse to the Phidget Framework installation directory and add the file.
| |
| | |
| [[File:CSharp VS2005 Add Reference 2.PNG|link=|alt=Add Reference]]
| |
| | |
| 4. Then, in your code, you will need to include the Phidget .NET library:
| |
| | |
| <div class="source">
| |
| <syntaxhighlight lang=csharp>
| |
| using Phidgets;
| |
| using Phidgets.Events;
| |
| </syntaxhighlight>
| |
| </div>
| |
| | |
| | |
| The project now has access to the Phidget function calls and you are ready to begin coding.
| |
| | |
| The same [[#Follow the Examples|teaching ]] section which describes the examples also has further resources for programming your Phidget.
| |
| | |
| ==Follow the Examples==
| |
| | |
| By following the instructions for your operating system and compiler above, you probably now have a working example and want to understand it better so you can change it to do what you want. This teaching section has resources for you to learn from the examples and write your own.
| |
| | |
| Your main reference for writing C# code will be our C# API information, with syntax for all of our functions:
| |
| | |
| {{UsingAPhidgetInCodeGeneral|both of which are available in C#|[http://www.phidgets.com/documentation/Phidget21.NET.zip .NET API]}}
| |
| | |
| ===Example Flow===
| |
| | |
| {{ExamplePseudocode|In C#, you can name these '''event''' functions whatever you like. You will add them to the Phidget .NET library in the Main Code section. This hooks them into the actual events when they occur. <br><br>
| |
| In the example code, the event functions common to all Phidgets are things like attach, detach, and error handling.<br>
| |
| Other event functions will be specific to each device, like when a tag is read on an RFID board, or when a sensor value changes on an Interface Kit.
| |
| |Creating a Phidget software object in C# is specific to the Phidget. For a Phidget Spatial, for example, this would involve creating a {{Code|Spatial}} object. The examples show how to do this and other API functions.<br><br>
| |
| The object provides device specific methods and properties which are available from the API for your specific Phidget.|
| |
| [http://www.phidgets.com/documentation/Phidget21.NET.zip .NET API]}}
| |
| | |
| ===Code Snippets===
| |
| | |
| Specific calls in C# will differ in syntax from those on the [[General Phidget Programming]] page, but the concepts stay the same.
| |
| | |
| It may help to have the [[General Phidget Programming]] page and this section open at the same time, because they parallel each other and you can refer to the C# syntax. However, ''many'' additional concepts are covered on the General Phidget Programming page on a high level, such as using multiple Phidgets, handling errors, and different styles of programming.
| |
| | |
| ====Step One: Initialize and Open====
| |
| | |
| The open() function opens the software object, but not hardware. So, it is not a guarantee you can use the Phidget immediately.
| |
| | |
| The different types of open can be used with parameters to try and get the first device it can find, open based on its serial number, or even open across the network. The API manual lists and [[General Phidget Programming]] discusses all of the available modes that open provides.
| |
| | |
| For example, if we were using a Temperature Sensor board as our device, the general calls would look like this:
| |
| | |
| <div class="source">
| |
| <syntaxhighlight lang=csharp>
| |
| using Phidgets;
| |
| using Phidgets.Events;
| |
| // using.....
| |
| | |
| namespace Program {
| |
| class Code {
| |
| static void Main(string[] args) {
| |
| try {
| |
| | |
| // Declare a TemperatureSensor object
| |
| TemperatureSensor device = new TemperatureSensor();
| |
|
| |
| // Hook in any event handlers
| |
| // ...
| |
| | |
| // Open the device
| |
| device.open();
| |
| | |
| } catch (PhidgetException ex) { Console.WriteLine(ex.Description); }
| |
| }
| |
| }
| |
| }
| |
| </syntaxhighlight> | | </syntaxhighlight> |
| </div>
| |
|
| |
|
| ====Step Two: Wait for Attachment (plugging in) of the Phidget==== | | || [[Image:Language_csharp_cli_runcode.png|center|350px|link=https://cdn.phidgets.com/docs/images/f/f3/Language_csharp_cli_runcode.png]] |
| | |- |
| | |} |
|
| |
|
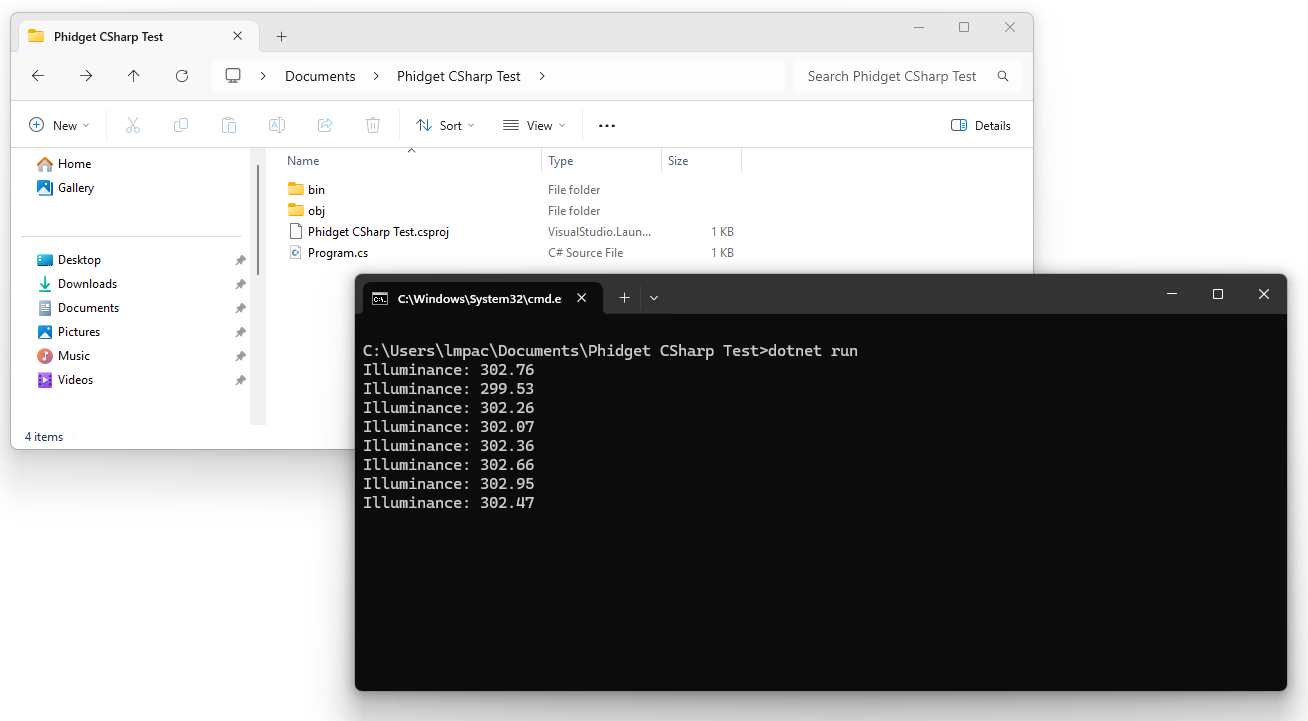
| To use the Phidget, it must be plugged in (attached). We can handle this by using event driven programming and tracking the AttachEvents and DetachEvents, or we can handle this by calling waitForAttachment. This function works for any Phidget. WaitForAttachment will block indefinitely until a connection is made to the Phidget, or an optional timeout is exceeded:
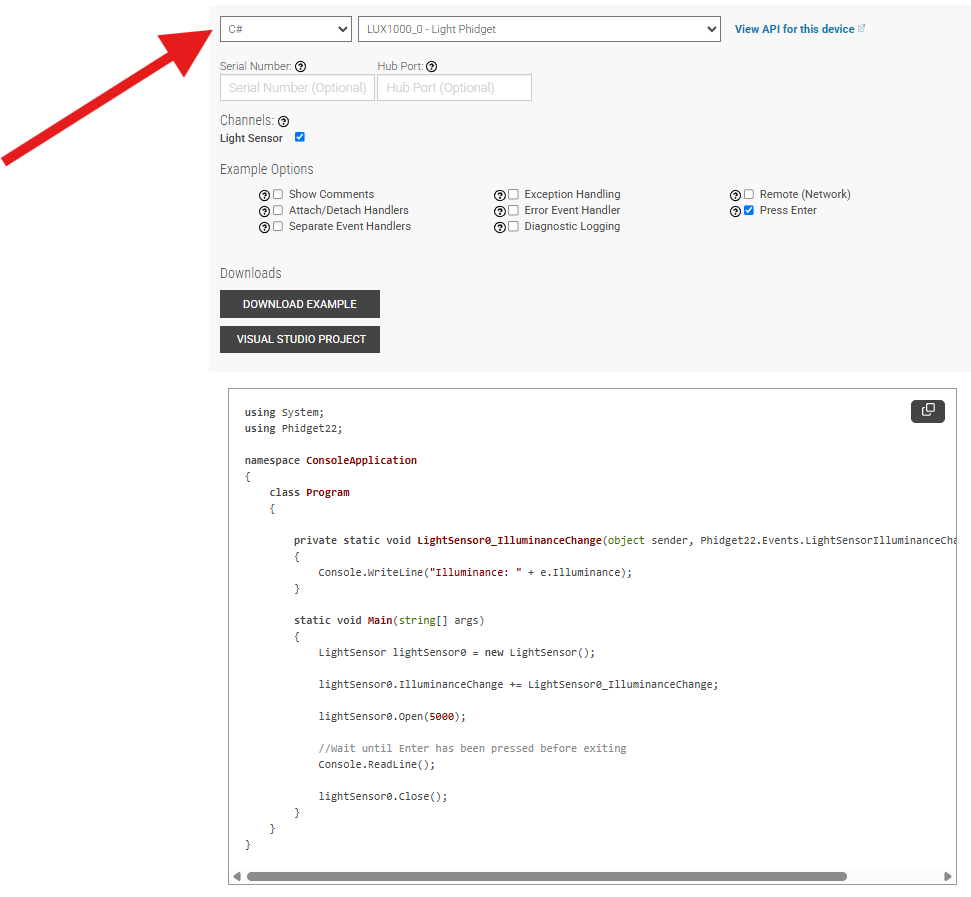
| | ==Example Code== |
| | Navigate to our [https://www.phidgets.com/?view=code_samples&lang=CSharp Code Sample Generator] to view and download code samples that are tailored to your specific device. |
|
| |
|
| <div class="source">
| | [[Image:Language_csharp_codesample.png|center|600px|link=https://cdn.phidgets.com/docs/images/0/03/Language_csharp_codesample.png]] |
| <syntaxhighlight lang=csharp>
| |
| device.open();
| |
| Console.WriteLine("Waiting for TemperatureSensor to be attached....");
| |
| device.waitForAttachment();
| |
| </syntaxhighlight>
| |
| </div>
| |
|
| |
|
| One important thing to remember is that when working with Phidgets, a local connection will reserve the device until closed. This means only one program can access the Phidget locally. Many computers can access one Phidget over the [[Phidget WebService]].
| | ===Phidget Programming Basics=== |
| | {{PhidgetProgrammingBasicsLink}} |
|
| |
|
| ====Step Three: Do Things with the Phidget==== | | ==API== |
| | | [{{SERVER}}/?view=api&lang=CSharp Phidget22 API] |
| We recommend the use of event driven programming when working with Phidgets. This allows the program to execute other tasks until the Phidget generates a new event. You can hook a custom function into an event trigger like this, using the Interface Kit Phidget as an example:
| |
| | |
| <div class="source">
| |
| <syntaxhighlight lang=csharp>
| |
| ifKit.SensorChange += new SensorChangeEventHandler(ifKit_SensorChange);
| |
| </syntaxhighlight>
| |
| </div>
| |
| | |
| The ifKit_SensorChange method is defined as follows:
| |
| | |
| <div class="source">
| |
| <syntaxhighlight lang=csharp>
| |
| void ifKit_SensorChange(object sender, SensorChangeEventArgs e) {
| |
| textBox1.Text = "Index " + e.Index + " Value: " + e.Value;
| |
| }
| |
| </syntaxhighlight>
| |
| </div>
| |
| | |
| Some values can be directly read and set on the Phidget. These functions can be used inside a polling loop as an alternative to event driven programming. The line inside the loop would be something like this, after which you could do something with the value:
| |
| | |
| <div class="source">
| |
| <syntaxhighlight lang=csharp>
| |
| int val = device.sensors[0].Value;
| |
| </syntaxhighlight>
| |
| </div>
| |
| | |
| ====Step Four: Close and Delete====
| |
| | |
| At the end of your program, unhook any events and call Application.DoEvents(). This will make sure there are no outstanding events being processed before calling close.
| |
| | |
| <div class="source">
| |
| <syntaxhighlight lang=csharp>
| |
| private void Form1_FormClosing(object sender, FormClosingEventArgs e) {
| |
| ifKit.SensorChange -= new SensorChangeEventHandler(ifKit_SensorChange);
| |
| //run any events in the message queue
| |
| Application.DoEvents();
| |
| ifKit.close();
| |
| }
| |
| </syntaxhighlight>
| |
| </div>
| |
| | |
| {{MoreHowTos}} | |
| | |
| The ''complete'' set of functions you have available for all Phidgets can be found in the [http://www.phidgets.com/documentation/Phidget21.NET.zip .NET API]. You can also find more description on any device-specific function in the Device API page for your specific Phidget, which can be found on its product page on our [http://www.phidgets.com main website].
| |
| | |
| ==Common Problems and Solutions/Workarounds== | |
| | |
| ==={{ProblemSolution|All Operating Systems|The Phidgets.Events.ErrorEventHandler conflicts with System.IO.ErrorEventHandler.}}===
| |
| | |
| <div class="source">
| |
| <syntaxhighlight lang=csharp>
| |
| using System.IO;
| |
| using Phidgets;
| |
| using Phidgets.Events;
| |
| ...
| |
| spatial.Error += new ErrorEventHandler(spatial_Error);
| |
| | |
| ...
| |
| void spatial_Error(object sender, ErrorEventArgs e){
| |
| ...
| |
| }
| |
| </syntaxhighlight>
| |
| </div>
| |
| | |
| The above code produces the following errors:
| |
| | |
| {{Code|'ErrorEventHandler' is an ambiguous reference between 'System.IO.ErrorEventHandler' and 'Phidgets.Events.ErrorEventHandler'}}.
| |
| | |
| and
| |
| | |
| {{Code|'ErrorEventArgs' is an ambiguous reference between 'System.IO.ErrorEventArgs' and 'Phidgets.Events.ErrorEventArgs'}}.
| |
| | |
| The error is due to the {{Code|System.IO}} and {{Code|Phidgets.Events}} namespaces both having a class called {{Code|ErrorEventHandler}}.
| |
| | |
| To get around this issue, use the fully qualified namespace when referring to the {{Code|ErrorEventHandler}} and {{Code|ErrorEventArgs}} classes:
| |
| <div class="source">
| |
| <syntaxhighlight lang=csharp>
| |
| using System.IO;
| |
| using Phidgets;
| |
| using Phidgets.Events;
| |
| ...
| |
| spatial.Error += new Phidgets.Events.ErrorEventHandler(spatial_Error);
| |
| ...
| |
| | |
| void spatial_Error(object sender, Phidgets.Events.ErrorEventArgs e){
| |
| ...
| |
| }
| |
| | |
| </syntaxhighlight>
| |
| </div>
| |