DST1200 User Guide
Part 1: Setup
Welcome to the DST1200 user guide! In order to get started, make sure you have the following hardware on hand:
- DST1200 - Sonar Phidget
- VINT Hub
- Phidget cable
- USB cable and computer
Next, you will need to connect the pieces:
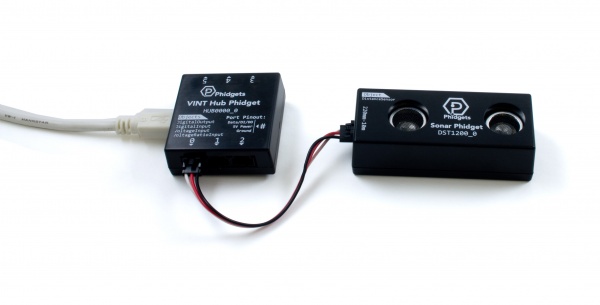
- Connect the DST1200 to the VINT Hub using the Phidget cable.
- Connect the VINT Hub to your computer with a USB cable.
Now that you have everything together, let's start using the DST1200!
Phidget Control Panel
In order to demonstrate the functionality of the DST1200, the Phidget Control Panel running on a Windows machine will be used.
The Phidget Control Panel is available for use on both macOS and Windows machines.
Windows
To open the Phidget Control Panel on Windows, find the ![]() icon in the taskbar. If it is not there, open up the start menu and search for Phidget Control Panel
icon in the taskbar. If it is not there, open up the start menu and search for Phidget Control Panel
macOS
To open the Phidget Control Panel on macOS, open Finder and navigate to the Phidget Control Panel in the Applications list. Double click on the ![]() icon to bring up the Phidget Control Panel.
icon to bring up the Phidget Control Panel.
For more information, take a look at the getting started guide for your operating system:
Linux users can follow the getting started with Linux guide and continue reading here for more information about the DST1200.
First Look
After plugging the DST1200 into your computer and opening the Phidget Control Panel, you will see something like this:
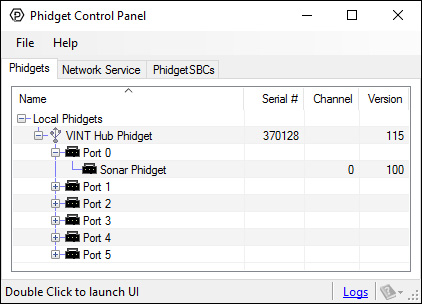
The Phidget Control Panel will list all connected Phidgets and associated objects, as well as the following information:
- Serial number: allows you to differentiate between similar Phidgets.
- Channel: allows you to differentiate between similar objects on a Phidget.
- Version number: corresponds to the firmware version your Phidget is running. If your Phidget is listed in red, your firmware is out of date. Update the firmware by double-clicking the entry.
The Phidget Control Panel can also be used to test your device. Double-clicking on an object will open an example.
Part 2: Using Your Phidget
About
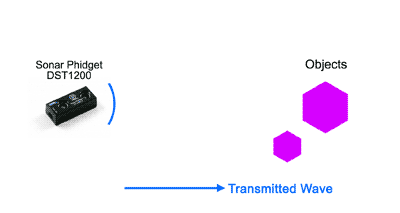
The DST1000 uses reflected ultrasonic waves to measure distance. Use this Phidget for motion sensing, object detection, or spatial awareness. The sensor will measure the distance of as many as 8 objects at the same time, from 40mm to ~10m in optimal conditions with an accuracy of about 10mm.
Explore Your Phidget Channels Using The Control Panel
You can use your Control Panel to explore your Phidget's channels.
1. Open your Control Panel, and you will find the following channel:
2. Double click on the channel to open the example program. This channel belongs to the DistanceSensor channel class:
In your Control Panel, double click on "Sonar Phidget":
Part 3: Create your Program
Part 4: Advanced Topics and Troubleshooting
Before you open a Phidget channel in your program, you can set these properties to specify which channel to open. You can find this information through the Control Panel.
1. Open the Control Panel and double-click on the red map pin icon:

2. The Addressing Information window will open. Here you will find all the information you need to address your Phidget in your program.

See the Phidget22 API for your language to determine exact syntax for each property.
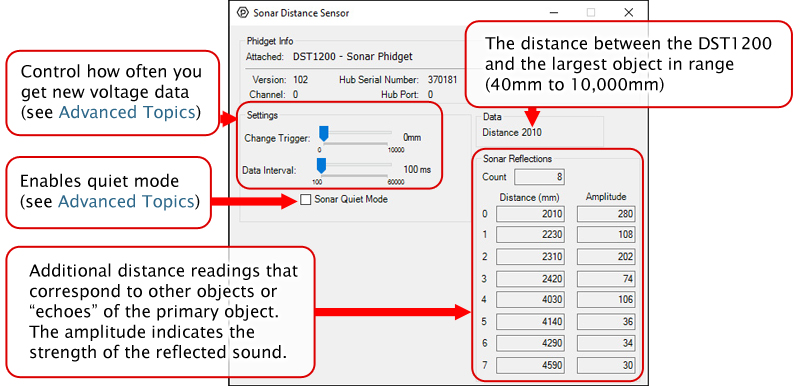
The Change Trigger is the minimum change in the sensor data needed to trigger a new data event.
The Data Interval is the time (in ms) between data events sent out from your Phidget.
The Data Rate is the reciprocal of Data Interval (measured in Hz), and setting it will set the reciprocal value for Data Interval and vice-versa.
You can modify one or both of these values to achieve different data outputs. You can learn more about these properties here.
The DST1200 has a Quiet Mode which reduces the volume of the sound pulses used by the sonar sensors. While the sound that this Phidget makes is audible in either mode, it is much less noticeable with quiet mode enabled. By enabling quiet mode, you will decrease the maximum sensing range and the number of reflections detected. Quiet mode also consumes less power (see product page specifications for details).
When you receive data from the DST1200, you will end up with an array of sonar reflections that each have a distance and an amplitude. The distance, of course, refers to how far away the object is. The amplitude gives you a general idea of the size of the object. The amplitude value can range from 3 to approximately 900, with 3 being a very small reflection and 900 being a very large reflection. In some applications, you will want to ignore reflections with an amplitude you deem is too small.
The DST1200 will fire saturation error events when the nearest reflection is closer than 40mm from the sensor. At this range it is too close for the sensor to accurately determine the range of the object.