Calibrating Load Cells
In order to convert the output from a load cell into a meaningful number, calibration is required. This can be done quickly and easily using the Phidget Control Panel on a Windows machine!
How to Calibrate a Load Cell
Video Guide
Note: calibration sheets (like this) are not described in the video above. If your load cell came with a calibration sheet, view step 2a below for more information.
Install Your Load Cell
In order to calibrate your load cell, it should be installed in the system you will be using.
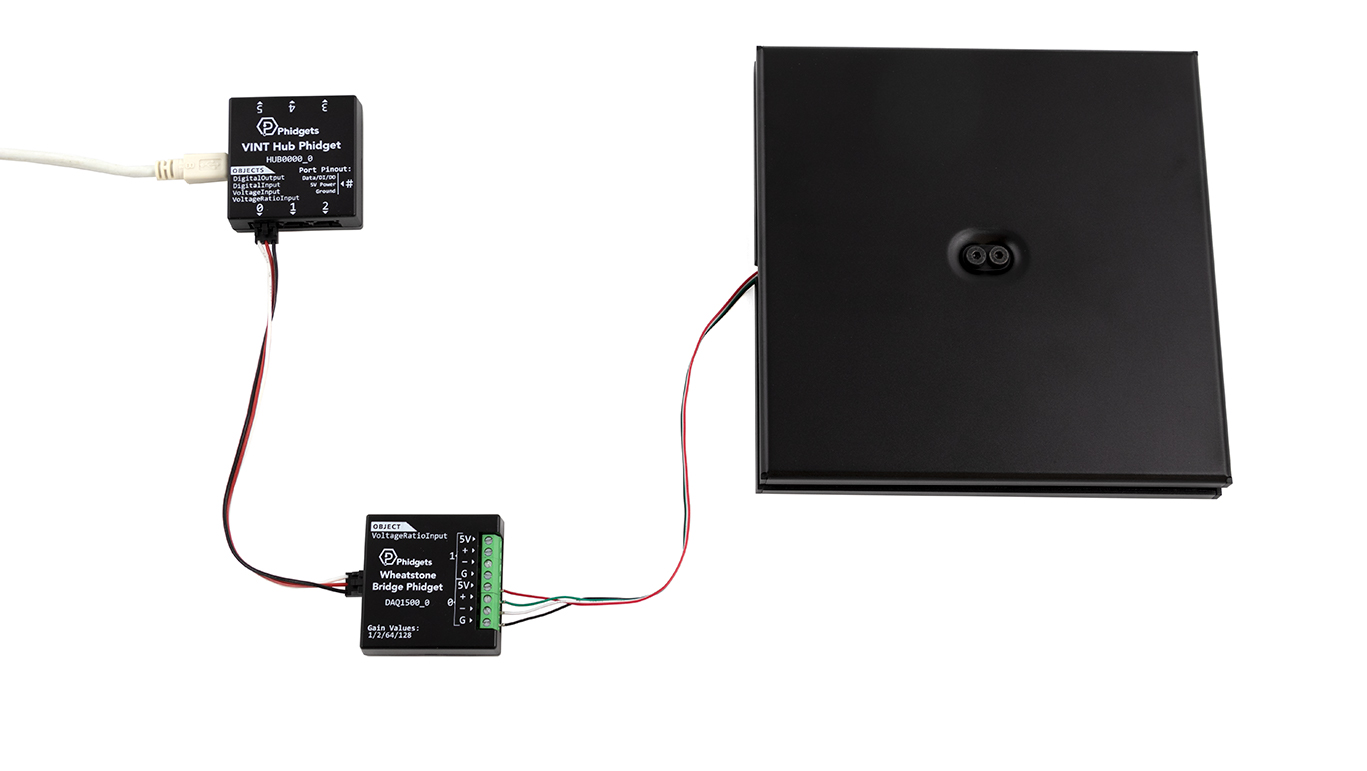
To demonstrate, we will use a 5kg Single Point Load Cell installed in a Weighing Scale Kit.

Connect Your Phidget
Use a Load Cell Interface to connect your load cell(s).
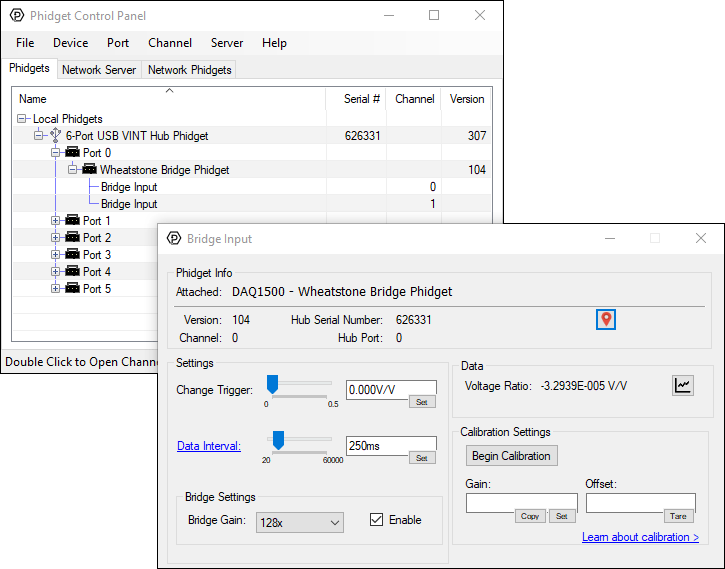
Open the Phidget Control Panel
Open the Phidget Control Panel application for your Phidget using a Windows machine.
Begin Calibration of Your System
Calibration Steps
Calibration is a simple process where two data points are collected:
- Zero load calibration point.
- Non-zero load calibration point.
If your load cell came with a calibration sheet, the non-zero load calibration point is not required.
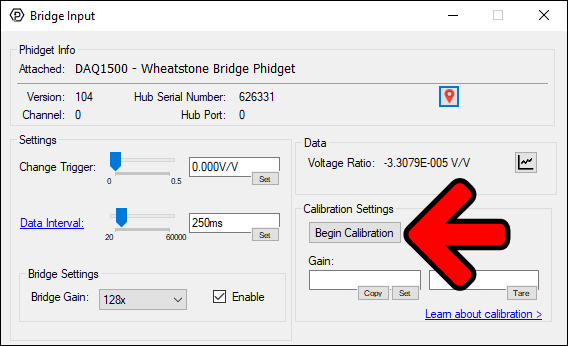
Start Calibration
Start by clicking on the Begin Calibration button.
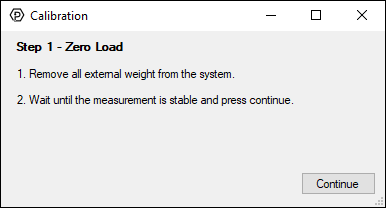
Determine the Zero Load Calibration Point
The first data point will be collected when the system is unloaded. The goal is to determine the offset of the system, and to remove that offset from all future measurements. This will result in the system outputting 0 when unloaded.
The offset of your system is determined by a variety of factors including fixed loads (e.g. the Weighing Scale Kit has a top plate and screws that constantly load the system), temperature impacts, intrinsic characteristics of your load cell(s), and more.
Before moving on, ensure your system is unloaded.

Click Continue when the button is available.
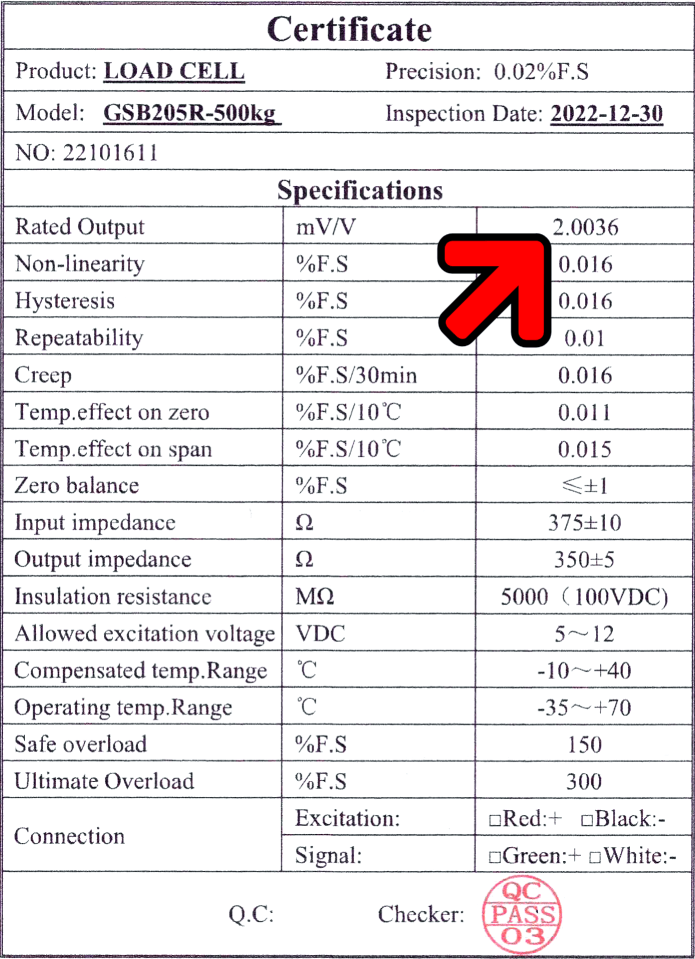
Step 2a: Enter the Rated Output
If your load cell came with a calibration sheet, you can enter the Rated Output and the Capacity during this step.
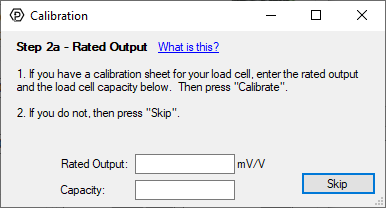
- Enter the Rated Output with units of mV/V.
- Enter the Capacity with units of your choosing. The units used during this step will determine the output units of the calibration. If you are using multiple load cells in parallel (connected to the same channel on the load cell interface), sum the capacities of all the load cells and enter the total.
If your load cell did not come with a calibration sheet, you can press Skip and move to step 2b.
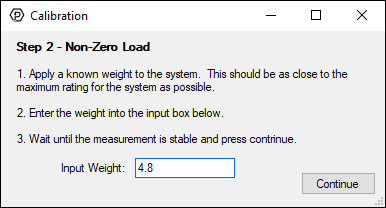
Step 2b: Determine the Non-Zero Load Calibration Point
If your load cell did not come with a calibration sheet, the second data point to collect is the non-zero load calibration point. In this step, you will apply a known weight to your system.
For more accurate results, use a known weight that is close to your system's capacity without overloading your system. For example, if you have a 5kg system, try loading it with a weight that is 4 to 5kg.
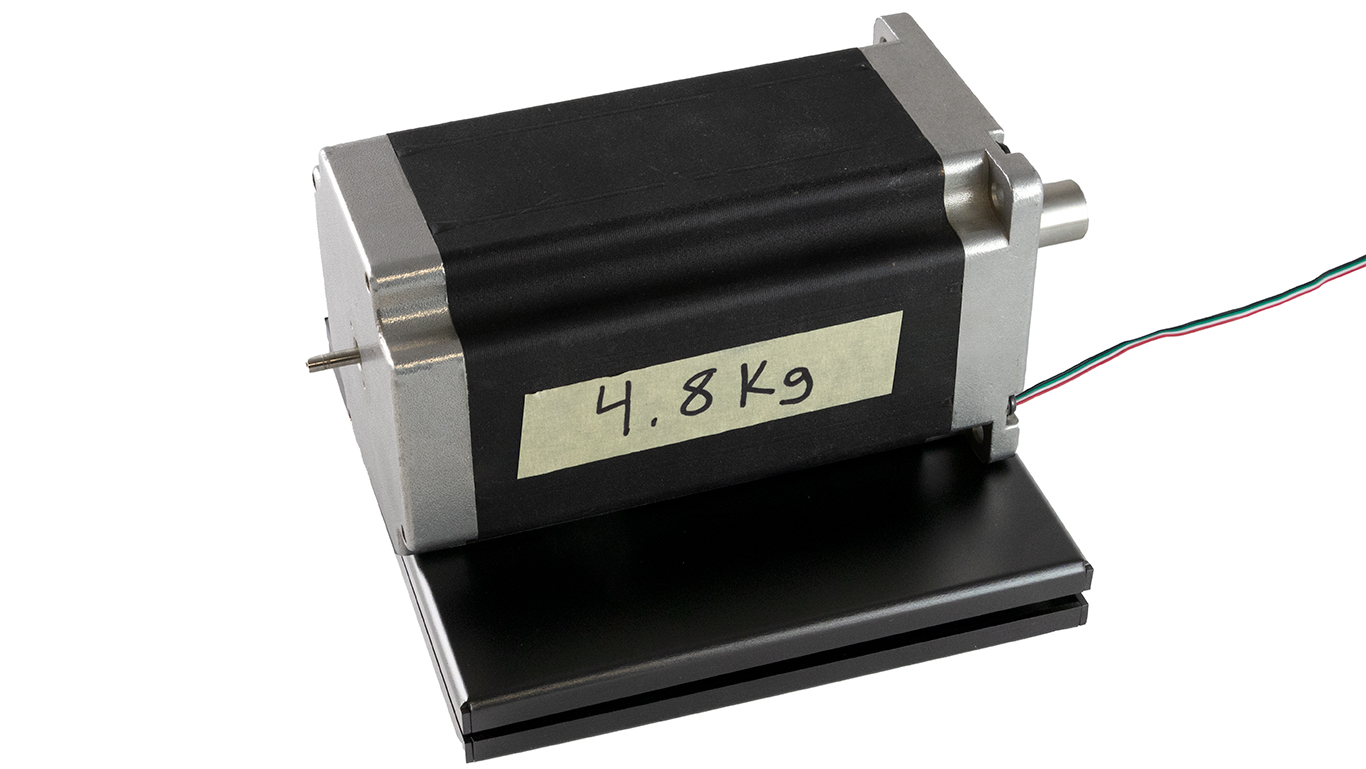
After loading your system, enter the known weight into the Input Weight text box and press Continue. The units used during this step will determine the output units of the calibration. For example, we used a 4.8kg weight for our 5kg system, so we enter 4.8 into the text box.
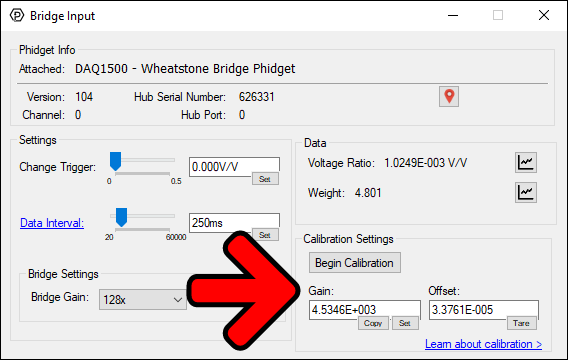
Review Calibration
You can now view your calibrated value.

You also have access to the calibration parameters Gain and Offset which can be used in your own software. Additionally, you can experiment with the Tare button to recalculate your zero load calibration point (offset).
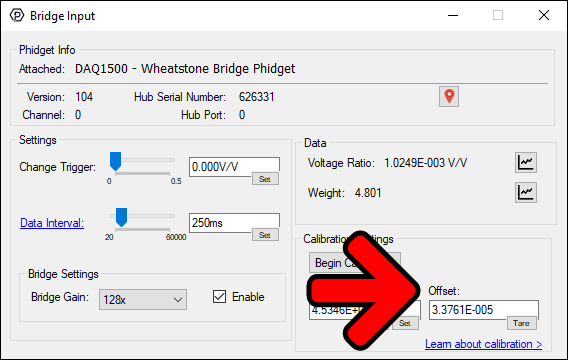
Tare Your System
Regularly taring your system will increase the accuracy of your measurements. You can experiment with taring your system through the Phidget Control Panel example:
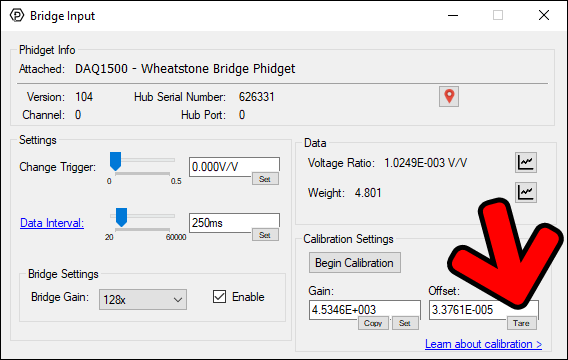
The tare button will update the Offset value. See the example code below for more information about how to do this in your software.
Taring your system (recalculating your system's offset), is normally performed when the system is unloaded, however, this functionality can also be used to remove the weight of an object prior to a measurement. This is often seen in kitchen scales where taring can remove the weight of a container so ingredients can be easily measured.
As mentioned above, regularly taring your system will result in more accurate measurements.
Best Practices - Using Multiple Channels
The Load Cell Interfaces from Phidgets Inc. have multiple channels available. This means you can connect multiple load cells to a single interface (e.g. four weighing scale kits can be connected to a single PhidgetBridge 4-Input).
If you are planning to use multiple channels in your final installation, we recommend the following:
- Open all of the channels you will be using on your load cell interface before calibrating. For example, if you plan to use channels 0 and 1 on a PhidgetBridge 4-Input, make sure to open them both through the Phidget Control Panel before calibrating.
- Configure the data interval of the channels you will be using before calibrating. For example, if you plan to use channels 0 and 1 on a PhidgetBridge 4-Input with a data interval of 100ms (10Hz), make sure the data interval of both channels is set prior to calibrating.
By following the steps above, your calibration will be as accurate as possible.
Using Calibration Parameters in Your Software
After calibration, you can apply your calibration parameters (gain and offset) in your custom software to calculate weight:
Definitions
Weight
Weight, as the name indicates, is the weight of an object as measured by your system. Parameters calculated during calibration (gain and offset) are used to convert the raw voltage ratio from a load cell into weight. The units of weight are determined during calibration and are normally grams, pounds, newtons, etc.
Voltage Ratio
This is the raw value from your load cell(s).
Gain
Gain is calculated during the calibration process. It converts the raw voltage ratio into a weight. This value will not change, so it can be hard coded into your software.
Offset
Offset is calculated during the calibration process. Although you can use the value displayed in the Phidget Control Panel application, we recommended recalculating your offset (taring your system) regularly. This can be done programatically, and is quite easy to do! View the example code below for more information.
Example Code
The code below shows how to apply the calibration parameters Gain and Offset to calculate the weight of an object. The offset parameter is recalculated every time the program runs.
Click on your preferred programming language to view the code example.
from Phidget22.Phidget import *
from Phidget22.Devices.VoltageRatioInput import *
import time

#Insert your gain value from the Phidget Control Panel
gain = 0

#The offset is calculated in tareScale
offset = 0

calibrated = False

def onVoltageRatioChange(self, voltageRatio):
    if(calibrated):
        #Apply the calibration parameters (gain, offset) to the raw voltage ratio
        weight = (voltageRatio - offset) * gain
        print("Weight: " + str(weight))


def tareScale(ch):
    global offset, calibrated
    num_samples = 16

    for i in range(num_samples):
        offset += ch.getVoltageRatio()
        time.sleep(ch.getDataInterval()/1000.0)

    offset /= num_samples
    calibrated = True

def main():
    voltageRatioInput0 = VoltageRatioInput()
    voltageRatioInput0.setOnVoltageRatioChangeHandler(onVoltageRatioChange)
    voltageRatioInput0.openWaitForAttachment(5000)

    #Set the data interval for the application
    voltageRatioInput0.setDataInterval(250)

    print("Taring")

    tareScale(voltageRatioInput0)

    print("Taring Complete")

    try:
        input("Press Enter to Stop\n")
    except (Exception, KeyboardInterrupt):
        pass

    voltageRatioInput0.close()

main()
import com.phidget22.*;
import java.util.Scanner; //Required for Text Input
import java.io.IOException;

public class Java_Example {

    //Insert your gain value from the Phidget Control Panel
    static double gain = 0;

    //The offset is calculated in tareScale
    static double offset = 0;

    static boolean calibrated = false;

    public static void tareScale(VoltageRatioInput ch) throws Exception {
        int numSamples = 16;

        for (int i = 0; i < numSamples; i++) {
            offset += ch.getVoltageRatio();
            Thread.sleep(ch.getDataInterval());
        }

        offset /= numSamples;
        calibrated = true;
    }

    public static void main(String[] args) throws Exception {
        VoltageRatioInput voltageRatioInput0 = new VoltageRatioInput();

        voltageRatioInput0.addVoltageRatioChangeListener(new VoltageRatioInputVoltageRatioChangeListener() {
            public void onVoltageRatioChange(VoltageRatioInputVoltageRatioChangeEvent e) {
                if (calibrated) {
                    //Apply the calibration parameters (gain, offset) to the raw voltage ratio
                    double weight = (e.getVoltageRatio() - offset) * gain;
                    System.out.println("Weight " + weight);
                }
            }
        });

        voltageRatioInput0.open(5000);

        //Set the data interval for your application
        voltageRatioInput0.setDataInterval(250);

        System.out.println("Taring");

        tareScale(voltageRatioInput0);

        System.out.println("Taring Complete");

        //Wait until Enter has been pressed before exiting
        System.in.read();

        voltageRatioInput0.close();
    }
}
using System;
using Phidget22;

namespace ConsoleApplication
{
	class Program
	{
		//Insert your gain value from the Phidget Control Panel
		static double gain = 0;

		//The offset is calculated in tareScale
		static double offset = 0;

		static bool calibrated = false;

		private static void VoltageRatioInput0_VoltageRatioChange(object sender, Phidget22.Events.VoltageRatioInputVoltageRatioChangeEventArgs e)
		{
			if (calibrated)
			{
				//Apply the calibration parameters (gain, offset) to the raw voltage ratio
				double weight = (e.VoltageRatio - offset) * gain;
				Console.WriteLine("Weight: " + weight);
			}
		}

		private static void tareScale(VoltageRatioInput ch)
		{
			int numSamples = 16;

			for (int i = 0; i < numSamples; i++)
			{
				offset += ch.VoltageRatio;
				System.Threading.Thread.Sleep(ch.DataInterval);
			}

			offset /= numSamples;
			calibrated = true;
		}

		static void Main(string[] args)
		{
			VoltageRatioInput voltageRatioInput0 = new VoltageRatioInput();
			voltageRatioInput0.VoltageRatioChange += VoltageRatioInput0_VoltageRatioChange;
			voltageRatioInput0.Open(5000);

			//Set the data interval for your application
			voltageRatioInput0.DataInterval = 250;

			Console.WriteLine("Taring");

			tareScale(voltageRatioInput0);

			Console.WriteLine("Taring Complete");

			//Wait until Enter has been pressed before exiting
			Console.ReadLine();

			voltageRatioInput0.Close();
		}
	}
}
#include <phidget22.h>
#include <stdio.h>
/* Determine if we are on Windows of Unix */
#ifdef WIN32
#include <windows.h>
#else
#include <unistd.h>
#define Sleep(x) usleep((x) * 1000)
#endif

//Insert your gain value from the Phidget Control Panel
double gain = 0;

//The offset is calculated in tareScale
double offset = 0;

int calibrated = 0;

int minDataInterval;

static void CCONV onVoltageRatioChange(PhidgetVoltageRatioInputHandle ch, void* ctx, double voltageRatio) {
	if (calibrated) {
		////Apply the calibration parameters (gain, offset) to the raw voltage ratio
		double weight = (voltageRatio - offset) * gain;
		printf("Weight: %lf\n", weight);
	}
}

static void CCONV tareScale(PhidgetVoltageRatioInputHandle ch) {
	int numSamples = 16;
	double voltageRatio;

	for (int i = 0; i < numSamples; i++) {
		PhidgetVoltageRatioInput_getVoltageRatio(ch, &voltageRatio);
		offset += voltageRatio;
		Sleep(minDataInterval);
	}

	offset /= numSamples;
	calibrated = 1;
}

int main() {
	PhidgetVoltageRatioInputHandle voltageRatioInput0;
	PhidgetVoltageRatioInput_create(&voltageRatioInput0);
	PhidgetVoltageRatioInput_setOnVoltageRatioChangeHandler(voltageRatioInput0, onVoltageRatioChange, NULL);
	Phidget_openWaitForAttachment((PhidgetHandle)voltageRatioInput0, 5000);

	//Set the data interval for application
	PhidgetVoltageRatioInput_setDataInterval(voltageRatioInput0, 250);

	printf("Taring\n");

	tareScale(voltageRatioInput0);

	printf("Taring Complete\n");

	//Wait until Enter has been pressed before exiting
	getchar();

	Phidget_close((PhidgetHandle)voltageRatioInput0);
	PhidgetVoltageRatioInput_delete(&voltageRatioInput0);
}
const phidget22 = require('phidget22');

const keypress = async () => {
	process.stdin.setRawMode(true)
	return new Promise(resolve => process.stdin.once('data', () => {
	  process.stdin.setRawMode(false)
	  resolve()
	}))
}

//Insert your gain value from the Phidget Control Panel
const gain = 0;

//The offset is calculated in tareScale
var offset = 0;

var calibrated = false;

function onVoltageRatioChange(voltageRatio) {
	if(calibrated){
		var weight = (voltageRatio - offset) * gain;
		//Apply the calibration parameters to the raw voltage ratio
		console.log('Weight: ' + weight.toString());
	}
}

function tareScale(ch) {
	var num_samples = 16;

	for (let i = 0; i < num_samples; i++) {
		setTimeout(async () => {
			offset += ch.voltageRatio;
		},ch.dataInterval*i);
	}
	setTimeout(async () => {
		offset /= num_samples;
		calibrated = true;
		console.log('Taring Complete');
		console.log('Press Enter to Stop');
	},ch.dataInterval*num_samples+1);
}

async function runExample() {
	const conn = new phidget22.NetworkConnection(5661, 'localhost');
	await conn.connect();

	const voltageRatioInput0 = new phidget22.VoltageRatioInput();
	voltageRatioInput0.onVoltageRatioChange = onVoltageRatioChange;
	await voltageRatioInput0.open(5000);

    //Set the data interval for application
    ch.dataInterval = 250;
	console.log('Press Enter to start Tare');
	await keypress();
	console.log('Taring');

	tareScale(voltageRatioInput0);

	await keypress();
	voltageRatioInput0.close();
	conn.close();
	conn.delete();
}

runExample();
Example Code - Explanation
There are three functions in the code above, we will describe them here.
main
In the this function, we do the following:
- Create and open our VoltageRatioInput object. This allows us to communicate with the PhidgetBridge 4-Input or a Wheatstone Bridge Phidget.
- Set the data rate for the application.
- Tare our system.
- Wait for user input before exiting the program.
tareScale
In the this function, we do the following:
- Define the number of samples to take. We recommend a minimum of 16 samples.
- Collect samples, ensuring we wait for the data interval to elapse before attempting to collect another sample.
- Average the collected data and set the offset variable.
Voltage Ratio Change
In the this function, we do the following:
- Wait until the calibration parameters are ready.
- Apply the calibration parameters to the raw voltage ratio using the formula shown previously.
- Output the weight value.