REL1000 User Guide
Getting Started
Welcome to the REL1000 user guide! In order to get started, make sure you have the following hardware on hand:
- REL1000 - 4x Relay Phidget
- VINT Hub
- Phidget cable
- USB cable and computer
- Power supply
- something to use with the REL1000 (e.g. a series circuit)
Next, you will need to connect the pieces:
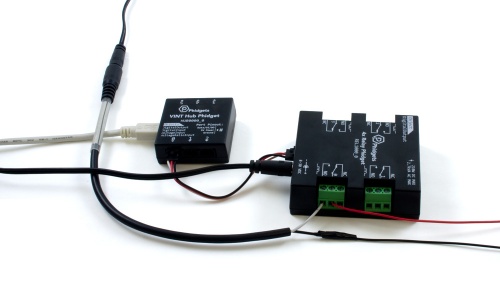
- Connect the REL1000 to the VINT Hub using the Phidget cable.
- Connect the VINT Hub to your computer with a USB cable.
- Connect the circuits you're switching to the terminal blocks on the REL1000. If you want the circuit to be closed by default when the relay is not energized, connect the two ends of the circuit to the NC and COM terminals. If you want the circuit to be open by default, connect it to the NO and COM terminals instead. It doesn't matter which end of the circuit is connected connected to each of the two terminals in either case.
- Connect the power supply to the barrel jack on the REL1000.
Now that you have everything together, let's start using the REL1000!
Using the REL1000
Phidget Control Panel
In order to demonstrate the functionality of the REL1000, the Phidget Control Panel running on a Windows machine will be used.
The Phidget Control Panel is available for use on both macOS and Windows machines.
Windows
To open the Phidget Control Panel on Windows, find the ![]() icon in the taskbar. If it is not there, open up the start menu and search for Phidget Control Panel
icon in the taskbar. If it is not there, open up the start menu and search for Phidget Control Panel
macOS
To open the Phidget Control Panel on macOS, open Finder and navigate to the Phidget Control Panel in the Applications list. Double click on the ![]() icon to bring up the Phidget Control Panel.
icon to bring up the Phidget Control Panel.
For more information, take a look at the getting started guide for your operating system:
Linux users can follow the getting started with Linux guide and continue reading here for more information about the REL1000.
First Look
After plugging the REL1000 into your computer and opening the Phidget Control Panel, you will see something like this:
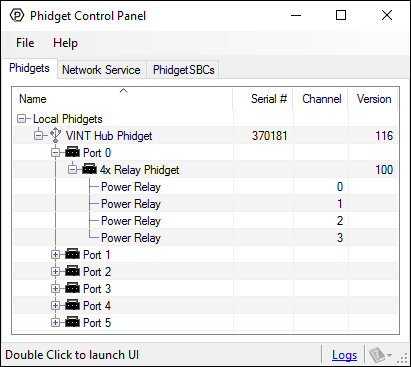
The Phidget Control Panel will list all connected Phidgets and associated objects, as well as the following information:
- Serial number: allows you to differentiate between similar Phidgets.
- Channel: allows you to differentiate between similar objects on a Phidget.
- Version number: corresponds to the firmware version your Phidget is running. If your Phidget is listed in red, your firmware is out of date. Update the firmware by double-clicking the entry.
The Phidget Control Panel can also be used to test your device. Double-clicking on an object will open an example.
Relay Output
Double-click on a Digital Output object labelled Power Relay in order to run the example:
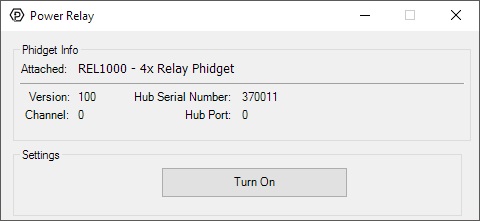
General information about the selected object will be displayed at the top of the window. You can also experiment with the following functionality:
- Toggle the state of the relay by pressing the button.
Finding The Addressing Information
Before you can access the device in your own code, and from our examples, you'll need to take note of the addressing parameters for your Phidget. These will indicate how the Phidget is physically connected to your application. For simplicity, these parameters can be found by clicking the button at the top of the Control Panel example for that Phidget.

In the Addressing Information window, the section above the line displays information you will need to connect to your Phidget from any application. In particular, note the Channel Class field as this will be the API you will need to use with your Phidget, and the type of example you should use to get started with it. The section below the line provides information about the network the Phidget is connected on if it is attached remotely. Keep track of these parameters moving forward, as you will need them once you start running our examples or your own code.

Using Your Own Program
You are now ready to start writing your own code for the device. The best way to do that is to start from our Phidget is compatible with the [https://www.phidgets.com/?view=code_samples&class=DigitalOutput DigitalOutput Examples. Code Samples].
Select your programming language of choice from the drop-down list to get an example for your device. You can use the options provided to further customize the example to best suit your needs.

Once you have your example, you will need to follow the instructions on the page for your programming language to get it running. To find these instructions, select your programming language from the Programming Languages page.
Technical Details
Failsafe Feature
Starting from firmware version 110, using Phidget22 library versions 1.0.0.20190107 and later, this device supports the use of a failsafe feature to put your device in a safe state should your program hang or crash.
With this feature, each Digital Output channel on this device has its own independently settable failsafe timer.
If the failsafe is not enabled, the device will behave as it did before the addition of this feature, maintaining the last state or duty cycle it received until it is explicitly told to stop.
Enabling the failsafe feature for a channel starts a recurring failsafe timer. Once the failsafe timer is enabled, it must be reset within the specified time or the channel will enter a failsafe state. Resetting the failsafe timer will reload the timer with the specified failsafe time, starting when the message to reset the timer is received by the Phidget.
For example: if the failsafe is enabled with a failsafe time of 1000ms, you will have 1000ms to reset the failsafe timer. Every time the failsafe timer is reset, you will have 1000ms from that time to reset the failsafe again.

If the failsafe timer is not reset before it runs out, the channel will enter a failsafe state. For Digital Output channels, this sets the output to a FALSE state. On the REL1000 this switches the relay contact to the Normally-Closed position. Once the channel enters the failsafe state, it will reject any further input until the channel is reopened.
To prevent the channel from falsely entering the failsafe state, we recommend resetting the failsafe timer as frequently as is practical for your applicaiton. A good rule of thumb is to not let more than a third of the failsafe time pass before resetting the timer.
Once the failsafe has been enabled, it cannot be disabled by any means other than closing and reopening the channel.
When you use a failsafe in your program, we strongly recommend setting up an error event handler to catch the Failsafe Error Event, to allow your program to catch the failsafe event.
If you want your program to try to automatically recover from a failsafe state, you can close and re-open the channel from the error event handler after determining a failsafe condition caused the event.
Safety
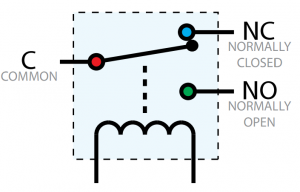
The relays on the REL1000 are SPDT (Single pole, double throw). This means there is a common pin (C), a normally open pin (NO) and a normally closed pin (NC). When the relay is unpowered, the switch will be resting in the NC position, as seen in the diagram. When the relay's Digital Output object is toggled in software, it will switch to the NO position. If the Digital Output object is closed (using the Close() method), the relay will always return to the NC position. For this reason, it is considered a best practice to call Close() at the end of your program on in the 'closing' portion of your project.
If communication between the REL1000 and your computer is broken (e.g. if the Phidget cable is unplugged), the relay will not change state. You will, however, get a detach event for the attached channels of that Phidget, so you may want to handle this case in your Digital Output detach handler. Since communication is already interrupted at this point, you can't tell the Digital Output to return to the NC position, but you can set a warning in your program to notify someone to come and reset the system manually.
Further Reading
You can read more about how mechanical relays work on our Mechanical Relay Primer.
What to do Next
- Programming Languages - Find your preferred programming language here and learn how to write your own code with Phidgets!
- Phidget Programming Basics - Once you have set up Phidgets to work with your programming environment, we recommend you read our page on to learn the fundamentals of programming with Phidgets.