Gyroscope Guide
Gyroscopes and Their Uses
Introduction

In the context of sensors, gyroscopes are used to measure rotations. More specifically, they measure the rate at which the sensor is rotating, called angular velocity. At Phidgets, we represent this rotation in terms of degrees per second. By adding up, or integrating all the readings of angular velocity over time, you can track the angle of rotation from where the sensor started.
Considerations
Gyroscopes can only be used to track a change in angular position. Unlike magnetometers and accelerometers, there is no fixed frame of reference that can be measured by the gyroscope itself to determine a starting angle. To make sense of your gyro readings, you will need to start from a known frame of reference. This either means starting the sensor in a known, fixed orientation, or using an accelerometer and compass to get a more general sense of orientation before factoring in the gyroscope.
Drift
All gyroscopes drift. Even the expensive ones. Of course, a good gyro will drift less than a cheaper one, but both will drift. Essentially, the readings from the gyro while it is at rest will change slightly over time. Since gyroscope readings are integrated to obtain meaningful results, even small drift can lead to large discrepancies in measured vs actual position over longer timescales. Either the sensor must be routinely reset or “zeroed” to compensate, or the sensor can be slowly corrected to a known frame of reference, such as one measured by a combination of accelerometer and compass measurements.
Temperature Effects
One contributor to gyroscope drift is changes in temperature. If your Phidget incorporates temperature stabilization, as is found on the MOT0110 Spatial Phidget, your system can be hardened against the effects of gradual changes in temperature.
So Why Gyroscopes?
To this point, we’ve covered a range of disadvantages and limitations of gyroscopes, and continually brought up the idea of correcting them via outside sources, like accelerometers and magnetometers. Why not just use those? The area where gyroscopes shine is measuring rotations over short periods of time, while the rest of the system is in motion. Gyroscopes are designed to ignore all outside factors except rotation. This means they provide an accurate sense of the sensor’s change in orientation over short timescales, which is useful when used in combination with other sensors to limit the effects of short-term outside factors on the measurement of orientation.
This All Sounds Really Complicated
So if gyroscopes are only really useful when used with other sensors, the next question is logically how do you go about doing so? Luckily, using the Phidget Spatial AHRS functionality, on newer Phidget Spatial devices, we can do those calculations for you. Check out our guide on AHRS to find out how!
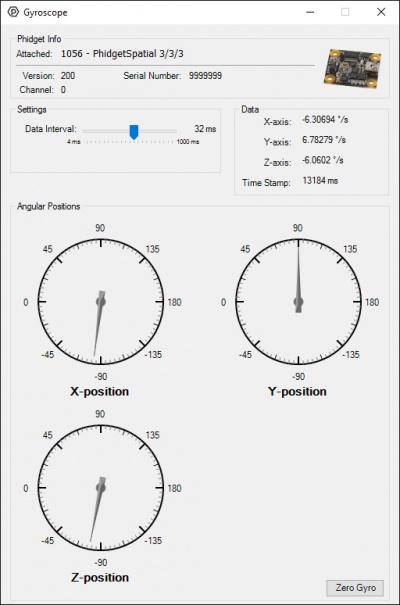
Demonstrations Using the Control Panel Example
To more clearly see the effects we have been describing, we can use the Control Panel example for your Phidgets Gyroscope to do some demonstrations.
The gyroscope example provides three dials showing the axes of rotation. For ease of demonstration, the example code is integrating the rotations in each axis and displaying the overall rotation in each.
Once your example is open, we recommend sliding the DataInterval slider all the way to the left for the highest data rates from your sensor.
If your sensor supports temperature stabilization, a checkbox will be available to enable heating. For best results, check the box to enable heating and wait for the temperature measurement to turn green. You will notice the readings tending closer to zero as the device heats up.
The first thing you may notice is that the angles are already slowly drifting while the device is sitting still. This is caused by gyro drift, and cleanly demonstrates why gyroscopes need to be routinely zeroed. Place your gyro on a solid, flat surface and press the Zero Gyro button on the example now.
You should notice that the angle indicators for all three axes have moved to zero, and are staying relatively stable. If you leave the device for a minute or two, you will start seeing the measurement diverge by a few degrees. Again, gyroscope measurements need to be handled with care.
After you have zeroed your gyro, you can slowly rotate your gyroscope while leaving it flat on your desk. The Z axis should track your movements. If you turn the gyroscope 90 degrees, the Z-position dial should also rotate 90 degrees, and generally follow your movements. It is very important this rotation be slow for this demonstration, as the low-rate high-precision gyro is much more accurate, but capped at a far lower than the maximum rotational speed measurable by the device.
Similarly, you can turn your sensor on its edge, and see Y-position rotate if you rotate the sensor about the cable, and X-position move by turning the sensor in the remaining direction.
Remember that these angles of rotation are all obtained through post-processing calculations, and not direct read-outs from the sensor. The other thing to remember is that these are all incredibly simple calculations done individually for each axis, which is not enough to actually keep track of the orientation of the sensor. Once the sensor rotates in one axis, rotations in all others must account for this change. We do not recommend diving into this problem unless you have very clear reasons to need to.
The main takeaway you should get from this example is how the gyroscopes respond to short-term rotations, and how they drift over time. To actually get the orientation of your sensor calculated for you, we recommend using the Spatial object in your code, and reading out the calculated device orientation directly.