1204 User Guide
Getting Started
Checking the Contents
|
You should have received:
|
In order to test your new Phidget you will also need:
| |
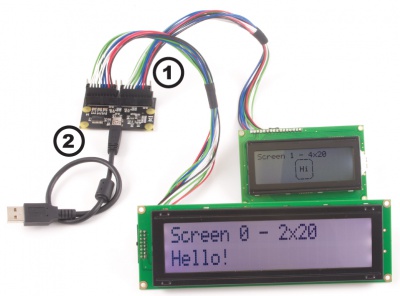
Connecting the Pieces
|
| |
Testing Using Windows 2000 / XP / Vista / 7
Make sure you have the current version of the Phidget library installed on your PC. If you don't, follow these steps:
- Go to the Quick Downloads section on the Windows page
- Download and run the Phidget21 Installer (32-bit, or 64-bit, depending on your system)
- You should see the
 icon on the right hand corner of the Task Bar.
Running Phidgets Sample Program
Double clicking on the ![]() icon loads the Phidget Control Panel; we will use this program to ensure that your new Phidget works properly.
icon loads the Phidget Control Panel; we will use this program to ensure that your new Phidget works properly.
The source code for the TextLCD-full sample program can be found in the quick downloads section on the C# Language Page. If you'd like to see examples in other languages, you can visit our Languages page.
Updating Device Firmware
If an entry in this list is red, it means the firmware for that device is out of date. Double click on the entry to be given the option of updating the firmware. If you choose not to update the firmware, you can still run the example for that device after refusing.
|
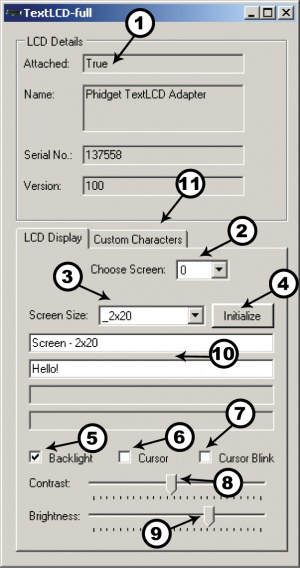
LCD Display Tab
|
| |
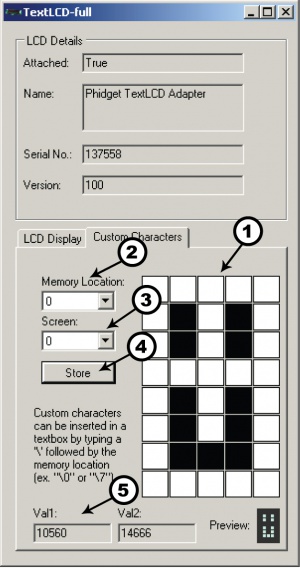
Custom Characters Tab
|
|
Testing Using Mac OS X
- Go to the Quick Downloads section on the macOS page
- Download and run the Phidget macOS Installer
- Click on System Preferences >> Phidgets (under Other) to activate the Preference Pane
- Make sure that the is properly attached.
- Double Click on in the Phidget Preference Pane to bring up the Sample program. This program will function in a similar way as the Windows version.
Using Linux
For a step-by-step guide on getting Phidgets running on Linux, check the Linux page.
Using Windows Mobile / CE 5.0 / CE 6.0
Technical Details
Introduction
Liquid Crystal Displays are display devices used to convey information through arrangements of pixels. Graphic and Text LCDs are the most common types available for electronic products. LCDs range from something as simple as the relatively simple 16-120 character displays available for small electronics to large 60+" high definition television sets.
How it works

- Polarizing filter film with a vertical axis to polarize light as it enters.
- Glass substrate with Indium tin oxide (ITO) electrodes. The shapes of these electrodes will determine the shapes that will appear when the LCD is turned ON. Vertical ridges etched on the surface are smooth.
- Twisted nematic liquid crystal.
- Glass substrate with common electrode film (ITO) with horizontal ridges to line up with the horizontal filter.
- Polarizing filter film with a horizontal axis to block/pass light.
- Reflective surface to send light back to viewer. (In a backlit LCD, this layer is replaced with a light source.)
Each pixel of an LCD typically consists of a layer of molecules aligned between two transparent electrodes, and two polarizing filters which are perpendicular to one another. With no actual liquid crystal between the polarizing filters, light passing through the first filter would be blocked by the second (crossed) polarizer. The surfaces of the electrodes in contact with the liquid crystal material are treated in order to align the crystal molecules in a certain direction.
In a twisted nematic device (still the most common liquid crystal device), the surface alignment directions at the two electrodes are perpendicular to each other, and so the molecules arrange themselves in a twist. When light passes through the liquid crystal molecules the rotation of the polarization changes slightly and reduces the effect so the light can pass through mostly unaffected. If a large voltage is applied, the liquid crystal molecules become almost completely untwisted. This causes the light to be heavily polarized again effectively making the pixel appear black. By adjusting the voltage, the polarization can be controlled precisely allowing you to display a full range of grey-scale.
Text LCDs

Text LCDs display full text strings set in software. Since text characters are defined from the ASCII standard library, other ASCII standard set characters and glyphs can also be sent to the text LCD. This can be done easily by using unicode characters within your text string. In C#, this may look something like this:
tLCD.rows[0].DisplayString = "Apple starts with \u0041";
In this example, the string \u indicates that a unicode character follows, and the unicode character 0041 (which references the hexadecimal character code 0x41) represents the capital letter A. After the LCD converts the unicode character, the above example would cause the LCD screen to read Apple starts with A. A chart of all ASCII standard set character codes is available here.
Custom Characters
Custom characters can also be generated for the PhidgetTextLCD. A custom character can be any arrangement of pixels within the space allotted for a single character. Single characters are made up of pixels arranged in a grid 5 pixels wide by 8 pixels high. Once generated, custom characters can be stored in any one of eight volatile memory locations on the PhidgetTextLCD, and can be recalled with a simple API command from software. When custom characters are designed, a formula is used to change the pixel design into a pair of numerical values. The first value relates to the design of the top 4 rows of the character, and the second value relates to the design of the bottom 4 rows of the character. Unlike the unicode characters used in the Special Characters section above, the calculated number is not in hexadecimal format but is an integer value up to six characters in length. The calculation for custom characters can be done by hand, or can be completed for you by using the form available at www.phidgets.com/documentation/customchar.html. Done by hand, each integer value represents the sum of two to the power of each individual on-pixel’s location within that integer-value’s half of the character. Pixels not turned on are valued at zero. For example, a custom character happy-face with pixels 6, 8, 11 and 13 in the upper half turned on, pixels 1, 3, 6, 8, 11, 12 and 13 in the lower half turned on, and all other pixels turned off, would result in the following integer values.

These two values are then stored in one of eight memory locations (CG-RAM 0 to 7) on the PhidgetTextLCD by using the Set Custom Character method in software. In C#, this may look something like this:
tLCD.customCharacters[0].setCustomCharacter(10560, 14666)
Once stored, characters can be recalled into a text string by either using the unicode value for the location as referenced in the ASCII chart (Appendix A) or by using the String Code method from the API. Examples in C# of both methods are shown below:
tLCD.rows[0].DisplayString = "I am happy \u0008";
tLCD.rows[0].DisplayString = "I am happy " + tLCD.customCharacters[0].StringCode;
API
Enums
enum {
- PHIDGET_TEXTLCD_SCREEN_NONE,
- PHIDGET_TEXTLCD_SCREEN_1x8,
- PHIDGET_TEXTLCD_SCREEN_2x8,
- PHIDGET_TEXTLCD_SCREEN_1x16,
- PHIDGET_TEXTLCD_SCREEN_2x16,
- PHIDGET_TEXTLCD_SCREEN_4x16,
- PHIDGET_TEXTLCD_SCREEN_2x20,
- PHIDGET_TEXTLCD_SCREEN_4x20,
- PHIDGET_TEXTLCD_SCREEN_2x24,
- PHIDGET_TEXTLCD_SCREEN_1x40,
- PHIDGET_TEXTLCD_SCREEN_2x40,
- PHIDGET_TEXTLCD_SCREEN_4x40,
} ScreenSizes This is a list of the supported screen sizes. The 4x40 screen is a special case because it requires both of the enable lines - so when it is attached, it must be setup on screen 0, and screen 1 cannot be used.
Properties
Template:UGapi Template:UGapi Template:UGapi Template:UGapi Template:UGapi Template:UGapi Template:UGapi Template:UGapi Template:UGapi Template:UGapi Template:UGapi Template:UGapi