|
|
| (15 intermediate revisions by 4 users not shown) |
| Line 1: |
Line 1: |
| | {{#seo:|description=Learn how to use Phidget USB devices with Java.}} |
| [[Category:Language]] | | [[Category:Language]] |
| __TOC__
| |
|
| |
|
| == Quick Downloads == | | ==Get Started== |
| | With the Phidget22 library, it's easy to create Java applications that work with Phidget devices. |
|
| |
|
| === Documentation === | | ==Java Libraries== |
|
| |
|
| *{{Phidget22API}} (Select Java from drop-down menu)
| | ===Source Files=== |
| | The Phidget22 Java library source files are available [https://cdn.phidgets.com/downloads/phidget22/libraries/windows/Phidget22-windevel.zip here]. |
|
| |
|
| === Example Code === | | ==Development Environment Configuration== |
|
| |
|
| *{{SampleCode|Java|Java Examples}}
| | Before choosing a development environment, make sure you have the [http://www.oracle.com/technetwork/java/index.html Java Development Kit] installed. |
|
| |
|
| === Libraries=== | | ===Javac=== |
| | | {| style="margin:auto;" class="table-no-border mw-collapsible mw-collapsed" |
| {{AllQuickDownloads}} | | |+ '''Instructions''' |
| | | |The easiest way to allow Java to access the Phidgets Java library is to place a copy of '''phidget22.jar''' in the same folder as your .java program. ||[[Image:Language_java_javac_folder.png|center|350px|link=https://cdn.phidgets.com/docs/images/8/89/Language_java_javac_folder.png]] |
| ==Getting Started with Java==
| | |- |
| Welcome to using Phidgets with Java! By using Java, you will have access to the complete Phidget22 API, including events. We also provide example code in Java for all Phidget devices.
| | |[https://www.phidgets.com/downloads/phidget22/libraries/any/Phidget22Java.zip You can download phidget22.jar here].|| |
| | | |- |
| If you are developing for Windows, keep reading. Otherwise, select your operating system to jump ahead:
| | |Once you are ready to run your program, enter the following command in the command prompt or terminal: |
| *[[#macOS | macOS]]
| | <syntaxhighlight> |
| *[[#Linux | Linux]]
| |
| | |
| == Windows ==
| |
| {{Windows_Languages}}
| |
| ===Javac (Command Line)===
| |
| ====Use our examples====
| |
| One of the best ways to start programming with Phidgets is to use our example code as a guide. In order to run the examples, you will need to download and install the Java Development Kit from [http://www.oracle.com/technetwork/java/index.html Oracle].
| |
| | |
| | |
| Next, select an example that will work with your Phidget:
| |
| *{{SampleCode|Java|Java Examples}}
| |
| | |
| | |
| Copy phidget22.jar from the following location:
| |
| *C:\Program Files\Phidgets\Phidget22\phidget22.jar
| |
| | |
| | |
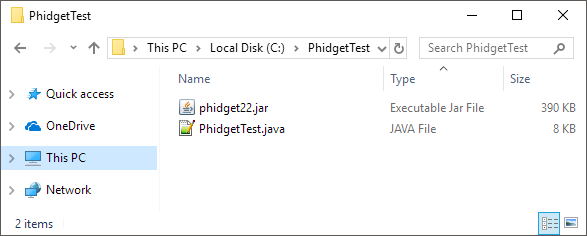
| Place both the example file and the phidget22.jar file in the same location. Your folder should now look something like this:
| |
| [[Image:Java_javac_folder.png|link= | center]]
| |
| | |
| | |
| Open the command prompt at the folder location. Next, enter the following command in the command prompt:
| |
| <syntaxhighlight lang="java"> | |
| javac -classpath .;phidget22.jar example.java | | javac -classpath .;phidget22.jar example.java |
| </syntaxhighlight> | | </syntaxhighlight> |
|
| |
|
| |
| Finally, enter the following command to run the program: | | Finally, enter the following command to run the program: |
| <syntaxhighlight lang="java"> | | <syntaxhighlight> |
| java -classpath .;phidget22.jar example | | java -classpath .;phidget22.jar example |
| </syntaxhighlight> | | </syntaxhighlight> |
| | | || |
| | | |- |
| [[Image:Java_javac.PNG|link= | center]]
| | |} |
| | |
| | |
| You should now have the example up and running for your device. Play around with the device and experiment with some of the functionality. When you are ready, the next step is configuring your project and writing your own code!
| |
| | |
| ====Configure your project====
| |
| When you are building a project from scratch, or adding Phidget functionality to an existing project, you'll need to configure your development environment to properly link the Phidget Java library.
| |
| | |
| | |
| To include the Phidget Java library, add the following line to your code:
| |
| <syntaxhighlight lang="java">
| |
| import com.phidget22.*
| |
| </syntaxhighlight>
| |
| | |
| You can now compile the file as shown in the previous section.
| |
| | |
| | |
| The project now has access to Phidgets. Next, view the [[#Write Code | write your own code]] section located below.
| |
| | |
| ===NetBeans===
| |
| ====Use our examples====
| |
| One of the best ways to start programming with Phidgets is to use our example code as a guide. In order to run the examples, you will need to download and install [https://netbeans.org/ NetBeans].
| |
| | |
| | |
| Now that you have NetBeans installed, select an example that will work with your Phidget:
| |
| *{{SampleCode|Java|Java Examples}}
| |
| | |
| | |
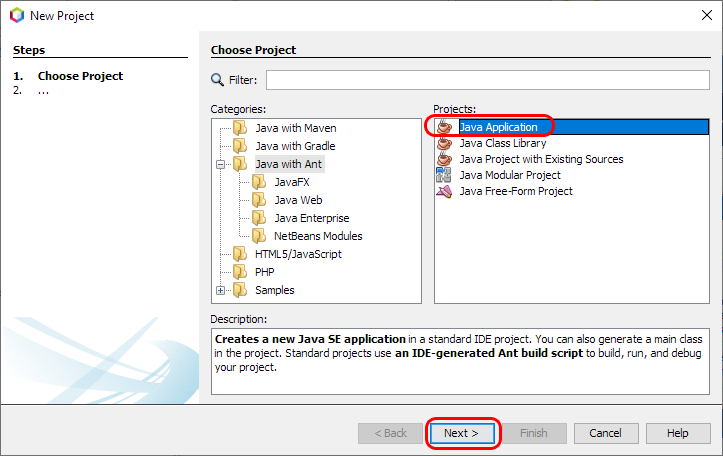
| Next, open NetBeans and create a new project:
| |
| [[Image:Java_netbeans_newproject.PNG|link=|center]]
| |
| | |
| | |
| Give your project a name and finish creating the project:
| |
| [[Image:Java_netbeans_nameproject.PNG|link= |center]]
| |
| | |
| | |
| Delete the java file that was generated with the project:
| |
| [[Image:Java_netbeans_deletefile.png|link= |center]]
| |
| | |
| | |
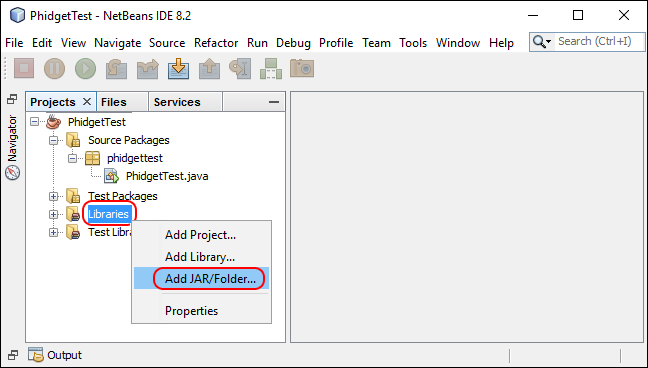
| Replace the deleted file with the example file that you downloaded. Next, add a reference to phidget22.jar by right-clicking on the libraries folder:
| |
| [[Image:Java_netbeans_addjar.png|link= |center]]
| |
| | |
| | |
| | |
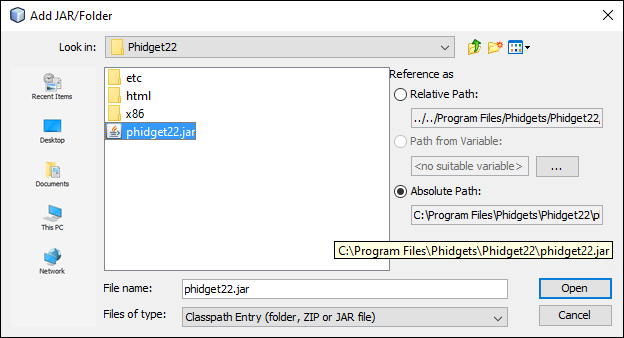
| You can find phidget22.jar at the following location:
| |
| *C:\Program Files\Phidgets\Phidget22\phidget22.jar
| |
| | |
| | |
| [[Image:Java_netbeans_jarpath.png|link=|center]]
| |
| | |
| | |
| After pressing run and selecting the main class, the example will be up and running for your device. Play around with the device and experiment with some of the functionality. When you are ready, the next step is configuring your project and writing your own code!
| |
| | |
| ====Configure your project====
| |
| When you are building a project from scratch, or adding Phidget functionality to an existing project, you'll need to configure your development environment to properly link the Phidget Java library.
| |
| | |
| | |
| To include the Phidget Java library, add the following line to your code:
| |
| <syntaxhighlight lang="java">
| |
| import com.phidget22.*
| |
| </syntaxhighlight>
| |
| | |
| You can now create your project as shown in the previous section.
| |
| | |
| | |
| The project now has access to Phidgets. Next, view the [[#Write Code | write your own code]] section located below.
| |
| | |
| ===Eclipse===
| |
| ====Use our examples====
| |
| One of the best ways to start programming with Phidgets is to use our example code as a guide. In order to run the examples, you will need to download and install [https://www.eclipse.org/downloads/ Eclipse].
| |
| | |
| | |
| Now that you have Eclipse installed, select an example that will work with your Phidget:
| |
| *{{SampleCode|Java|Java Examples}}
| |
| | |
| | |
| Next, create a new Java project. Give it the same name as the example you downloaded above:
| |
| | |
| [[Image:Java_eclipse_newproject.PNG|link=| center]]
| |
| | |
| | |
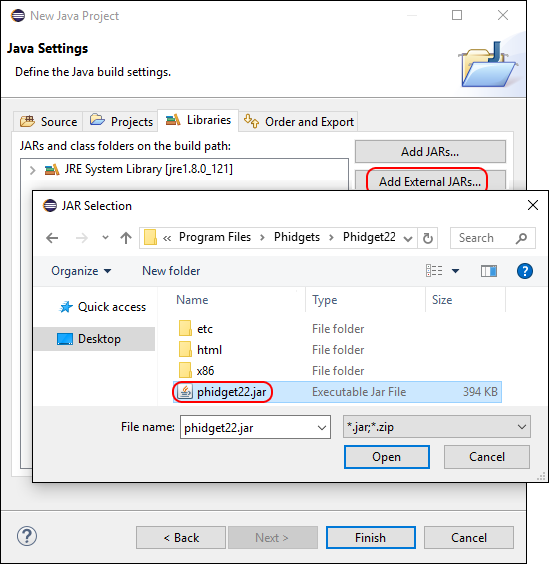
| Click ''Next >'' and add phidget22.jar to your project as an external jar. You can find phidget22.jar at the following location:
| |
| *C:\Program Files\Phidgets\Phidget22\phidget22.jar
| |
| | |
| | |
| [[Image:Java_eclipse_addjar.png|link=| center]]
| |
| | |
| | |
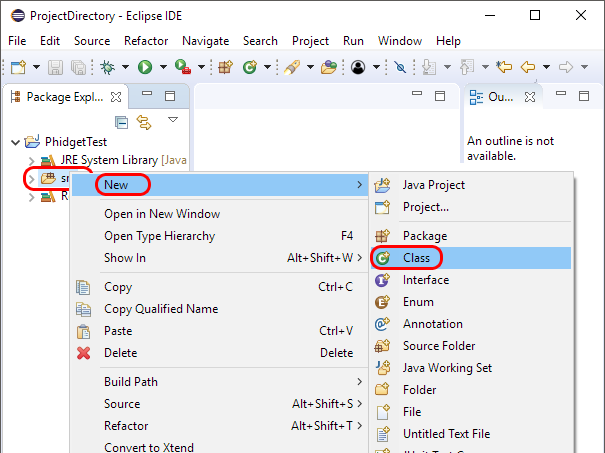
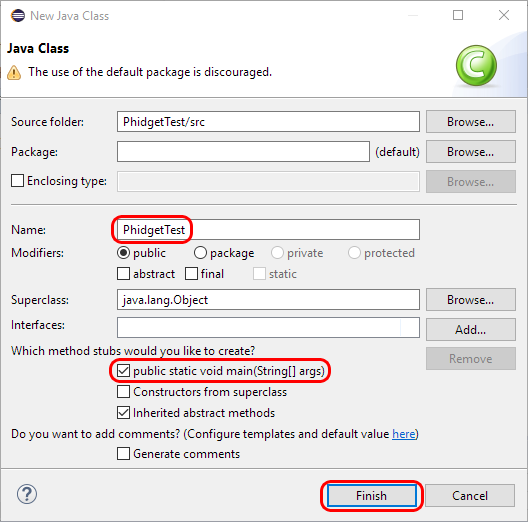
| Finally, drag the example java file into the src folder that has been created for you and run the example:
| |
| | |
| [[Image:Java_eclipse_run.png|link=|center]]
| |
| | |
| | |
| You should now have the example up and running for your device. Play around with the device and experiment with some of the functionality. When you are ready, the next step is configuring your project and writing your own code!
| |
| ====Configure your project====
| |
| When you are building a project from scratch, or adding Phidget functionality to an existing project, you'll need to configure your development environment to properly link the Phidget Java library.
| |
| | |
| | |
| To include the Phidget Java library, add the following line to your code:
| |
| <syntaxhighlight lang="java">
| |
| import com.phidget22.*
| |
| </syntaxhighlight>
| |
| | |
| You can now create your project as shown in the previous section.
| |
| | |
| | |
| The project now has access to Phidgets. Next, view the [[#Write Code | write your own code]] section located below.
| |
| | |
| ==macOS==
| |
| {{macOS_Languages}}
| |
| ===Javac (Terminal)===
| |
| ====Use our examples====
| |
| One of the best ways to start programming with Phidgets is to use our example code as a guide. In order to run the examples, you will need to download and install the Java Development Kit from [http://www.oracle.com/technetwork/java/index.html Oracle]. You will also need a copy of [{{SERVER}}/downloads/phidget22/libraries/any/Phidget22Java.zip phidget22.jar].
| |
| | |
| | |
| Next, select an example that will work with your Phidget:
| |
| *{{SampleCode|Java|Java Examples}}
| |
| | |
| | |
| Place both the example file and the phidget22.jar file in the same location. Your folder should now look something like this:
| |
| [[Image:Java_mac_javac_folder.png|link=|center]]
| |
| | |
| | |
| Open the terminal at the folder location. Next, enter the following command:
| |
| | |
| <syntaxhighlight lang="java">
| |
| javac -classpath .:phidget22.jar example.java
| |
| </syntaxhighlight>
| |
| | |
| | |
| Finally, enter the following command to run the program:
| |
| | |
| <syntaxhighlight lang="java">
| |
| java -classpath .:phidget22.jar example
| |
| </syntaxhighlight>
| |
| | |
| | |
| [[Image:Java_mac_javac_run.png|link=|center]]
| |
| | |
| | |
| You should now have the example up and running for your device. Play around with the device and experiment with some of the functionality. When you are ready, the next step is configuring your project and writing your own code!
| |
| | |
| ====Configure your project====
| |
| When you are building a project from scratch, or adding Phidget functionality to an existing project, you'll need to configure your development environment to properly link the Phidget Java library.
| |
| | |
| | |
| To include the Phidget Java library, add the following line to your code:
| |
| <syntaxhighlight lang="java">
| |
| import com.phidget22.*
| |
| </syntaxhighlight>
| |
| | |
| You can now compile your project as shown in the previous section.
| |
| | |
| | |
| The project now has access to Phidgets. Next, view the [[#Write Code | write your own code]] section located below.
| |
|
| |
|
| ===Netbeans=== | | ===Netbeans=== |
| ====Use our examples==== | | {| style="margin:auto;" class="table-no-border mw-collapsible mw-collapsed" |
| One of the best ways to start programming with Phidgets is to use our example code as a guide. In order to run the examples, you will need to download and install [https://netbeans.org/ NetBeans]. You will also need a copy of [{{SERVER}}/downloads/phidget22/libraries/any/Phidget22Java.zip phidget22.jar].
| | |+ '''Instructions''' |
| | | |The easiest way to allow Java to access the Phidgets Java library is to place a copy of '''phidget22.jar''' in the same folder as your .java program. ||[[Image:Language_java_javac_folder.png|center|350px|link=https://cdn.phidgets.com/docs/images/8/89/Language_java_javac_folder.png]] |
| | | |- |
| Now that you have NetBeans installed, select an example that will work with your Phidget:
| | |[https://www.phidgets.com/downloads/phidget22/libraries/any/Phidget22Java.zip You can download phidget22.jar here].|| |
| *{{SampleCode|Java|Java Examples}}
| | |- |
| | | | To start, open NetBeans and create a new project. Select Java Application and follow the steps as directed by Netbeans.|| [[Image:Windows_netbeans1.jpg|center|350px|link=https://cdn.phidgets.com/docs/images/c/c9/Windows_netbeans1.jpg]] |
| | | |- |
| Next, open NetBeans and create a new project:
| | | Next, add a reference to phidget22.jar by right-clicking on the libraries folder. || [[Image:Windows_netbeans2.jpg|center|350px|link=https://cdn.phidgets.com/docs/images/2/2b/Windows_netbeans2.jpg]] |
| [[Image:Java_netbeans_mac_newproject.png|link=|center]]
| | |- |
| | | | Navigate to the folder where you downloaded phidget22.jar, and select it. || [[Image:Windows_netbeans3.jpg|center|350px|link=https://cdn.phidgets.com/docs/images/7/76/Windows_netbeans3.jpg]] |
| | | |- |
| Give your project a name and finish creating the project:
| | | The project now has access to Phidgets. || |
| [[Image:Java_netbeans_mac_nameproject.png|link=|center]]
| | |} |
| | |
| | |
| Delete the file that was generated with the project:
| |
| [[Image:Java_netbeans_mac_delete.png|link=|center]] | |
| | |
| | |
| Replace the deleted file with the example you downloaded:
| |
| [[Image:Java_netbeans_mac_replace.png|link=|center]]
| |
| | |
| Next, add a reference to the phidget22.jar you downloaded above by right-clicking on the libraries folder: | |
| [[Image:Java_netbeans_mac_addjar.png|link=|center]] | |
| | |
| | |
| After pressing run and selecting the main class, the example will be up and running for your device. Play around with the device and experiment with some of the functionality. When you are ready, the next step is configuring your project and writing your own code!
| |
| ====Configure your project==== | |
| When you are building a project from scratch, or adding Phidget functionality to an existing project, you'll need to configure your development environment to properly link the Phidget Java library.
| |
| | |
| | |
| To include the Phidget Java library, add the following line to your code:
| |
| <syntaxhighlight lang="java">
| |
| import com.phidget22.*
| |
| </syntaxhighlight>
| |
| | |
| You can now create your project as shown in the previous section.
| |
| | |
| | |
| The project now has access to Phidgets. Next, view the [[#Write Code | write your own code]] section located below. | |
|
| |
|
| ===Eclipse=== | | ===Eclipse=== |
| ====Use our examples==== | | {| style="margin:auto;" class="table-no-border mw-collapsible mw-collapsed" |
| One of the best ways to start programming with Phidgets is to use our example code as a guide. In order to run the examples, you will need to download and install [https://www.eclipse.org/downloads/ Eclipse].You will also need a copy of [{{SERVER}}/downloads/phidget22/libraries/any/Phidget22Java.zip phidget22.jar].
| | |+ '''Instructions''' |
| | | |The easiest way to allow Java to access the Phidgets Java library is to place a copy of '''phidget22.jar''' in the same folder as your .java program. ||[[Image:Language_java_javac_folder.png|center|350px|link=https://cdn.phidgets.com/docs/images/8/89/Language_java_javac_folder.png]] |
| | | |- |
| Now that you have Eclipse installed, select an example that will work with your Phidget:
| | |[https://www.phidgets.com/downloads/phidget22/libraries/any/Phidget22Java.zip You can download phidget22.jar here].|| |
| *{{SampleCode|Java|Java Examples}}
| | |- |
| | | | To start, open Eclipse and create a new Java project.|| [[Image:Windows_eclipse1.jpg|center|350px|link=https://cdn.phidgets.com/docs/images/3/3a/Windows_eclipse1.jpg]] |
| | | |- |
| Next, create a new Java project. Give it the same name as the example you downloaded above:
| | | On the Libraries tab, click Add External JARs and add phidget22.jar to your project as an external jar. || [[Image:Windows_eclipse2.jpg|center|350px|link=https://cdn.phidgets.com/docs/images/0/0c/Windows_eclipse2.jpg]] |
| | | |- |
| [[Image:Java_eclipse_mac_newproject.png|link=|center]] | | | Create a new Class in your project. || [[Image:Windows_eclipse3.jpg|center|350px|link=https://cdn.phidgets.com/docs/images/d/d9/Windows_eclipse3.jpg]] |
| | | |- |
| | | | Name the class, and be sure to check the '''public static void main''' box. || [[Image:Windows_eclipse4.jpg|center|350px|link=https://cdn.phidgets.com/docs/images/8/87/Windows_eclipse4.jpg]] |
| Click ''Next >'' and add phidget22.jar to your project as an external jar:
| | |- |
| [[Image:Java_eclipse_mac_addjar.png|link=| center]]
| | | Your project now has access to Phidgets! || |
| | | |- |
| | | |} |
| Finally, drag the example java file into the src folder that has been created for you and run the example:
| |
| | |
| [[Image:Java_eclipse_mac_run.png|link=|center]] | |
| | |
| | |
| You should now have the example up and running for your device. Play around with the device and experiment with some of the functionality. When you are ready, the next step is configuring your project and writing your own code!
| |
| | |
| ====Configure your project====
| |
| When you are building a project from scratch, or adding Phidget functionality to an existing project, you'll need to configure your development environment to properly link the Phidget Java library.
| |
| | |
| | |
| To include the Phidget Java library, add the following line to your code:
| |
| <syntaxhighlight lang="java">
| |
| import com.phidget22.*
| |
| </syntaxhighlight>
| |
| | |
| You can now create your project as shown in the previous section.
| |
| | |
| | |
| The project now has access to Phidgets. Next, view the [[#Write Code | write your own code]] section located below.
| |
| | |
| == Linux ==
| |
| {{Linux_Languages}}
| |
| ===Javac (Terminal)===
| |
| ====Use our examples====
| |
| One of the best ways to start programming with Phidgets is to use our example code as a guide. In order to run the examples, you will need to download and install the JDK. You can do this by entering the following command in the terminal (where VERSION is replaced with your preferred version number):
| |
| <syntaxhighlight lang='bash'>
| |
| apt-get install openjdk-VERSION-jdk
| |
| </syntaxhighlight>
| |
| | |
| Before continuing, ensure your JDK version matches your JRE version:
| |
| <syntaxhighlight lang='bash'>
| |
| javac -version
| |
| java -version
| |
| </syntaxhighlight>
| |
| | |
| | |
| You will also need a copy of [{{SERVER}}/downloads/phidget22/libraries/any/Phidget22Java.zip phidget22.jar].
| |
| | |
| | |
| Now that you have the JDK installed and phidget22.jar on hand, select an example that will work with your Phidget:
| |
| *{{SampleCode|Java|Java Examples}}
| |
| | |
| | |
| Your project folder should now look something like this:
| |
| [[Image:Java_javac_linux_folder.PNG|link=|center]] | |
| | |
| | |
| Next, open the terminal at the folder location and enter the following command:
| |
| <syntaxhighlight lang='bash'>
| |
| javac -classpath .:phidget22.jar example.java
| |
| </syntaxhighlight>
| |
| | |
| Finally, enter the following command to run the program:
| |
| <syntaxhighlight lang='bash'>
| |
| java -classpath .:phidget22.jar example
| |
| </syntaxhighlight>
| |
| | |
| | |
| [[Image:Java_javac_linux_run.PNG|link=|center]]
| |
| | |
| | |
| You should now have the example up and running for your device. Play around with the device and experiment with some of the functionality. When you are ready, the next step is configuring your project and writing your own code!
| |
| | |
| ====Configure your project====
| |
| When you are building a project from scratch, or adding Phidget functionality to an existing project, you'll need to configure your development environment to properly link the Phidget Java library.
| |
| | |
| | |
| To include the Phidget Java library, add the following line to your code:
| |
| <syntaxhighlight lang="java">
| |
| import com.phidget22.*
| |
| </syntaxhighlight>
| |
| | |
| You can now compile the file as shown in the previous section.
| |
| | |
| | |
| The project now has access to Phidgets. Next, view the [[#Write Code | write your own code]] section located below.
| |
| | |
| ===NetBeans===
| |
| We offer in-depth tutorials on using our examples in NetBeans and Eclipse in the [[#NetBeans|Windows NetBeans]] and [[#Eclipse|Windows Eclipse]] sections.
| |
| | |
| ====Installation====
| |
| Although Eclipse is standard in the Debian/Ubuntu package repository, NetBeans is no longer standard. What is more, Netbeans does not install by default into a folder within your path.
| |
| | |
| To install NetBeans:
| |
| | |
| 1. Download the install script from website: '''<span style="color:#FF0000">http://netbeans.org/downloads/</span>'''
| |
| | |
| 2. Change the permissions of the downloaded file to be executable. Usually, this is something like:
| |
| | |
| chmod +x netbeans-7.1-ml-javase-linux.sh
| |
| 3. Run the downloaded file as a script. (This will result in a GUI interaction that walks you through installation.)
| |
| | |
| 4. To find the location where the NetBeans installation occurred, run:
| |
| updatedb
| |
| locate netbeans
| |
| | |
| 5. Usually, the location of the binary is /usr/local/netbeans-7.1/bin/netbeans, where 7.1 is the installed version.
| |
| | |
| ====Use our examples====
| |
| Once you have NetBeans installed, running our examples will be very similar to the process described in the Windows NetBeans section
| |
| | |
| ====Write your own code====
| |
| When you are building a project from scratch, or adding Phidget function calls to an existing project, you'll need to configure your development environment to properly link the Phidget Java library. Please see the Windows NetBeans section for instructions if you are unfamiliar with NetBeans.
| |
| In your code, you will need to include the Phidget Java library:
| |
| | |
| <syntaxhighlight lang="java">
| |
| import com.phidget22.*
| |
| </syntaxhighlight>
| |
| | |
| The project now has access to the Phidget function calls and you are ready to begin coding.
| |
| | |
| == Edit the Examples ==
| |
| | |
| By following the instructions for your operating system and compiler above, you probably now have a working example and want to understand it better so you can change it to do what you want. This teaching section has resources for you to learn from the examples and write your own.
| |
| Your main reference for writing Java code will be the {{Phidget22API}}.
| |
| | |
| === Code Snippets ===
| |
| | |
| When programming in Java, you're in luck. All of our code snippet examples on our [[Phidget Programming Basics]] page are in both C++ and Java. Therefore, we do not include any here, because that page is much more in-depth, and you won't have to have two pages open at once. So head over there, and start writing code!
| |
| | |
| == Further Reading ==
| |
| | |
| [[Phidget Programming Basics]] - Here you can find the basic concepts to help you get started with making your own programs that use Phidgets.
| |
|
| |
|
| [[Data Interval/Change Trigger]] - Learn about these two properties that control how much data comes in from your sensors.
| | === PhidgetSBC Web Interface === |
| | {| style="margin:auto;" class="table-no-border mw-collapsible mw-collapsed" |
| | |+'''Instructions''' |
| | |<center>{{#ev:youtube|gZmWvWXICIA|rel=0}}</center> |
| | |} |
|
| |
|
| [[Using Multiple Phidgets]] - It can be difficult to figure out how to use more than one Phidget in your program. This page will guide you through the steps. | | ==Example Code== |
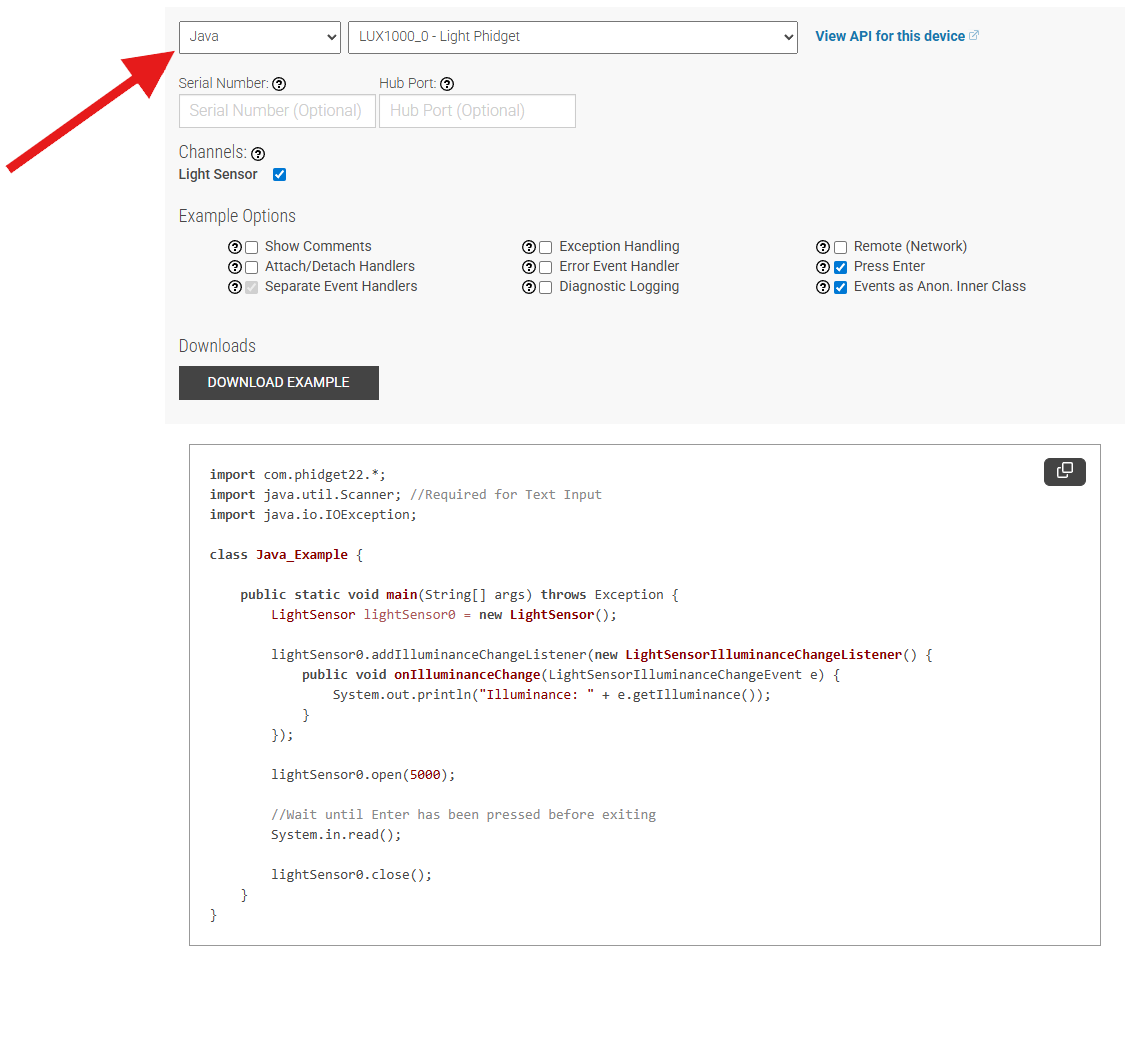
| | Navigate to our [https://www.phidgets.com/?view=code_samples&lang=Java Code Sample Generator] to view and download code samples that are tailored to your specific device. |
|
| |
|
| [[Polling vs. Events]] - Your program can gather data in either a polling-driven or event-driven manner. Learn the difference to determine which is best for your application. | | [[Image:Language_java_codesample.png|center|600px|link=https://cdn.phidgets.com/docs/images/a/af/Language_java_codesample.png]] |
|
| |
|
| [[Logging, Exceptions, and Errors]] - Learn about all the tools you can use to debug your program.
| | ===Phidget Programming Basics=== |
| | {{PhidgetProgrammingBasicsLink}} |
|
| |
|
| [[Phidget Network Server]] - Phidgets can be controlled and communicated with over your network- either wirelessly or over ethernet. | | ==API== |
| | [{{SERVER}}/?view=api&lang=Python Phidget22 API] |