|
Notice: This page contains information for the legacy Phidget21 Library. Phidget21 is out of support. Bugfixes may be considered on a case by case basis. Phidget21 does not support VINT Phidgets, or new USB Phidgets released after 2020. We maintain a selection of legacy devices for sale that are supported in Phidget21. We recommend that new projects be developed against the Phidget22 Library.
|
Weather Station: Difference between revisions
(→Code) |
|||
| Line 279: | Line 279: | ||
We have code snippets for using more than one USB Phidget on the [[General Phidget Programming#Using Multiple Phidgets|General Phidget Programming page]]. To use more than one analog sensor, you simply use the port number it is plugged in to. As shown on the general programming page, you can automatically detect which USB Phidgets are attached, without knowing their serial number. But you cannot detect which analog ports are being used, unless create an ad-hoc method, such as assuming a value of 0 means no sensor is attached, and any other value indicates an attached sensor. | We have code snippets for using more than one USB Phidget on the [[General Phidget Programming#Using Multiple Phidgets|General Phidget Programming page]]. To use more than one analog sensor, you simply use the port number it is plugged in to. As shown on the general programming page, you can automatically detect which USB Phidgets are attached, without knowing their serial number. But you cannot detect which analog ports are being used, unless create an ad-hoc method, such as assuming a value of 0 means no sensor is attached, and any other value indicates an attached sensor. | ||
After we read the data from the Phidgets, we want to save it on the USB data key. We can either hard-code the location or automatically detect where the key is plugged in. | After we read the data from the Phidgets, we want to save it on the USB data key. We can either hard-code the location or automatically detect where the key is plugged in. Using USB keys with the SBC is discussed in detail on the [[OS - Phidget SBC#Using USB Data Keys|SBC operating system page]]. We will hard-code the location in this section's code, but we show how to automatically detect a USB key in the [[#Moving USB Data|Moving USB Data]] section. | ||
| Line 290: | Line 290: | ||
</div> | </div> | ||
After this, you will have a file {{Code|data.txt}} full of lines that look like this: | This code snippet shows only one LED in use to show status, attached to digital output port 0 (short LED wire goes into the ground '''G''' terminal). For ideas on using other LEDs to display the status of the SBC and your program, see the [[#Status|status section]]. | ||
After running this a number of times, you will have a file {{Code|data.txt}} full of lines that look like this: | |||
<div class="source"> | <div class="source"> | ||
| Line 297: | Line 299: | ||
</syntaxhighlight> | </syntaxhighlight> | ||
</div> | </div> | ||
====Moving USB Data==== | ====Moving USB Data==== | ||
Revision as of 21:10, 13 March 2012
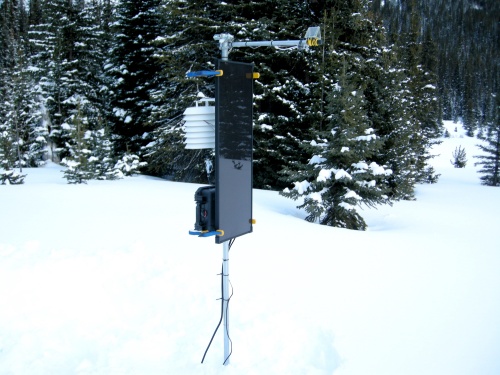
The project described here is a simple weather station that measures air temperature, humidity, and surface temperature of the ground below the weather station.
Practical concepts covered are:
|
|
As with any of our described projects, Phidgets takes care of the electrical component design. Still, a project of this magnitude require a time investment in addition to a monetary investment. Designing projects like these is hard.
But the reward is deep - and very real. A full, functional outdoor sensor system that you can build to whatever specifications you like... ask any hobbyist and you may see their eyes light up remembering their latest project. Building such things is a special kind of freedom!
Time: About 6 full days of work, including gathering components, writing code, and drilling/assembling
Special Needed Tools: Drill, soldering iron, small screwdriver, socket and wrench set
Other Useful Tools: Hammer, tin snips for pipe strapping
Introduction
A remote station project can monitor and log weather and other environmental conditions using Phidgets.
On this page, we describe this particular setup to get you started:
We start with all of the pieces (the Phidgets, the power supply, the main structure, and the code) and then put it all together.
Phidgets
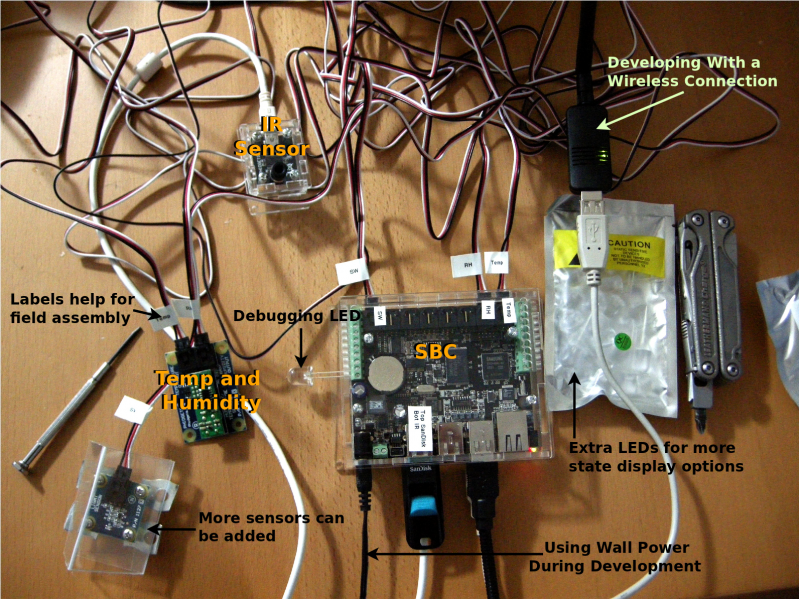
At the core of this weather logging station is the Phidget Single Board Computer (SBC). The sensors and other attachments from Phidgets could include:
| Task | Phidget |
|---|---|
|
1072 - PhidgetSBC2 |
|
1045 - PhidgetTemperatureSensor IR |
|
1125 - Humidity/Temperature Sensor |
|
1018 - PhidgetInterfaceKit 8/8/8 |
|
3402 - USB Webcam |
|
3601 - 10mm Green LED / 3600 - 10mm Red LED |
|
3004 - Sensor Cable 350cm |
The SBC has the ability to run both USB-based Phidgets (such as the 1045 - PhidgetTemperatureSensor IR) and analog-based Phidgets (such as the 1125 - Humidity/Temperature Sensor). But we have a variety of different environmental sensors that you could use on your system. The included 1018 - PhidgetInterfaceKit 8/8/8 on board the SBC can handle up to 8 analog sensors, and 8 digital in sensors like switches.
Using these components requires a bit of care, so the next sections give some suggestions on how to use each Phidget.
Phidget Infrared Temperature Sensor (IR Sensor)
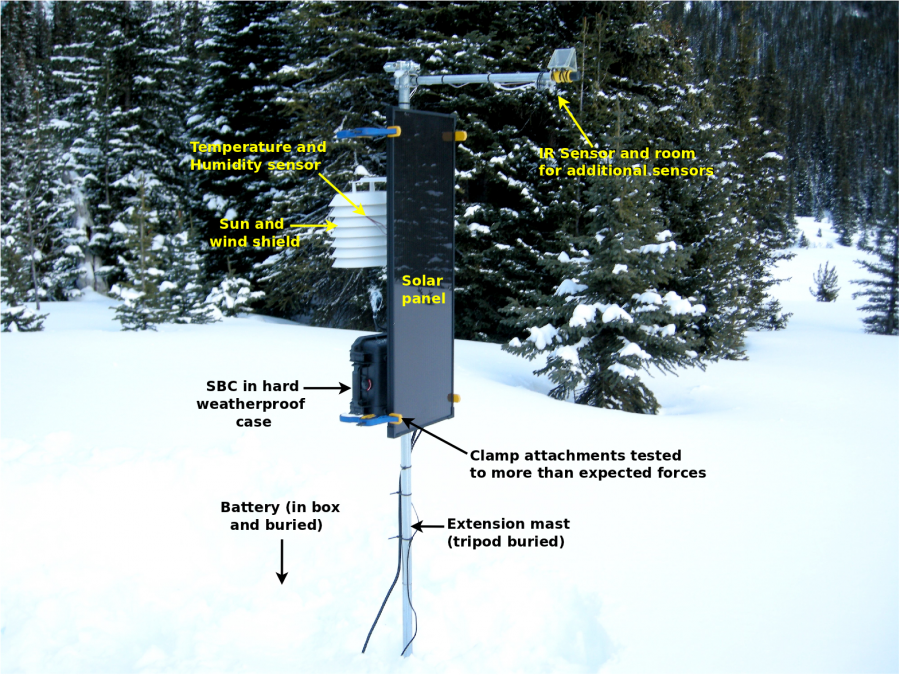
Measuring the temperature of the ground is useful for things such as highway temperature in the summer, or snow surface temperature in the winter. The IR board can face downward to do this without contacting the surface itself.
The IR board should be:
- Encased and sealed (such as with a Phidget Enclosure and low-temperature caulk) against the weather
- Suspended at the right height for the sample size of ground needed (see the 1045 - PhidgetTemperatureSensor IR specifications for the degrees of view you have)
- Suspended far enough away from the station that it is measuring only ground, and not measuring the base of the station
- Reasonably protected from solar heating (having a large station arm above it and shading it will probably do it)
Note that you will need to calibrate the data received from this sensor. When you can control all of the variables around what you are using the IR board to measure, you can get very accurate measurements. But in the out-of-doors with a weather station, you will use the board temperature, any shaded temperatures you get from the second temperature sensor, and thermal measurement theory to correct the value the sensor receives. Error includes:
- Warming of the IR board itself (i.e. you may need corrections based on board temperature)
- Emissivity of your subject being less than 1.0 (for more information on emissivity, see the 1045 - PhidgetTemperatureSensor IR product page)
- Measurement of any reflected heat in addition to emitted heat (this also depends on the emissivity)
These concepts and terms should help you get started in your research on how to correct the data specific to your needs - or if you need to do so at all - but a full course in correction is beyond our scope here.
Phidget Temperature and Humidity Sensor
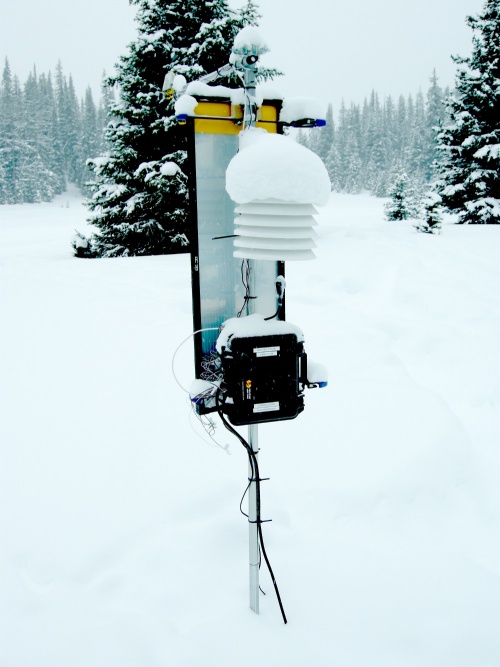
Temperature sensors need to be protected from heating by the sun. Both humidity and temperature sensors need to be protected from snow accumulating on them so that they can interact with the ambient air.
A standard, suspended, white plastic Stephenson-type screen can provide this kind of protection. Plastic ones are inexpensive, and available from specialized weather stores. The photo in the Introduction shows a typical shield screen of this type.
Webcam
Whatever webcam you choose, you should test it outside to properly set the exposure and focus. Most webcams are not weatherproof. Your webcam can either be housed in a weather resistant housing such as those designed for outdoor floodlights, or sealed directly (except the lens) with thick, low-temperature caulk.
Communication
Because of the power requirements (as discussed further in the power section), we chose not to include a wireless connection to transfer data and check on status. Rather, this task can be split up into two parts:
- LEDs can provide visible status
- USB keys can store and transfer data
Performing both of these tasks during normal field operation is covered in the code section. However, for development and debugging, we did use a wireless connection:
Power
From the Phidget documentation, we know that the Single Board Computer (SBC) will run at 1.2 watts with no power consumed by devices in its USB ports, and 2.5 watts maximum if all USB port devices are drawing power to maximum specification. Because the power to all sensors and USB devices is included in this estimate, this is what we use to pick a battery and a solar panel.
Although we chose our Phidgets first, and are now designing a power system to support them, the Phidget selection also included some power concerns. With a little forethought, we can guess that the wireless internet adaptor is probably the most power hungry thing that we can plug into a Phidget SBC. A wireless adaptor has two important benefits:
- You can download data over the network
- You can change code, settings, and scheduling of data gathering as the station is operating
You don't necessarily need an internet connection to use the wireless, as you can connect to it via its phidgetsbc.local local link address.
On the other hand, without a wireless adaptor, the SBC is essentially running autonomously. You can save a lot of power this way, but if the SBC gets into an undesirable state (extreme weather causes it to reboot, a USB Phidget wiggles loose and doesn't properly attach in software, etc) your only options are to either reboot, or add a network connection to log in and change things.
As we do not use wireless here, but do use a webcam, we use an estimate of 2.0 watts to run the SBC.
Solar Panel
We would like to have a power setup that will operate continuously, rather than having to replace the battery. This involves solar power, and it also involves knowing something about the expected weather (namely, the sunshine) in the installation location. Your solar watt capacity should be big enough that in periods of sun it can recharge the battery much faster than the SBC will drain it.
To take an example as to why this matters, imagine installing a 2.0 watt solar panel into your system. If there were sunshine 100% of the time, this would be a closed, self-refreshing system because the SBC would draw 2.0 watts from the battery, and the solar panel would put 2.0 watts back in. But with only a short period of dark, the battery will be drained slightly and never refreshed. So we need to consider all of the factors that could cause darkness (or relative darkness) and determine from them how big a solar panel we need.
We start with choosing amorphous solar panels because of their low cost, and (more importantly) their ability to charge a battery in low or indirect light conditions.
Then, we account for nightfall. This at least doubles our solar needs, especially in winter when nights are long. We assume 3/5 dark time, as twilight conditions are poor for power generation, and the station will be installed in a valley with high ridges blocking the sun for morning and evening. So even assuming every day is sunny, we will only receive 2/5 charge time, and will need 5/2 (5 watts) of power via the solar cell simply due to location and season.
Then, we account for weather. An average long storm for the interior Rocky mountains is about two weeks. Although we chose amorphous solar panels for their low-light performance, the conservative assumption is that the battery will get little recharge during such a storm. Therefore, we want to recharge quickly between storms. In late winter, the mountain sky is cloudy about 2/3 of the time, leaving us one week to top off the battery after two weeks of drain. From our more general power needs section, we can learn that our 2.0 watt SBC will draw 0.17 amps if we use a 12 V battery. So our drain - at worst - will be:
- Two weeks = 24 hours per day x 14 days = 336 hours
- 336 hours at 0.17 amps = 57 amp-hours
To recharge 57 amps at 12 V, with a 10 watt panel this would take (the concepts are from the more general power needs section):
- 57 amps * N hours = 10 watts / 12 V
- N = 68
...68 hours. At 2/5 charge time from the nightfall calculation (giving ten hours a day of charge), a 10 watt panel would recharge in the expected week (6.8 days). This gives us an idea of what class of solar panel we are looking for, and from here we can examine 10 watt and larger panels with respect to cost and size.
After examining cost, a 10-watt panel was nearly the same size and cost as an 18-watt panel ($80), and so an 18-watt panel was used here. The 18-watt panel also would help add a buffer when - even on non-storm days - high mountain clouds form and further reduce the available sun.
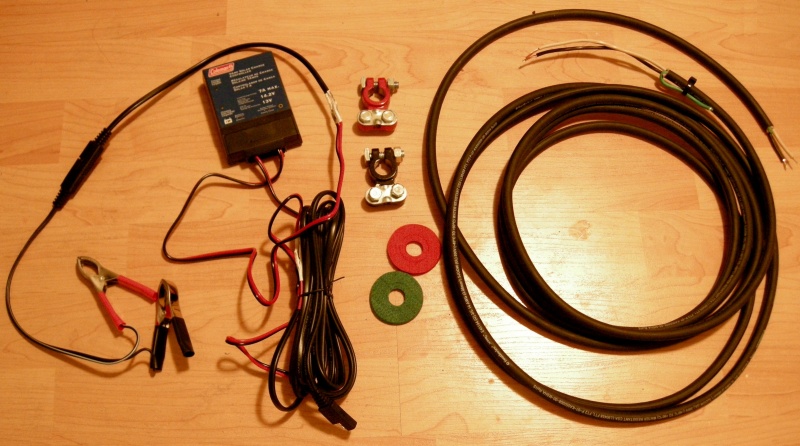
Whatever you choose for your solar panel, you should include a charge limiter, and a way to reliably attach the wires to a battery (clips are for testing only, the post clamps are a more permanent install). The cable on the right is outdoor grade power hookup wire:
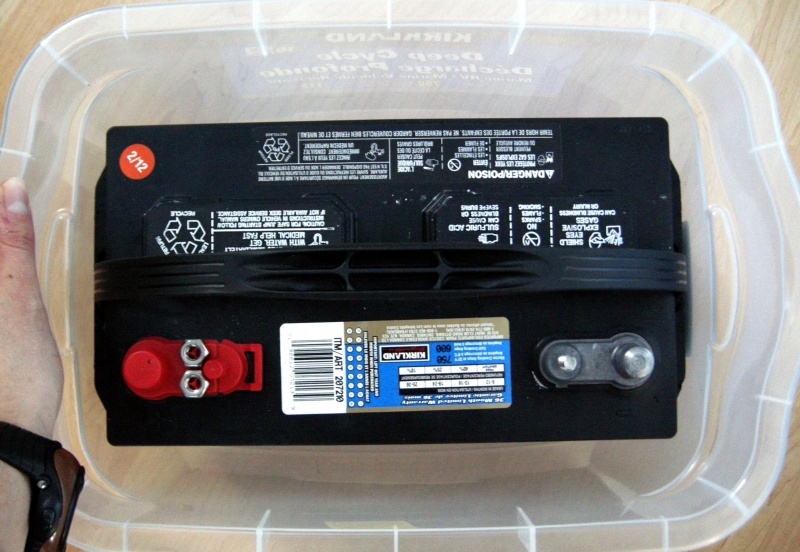
Battery
Your battery amp capacity should be big enough that the SBC can run continuously, with reserves, in times of cloudy weather. Even with a proper type of battery, if your SBC completely drains your battery, depending on the battery type it has a chance of dying completely (which is called bricking) and will lose its capacity to recharge.
We have an in-depth description of how to choose batteries in a more general power needs section. From the information in that section, we can determine that we will probably be using a 12 V battery, and that the SBC will draw 0.17 amps with a 12 V battery.
Using this in the solar power section, we calculated that the drain on the battery during a long storm would be, at worst, 57 amp-hours, and so this is the minimum usable capacity we need for the battery.
At more than about 30 amp-hours, the battery that makes the most sense is the large car-battery type lead acid battery. However, typical car batteries won't work as they are not deep cycle that is, they are designed to stay fully charged most of the time. Drawing current from this type of battery continuously will only damage and eventually destroy it. Batteries for RVs, boats, electric golf carts, and the like are designed to be used up through most of their amperage capacity, recharged, and used again and again - these batteries are deep cycle batteries.
Most batteries list this usable capacity for their specification, but if not, consider only 60% of the capacity to be usable. Some example specifications are:
- 70 Amp-hours (110 reserve) - this battery has 70 usable amp hours
- 70 Amp hours - this battery probably only has 42 amp hours, but you can call the manufacturer to make sure
The battery will probably be a higher cost than the solar panel. A 60-70 usable amp-hour lead acid battery will be about $100 and 50 lbs. When choosing a battery, the 'buy in bulk' philosophy can come into play. For example, this station ended up using a 110 amp-hour battery, which was $115 and 65 lbs. This is not much weight or price difference for nearly double the power capacity. And extra power capacity will give you extra buffer for when your wires wiggle loose, or when you are testing your system at the beginning.
There are many different types of deep cycle batteries - not just lead acid - and they vary in price significantly. There are resources all over the Internet about different battery types to use with solar panels, so we will not describe them here. The key deciding factor is how long the installation is designed to last. Lead acid batteries have a lifespan of about three years. Longer than that, and you will need to purchase a more expensive battery.
Structural System
The list of major components for this weather station is:
| Component |
|---|
| Station Tripod |
| Commercial lightweight tripod |
| Extension masts |
| Protective screen for temperature and humidity sensor |
| Wires |
| Exterior-grade power cable |
| Hookup wire for LEDs and Long Phidget Sensor wires |
| Solder and heatshrink |
| Misc Hardware |
| Horizontal arm for measuring surface temperature (Pipe plus U-bolts and pipe strapping) |
| Solar panel and SBC case mounting (Metal frame or wide clamps with locks, with U-bolts) |
| Battery box to keep snow off the terminals |
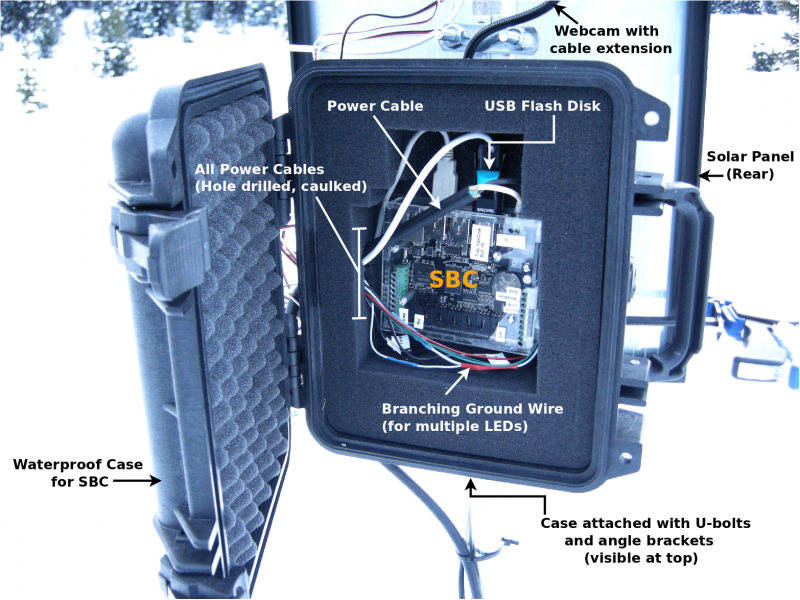
| Pelican 1200 waterproof case for SBC |
| Battery post mounts, protectors, and charge limiter |
Although most of these components individually are inexpensive, put them together and the Phidgets are only a small portion of the overall system cost.
With these types of projects, it is easy to lose track of all the little details. Even in something contained like a weather station there are lots, including:
- Zip ties (black exterior type) for cable management
- Cold weather silicone caulk for sealing the case wire holes
- Silica gel packets for desiccant within the SBC case
- Penetrating oil (WD-40) and a hammer for working with the tripod and masts
- Foam to pad the U-bolt ends from the solar panel
- Bolts and angle brackets for the Pelican case mounting
And so on. So plan to spend a while working your particular system out with diagrams, lists, or whatever works for you.
The details of each major connecting part (e.g. mounting the solar panel on the mast, mounting the SBC within the case and to the mast, mounting the horizontal arm, etc) will depend on many different details specific to your application, such as:
- Snow depth, expected winds, and primary weather
- Length of the horizontal arm and any sensors also on the end
We found U-bolts to be sufficient for most mounting needs, and quick grip clamps to be sufficient for the solar panel (a person could hang on them), which made the station easier to maintain. This station was designed to be run for a few months and then moved or taken down; a more permanent installation may have a different design.
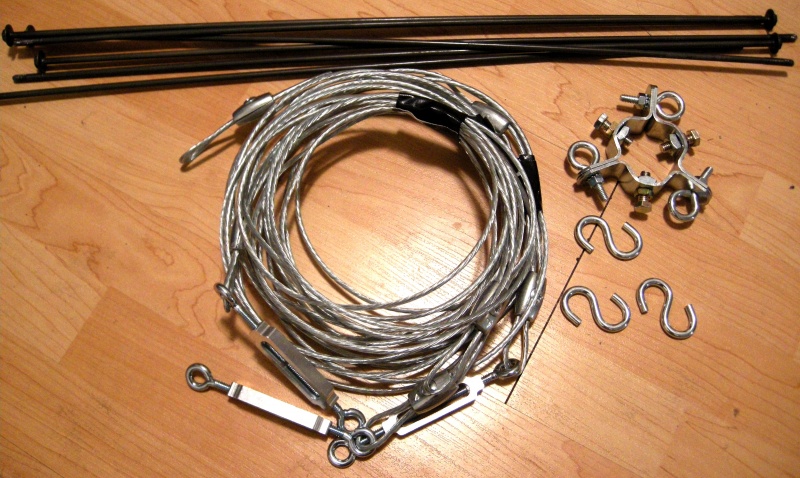
Depending on your expected forces, you can enhance this basic system design. For example, adding some stakes and plastic coated galvanized guy wires can enable your weather station masts to withstand winds of 70 kph with minimal vibration:
Code
We will be writing our Phidget code in Python. This code will then be scheduled to run - via cron on the SBC - to sample data once per minute and take a webcam photo once every thirty minutes.
Since the weather station runs autonomously - on its own, in the wild - you will need to write code that runs on the SBC itself, as you will have no external computer to control the SBC. This depends on the SBC being set up as described in the 1072 - Getting Started page, and then additionally as described in the OS - Phidget SBC page. Namely, to follow along with this particular station design, you will need:
- SSH enabled
- Python installed
Of course, there are many, many other ways to design this code - in Java, to run at boot rather than as a cron job, and so on - and many of these alternatives are outlined on the OS - Phidget SBC page.
For this example, we have two Python scripts: station.py which runs the sensors once per minute and saves the data, and webcam.py which saves a webcam picture once per minute.
Station
The station code in station.py has three jobs:
- Reading data, which is the gathering and saving of the weather data,
- Displaying status via the Interface Kit and LEDs, and
- Moving data onto a second USB key (optional)
Reading Data
This station handles two USB Phidgets (the Interface Kit on the SBC board, and the IR Temperature sensor), and two analog Phidgets (air temperature, and humidity).
We have code snippets for using more than one USB Phidget on the General Phidget Programming page. To use more than one analog sensor, you simply use the port number it is plugged in to. As shown on the general programming page, you can automatically detect which USB Phidgets are attached, without knowing their serial number. But you cannot detect which analog ports are being used, unless create an ad-hoc method, such as assuming a value of 0 means no sensor is attached, and any other value indicates an attached sensor.
After we read the data from the Phidgets, we want to save it on the USB data key. We can either hard-code the location or automatically detect where the key is plugged in. Using USB keys with the SBC is discussed in detail on the SBC operating system page. We will hard-code the location in this section's code, but we show how to automatically detect a USB key in the Moving USB Data section.
The Python code to open the two USB Phidgets, read the IR temperature state, read the two analog in sensors, write the data to an existing file on the USB data key, and turn on and off an LED looks like:
TBD
This code snippet shows only one LED in use to show status, attached to digital output port 0 (short LED wire goes into the ground G terminal). For ideas on using other LEDs to display the status of the SBC and your program, see the status section.
After running this a number of times, you will have a file data.txt full of lines that look like this:
2012-03-10 08:37:02.776500,T=-1.77726,RH=40.2,IR-T=-1.01,IR-Brd=-1.09
Moving USB Data
The station was visited once per week to obtain the data. With this setup, you can either:
- Write some extra code to copy all of the latest data to a second USB key when it is plugged in, or
- Simply change out the old USB key for a new one on every visit, and reboot the system
After experimenting with both, it turned out that the second option worked well and was the simplest. Rebooting the station at every visit was no problem because the cron job simply restarts as soon as the SBC restarts. Having only one key with the data on it for the week, and then installing a fresh one created only one key to keep track of at a time.
However, if you wish to use the copy method instead, you can use the mount table to detect a second USB key like this:
Status
There are many ways to use LEDs to communicate status, but a key way is to have the LEDs turn on when reading data, and turn off when finished successfully. Then, if they remain on at your next visit, you will know an error was triggered.
This shows that an error occurred, but not what error. You can also consider writing the details of the error to your data file along with time and date information so you know what surrounding conditions may have caused it. But depending on your method of moving (or copying) the USB data off of the board, you may want to have many LEDs for different states:
- Data being measured
- Data being copied
- Error generated
- Program exited normally
If you use more than one LED, especially of the same colour, make sure to label them!
The LED setup that was used in this particular station turned an LED on for measurement, and then off on successful program exit. Then, when the station SBC was rebooted in the field, a briefly flashing LED once per minute means the reboot of the station and software was successful.
Webcam
Scheduling
You can schedule your Python scripts the same way we did - as cron jobs by following the cron section on the SBC operating system page.
The line used to schedule the weather station every minute was:
* * * * * /root/station.py
The line used to schedule the webcam every thirty minutes was:
0,30 * * * * /root/webcam.py
Data
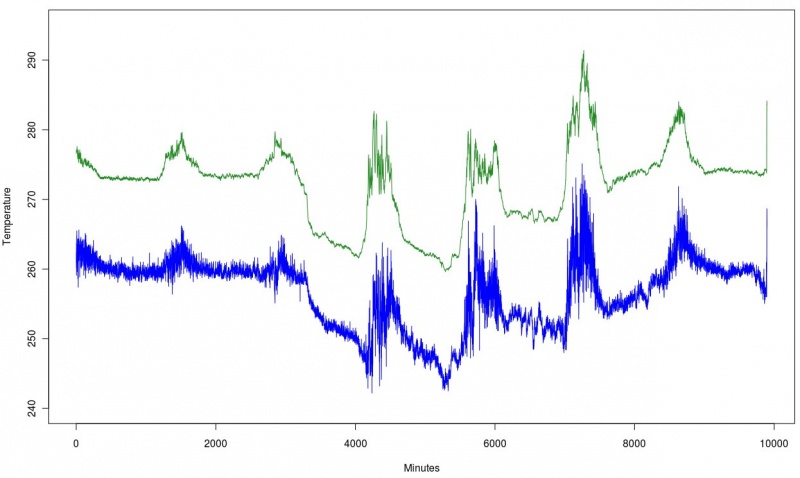
When visiting this weather station, we could perform any upkeep. Then, as above, we could get the data off the weather station by simply removing the USB key drive from the SBC and rebooting the SBC. As mentioned earlier, the reboot helped keep our code stable over time by resetting and fully cleaning out any script instances which had hung due to unforeseen circumstances. The USB key would then have a week of data on it at a time. Here is a week with air temperature in green and (partially corrected) snow surface temperature in blue:
Putting it All Together
Field installation will always be harder than you think. But at the same time it will be fun, seeing your hard work come together. Make sure you have permission to set up your station in its new home if the land is not yours. Some day-of-assembly tips:
- Pick a day with reasonable weather for the installation, so you can slow down and do things carefully.
- Assemble the pieces for practice at home, or better yet run them in your backyard before installing elsewhere
- Bring basic tools into the field with you when you install (a solar setup tester, hammer, penetrating oil, some wrenches and sockets, caulk)
It is good to check your code very carefully before installing, but if something doesn't go right, you can always remove the SBC, transport it home, fix it, and reinstall relatively easily.
When you check on the station, things you may not expect can happen in the interim, so consider bringing a small repair kit each time as you work the bugs out.
Extra Credit
Faster Sampling
The ports can sample at any time interval up to the maximum data rate of the 1018 - PhidgetInterfaceKit 8/8/8 attached to the SBC. So you can also write fast-sampling code that runs constantly from the SBC boot time and samples very quickly. With fewer than four analog sensors, you can sample up to 1000 times per second.
A Smarter Station
The Single Board Computer is just that - a computer! So you could install something like the R Statistical Package (you can do this by using apt-get install r-base over SSH on the SBC) and do analysis on the data as it comes in.