|
Notice: This page contains information for the legacy Phidget21 Library. Phidget21 is out of support. Bugfixes may be considered on a case by case basis. Phidget21 does not support VINT Phidgets, or new USB Phidgets released after 2020. We maintain a selection of legacy devices for sale that are supported in Phidget21. We recommend that new projects be developed against the Phidget22 Library.
|
Language - Simulink: Difference between revisions
No edit summary |
No edit summary |
||
| (28 intermediate revisions by 3 users not shown) | |||
| Line 1: | Line 1: | ||
[[Category:Language]] | [[Category:Language]] | ||
{{OSLang|[[File:icon-Simulink.png|64x64px]]| | {{OSLang|[[File:icon-Simulink.png|64x64px]]|Simulink support is no longer maintained by Phidgets}} | ||
=='''Legacy Documentation'''== | |||
<font color=red>We no longer officially support Simulink, as newer versions have been found to be incompatible with Phidgets libraries.</font> | |||
Below is the documentation for previously supported versions of Simulink. | |||
==Introduction== | ==Introduction== | ||
{{LanguageSupport|Simulink|the non-[[General Phidget Programming#Event Driven Code|event driven]] part of the Phidget API | {{LanguageSupport|Simulink|the non-[[General Phidget Programming#Event Driven Code|event driven]] part of the Phidget API|the Phidget Interface Kit.|Windows, Mac, and Linux; however, we provide a Windows walkthrough here|}} | ||
==Quick Downloads== | |||
{{QuickDownloads|Simulink| | |||
{{APIQuickDownloads|{{SERVER}}/documentation/Phidget21_C_Doc.zip C}}| | |||
{{ExampleQuickDownloads|{{SERVER}}/downloads/phidget21/examples/c/Simulink.zip Simulink|}} | |||
{{ExampleQuickDownloads|{{SERVER}}/downloads/phidget21/examples/c/Matlab.zip MATLAB| (needed for the library)}}| | |||
{{WindowsQuickDownloads}} | |||
{{MacQuickDownloads}} | |||
{{LinuxQuickDownloads}}}} | |||
==Getting Started with Simulink== | |||
We show how to use Simulink on Windows. Simulink, like MATLAB, can run on Mac OS X and Linux systems. Once you have MATLAB set up for your system - as described on our [[Language - MATLAB | MATLAB page]] - these instructions should apply no matter what your operating system behind MATLAB. | |||
This page assumes the reader is familiar with Simulink, Simulink user-defined functions, and interacting with Phidgets using MATLAB. In particular, if you've not written working MATLAB code for Phidgets yet, please work through the [[Language - MATLAB|main MATLAB page]] before working through this one. MATLAB and Simulink depend heavily on hooking MATLAB into the Phidget C library and writing user-defined blocks, and this may be a new aspect of MATLAB for you. | |||
If you are new to writing code for Phidgets in Simulink, we recommend starting by running, then modifying existing examples. This will allow you to: | |||
{{ExampleCodeReasons}} | |||
===Description of Files=== | |||
* The '''{{Code|phidget21Matlab.h}}''' file - found in the MATLAB (not Simulink) examples - is the library that makes both the MATLAB and the Simulink Phidget examples and other code work. On both Linux and Mac OS X, this file should be modified as described on the [[Language - MATLAB|main MATLAB page]]. | |||
===Use Our Examples=== | |||
Please start by downloading the [{{SERVER}}/downloads/phidget21/examples/c/Simulink.zip Simulink examples] and [{{SERVER}}/downloads/phidget21/examples/c/Matlab.zip MATLAB examples] and unpacking them into a folder. The Phidget examples were written using Simulink 6.1/MATLAB 7 in Windows XP. Other recent versions of Simulink should work as well and would be set up in a similar manner. | |||
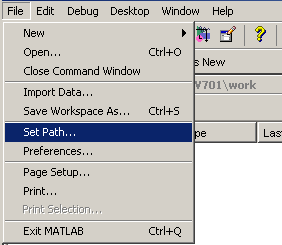
First, make sure that the '''{{Code|phidget21Matlab.h}}''' file from the MATLAB examples is in your MATLAB path. This would be a good time to also add the path to the Simulink examples that you've unpacked. To add these folders to the Simulink path, choose "File → Set Path..." and add your folders: | |||
[[Image:Simulink setpath.png|link=|alt=]] | |||
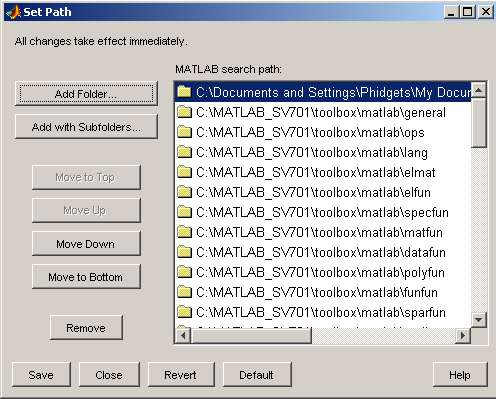
You can add them one by one, or include all of the sub-folder of the folder you unpacked the example into: | |||
[[Image:Simulink choosepathfolder.png|link=|alt=]] | |||
Make sure to save and close afterwards. | |||
Now you are ready to run the Simulink Example. At this time, we only have a Simulink example for the Phidget Interface Kit. However, even if you don't have an Interface Kit, you can dig through the code behind the Simulink example and modify it to your own Phidget board (Spatial, Temperature Sensor, etc). | |||
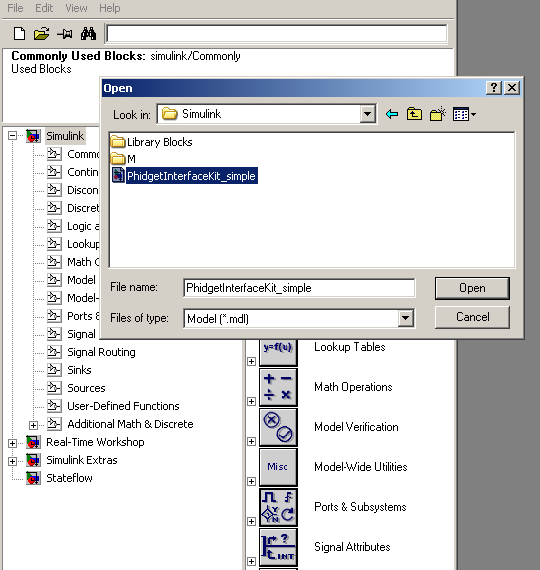
With an Interface Kit, make sure it is plugged in. Then, open the example by navigating to it from Simulink under "File → Open...". This will allow you to open the Interface Kit example: | |||
[[Image:Simulink openexamples.png|link=|alt=]] | |||
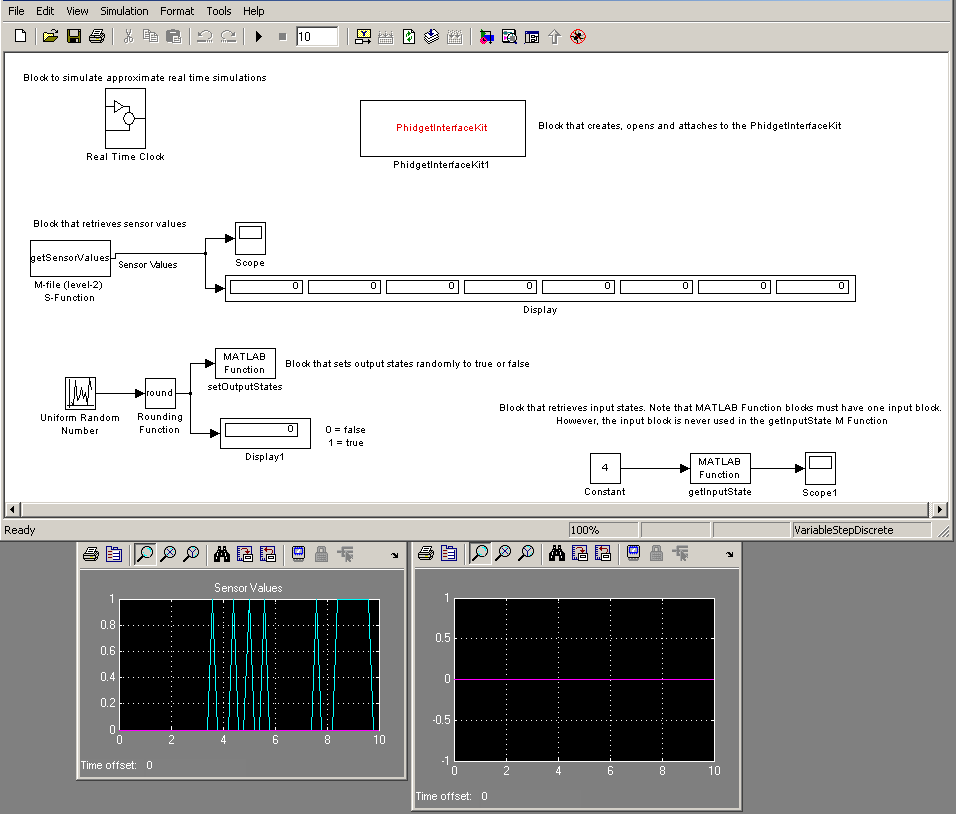
Opening the example will open the dashboard within Simulink to observe the Interface Kit. You will have the main layout of the blocks, and then also two traces: | |||
[[Image:Simulink ifktopened.png|link=|alt=]] | |||
Once opened, the example should look like the screenshot above. If the boxes for the Interface Kit are red, and running it results in a Phidgets object unknown error, you need to include the Simulink project and the MATLAB examples in your path. | |||
When you run the example, by using "Simulation → Start", the Interface Kit will turn on and off its digital outputs (to turn on and off any test LEDs you may have in them) and also print the output and sensor values to the screen and the traces: | |||
[[Image:Simulink runexamples.png|link=|alt=]] | |||
== | At this point, you probably want to set up your own project and [[#Write Your Own Code|write your own code]], or refer to our [[#Follow The Examples|teaching section]] to match code snippets and explanations to the example code. | ||
===Write Your Own Code=== | |||
To begin your own project, you can make sure your MATLAB path is set as described in the [[#Use Our Examples|Use Our Examples]] section. Then, you have to decide whether you will need to create new blocks first (refer to our example under the "M" directory for structure and example block code) or use the small set of Phidget blocks we already provide for the Interface Kit. For help writing new blocks, we have some code snippets in the [[#Follow The Examples|Follow The Examples]] section. | |||
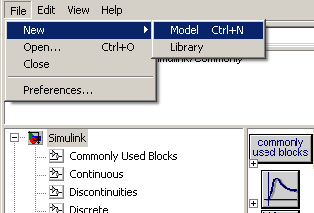
Once you have all the blocks you need (and they have been added to your path), you can create a new Model from the Simulink window: | |||
[[Image:Simulink newmodel.png|link=|alt=]] | |||
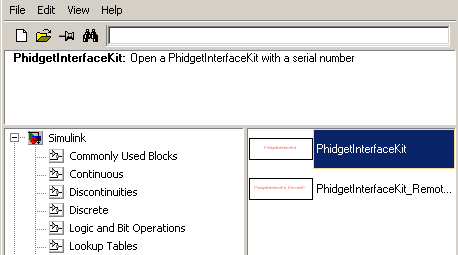
Then you can open up the Phidgets blocks right on the Simulink window and peruse the functionality of each block via its sub-menus. Here are the two blocks available from the Simulink example: | |||
[[Image:Simulink addifkt.png|link=|alt=]] | |||
Once your blocks appear like this, it is easy to drag and drop them into your new model pane. We have some [[#Follow The Examples|code snippets available]] for you to break down our example code into usable blocks, but as mentioned earlier you should already be familiar with writing user-defined blocks in Simulink as this is beyond the scope of this guide. | |||
==Follow The Examples== | |||
By following the instructions above, you probably now have a working example and want to understand it better so you can change it to do what you want. This section has resources for you to learn from the example and write your own. | |||
Your main reference for writing Simulink code will be our C++ API information (because Simulink calls our C library directly) with syntax for all of our functions: | |||
{{UsingAPhidgetInCodeGeneral|although only traditional non-event driven code is available in Simulink.|[{{SERVER}}/documentation/Phidget21_C_Doc.zip C/C++ API]}} | |||
===Code Snippets=== | |||
This tutorial will use MATLAB code to demonstrate how user defined functions can be used to interact with Phidgets through the use of MATLAB Fcn, M Level 1 S Functions, and M Level 2 S Function blocks. | This tutorial will use MATLAB code to demonstrate how user defined functions can be used to interact with Phidgets through the use of MATLAB Fcn, M Level 1 S Functions, and M Level 2 S Function blocks. | ||
As writing C code is beyond the scope of this guide, C S Function blocks will not be discussed. | As writing C code is beyond the scope of this guide, C S Function blocks will not be discussed. However, C S Function blocks work similar to M S Function blocks. | ||
However, C S Function blocks work similar to M S Function blocks. | |||
MATLAB Fcn blocks are the easiest blocks to use, but have limited features(i.e., only 1 input port). Level 1 S Functions blocks have more featues, but are more complicated to implement. Level 2 S Functions blocks are the most complex, but benefit in supporting the most features. | |||
MATLAB Fcn blocks are the easiest blocks to use, but have limited features(i.e., only 1 input port). | |||
Level 1 S Functions blocks have more featues, but are more complicated to implement. Level 2 S Functions blocks are the most complex, but benefit in supporting the most features. | Specific calls in Simulink user blocks will differ in syntax from those on the [[General Phidget Programming]] page, but the concepts stay the same. | ||
It may help to have the [[General Phidget Programming]] page and this section open at the same time, because they parallel each other and you can refer to the MATLAB/Simulink syntax. However, many additional concepts are covered on the General Phidget Programming page on a high level, such as using multiple Phidgets, handling errors, and different styles of programming. | |||
You may also find it useful to refer to the code snippets main [[Language - MATLAB#Code Snippets|MATLAB page]]. | |||
=== | ====Step One: Initialize and Open==== | ||
Before using the Phidget in your code, the Phidget object will need to be declared and initialized. | |||
For example, we can declare and initialize an instance of a PhidgetInterfaceKit inside a M file of a Level 1 S Function block with: | For example, we can declare and initialize an instance of a PhidgetInterfaceKit inside a M file of a Level 1 S Function block with: | ||
<div class="source"><syntaxhighlight lang= | <div class="source"><syntaxhighlight lang=matlab> | ||
global handle; | global handle; | ||
loadlibrary('phidget21', 'phidget21Matlab.h'); | loadlibrary('phidget21', 'phidget21Matlab.h'); | ||
| Line 64: | Line 112: | ||
handle = get(ptr, 'Value'); | handle = get(ptr, 'Value'); | ||
calllib('phidget21', 'CPhidget_open', handle, -1) | calllib('phidget21', 'CPhidget_open', handle, -1) | ||
</syntaxhighlight></div> | </syntaxhighlight></div> | ||
The handle variable is declared as a global, and can be easily accessed by other blocks. | The handle variable is declared as a global, and can be easily accessed by other blocks. Since blocks repeatedly run until the simulation is completed, the above code will need to be restricted so that it runs only once during a simulation. Hence, you should put such code inside the mdlInitializeSizes function. | ||
Since blocks repeatedly run until the simulation is completed, the above code will need to be restricted so that it runs only once during a simulation. | |||
====Step Two: Wait for Attachment (plugging in) of the Phidget==== | |||
To use the Phidget, it must be plugged in (attached). We can handle this by calling waitForAttachment. This function works for any Phidget. WaitForAttachment will block indefinitely until a connection is made to the Phidget, or an optional timeout is exceeded: | |||
<div class="source"><syntaxhighlight lang=matlab> | |||
calllib('phidget21', 'CPhidget_waitForAttachment', handle, 2500) | |||
</syntaxhighlight></div> | </syntaxhighlight></div> | ||
This line is also placed inside the mdlInitializeSizes function. | |||
Because Simulink and MATLAB cannot handle events, you cannot catch the attach events in the C library as you can with our other supported languages. | |||
The following code is placed inside a M file. | |||
The block’s input is the desired output state | ====Step Three: Do Things with the Phidget==== | ||
Although we usually recommend using events to interact with your Phidget, MATLAB and Simulink do not support event handling. Hence, you can only use the "get" and "set" functions from the C library to interact with your Phidget. | |||
For example, here we have a MATLAB Fcn block which can be used to set the output states of the digital output ports on a PhidgetInterfaceKit 8/8/8. The following code is placed inside a M file. | |||
The block’s input variable is the desired output state to be set: | |||
<div class="source"><syntaxhighlight lang=cpp> | <div class="source"><syntaxhighlight lang=cpp> | ||
function setOutputStates(outputState) | function setOutputStates(outputState) | ||
global handle; | global handle; | ||
| Line 97: | Line 144: | ||
end | end | ||
end | end | ||
</syntaxhighlight></div> | </syntaxhighlight></div> | ||
Note that this handle is the same handle that was created earlier. | Note that this handle is the same handle that was [[#Step One: Initialize and Open|created]] and [[#Step Two: Wait for Attachment (plugging in) of the Phidget|attached]] earlier. | ||
Next, a M Level 2 S Function will be used to retrieve sensor values of analog sensor ports and output it to a scope. | |||
The block will contain no inputs and 1 output, with 8 dimensions(1 dimension for each analog sensor of a PhidgetInterfaceKit 8/8/8). | Next, a M Level 2 S Function will be used to retrieve sensor values of analog sensor ports and output it to a Simulink scope window. The block will contain no inputs and 1 output, with 8 dimensions (1 dimension for each analog sensor of a PhidgetInterfaceKit 8/8/8). For this, you can place the following code in the Output function in the M file: | ||
<div class="source"><syntaxhighlight lang=cpp> | <div class="source"><syntaxhighlight lang=cpp> | ||
function Output(block) | function Output(block) | ||
dataptr = libpointer('int32Ptr',0); | dataptr = libpointer('int32Ptr',0); | ||
| Line 115: | Line 159: | ||
end | end | ||
end | end | ||
</syntaxhighlight></div> | </syntaxhighlight></div> | ||
=== | ====Step Four: Close and Delete==== | ||
At the end of the simulation, the Phidget object will need to be closed and deleted. | |||
To do this, the following lines can added to mdlTerminate. | |||
== | <div class="source"><syntaxhighlight lang=matlab> | ||
calllib('phidget21', 'CPhidget_close', handle); | |||
calllib('phidget21', 'CPhidget_delete', handle); | |||
</syntaxhighlight></div> | |||
=== | ====Special Cases: Strings and Real-Time==== | ||
=== | =====Strings===== | ||
It is possible for a user to specify a string of characters in the block parameters dialog box of a user defined function such that it is passed into a user defined function. | It is possible for a user to specify a string of characters in the block parameters dialog box of a user defined function such that it is passed into a user defined function. | ||
Please see the PhidgetInterfaceKit_RemoteIP block library in the Simulink examples for details. | Please see the PhidgetInterfaceKit_RemoteIP block library in the Simulink examples for details. Simulink cannot display strings in the GUI, however it is possible to write a C S function that displays strings in the MATLAB console. | ||
Simulink cannot display strings in the GUI, however it is possible to write a C S function that displays strings in the MATLAB console. | |||
===Working in Real Time=== | =====Working in Real Time===== | ||
Even though a model may finish simulating before a user has a chance to interact with Phidgets, there are workarounds that can be used to slow down simulation time to allow for user interaction. | Even though a model may finish simulating before a user has a chance to interact with Phidgets, there are workarounds that can be used to slow down simulation time to allow for user interaction. | ||
One method is to modify the Solver Options(under Simulation->Configuration Parameters->Solver). | |||
Changing the step size and stop time may slow down the simulation. Another method is to implement a user defined function that reduces the simulation speed until the system clock matches the Simulink clock. | One method is to modify the Solver Options (under Simulation->Configuration Parameters->Solver). Changing the step size and stop time may slow down the simulation. Another method is to implement a user defined function that reduces the simulation speed until the system clock matches the Simulink clock. | ||
The Phidget Simulink example uses the “Real Time Block” to simulate the model in approximate real time. | The Phidget Simulink example uses the “Real Time Block” to simulate the model in approximate real time. | ||
To use the “Real Time Block”, place the following files in your MATLAB working directory: slblocks.m, rtc.mdl, waitforreal.m. These files can be extracted from the root directory and the Real Time directory of the Phidget Simulink example. Open up the Simulink Library Browser and select “Real Time Clock”. Place the Real Time Clock block onto your model. | |||
For applications where accurate real time simuation is needed, xPC Target can be used. Please note that the simulation speed of these methods may differ depending on the CPU speed, complexity of the model, the amount of text being displayed in the MATLAB console, etc.... | |||
{{MoreHowTos}} | |||
Note, however, that although being familiar with both event and traditional programming can help you identify which functions are which within an API, Simulink only supports traditional logic programming. | |||
== | ==Common Problems and Solutions/Workarounds== | ||
None at this time. | |||
Latest revision as of 15:39, 18 September 2017
 |
Simulink support is no longer maintained by Phidgets |
Legacy Documentation
We no longer officially support Simulink, as newer versions have been found to be incompatible with Phidgets libraries.
Below is the documentation for previously supported versions of Simulink.
Introduction
If this is your first time working with a Phidget, we suggest starting with the Getting Started page for your specific device. This can be found in the user guide for your device. That page will walk you through installing drivers and libraries for your operating system, and will then bring you back here to use Simulink specifically.
Simulink is capable of using the non-event driven part of the Phidget API. We also provide example code in Simulink for the Phidget Interface Kit.
Simulink can be developed with Windows, Mac, and Linux; however, we provide a Windows walkthrough here.
You can compare Simulink with our other supported languages.
Quick Downloads
Just need the Simulink documentation, drivers, libraries, and examples? Here they are:
Documentation
Example Code
Libraries and Drivers
- 32-bit Windows Drivers Installer
- 64-bit Windows Drivers Installer
- Windows Driver and Library Files (Zipped)
- OS X Drivers Installer
- Linux Libraries (Source Code)
Getting Started with Simulink
We show how to use Simulink on Windows. Simulink, like MATLAB, can run on Mac OS X and Linux systems. Once you have MATLAB set up for your system - as described on our MATLAB page - these instructions should apply no matter what your operating system behind MATLAB.
This page assumes the reader is familiar with Simulink, Simulink user-defined functions, and interacting with Phidgets using MATLAB. In particular, if you've not written working MATLAB code for Phidgets yet, please work through the main MATLAB page before working through this one. MATLAB and Simulink depend heavily on hooking MATLAB into the Phidget C library and writing user-defined blocks, and this may be a new aspect of MATLAB for you.
If you are new to writing code for Phidgets in Simulink, we recommend starting by running, then modifying existing examples. This will allow you to:
- Make sure your libraries are properly linked
- Go from source code to a test application as quickly as possible
- Ensure your Phidget is hooked up properly
Description of Files
- The
phidget21Matlab.hfile - found in the MATLAB (not Simulink) examples - is the library that makes both the MATLAB and the Simulink Phidget examples and other code work. On both Linux and Mac OS X, this file should be modified as described on the main MATLAB page.
Use Our Examples
Please start by downloading the Simulink examples and MATLAB examples and unpacking them into a folder. The Phidget examples were written using Simulink 6.1/MATLAB 7 in Windows XP. Other recent versions of Simulink should work as well and would be set up in a similar manner.
First, make sure that the phidget21Matlab.h file from the MATLAB examples is in your MATLAB path. This would be a good time to also add the path to the Simulink examples that you've unpacked. To add these folders to the Simulink path, choose "File → Set Path..." and add your folders:
You can add them one by one, or include all of the sub-folder of the folder you unpacked the example into:
Make sure to save and close afterwards.
Now you are ready to run the Simulink Example. At this time, we only have a Simulink example for the Phidget Interface Kit. However, even if you don't have an Interface Kit, you can dig through the code behind the Simulink example and modify it to your own Phidget board (Spatial, Temperature Sensor, etc).
With an Interface Kit, make sure it is plugged in. Then, open the example by navigating to it from Simulink under "File → Open...". This will allow you to open the Interface Kit example:
Opening the example will open the dashboard within Simulink to observe the Interface Kit. You will have the main layout of the blocks, and then also two traces:
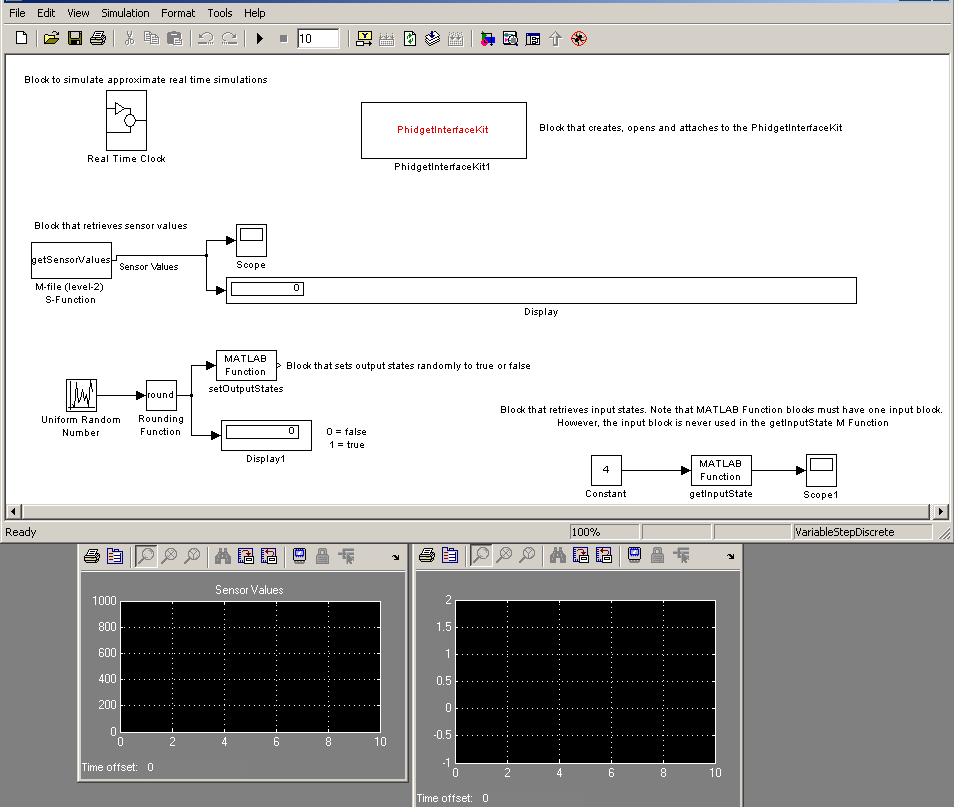
Once opened, the example should look like the screenshot above. If the boxes for the Interface Kit are red, and running it results in a Phidgets object unknown error, you need to include the Simulink project and the MATLAB examples in your path.
When you run the example, by using "Simulation → Start", the Interface Kit will turn on and off its digital outputs (to turn on and off any test LEDs you may have in them) and also print the output and sensor values to the screen and the traces:
At this point, you probably want to set up your own project and write your own code, or refer to our teaching section to match code snippets and explanations to the example code.
Write Your Own Code
To begin your own project, you can make sure your MATLAB path is set as described in the Use Our Examples section. Then, you have to decide whether you will need to create new blocks first (refer to our example under the "M" directory for structure and example block code) or use the small set of Phidget blocks we already provide for the Interface Kit. For help writing new blocks, we have some code snippets in the Follow The Examples section.
Once you have all the blocks you need (and they have been added to your path), you can create a new Model from the Simulink window:
Then you can open up the Phidgets blocks right on the Simulink window and peruse the functionality of each block via its sub-menus. Here are the two blocks available from the Simulink example:
Once your blocks appear like this, it is easy to drag and drop them into your new model pane. We have some code snippets available for you to break down our example code into usable blocks, but as mentioned earlier you should already be familiar with writing user-defined blocks in Simulink as this is beyond the scope of this guide.
Follow The Examples
By following the instructions above, you probably now have a working example and want to understand it better so you can change it to do what you want. This section has resources for you to learn from the example and write your own.
Your main reference for writing Simulink code will be our C++ API information (because Simulink calls our C library directly) with syntax for all of our functions:
- C/C++ API (This is the complete set of functions you have available for all Phidgets)
- Device Specific APIs - The one for your Phidget can be found in its user guide.
To learn the details behind opening, configuring, using, and closing your Phidget, try the General Phidget Programming page. That page also describes using the Phidget in an event-driven manner and in a traditional manner, although only traditional non-event driven code is available in Simulink..
Code Snippets
This tutorial will use MATLAB code to demonstrate how user defined functions can be used to interact with Phidgets through the use of MATLAB Fcn, M Level 1 S Functions, and M Level 2 S Function blocks. As writing C code is beyond the scope of this guide, C S Function blocks will not be discussed. However, C S Function blocks work similar to M S Function blocks.
MATLAB Fcn blocks are the easiest blocks to use, but have limited features(i.e., only 1 input port). Level 1 S Functions blocks have more featues, but are more complicated to implement. Level 2 S Functions blocks are the most complex, but benefit in supporting the most features.
Specific calls in Simulink user blocks will differ in syntax from those on the General Phidget Programming page, but the concepts stay the same.
It may help to have the General Phidget Programming page and this section open at the same time, because they parallel each other and you can refer to the MATLAB/Simulink syntax. However, many additional concepts are covered on the General Phidget Programming page on a high level, such as using multiple Phidgets, handling errors, and different styles of programming.
You may also find it useful to refer to the code snippets main MATLAB page.
Step One: Initialize and Open
Before using the Phidget in your code, the Phidget object will need to be declared and initialized. For example, we can declare and initialize an instance of a PhidgetInterfaceKit inside a M file of a Level 1 S Function block with:
    global handle;
    loadlibrary('phidget21', 'phidget21Matlab.h');
    ptr = libpointer('int32Ptr',0);
    calllib('phidget21', 'CPhidgetInterfaceKit_create', ptr);
    handle = get(ptr, 'Value');
    calllib('phidget21', 'CPhidget_open', handle, -1)
The handle variable is declared as a global, and can be easily accessed by other blocks. Since blocks repeatedly run until the simulation is completed, the above code will need to be restricted so that it runs only once during a simulation. Hence, you should put such code inside the mdlInitializeSizes function.
Step Two: Wait for Attachment (plugging in) of the Phidget
To use the Phidget, it must be plugged in (attached). We can handle this by calling waitForAttachment. This function works for any Phidget. WaitForAttachment will block indefinitely until a connection is made to the Phidget, or an optional timeout is exceeded:
calllib('phidget21', 'CPhidget_waitForAttachment', handle, 2500)
This line is also placed inside the mdlInitializeSizes function.
Because Simulink and MATLAB cannot handle events, you cannot catch the attach events in the C library as you can with our other supported languages.
Step Three: Do Things with the Phidget
Although we usually recommend using events to interact with your Phidget, MATLAB and Simulink do not support event handling. Hence, you can only use the "get" and "set" functions from the C library to interact with your Phidget.
For example, here we have a MATLAB Fcn block which can be used to set the output states of the digital output ports on a PhidgetInterfaceKit 8/8/8. The following code is placed inside a M file. The block’s input variable is the desired output state to be set:
    function setOutputStates(outputState)
        global handle;
        for i = 0:7
            if (calllib('phidget21', 'CPhidgetInterfaceKit_setOutputState', handle, i, outputState) == 1)
                display('Set output state failed')

            end
        end
Note that this handle is the same handle that was created and attached earlier.
Next, a M Level 2 S Function will be used to retrieve sensor values of analog sensor ports and output it to a Simulink scope window. The block will contain no inputs and 1 output, with 8 dimensions (1 dimension for each analog sensor of a PhidgetInterfaceKit 8/8/8). For this, you can place the following code in the Output function in the M file:
    function Output(block)
        dataptr = libpointer('int32Ptr',0);
        global handle;
        for i = 0:7
            if (calllib('phidget21', 'CPhidgetInterfaceKit_getSensorValue', handle, i, dataptr) == 0)
                block.OutputPort(1).Data(i+1) = get(dataptr, 'Value');
            end
        end
Step Four: Close and Delete
At the end of the simulation, the Phidget object will need to be closed and deleted. To do this, the following lines can added to mdlTerminate.
    calllib('phidget21', 'CPhidget_close', handle);
    calllib('phidget21', 'CPhidget_delete', handle);
Special Cases: Strings and Real-Time
Strings
It is possible for a user to specify a string of characters in the block parameters dialog box of a user defined function such that it is passed into a user defined function. Please see the PhidgetInterfaceKit_RemoteIP block library in the Simulink examples for details. Simulink cannot display strings in the GUI, however it is possible to write a C S function that displays strings in the MATLAB console.
Working in Real Time
Even though a model may finish simulating before a user has a chance to interact with Phidgets, there are workarounds that can be used to slow down simulation time to allow for user interaction.
One method is to modify the Solver Options (under Simulation->Configuration Parameters->Solver). Changing the step size and stop time may slow down the simulation. Another method is to implement a user defined function that reduces the simulation speed until the system clock matches the Simulink clock.
The Phidget Simulink example uses the “Real Time Block” to simulate the model in approximate real time.
To use the “Real Time Block”, place the following files in your MATLAB working directory: slblocks.m, rtc.mdl, waitforreal.m. These files can be extracted from the root directory and the Real Time directory of the Phidget Simulink example. Open up the Simulink Library Browser and select “Real Time Clock”. Place the Real Time Clock block onto your model.
For applications where accurate real time simuation is needed, xPC Target can be used. Please note that the simulation speed of these methods may differ depending on the CPU speed, complexity of the model, the amount of text being displayed in the MATLAB console, etc....
More How-To's
The General Phidget Programming page gives more information about:
- Using Multiple Phidgets (or a Phidget other than the Interface Kit)
- Catching exceptions and errors and using logging
- Event catching versus direct polling
- And more....
Note, however, that although being familiar with both event and traditional programming can help you identify which functions are which within an API, Simulink only supports traditional logic programming.
Common Problems and Solutions/Workarounds
None at this time.