|
Notice: This page contains information for the legacy Phidget21 Library. Phidget21 is out of support. Bugfixes may be considered on a case by case basis. Phidget21 does not support VINT Phidgets, or new USB Phidgets released after 2020. We maintain a selection of legacy devices for sale that are supported in Phidget21. We recommend that new projects be developed against the Phidget22 Library.
|
Language - LabVIEW: Difference between revisions
No edit summary |
|||
| (44 intermediate revisions by 5 users not shown) | |||
| Line 1: | Line 1: | ||
[[Category:Language]] | [[Category:Language]] | ||
[[File:icon-LabVIEW.png|64x64px|link=|alt= | {{OSLang|[[File:icon-LabVIEW.png|64x64px|link=|alt=]]|LabVIEW, developed by [http://www.ni.com National Instruments] is dataflow programming language for data processing.}} | ||
__TOC__ | __TOC__ | ||
==Introduction== | ==Introduction== | ||
{{LanguageSupport|LabVIEW|the complete Phidget API, including events|all Phidget devices.| Windows. OS X and Linux are unsupported as Phidgets | {{LanguageSupport|LabVIEW|the complete Phidget API, including events|all Phidget devices.| Windows. A minimum version of LabVIEW 2009 is required. OS X and Linux are unsupported as the Labview/Phidgets combination has not been tested on those systems.|}} | ||
Note that with LabVIEW you can install a 32-bit version on a 64-bit computer without any issues, but the 64-bit version cannot obviously be installed on a 32-bit computer. The reason this is relevant is that the respective versions cannot create executables that the other can run. I.E. 64-bit LabVIEW cannot generate a 32-bit executable. The upshot of this is that if you need your executable to be compatible with older machines (such as Windows XP machines) then you will need to use a 32-bit version of LabVIEW to create your program. | |||
==Quick Downloads== | ==Quick Downloads== | ||
{{QuickDownloads| | {{QuickDownloads|LabVIEW| | ||
{{APIQuickDownloads| | {{APIQuickDownloads|{{SERVER}}/documentation/LabVIEW_Manual.pdf PDF}} | ||
{{ExampleQuickDownloads| | {{ExtraAPIQuickDownloads|{{SERVER}}/documentation/web/LabVIEWDoc/index.html|HTML version of}}| | ||
{{ExampleQuickDownloads| | {{ExampleQuickDownloads|{{SERVER}}/downloads/phidget21/libraries/any/LabVIEWx86.zip| (32 bit Windows - same file as LabVIEW library)}} | ||
{{ExampleQuickDownloads|{{SERVER}}/downloads/phidget21/libraries/any/LabVIEWx64.zip| (64 bit Windows - same file as LabVIEW library)}}| | |||
{{ExtraLibraryQuickDownloads|{{SERVER}}/downloads/phidget21/libraries/any/LabVIEWx86.zip|LabVIEW|(32 bit Windows - same file as LabVIEW Examples)}} | |||
{{ExtraLibraryQuickDownloads|{{SERVER}}/downloads/phidget21/libraries/any/LabVIEWx64.zip|LabVIEW|(64 bit Windows - same file as LabVIEW Examples)}} | |||
{{WindowsQuickDownloads}} | {{WindowsQuickDownloads}} | ||
}} | }} | ||
Please note that the x64 examples are only compatible with LabVIEW 9 and newer. | |||
==Getting started with LabVIEW== | ==Getting started with LabVIEW== | ||
| Line 23: | Line 27: | ||
{{ExampleCodeReasons}} | {{ExampleCodeReasons}} | ||
==Windows( | ==Windows (XP/Vista/7/8)== | ||
===Description of Library Files=== | ===Description of Library Files=== | ||
LabVIEW programs on Windows depend on two | LabVIEW programs on Windows depend on the following two items, The installers in the [[#Libraries and Drivers|Quick Downloads]] section put only the {{Code|phidget21.dll}} into your system. You will need to manually put the Phidget LabVIEW library onto your system: | ||
* <b>{{Code|phidget21.dll}}</b> contains the actual Phidget library, which is used at run-time. By default, it is placed in {{Code|C:\Windows\System32}}. | * <b>{{Code|phidget21.dll}}</b> contains the actual Phidget library, which is used at run-time. By default, it is placed in {{Code|C:\Windows\System32}}. | ||
* <b>{{Code|Phidgets LabVIEW library}}</b> contains the Phidget library for LabVIEW. You need to place the library into your LabVIEW functions palette. Instructions are explained in the [[#Write Your Own Code | Write Your Own Code]] section. | |||
If you do not want to use our installer, you can download the [ | If you do not want to use our installer, you can download the [{{SERVER}}/downloads/phidget21/libraries/windows/Phidget-x86.zip {{Code|phidget21.dll}}] and manually install it where you want; refer to our [[OS_-_Windows#Manual_File_Installation | Manual Installation Instructions]]. | ||
We include instructions on [[#Use Our Examples | using our examples]] and [[#Write Your Own Code | writing your own code]]. | We include instructions for LabVIEW 2011 on [[#Use Our Examples | using our examples]] and [[#Write Your Own Code | writing your own code]]. | ||
====Use Our Examples==== | ====Use Our Examples==== | ||
To run the examples, you first download the examples found in the [[#Example Code | Quick | To run the examples, you first download the examples found in the [[#Example Code | Quick Downloads]] section and unpack them into a folder. Here, you will find the {{Code|examples}} folder, which contains {{Code|vi}} programs for all the devices. Each {{Code|vi}} example demonstrate the usage of a few of the device's properties. To get a broader understanding of the device, you should take a look at all the {{Code|vi}} examples inside the directory for your device. {{FindYourDevice}} | ||
1. Inside the {{Code|examples}} folder, navigate to the directory for your device. | 1. Inside the {{Code|examples}} folder, navigate to the directory for your device. | ||
| Line 45: | Line 50: | ||
You will see the front panel of the example. The front panel shows the user interface of the {{code|vi}} program. | You will see the front panel of the example. The front panel shows the user interface of the {{code|vi}} program. | ||
3. Next, let us take a look at the block diagram by navigating to {{Code|Window → Show Block Diagram}}. | |||
[[File:LabVIEW Win Block Diagram 1.PNG|link=|alt=Block Diagram]] | [[File:LabVIEW Win Block Diagram 1.PNG|link=|alt=Block Diagram]] | ||
| Line 53: | Line 58: | ||
[[File:LabVIEW Win Block Diagram 2.PNG|link=|alt=Block Diagram]] | [[File:LabVIEW Win Block Diagram 2.PNG|link=|alt=Block Diagram]] | ||
4. The only thing left to do is to run the examples! Navigate to {{Code|Operate → Run}}. | |||
[[File:LabVIEW Win Run 1.PNG|link=|alt=Run]] | [[File:LabVIEW Win Run 1.PNG|link=|alt=Run]] | ||
5. The application will run. | |||
[[File:LabVIEW Win Run 2.PNG|link=|alt=Run]] | [[File:LabVIEW Win Run 2.PNG|link=|alt=Run]] | ||
You can determine that your device is connected to your application if you see the indicator for {{Code|attached}} turn green and the correct serial number is displayed. These features are available in most of the example {{Code| | You can determine that your device is connected to your application if you see the indicator for {{Code|attached}} turn green and the correct serial number is displayed. These features are available in most of the example {{Code|vis}} we provide. | ||
6. When you are ready to terminate the application, click on the [[File:LabVIEW Win Stop.PNG|link=|alt=Stop]] button to release the hold on the device. Please keep in mind that the application may not terminate properly if you stop it by clicking on {{Code|Operate → Stop}}. | |||
Once you have the LabVIEW examples running, we have a [[#Follow the Examples|teaching]] section below to help you follow them. | Once you have the LabVIEW examples running, we have a [[#Follow the Examples|teaching]] section below to help you follow them. | ||
| Line 71: | Line 76: | ||
When you are building a project from scratch, or adding Phidget function calls to an existing project, you'll need to add the Phidget LabVIEW library to your development environment. To begin: | When you are building a project from scratch, or adding Phidget function calls to an existing project, you'll need to add the Phidget LabVIEW library to your development environment. To begin: | ||
1 | 1. Navigate to {{Code|Tools → Advanced → Edit Palette Set}} to modify the functions palette. | ||
[[File:LabVIEW Win Functions Palette 1.PNG|link=|alt=Edit Function Palette]] | [[File:LabVIEW Win Functions Palette 1.PNG|link=|alt=Edit Function Palette]] | ||
2. The functions palette will show up. Right click an empty area, and select {{Code|Insert → Subpalette}}. | |||
[[File:LabVIEW Win Functions Palette 2.PNG|link=|alt=Insert Function Palette]] | [[File:LabVIEW Win Functions Palette 2.PNG|link=|alt=Insert Function Palette]] | ||
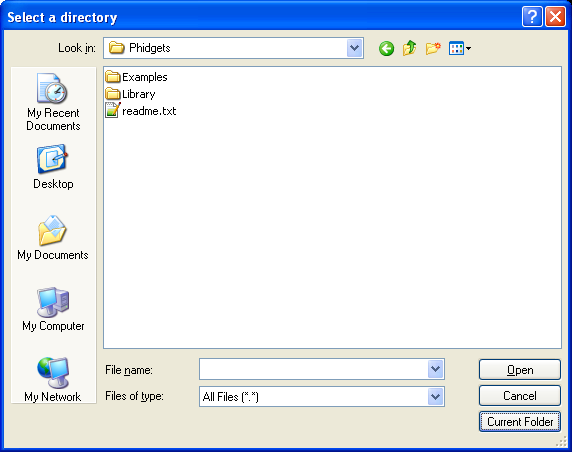
3. Next, select {{Code|Link to a directory}}. | |||
[[File:LabVIEW Win Functions Palette 3.PNG|link=|alt=Link to a library]] | [[File:LabVIEW Win Functions Palette 3.PNG|link=|alt=Link to a library]] | ||
4. Make sure you have the Phidget LabVIEW library and examples in the [[#Libraries and Drivers| Quick Downloads]] section downloaded and extracted. After extracting, you will find the {{Code|Phidgets}} folder. In LabVIEW, browse to the {{Code|Phidgets}} folder, and select {{Code|Current Folder}}. | |||
[[File:LabVIEW Win Functions Palette 4.PNG|link=|alt=Select Phidgets library]] | [[File:LabVIEW Win Functions Palette 4.PNG|link=|alt=Select Phidgets library]] | ||
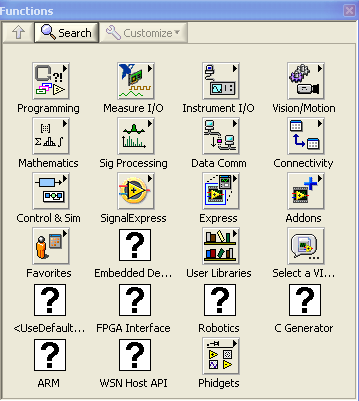
This will load the | This will load the Phidget LabVIEW library into the functions palette. You can find all the functions that pertain to Phidgets inside the {{Code|Phidgets}} palette. | ||
[[File:LabVIEW Win Functions Palette 5.PNG|link=|alt=Phidgets LabVIEW Library]] | [[File:LabVIEW Win Functions Palette 5.PNG|link=|alt=Phidgets LabVIEW Library]] | ||
5. Click on {{Code|Save Changes}} in the {{Code|Edit Controls and Functions Palette Set}} window. | |||
[[File:LabVIEW Win Functions Palette 6.PNG|link=|alt=Save Function Palette]] | [[File:LabVIEW Win Functions Palette 6.PNG|link=|alt=Save Function Palette]] | ||
| Line 103: | Line 106: | ||
==Follow the Examples== | ==Follow the Examples== | ||
By following the instructions for your operating system and compiler above, you probably now have a working example and want to understand it better so you can change it to do what you want. This | By following the instructions for your operating system and compiler above, you probably now have a working example and want to understand it better so you can change it to do what you want. | ||
Since LabVIEW is a graphical language, the best way to get the 'code snippets' you need is to take them from our examples. The best way to find what blocks exist and how to use them is probably to switch between the block diagram view and the GUI view between examples that apply to you. This will allow you to use pieces from our examples to create your own LabVIEW application. | |||
Your main reference for writing LabVIEW code will be our LabVIEW API information, with syntax for all of our functions: | |||
{{UsingAPhidgetInCodeGeneral|both of which are available in | {{UsingAPhidgetInCodeGeneral|both of which are available in LabVIEW|[{{SERVER}}/documentation/LabVIEW_Manual.pdf API Manual]}} | ||
If you are really getting in to using Phidgets, you probably want our more general programming resources as well. Although these are focused on the text-based languages that we support (C++, Java, etc), the concepts remain the same on how Phidgets are used within code. Our [[General Phidget Programming]] page gives more information about: | |||
* [[General Phidget Programming#Using Multiple Phidgets|Using Multiple Phidgets]] (or a Phidget [[General Phidget Programming#Creating a Software Object|other than the Interface Kit]]) | |||
* Catching [[General Phidget Programming#Exceptions and Errors|exceptions and errors]] and [[General Phidget Programming#Logging|using logging]] | |||
* [[General Phidget Programming#Event Driven Code|Event catching]] versus [[General Phidget Programming#Logic Code|direct polling]] | |||
* And more.... | |||
Of course, most of these concepts are covered using block flow within LabVIEW, but knowing the general order of operations can help you structure your code. | |||
==LabVIEW Error Codes== | |||
LabVIEW uses a number of Phidget specific error codes which are not always well described when they pop up. If you are debugging your application and are running into one that you cannot figure out you can get more information from the [[General Phidget Programming#Error Codes|Phidget Error Codes list]] under "Software Errors". The LabVIEW error codes are just the Phidget error codes + 7000. | |||
| | |||
==Common Problems and Solutions/Workarounds== | ==Common Problems and Solutions/Workarounds== | ||
===Issue: Events can occasionally cause issues, especially when there are multiple of the same type of event=== | |||
In other words, if you open 2 Interface Kits and have a sensor change event for each one your system can behave unpredictably. This problem is a quirk in the way that LabVIEW handles passing pointers to C. There are a few solutions to this issue, either: | |||
*Stop using events and simply poll the device. Events work similarly to polling in LabVIEW anyway and should not cause substantial performance changes to your application. | |||
*Implement a simple fix to the events which are causing the problem. The pointer is identical in the case where two events of the same type are passed from a single function. This causes the events in C to output to the same event in LabVIEW. To get around this you would need to copy the offending subVI, then change the name of the cluster object in it from "Event" to something else (your choice), change the name of the .vi to something else and then use those two different subVIs in your program. You would need to repeat this for each subsequent event of the same type you wish to have. | |||
Either solution will work and while the first is a bit cleaner the second will work just as well. | |||
===Issue: I cannot attach to an object any more after running my program once=== | |||
What this means is you probably halted the VI instead of using the stop button. Halting operation will not release the Phidget device properly and will consequently make it unusable until LabVIEW has been exited and restarted. In order to prevent this from happening you should always use the stop button instead of simply halting operation. That way the close subVI gets called and the Phidget will be released. | |||
Latest revision as of 20:20, 6 June 2017
| LabVIEW, developed by National Instruments is dataflow programming language for data processing. |
Introduction
If this is your first time working with a Phidget, we suggest starting with the Getting Started page for your specific device. This can be found in the user guide for your device. That page will walk you through installing drivers and libraries for your operating system, and will then bring you back here to use LabVIEW specifically.
LabVIEW is capable of using the complete Phidget API, including events. We also provide example code in LabVIEW for all Phidget devices.
LabVIEW can be developed with Windows. A minimum version of LabVIEW 2009 is required. OS X and Linux are unsupported as the Labview/Phidgets combination has not been tested on those systems..
You can compare LabVIEW with our other supported languages.
Note that with LabVIEW you can install a 32-bit version on a 64-bit computer without any issues, but the 64-bit version cannot obviously be installed on a 32-bit computer. The reason this is relevant is that the respective versions cannot create executables that the other can run. I.E. 64-bit LabVIEW cannot generate a 32-bit executable. The upshot of this is that if you need your executable to be compatible with older machines (such as Windows XP machines) then you will need to use a 32-bit version of LabVIEW to create your program.
Quick Downloads
Just need the LabVIEW documentation, drivers, libraries, and examples? Here they are:
Documentation
Example Code
- Example Code (32 bit Windows - same file as LabVIEW library)
- Example Code (64 bit Windows - same file as LabVIEW library)
Libraries and Drivers
- LabVIEW Libraries (32 bit Windows - same file as LabVIEW Examples)
- LabVIEW Libraries (64 bit Windows - same file as LabVIEW Examples)
- 32-bit Windows Drivers Installer
- 64-bit Windows Drivers Installer
- Windows Driver and Library Files (Zipped)
Please note that the x64 examples are only compatible with LabVIEW 9 and newer.
Getting started with LabVIEW
If you are new to writing code for Phidgets, we recommend starting by running, then modifying existing examples. This will allow you to:
- Make sure your libraries are properly linked
- Go from source code to a test application as quickly as possible
- Ensure your Phidget is hooked up properly
Windows (XP/Vista/7/8)
Description of Library Files
LabVIEW programs on Windows depend on the following two items, The installers in the Quick Downloads section put only the phidget21.dll into your system. You will need to manually put the Phidget LabVIEW library onto your system:
phidget21.dllcontains the actual Phidget library, which is used at run-time. By default, it is placed inC:\Windows\System32.Phidgets LabVIEW librarycontains the Phidget library for LabVIEW. You need to place the library into your LabVIEW functions palette. Instructions are explained in the Write Your Own Code section.
If you do not want to use our installer, you can download the phidget21.dll and manually install it where you want; refer to our Manual Installation Instructions.
We include instructions for LabVIEW 2011 on using our examples and writing your own code.
Use Our Examples
To run the examples, you first download the examples found in the Quick Downloads section and unpack them into a folder. Here, you will find the examples folder, which contains vi programs for all the devices. Each vi example demonstrate the usage of a few of the device's properties. To get a broader understanding of the device, you should take a look at all the vi examples inside the directory for your device. The source file will be named the same as the software object for your device. If you are not sure what the software object for your device is, find your Phidget on our webpage, and then check the API documentation for it.
1. Inside the examples folder, navigate to the directory for your device.
2. Open up any .vi of your choice in LabVIEW. In this section, the Sensor to Output Example.vi of the PhidgetInterfaceKit examples will be used.
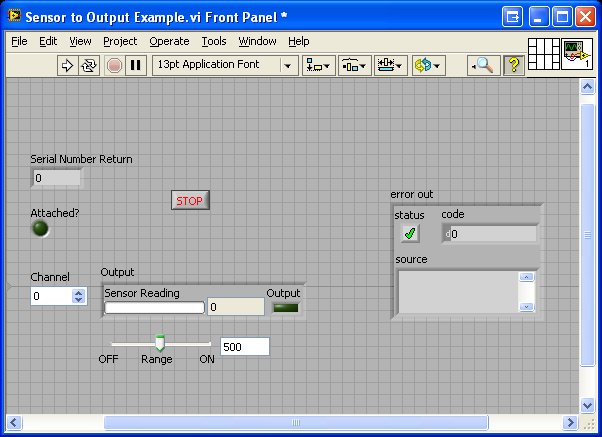
You will see the front panel of the example. The front panel shows the user interface of the vi program.
3. Next, let us take a look at the block diagram by navigating to Window → Show Block Diagram.
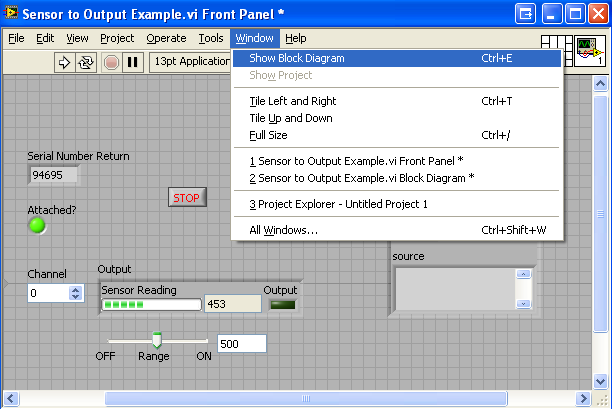
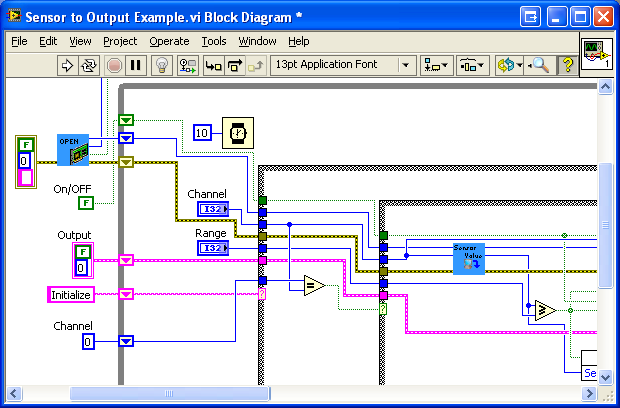
The block diagram shows the logic of the application.
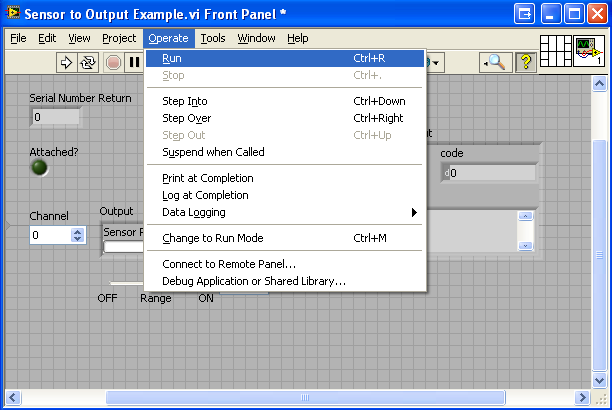
4. The only thing left to do is to run the examples! Navigate to Operate → Run.
5. The application will run.
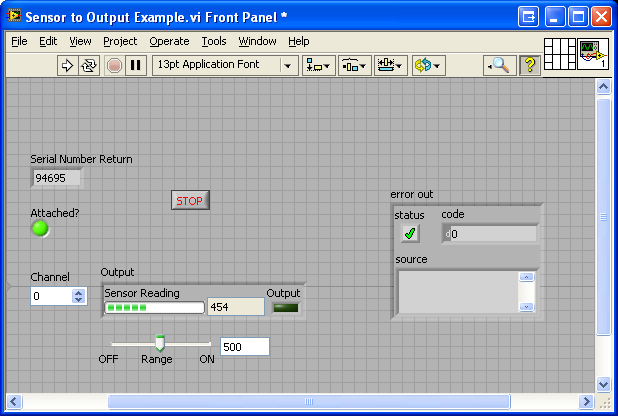
You can determine that your device is connected to your application if you see the indicator for attached turn green and the correct serial number is displayed. These features are available in most of the example vis we provide.
6. When you are ready to terminate the application, click on the ![]() button to release the hold on the device. Please keep in mind that the application may not terminate properly if you stop it by clicking on
button to release the hold on the device. Please keep in mind that the application may not terminate properly if you stop it by clicking on Operate → Stop.
Once you have the LabVIEW examples running, we have a teaching section below to help you follow them.
Write Your Own Code
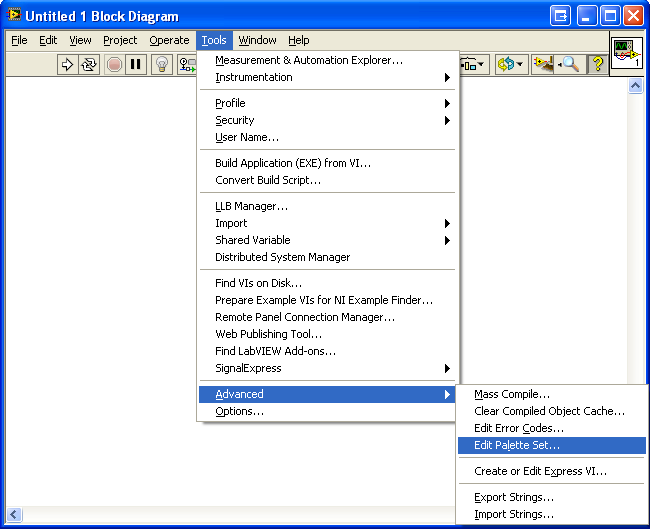
When you are building a project from scratch, or adding Phidget function calls to an existing project, you'll need to add the Phidget LabVIEW library to your development environment. To begin:
1. Navigate to Tools → Advanced → Edit Palette Set to modify the functions palette.
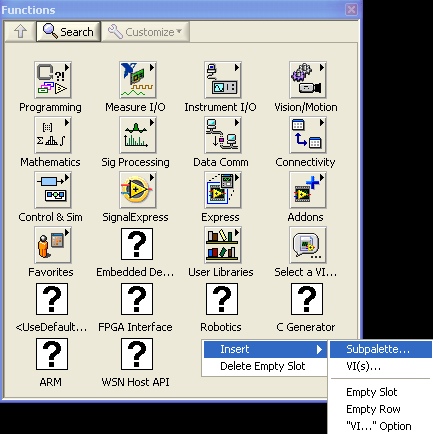
2. The functions palette will show up. Right click an empty area, and select Insert → Subpalette.
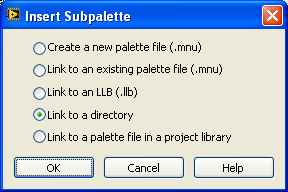
3. Next, select Link to a directory.
4. Make sure you have the Phidget LabVIEW library and examples in the Quick Downloads section downloaded and extracted. After extracting, you will find the Phidgets folder. In LabVIEW, browse to the Phidgets folder, and select Current Folder.
This will load the Phidget LabVIEW library into the functions palette. You can find all the functions that pertain to Phidgets inside the Phidgets palette.
5. Click on Save Changes in the Edit Controls and Functions Palette Set window.

The project now has access to the Phidget function calls and you are ready to begin coding.
The same teaching section which describes the examples also has further resources for programming your Phidget.
Follow the Examples
By following the instructions for your operating system and compiler above, you probably now have a working example and want to understand it better so you can change it to do what you want.
Since LabVIEW is a graphical language, the best way to get the 'code snippets' you need is to take them from our examples. The best way to find what blocks exist and how to use them is probably to switch between the block diagram view and the GUI view between examples that apply to you. This will allow you to use pieces from our examples to create your own LabVIEW application.
Your main reference for writing LabVIEW code will be our LabVIEW API information, with syntax for all of our functions:
- API Manual (This is the complete set of functions you have available for all Phidgets)
- Device Specific APIs - The one for your Phidget can be found in its user guide.
To learn the details behind opening, configuring, using, and closing your Phidget, try the General Phidget Programming page. That page also describes using the Phidget in an event-driven manner and in a traditional manner, both of which are available in LabVIEW.
If you are really getting in to using Phidgets, you probably want our more general programming resources as well. Although these are focused on the text-based languages that we support (C++, Java, etc), the concepts remain the same on how Phidgets are used within code. Our General Phidget Programming page gives more information about:
- Using Multiple Phidgets (or a Phidget other than the Interface Kit)
- Catching exceptions and errors and using logging
- Event catching versus direct polling
- And more....
Of course, most of these concepts are covered using block flow within LabVIEW, but knowing the general order of operations can help you structure your code.
LabVIEW Error Codes
LabVIEW uses a number of Phidget specific error codes which are not always well described when they pop up. If you are debugging your application and are running into one that you cannot figure out you can get more information from the Phidget Error Codes list under "Software Errors". The LabVIEW error codes are just the Phidget error codes + 7000.
Common Problems and Solutions/Workarounds
Issue: Events can occasionally cause issues, especially when there are multiple of the same type of event
In other words, if you open 2 Interface Kits and have a sensor change event for each one your system can behave unpredictably. This problem is a quirk in the way that LabVIEW handles passing pointers to C. There are a few solutions to this issue, either:
- Stop using events and simply poll the device. Events work similarly to polling in LabVIEW anyway and should not cause substantial performance changes to your application.
- Implement a simple fix to the events which are causing the problem. The pointer is identical in the case where two events of the same type are passed from a single function. This causes the events in C to output to the same event in LabVIEW. To get around this you would need to copy the offending subVI, then change the name of the cluster object in it from "Event" to something else (your choice), change the name of the .vi to something else and then use those two different subVIs in your program. You would need to repeat this for each subsequent event of the same type you wish to have.
Either solution will work and while the first is a bit cleaner the second will work just as well.
Issue: I cannot attach to an object any more after running my program once
What this means is you probably halted the VI instead of using the stop button. Halting operation will not release the Phidget device properly and will consequently make it unusable until LabVIEW has been exited and restarted. In order to prevent this from happening you should always use the stop button instead of simply halting operation. That way the close subVI gets called and the Phidget will be released.