Phidget Programming Basics: Difference between revisions
No edit summary |
No edit summary |
||
| Line 8: | Line 8: | ||
To use a Phidget, you'll want to: | To use a Phidget, you'll want to: | ||
# '''[[#Creating a Software | # '''[[#Creating a Software Channel|Create]]''' an instance of the channel class that provides access to the device you want to control. | ||
# '''[[#Opening the Phidget|Open]]''' the channel. | # '''[[#Opening the Phidget|Open]]''' the channel. | ||
# Detect when the channel is '''[[#Attaching the Channel|attached]]'''. | # Detect when the channel is '''[[#Attaching the Channel|attached]]'''. | ||
| Line 26: | Line 26: | ||
<syntaxhighlight lang=java> | <syntaxhighlight lang=java> | ||
// Create a new Accelerometer | // Create a new Accelerometer channel | ||
Accelerometer accel = new Accelerometer(); | Accelerometer accel = new Accelerometer(); | ||
</syntaxhighlight> | </syntaxhighlight> | ||
<syntaxhighlight lang=java> | <syntaxhighlight lang=java> | ||
// Create a new RFID | // Create a new RFID channel | ||
RFID rfid = new RFID(); | RFID rfid = new RFID(); | ||
</syntaxhighlight> | </syntaxhighlight> | ||
| Line 37: | Line 37: | ||
<syntaxhighlight lang=c> | <syntaxhighlight lang=c> | ||
// Create a new Accelerometer | // Create a new Accelerometer channel | ||
PhidgetAccelerometerHandle accel; | PhidgetAccelerometerHandle accel; | ||
PhidgetAccelerometer_create(&accel); | PhidgetAccelerometer_create(&accel); | ||
</syntaxhighlight> | </syntaxhighlight> | ||
<syntaxhighlight lang=c> | <syntaxhighlight lang=c> | ||
// Create a new RFID | // Create a new RFID channel | ||
PhidgetRFIDHandle rfid; | PhidgetRFIDHandle rfid; | ||
PhidgetRFID_create(&rfid); | PhidgetRFID_create(&rfid); | ||
| Line 51: | Line 51: | ||
== Opening the Channel == | == Opening the Channel == | ||
After you have created a [[#Creating a Software | After you have created a [[#Creating a Software Channel| channel instance]], you can call the <code>open()</code> method to begin the process of matching the channel to a Phidget device channel. | ||
For example, with the <code>Accelerometer</code> channel in Java: | For example, with the <code>Accelerometer</code> channel in Java: | ||
| Line 179: | Line 179: | ||
<syntaxhighlight lang=java> | <syntaxhighlight lang=java> | ||
//create a Phidget accelerometer | //create a Phidget accelerometer channel: | ||
Accelerometer accel = new Accelerometer(); | Accelerometer accel = new Accelerometer(); | ||
accel.addAttachListener((AttachEvent ae) -> { | accel.addAttachListener((AttachEvent ae) -> { | ||
| Line 198: | Line 198: | ||
int main() { | int main() { | ||
// .....Then, in the main code create the | // .....Then, in the main code create the channel and set the attach handler: | ||
PhidgetAccelerometerHandle accel; | PhidgetAccelerometerHandle accel; | ||
PhidgetAccelerometer_create(&accel); | PhidgetAccelerometer_create(&accel); | ||
| Line 222: | Line 222: | ||
<syntaxhighlight lang=java> | <syntaxhighlight lang=java> | ||
// After creating and opening a VoltageInput | // After creating and opening a VoltageInput channel called "sensorIn": | ||
sensorIn.addVoltageChangeListener((VoltageInputVoltageChangeEvent de) -> { | sensorIn.addVoltageChangeListener((VoltageInputVoltageChangeEvent de) -> { | ||
System.out.println("Voltage: " + de.getVoltage()); | System.out.println("Voltage: " + de.getVoltage()); | ||
| Line 236: | Line 236: | ||
// .....Then, in the main code: | // .....Then, in the main code: | ||
// After creating and opening a VoltageInput | // After creating and opening a VoltageInput channel called "sensorIn": | ||
PhidgetVoltageInput_setOnVoltageChangeHandler(sensorIn, onVoltageChangeHandler, NULL); | PhidgetVoltageInput_setOnVoltageChangeHandler(sensorIn, onVoltageChangeHandler, NULL); | ||
</syntaxhighlight> | </syntaxhighlight> | ||
| Line 257: | Line 257: | ||
===Sensors, Input, and Output=== | ===Sensors, Input, and Output=== | ||
Often, your Phidget will be something like an [{{SERVER}}/products.php?product_id=1018 1018 Phidget Interface Kit] which has voltage inputs (black plug holes), digital inputs and outputs (green screw attachments). You can learn about the | Often, your Phidget will be something like an [{{SERVER}}/products.php?product_id=1018 1018 Phidget Interface Kit] which has voltage inputs (black plug holes), digital inputs and outputs (green screw attachments). You can learn about the channel classes your Phidget uses and how to attach to them by visiting its product page and the {{Phidget22API}}. For InterfaceKits like the 1018: | ||
* To the voltage inputs, you can attach various sensors, including sensors for temperature, humidity, light, sound, and so on. | * To the voltage inputs, you can attach various sensors, including sensors for temperature, humidity, light, sound, and so on. | ||
| Line 263: | Line 263: | ||
* To the digital outputs, you can attach simple indicators like LEDs, buzzers, or relays. | * To the digital outputs, you can attach simple indicators like LEDs, buzzers, or relays. | ||
You use all of these things in software entirely through the | You use all of these things in software entirely through the channel class that each one belongs to. For example, to turn off an LED connected to output 1 on on an RFID tag reader, you'll want to set the output at location 1 to "0" (or false). In C, this would be: | ||
<syntaxhighlight lang=cpp> | <syntaxhighlight lang=cpp> | ||
// Create the DigitalOutput | // Create the DigitalOutput channel: | ||
PhidgetDigitalOutput led_out | PhidgetDigitalOutput led_out; | ||
PhidgetDigitalOutput_create(&led_out); | PhidgetDigitalOutput_create(&led_out); | ||
Phidget_setChannel((PhidgetHandle)led_out,1); | Phidget_setChannel((PhidgetHandle)led_out, 1); | ||
// Open and handle the attachment of the DigitalOutput | // Open and handle the attachment of the DigitalOutput handle | ||
.... | .... | ||
| Line 280: | Line 280: | ||
<syntaxhighlight lang=java> | <syntaxhighlight lang=java> | ||
// Create the DigitalOutput software | // Create the DigitalOutput software handle | ||
DigitalOutput | DigitalOutput ledOut = new DigitalOutput(); | ||
ledOut.setChannel(1); | |||
// Open and handle the attachment of the digital output | // Open and handle the attachment of the digital output handle | ||
.... | .... | ||
// Then, turn the LED off, passing first the output number, then the new state: | // Then, turn the LED off, passing first the output number, then the new state: | ||
ledOut.setState(0); | |||
</syntaxhighlight> | </syntaxhighlight> | ||
| Line 293: | Line 293: | ||
Getting sensor data from a voltage input is a little more complicated because: | Getting sensor data from a voltage input is a little more complicated because: | ||
* You must declare the sensor as one of two types ('''ratiometric''' or '''non-ratiometric'''). If it is ratiometric, use the VoltageRatioInput | * You must declare the sensor as one of two types ('''ratiometric''' or '''non-ratiometric'''). If it is ratiometric, use the VoltageRatioInput class to open the device channel. If it is non-ratiometric, use the VoltageInput class instead. To find out which your sensor is, read the product information for your specific sensor on our [{{SERVER}} main web site]. | ||
* You must translate the 0-5V reading that you get from the input into the proper units you need (temperature, luminosity, decibels, etc.) | * You must translate the 0-5V reading that you get from the input into the proper units you need (temperature, luminosity, decibels, etc.) | ||
If the sensor comes from Phidgets, you can use the <code>setSensorType</code> method in order to have the conversion done for you. | If the sensor comes from Phidgets, you can use the <code>setSensorType</code> method in order to have the conversion done for you. | ||
| Line 299: | Line 299: | ||
For example, to obtain the lux from the [{{SERVER}}/products.php?product_id=1127 - PrecisionLightSensor], a '''non-ratiometric''' sensor plugged into voltage input 5, you would do this in C: | For example, to obtain the lux from the [{{SERVER}}/products.php?product_id=1127 - PrecisionLightSensor], a '''non-ratiometric''' sensor plugged into voltage input 5, you would do this in C: | ||
<syntaxhighlight lang= | <syntaxhighlight lang=c> | ||
// Use the VoltageInput | // Use the VoltageInput class because the 1127 is non-ratiometric | ||
PhidgetVoltageInputHandle voltageInput; | PhidgetVoltageInputHandle voltageInput; | ||
PhidgetVoltageInput_create(&voltageInput) | PhidgetVoltageInput_create(&voltageInput) | ||
| Line 321: | Line 321: | ||
<syntaxhighlight lang=java> | <syntaxhighlight lang=java> | ||
// Use the VoltageInput | // Use the VoltageInput class because the 1127 is non-ratiometric | ||
VoltageInput voltageInput = new VoltageInput(); | VoltageInput voltageInput = new VoltageInput(); | ||
| Line 339: | Line 339: | ||
The things you can do with your particular Phidget are many and varied, so we only include general concepts on this page. | The things you can do with your particular Phidget are many and varied, so we only include general concepts on this page. | ||
You can view the complete list of functions for your device in the {{Phidget22API}}. Select your device at the top of the screen, select your preferred programming language, and then select which | You can view the complete list of functions for your device in the {{Phidget22API}}. Select your device at the top of the screen, select your preferred programming language, and then select which channel class you want to view the documentation for. | ||
The API documentation is broken up into sections. The first section is a list of methods (or if you're using an object-oriented language, properties), after that there'll be a list of events and event handlers. After that, there may be sections for enumerations (which are like names that let you select options for certain functions, like SensorType in the earlier example), error events, or structs, depending on the language. | The API documentation is broken up into sections. The first section is a list of methods (or if you're using an object-oriented language, properties), after that there'll be a list of events and event handlers. After that, there may be sections for enumerations (which are like names that let you select options for certain functions, like SensorType in the earlier example), error events, or structs, depending on the language. | ||
Revision as of 20:15, 27 June 2017
Please refer to What is a Phidget? for an introduction to the concept of Phidgets.
The Phidget software library matches a Phidget device channel with a software channel that is created by a user. Software channels are each of a class, where that class defines a set of methods, properties, events and errors. Phidget devices are aware of the channel classes, and expose access to features of the device through the class interface.
To use a Phidget, you'll want to:
- Create an instance of the channel class that provides access to the device you want to control.
- Open the channel.
- Detect when the channel is attached.
- Use methods and properties of the attached channel.
- Close the channel.
Small code snippets are provided for each step in the sections below. Java and C were selected because Java is a high-level language and C is low level language. The best reference to the features each channel class is the Phidget22 API for your specific language. This page is intended to be a high-level introduction.
Creating a Channel
A Phidget device exposes one or more device channels where each channel is an interface to a feature of the hardware. A channel class defines an interface to control and query a channel of the Phidget device. For example, a 1018 - Phidget InterfaceKit device includes support
for digital input and digital out, and therefore exports DigitalInput and DigitalOutput channels.
Phidget devices are controlled by creating an instance of a Phidget channel class. Each channel class has a function that allows you to create an instance, and a function to later delete the instance.
For example, in Java:
 // Create a new Accelerometer channel
 Accelerometer accel = new Accelerometer();
 // Create a new RFID channel
 RFID rfid = new RFID();
Or in C:
 // Create a new Accelerometer channel
 PhidgetAccelerometerHandle accel;
 PhidgetAccelerometer_create(&accel);
 // Create a new RFID channel
 PhidgetRFIDHandle rfid;
 PhidgetRFID_create(&rfid);
A channel class will have properties and methods specific to the feature they belong to. For example, the VoltageInput class has a Voltage property that lets you access the current voltage measured by the device, the Accelerometer class has properties to set the sensitivity on each axis and the RFID has a method that writes to a writable RFID tag.
Opening the Channel
After you have created a channel instance, you can call the open() method to begin the process of matching the channel to a Phidget device channel.
For example, with the Accelerometer channel in Java:
accel.open();
Or in C:
Phidget_open((PhidgetHandle) accel);
To see how to use open() in other languages, please refer to the Phidget22 API.
The open() function begins the process of matching the channel handle you created to a channel of a Phidget device, and does not actually open the Phidget itself. An open channel may match a new Phidget device when it is plugged in if that channel has not already found a Phidget device channel that met its criteria.
Details for Open()
Because open() simply enables the process of matching a channel to a Phidget device channel, open() returns immediately and does not wait for the channel to attach to a Phidget device channel. The channel changes state to open, but is not necessarily attached. Until the channel actually becomes attached to a Phidget device channel, most of the channel class interface will not be available.
As long as the channel is open (and not attached), the system will continue to try to match it with a
Phidget device channel that has not already been matched with a channel. The channel can only be matched once, and the Phidget device channel can only be matched once. For example, if you connected a single Phidget Accelerometer to a computer, and you created and opened two Accelerometer channels, only one of the channels would attach while the other would remain open but not attached. If the attached channel were to be closed, the other channel would then attach to the Accelerometer.
When the channels is matched with a Phidget device channel, the channel state is changed to attached and an event is fired.
Note: Once a Phidget device channel is matched to a channel, it will not be available to match another channel until the first channel is closed. The one exception is if the Phidget device channel is attached over the network through the Phidget Network Server. In that case, multiple channels are allowed to match and attach to the Phidget device channel. Some Phidgets, such as motor controllers will never match more than one channel at a time.
Channel Matching
open() can be used without specifying any matching properties. In this case the system will match a channel with the first Phidget device channel that matches the channel class. The channel class itself is an implied matching parameter.
If there is more than one Phidget connected to the computer that supports the channel class, the DeviceSerialNumber property must be set determine which Phidget will match.
If the Phidget connected to the computer has more than one channel of the same classes, the Channel property must be set to determine which Phidget device channel will match.
If the Phidget Network Server is enabled on the computer, the IsRemote and IsLocal properties can be used to determine if the channel will match the Phidget device channel or the network channel.
Please refer to the Phidget22 API, and Best Practices for more information on matching channels to Phidget device channels.
Opening a Channel on a USB Phidget
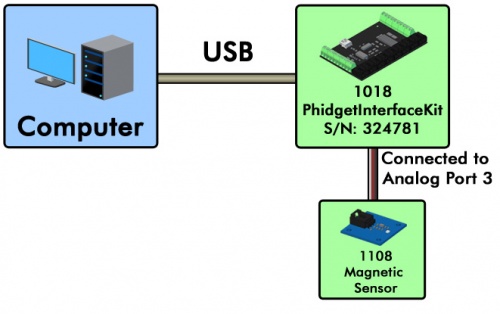
In this example, a 1018 PhidgetInterfaceKit 8/8/8 is connected to a computer. A 1108 Magnetic Sensor is connected to analog port 3 on the 1018. Here's how you would open the channel for the magnetic sensor in Java:
VoltageRatioInput ch = new VoltageRatioInput();
ch.setDeviceSerialNumber(324781);
ch.setChannel(3);
ch.open();
If you wanted to open digital input 5 in the same example, it would look like this:
DigitalInput ch = new DigitalInput();
ch.setDeviceSerialNumber(324781);
ch.setChannel(5);
ch.open();
Opening a VINT Hub Port as a Channel
The ports on a VINT Hub can be opened as Digital Inputs, Digital Outputs, Voltage Inputs, or Voltage Ratio Inputs. Suppose you had a HUB0000 VINT Hub with a 1133 Sound Sensor connected to its sixth port.
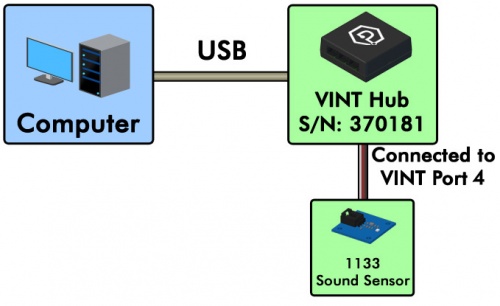
Here's how you would open it in Java:
VoltageInput ch = new VoltageInput();
ch.setDeviceSerialNumber(370181);
ch.setIsHubPortDevice(true);
ch.setHubPort(6);
ch.open();
Opening a Channel on a VINT Device
In this example, we have a TMP1101 4x Thermocouple Phidget and a HUB0000 VINT Hub.
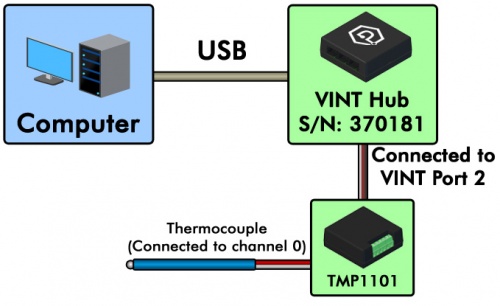
If we wanted to open both the thermocouple connected to port 0 and the integrated temperature sensor on the board, we first need to figure out which channels those are. Go to the product page for the TMP1101 and click on the API tab. From the table at the top of the tab, we can see that the integrated temperature sensor is TemperatureSensor channel 4. In Java, opening these channels would look like this:
TemperatureSensor tc = new TemperatureSensor(); // Handle for the thermocouple
TemperatureSensor ic = new TemperatureSensor(); // Handle for the integrated temperature chip

tc.setDeviceSerialNumber();
ic.setDeviceSerialNumber();
tc.setHubPort(2);
ic.setHubPort(2);
tc.setChannel(0);
ic.setChannel(4);

tc.open();
ic.open();
Opening a Channel on a Remote Phidget
Suppose you wanted to open a locally connected Phidget remotely over the Network Service, so that you could have multiple programs connecting to it at the same time. In this example, we have a 1024 PhidgetRFID connected to a computer that has the Phidget Network Server enabled.
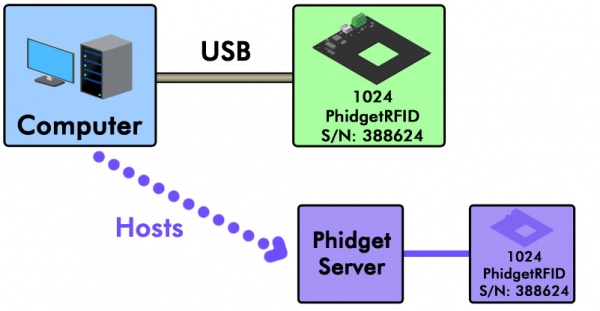
You could open the RFID reader channel remotely with the following code in Java:
RFID ch = new RFID();
ch.setDeviceSerialNumber(388624);
ch.setIsRemote(true);
ch.open();
Attaching the Channel
When a channel is open (and not attached), the system will continue to try to match it with a Phidget device channel until either a match is found, or the channel is closed. When the channels is matched with a Phidget device channel, the channel state is changed to attached and an event is fired.
An event handler can be registered to catch the attach event through the channel's Attach event. Each channel also has a Attached property that can be read to determine if the class has
been matched to a Phidget device channel.
To set an event handler to detect the attach in Java:
  //create a Phidget accelerometer channel:
  Accelerometer accel = new Accelerometer();
  accel.addAttachListener((AttachEvent ae) -> {
      Accelerometer accel = (Accelerometer) ae.getSource();
      // Do things after attachment (i.e. read data, control the device)
      }
  });
Or in C:
  // Define the attach handler function
  void CCONV onAttachedEventHandler(PhidgetHandle channel, void *userPtr) {
      printf("A channel has been attached\n");
      // Do things after attachment (i.e. read data, control the device)
  }

  int main() {
    // .....Then, in the main code create the channel and set the attach handler:
    PhidgetAccelerometerHandle accel;
    PhidgetAccelerometer_create(&accel);
    Phidget_setOnAttachHandler((PhidgetHandle)accel, OnAttachedEventHandler, NULL);

    // other stuff in main
  }
You should set the attach event handler before you open() the channel; otherwise, you may miss attach event if it occurs between opening the channel and setting the handler.
Do Things with the Phidget
After a channel has been opened and attached, software can control the Phidget device via the channel class interface.
The examples below are for a.
Like setting an event handler that executes when the channels is attached, event handlers can be set for many Phidget devices when a state change occurs, or sensor data is received.
For example, for a Voltage Input channel like the ones supported by the 1018 Phidget Interface Kit you can set an event handler that gets called at a defined interval.
In Java, this would look like:
  // After creating and opening a VoltageInput channel called "sensorIn":
  sensorIn.addVoltageChangeListener((VoltageInputVoltageChangeEvent de) -> {
            System.out.println("Voltage: " + de.getVoltage());
  });
Or in C:
  void CCONV onVoltageChangeHandler(PhidgetVoltageInputHandle voltageInput, void *userPtr, double voltage) {
	printf("\nVoltage: %lf V\n", voltage);
  }

  // .....Then, in the main code:
  // After creating and opening a VoltageInput channel called "sensorIn":
  PhidgetVoltageInput_setOnVoltageChangeHandler(sensorIn, onVoltageChangeHandler, NULL);
The voltage value delivered in the above snippets could also be accessed via the Voltage property of the channel. Properties that have related events are automatically updated each time the event is received by the channel, and calls between events always return the value set by the last event.
    double val = sensorIn.getVoltage();
}
Or, in C:
    double val;
    PhidgetVoltageInput_getVoltage(sensorIn, &val);
  }
Sensors, Input, and Output
Often, your Phidget will be something like an 1018 Phidget Interface Kit which has voltage inputs (black plug holes), digital inputs and outputs (green screw attachments). You can learn about the channel classes your Phidget uses and how to attach to them by visiting its product page and the Phidget22 API. For InterfaceKits like the 1018:
- To the voltage inputs, you can attach various sensors, including sensors for temperature, humidity, light, sound, and so on.
- To the digital inputs, you can attach various input devices, including switches.
- To the digital outputs, you can attach simple indicators like LEDs, buzzers, or relays.
You use all of these things in software entirely through the channel class that each one belongs to. For example, to turn off an LED connected to output 1 on on an RFID tag reader, you'll want to set the output at location 1 to "0" (or false). In C, this would be:
  // Create the DigitalOutput channel:
  PhidgetDigitalOutput led_out;
  PhidgetDigitalOutput_create(&led_out);
  Phidget_setChannel((PhidgetHandle)led_out, 1);
  // Open and handle the attachment of the DigitalOutput handle
  ....

  // Then, turn the LED off, passing first the digitalOutput handle, then the new state:
  PhidgetDigitalOutput_setState(led_out, 0);
Or in Java, this would be:
  // Create the DigitalOutput software handle
  DigitalOutput ledOut = new DigitalOutput();
  ledOut.setChannel(1);
  // Open and handle the attachment of the digital output handle
  ....

  // Then, turn the LED off, passing first the output number, then the new state:
  ledOut.setState(0);
Getting a digital input would follow a similar pattern, except you would use the getState function and store the result in a variable instead of passing the function a new output state.
Getting sensor data from a voltage input is a little more complicated because:
- You must declare the sensor as one of two types (ratiometric or non-ratiometric). If it is ratiometric, use the VoltageRatioInput class to open the device channel. If it is non-ratiometric, use the VoltageInput class instead. To find out which your sensor is, read the product information for your specific sensor on our main web site.
- You must translate the 0-5V reading that you get from the input into the proper units you need (temperature, luminosity, decibels, etc.)
If the sensor comes from Phidgets, you can use the setSensorType method in order to have the conversion done for you.
For example, to obtain the lux from the - PrecisionLightSensor, a non-ratiometric sensor plugged into voltage input 5, you would do this in C:
 // Use the VoltageInput class because the 1127 is non-ratiometric
 PhidgetVoltageInputHandle voltageInput;
 PhidgetVoltageInput_create(&voltageInput)

 // Set the input channel to 5 and open
 Phidget_setChannel(voltageInput, 5);
 Phidget_open(voltageInput);

 // Set the sensor type. For a complete list of Phidgets sensors, see the Sensor Type enum in the API documentation.
 PhidgetVoltageInput_setSensorType(voltageInput, SENSOR_TYPE_1127);

 // Get the sensor value; since the library knows it's an 1127, it will automatically convert from volts to lux.
 int lightLevel;
 PhidgetVoltageInput_getSensorValue(voltageInput, &lightLevel);
Or in Java:
  // Use the VoltageInput class because the 1127 is non-ratiometric
  VoltageInput voltageInput = new VoltageInput();

  // Set the input channel to 5 and open
  voltageInput.setChannel(5);
  voltageInput.open();

  // Set the sensor type. For a complete list of Phidgets sensors, see the Sensor Type enum in the API documentation.
  voltageInput.setSensorType(SENSOR_TYPE_1127);

  // Get the sensor value; since the library knows it's an 1127, it will automatically convert from volts to lux.
  int lightLevel = voltageInput.SensorValue();
Learning Everything You Can Do
The things you can do with your particular Phidget are many and varied, so we only include general concepts on this page.
You can view the complete list of functions for your device in the Phidget22 API. Select your device at the top of the screen, select your preferred programming language, and then select which channel class you want to view the documentation for.
The API documentation is broken up into sections. The first section is a list of methods (or if you're using an object-oriented language, properties), after that there'll be a list of events and event handlers. After that, there may be sections for enumerations (which are like names that let you select options for certain functions, like SensorType in the earlier example), error events, or structs, depending on the language.
Close the Phidget
When you are finished with a channel, you should close and (in some languages) delete it. Once closed, the Phidget device channel the channel was matched to will be released and made available for another channel to match.
For example, in Java:
  device.close();
  device = null;
Or, in C:
 Phidget_close((PhidgetHandle)channel);
 Phidget_release((PhidgetHandle)&channel); // will NULL the pointer
Further Reading
Data Interval/Change Trigger - Learn about these two properties that control how much data comes in from your sensors.
Using Multiple Phidgets - How to know you are attaching to the Phidget you want.
Polling vs. Events - Your program can gather data in either a polling-driven or event-driven manner. Learn the difference to determine which is best for your application.
Logging, Exceptions, and Errors - Learn about all the tools you can use to debug your program.
Phidget Network Server - Phidgets can be controlled and communicated with over your network- either wirelessly or over ethernet.
Best Phidgets Practices - Good programming habits that will save you from common problems when writing code for your Phidgets.