PRX2300 User Guide: Difference between revisions
No edit summary |
|||
| Line 43: | Line 43: | ||
[[Image:PRX2300_pot.jpg|link=]] | [[Image:PRX2300_pot.jpg|link=]] | ||
If you're using this Phidget in '''DigitalInput''' mode, | If you're using this Phidget in '''DigitalInput''' mode (are detecting large opaque objects that will strongly break the beam), rotate the potentiometer counter-clockwise toward the (+). No further calibration is needed. | ||
If you're using this Phidget in '''VoltageInput''' mode, we recommend adjusting the voltage offset until it sits at around 1.25V when the beam is not blocked. Next, you should write a short program that will log all of the voltage data to a text file or spreadsheet (and set the data interval to the minimum value in order to catch all of the data), so you can determine which voltage spikes indicate and object and which voltage spikes are just noise. | If you're using this Phidget in '''VoltageInput''' mode, we recommend adjusting the voltage offset until it sits at around 1.25V when the beam is not blocked. Next, you should write a short program that will log all of the voltage data to a text file or spreadsheet (and set the data interval to the minimum value in order to catch all of the data), so you can determine which voltage spikes indicate and object and which voltage spikes are just noise. | ||
Revision as of 18:28, 26 August 2020
Part 1: Setup
Welcome to the PRX2300 user guide! In order to get started, make sure you have the following hardware on hand:
- PRX2300 - Beam Break Phidget
- VINT Hub
- Phidget cable
- USB cable and computer
Next, you will need to connect the pieces:
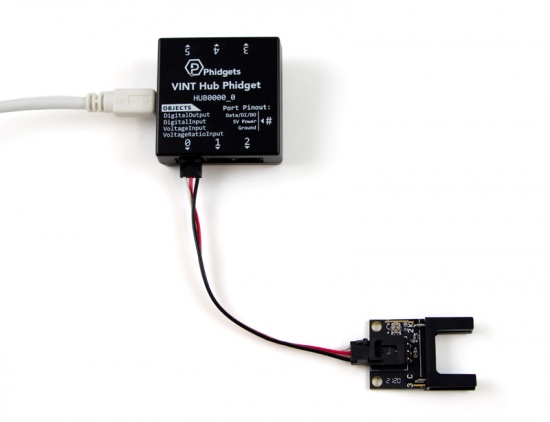
- Connect the PRX2300 to the VINT Hub using the Phidget cable.
- Connect the VINT Hub to your computer with a USB cable.
Now that you have everything together, let's start using the PRX2300!
Phidget Control Panel
In order to demonstrate the functionality of the PRX2300, the Phidget Control Panel running on a Windows machine will be used.
The Phidget Control Panel is available for use on both macOS and Windows machines.
Windows
To open the Phidget Control Panel on Windows, find the ![]() icon in the taskbar. If it is not there, open up the start menu and search for Phidget Control Panel
icon in the taskbar. If it is not there, open up the start menu and search for Phidget Control Panel
macOS
To open the Phidget Control Panel on macOS, open Finder and navigate to the Phidget Control Panel in the Applications list. Double click on the ![]() icon to bring up the Phidget Control Panel.
icon to bring up the Phidget Control Panel.
For more information, take a look at the getting started guide for your operating system:
Linux users can follow the getting started with Linux guide and continue reading here for more information about the PRX2300.
First Look
After plugging the PRX2300 into your computer and opening the Phidget Control Panel, you will see something like this:
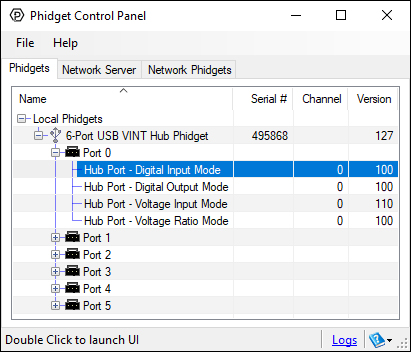
The Phidget Control Panel will list all connected Phidgets and associated objects, as well as the following information:
- Serial number: allows you to differentiate between similar Phidgets.
- Channel: allows you to differentiate between similar objects on a Phidget.
- Version number: corresponds to the firmware version your Phidget is running. If your Phidget is listed in red, your firmware is out of date. Update the firmware by double-clicking the entry.
The Phidget Control Panel can also be used to test your device. Double-clicking on an object will open an example.
Part 2: Using Your Phidget
About
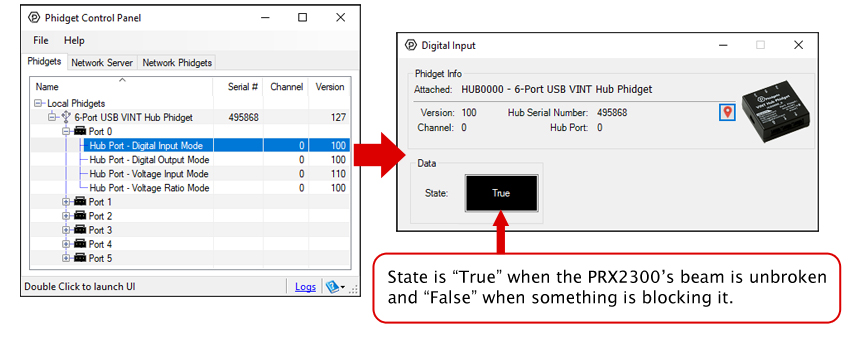
The PRX2300 shines a beam of infrared light between its prongs, and can detect when the beam is broken by a small object. This sensor's signal can be read using the Digital Input channel class when it is connected to a VINT hub.
Explore Your Phidget Channels Using The Control Panel
Double click on the Digital Input channel class under the port your PRX2300 is connected to.
Part 3: Create your Program
1. Setting up your Programming Environment
Part 4: Advanced Topics and Troubleshooting
Before you open a Phidget channel in your program, you can set these properties to specify which channel to open. You can find this information through the Control Panel.
1. Open the Control Panel and double-click on the red map pin icon:

2. The Addressing Information window will open. Here you will find all the information you need to address your Phidget in your program.

See the Phidget22 API for your language to determine exact syntax for each property.
You can use the PRX2300 by plugging it into a VINT Hub port and opening that port in VoltageInput or DigitalInput mode. For applications that involve opaque objects large enough to block the whole beam at once, we recommend using DigitalInput mode. For small or translucent objects, using VoltageInput may be necessary since a partial beam break may not result in a voltage high enough to register a state change (e.g. 1.8V in the case of the HUB0000).
The PRX2300 has a small trim potentiometer on board to adjust the voltage offset.
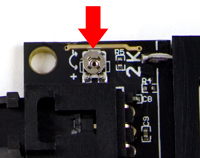
If you're using this Phidget in DigitalInput mode (are detecting large opaque objects that will strongly break the beam), rotate the potentiometer counter-clockwise toward the (+). No further calibration is needed.
If you're using this Phidget in VoltageInput mode, we recommend adjusting the voltage offset until it sits at around 1.25V when the beam is not blocked. Next, you should write a short program that will log all of the voltage data to a text file or spreadsheet (and set the data interval to the minimum value in order to catch all of the data), so you can determine which voltage spikes indicate and object and which voltage spikes are just noise.
For example, suppose you tested the sensor and observed 4 objects pass through, resulting in the following data:
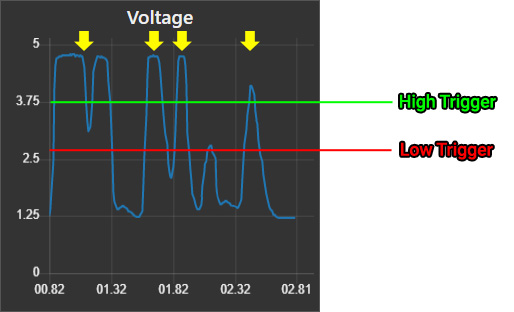
If we assume the first two peaks are actually one object that just happened to allow some of the beam to pass, and the fifth peak is a false positive, then we can assume the peaks indicated by the four yellow arrows are the data that correspond with the four objects. In order for our program to correctly identify these, we need to set a high trigger (indicated by the green line) well above the fifth peak, but below the sixth peak. Similarly, in order to prevent the first two peaks from counting as two separate events, we must set the low trigger below the dip in between them, but above the dip between the next two peaks.
Once you've done enough testing to determine where your high and low triggers should be set, you just need to add a bit of logic to your voltage change event. If the voltage is higher than your high trigger, you can set a global variable that indicates that an object has been sensed, and you should not reset that variable until the voltage has dropped back down below the low trigger. Here's and example of what the event handler might look like in Python if our high trigger is 3.75V and our low trigger is 2.7V:
eventTriggered = 0

def onVoltageChange(self, voltage):
    if voltage > 3.75 and eventTriggered == 0
        eventTriggered = 1
        print("Object detected!")

    if voltage < 2.7 and eventTriggered == 1
        eventTriggered = 0
Try adjusting the sensitivity trim pot on the PRX2300. If it's turned all the way clockwise, you will get this behavior. If it's still stuck on "False" after adjusting the sensitivity, try cleaning the emitter and receiver on the inside of the prongs to clear away any debris that could be blocking the infrared beam.