|
|
| (48 intermediate revisions by 4 users not shown) |
| Line 1: |
Line 1: |
| | <metadesc>Communicate over USB with sensors, controllers and relays with Phidgets! Program in macOS using a wide variety of programming languages.</metadesc> |
| [[Category:OS]] | | [[Category:OS]] |
| {{OSLang|[[File:Icon-Mac-OS.png|64x64px|left|link=]]|On macOS, Phidgets can be either plugged directly into a USB Port or run over a network using the [[#Phidget Network Service|Network Service]].}}
| |
| __TOC__ | | __TOC__ |
| Phidgets are designed to run on '''OS X 10.5 Leopard or newer''', and can run on PPC, 32-bit, and 64-bit systems.
| |
|
| |
|
| ==Quick Downloads== | | ==Quick Downloads== |
| | Already know what you're doing? Here you go: |
| | *[{{SERVER}}/downloads/phidget22/libraries/macos/Phidget22.dmg macOS Installer Download] |
| | *[[Software License]] |
|
| |
|
| If this is your first Phidget, we highly recommend working through the Getting Started guide for your specific Phidget device, which may be found in its [[:Category:UserGuide|user guide]]. If you already have the Preference Pane Installed and know how to use it, then you've already followed the guide and are ready to learn more about the workings behind the Preference Pane, the Phidget Network Service, and more - all specific to macOS. | | If you need older versions of the Phidget22 macOS libraries, [{{SERVER}}/downloads/phidget22/libraries/macos/Phidget22/ click here]. |
|
| |
|
| If you are already a pro, and just want the drivers: | | If you need Phidget21 macOS libraries, [{{SERVER}}/downloads/phidget21/libraries/macos/Phidget/ click here]. |
| | |
| *[{{SERVER}}/downloads/libraries/Phidget.dmg macOS Installer Download]
| |
| *[[Software License]]
| |
|
| |
|
| ==Getting Started with macOS== | | ==Getting Started with macOS== |
| ===Installing===
| | Welcome to using Phidgets with macOS. If you are ready to go, the first step in creating macOS applications with Phidgets is installing our libraries! |
|
| |
|
| The Phidget installer will install the core Phidget files onto your system.
| | ===Install=== |
| | To install our libraries, download the installer for your machine: |
| | *[{{SERVER}}/downloads/phidget22/libraries/macos/Phidget22.dmg macOS installer download] |
|
| |
|
| To install the libraries, follow these steps:
| |
|
| |
|
| 1. Download the Phidget installer for your system:
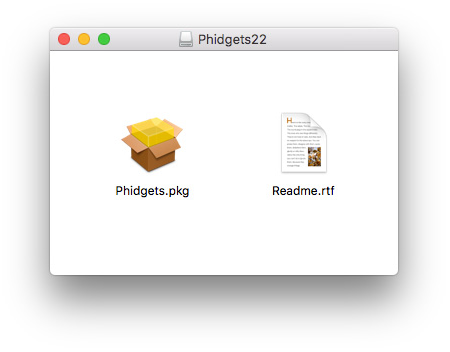
| | Next, open up the installer, and double click on ''Phidgets.pkg'' to install the libraries: |
| *[{{SERVER}}/downloads/libraries/Phidget.dmg macOS Installer]
| | [[File:OSX Install 1.png|link=|alt=macOS Install|center]] |
|
| |
|
| 2. Open up the installer, and double click on {{Code|Phidgets.pkg}} to install the libraries.
| |
|
| |
|
| [[File:OSX Install 1.png|link=|alt=macOS Install]] | | When prompted, continue with the installation: |
| | [[File:OSX Install 2.png|link=|alt=macOS Install|center]] |
|
| |
|
| 3. Proceed through the wizard.
| | If you are using OS X 10.13 or newer you will also need to give explicit permission for the driver to function. You can read about this here[https://developer.apple.com/library/content/technotes/tn2459/_index.html]. |
|
| |
|
| [[File:OSX Install 2.png|link=|alt=macOS Install]]
| | The libraries are now installed on your machine. Next, let's verify that they are working properly. |
|
| |
|
| 4. Once the installation is complete, you are ready to program with Phidgets. To find out what files got installed, please see [[#Description of Library Files | Description of Installer files]] in the Appendix section.
| | ===Verify=== |
| | The best way to verify that your libraries are working properly is to use the Phidget Control Panel. The control panel is a powerful tool that will help you develop your Phidgets applications. Get started by following the instructions below: |
|
| |
|
| Installing our libraries also installs the Phidget Control Panel App, which is explained in the next section.
| |
|
| |
|
| ====Phidget Control Panel====
| | Open Finder and navigate to the Phidget Control Panel in the Applications list: |
| | [[File:OSX Finder Apps.png|link=|900px|alt=macOS Finder Apps|center]] |
|
| |
|
| The Phidget Control Panel is a tool to quickly determine whether your system is able to communicate with Phidgets, and also acts as a debugging tool.
| |
|
| |
|
| Once the Phidget libraries have been installed using the installer, open up the {{Code|Finder}} and find the Phidget Control Panel in the Applications list.
| | Double-click on the Phidgets icon to bring up the Phidget Control Panel. You can now see all the Phidgets that are plugged into your machine, as well as any Phidgets that are on the network: |
| | [[File:OSX ControlPanel General.png|link=|alt=macOS Control Panel General|center]] |
|
| |
|
| [[File:OSX Finder Apps.png|link=|900px|alt=macOS Finder Apps]]
| |
|
| |
|
| Double click on the {{Code|Phidgets}} icon to bring up the Phidget Control Panel. | | Click on the arrow beside a device to expand it so that you can see all available channels. Double-click on one of these channels to open up a window that lets you interact with it: |
| | [[File:OSX Control Panel Channel.png |link=|alt=macOS Control Panel Channel|center]] |
|
| |
|
| [[File:OSX ControlPanel General.png|link=|alt=macOS Control Panel General]]
| |
|
| |
|
| The Phidget Control Panel can: | | The Phidget Control Panel can be used for testing devices, updating firmware, enabling a network server, and more! Visit the [[Phidget Control Panel|Phidget Control Panel page]] for more information. |
| * Access and test Phidgets connected to your computer
| |
| * Update device firmware
| |
| * Access other Phidgets over the network, and make your local Phidgets accessible over the Phidget Network Service
| |
| * Make use of the [[Phidget Dictionary]]
| |
| * View all [[OS_-_Phidget_SBC|SBCs]] on the network and view their webpages
| |
|
| |
|
|
| |
|
| '''For more information, visit the [[Phidget Control Panel#macOS|Phidget Control Panel]] page.'''
| | Your Phidget is now able to communicate with your development machine. The next step is selecting a programming language so you can start to write some code! |
|
| |
|
| ===Checking=== | | ==Programming== |
| | Ready to write some code? Select one of the programming languages below: |
|
| |
|
| To confirm the libraries were installed and work correctly, you can check both the hardware and software components of the interface. It is worth checking the software side first, because if it works then you know the hardware side is also working.
| | ''Great choices for beginners:'' |
| | | * [[Language - C|C]] |
| ====Software====
| |
| | |
| If you have the Phidgets library installed on your system, you can verify that the software component is working by seeing if the Phidget device is listed in the {{Code|Phidgets}} tab of the Phidget Control Panel.
| |
| | |
| [[File:OSX ControlPanel General.png|link=|alt=macOS Control Panel General]]
| |
| | |
| Plug your Phidget into one of the computer's USB ports, and you should see it appear in the list of devices. The above screenshot shows that a PhidgetRFID and a PhidgetInterfaceKit are attached to the computer. If you are not able to see that the Phidget is in the list, there may be a hardware issue. Please see the [[#Hardware| hardware]] section for more details. You can click on the arrow beside a device to expand it so that you can see all available channels. Double click on one of these channels to open up a window that lets you interact with it.
| |
| | |
| [[File:OSX Control Panel Channel.png |link=|alt=macOS Control Panel Channel]]
| |
| | |
| You can use the control panel to test your device and make sure it's working as intended. These examples are limited in function though, so if you need a program that does more, you'll have to program it yourself. Continue on to the [[#Programming_Languages|programming]] section to get started.
| |
| | |
| ====Hardware====
| |
| | |
| You can verify that your computer detects that the Phidget is plugged in through a USB connection by going to the macOS System Report. You can access the System Report by selecting {{Code|About This Mac}} under the Apple icon.
| |
| | |
| [[File:OSX About This Mac.png|link=|alt=macOS About This Mac]]
| |
| | |
| A new window will open up with your OS details. Click on the {{Code|System Report...}} button.
| |
| | |
| The System Report will show up. In the USB section, you will be able to find all connected USB devices.
| |
| | |
| [[File:OSX USB Devices.png |link=|alt=macOS Attached USB Devices]]
| |
| | |
| In the above screenshot, The PhidgetInterfaceKit and PhidgetRFID (1024_0) are connected to the USB ports.
| |
| | |
| If you don't see the Phidget in the list, then take a look at the [[#Troubleshooting|troubleshooting]] section below, as well as the communications section of our [[General Troubleshooting#Communications Troubleshooting|general troubleshooting page]].
| |
| | |
| ====Troubleshooting====
| |
| | |
| If the example programs '''do not''' work but USB '''does''' work (i.e. your computer can consistently see the device in [[#Hardware|hardware]]), take a moment to check the basics:
| |
| * You are using macOS X 10.5 or newer.
| |
| * No other programs, drivers, or processes are using that USB port in software (including other programs trying to use Phidgets)
| |
| * The Phidget libraries are the latest version (visit the [[#Quick Downloads| quick downloads section]] to download them)
| |
| | |
| If your problem doesn't seem to be fixed by these steps, make sure that the Phidget is seen '''consistently''' by USB (if it is erratic, try our [[General Troubleshooting|general troubleshooting guide]]). If you are still having problems after using the troubleshooting guide, please {{ContactUs|ask us}}!
| |
| | |
| ==Programming Languages==
| |
| Phidgets’ philosophy is that you do not have to be an electrical engineer in order to do projects that use devices like sensors, motors, motor controllers, and interface boards. All you need to know is how to program.
| |
| | |
| After you have installed the drivers above, you should pick a programming language, install libraries, and run the examples for that specific language. You can learn more about what is needed to program in a particular language by choosing the language of your preference below. If you need help choosing a language, please look at the [[Software Overview#Language Support |language comparison table]].
| |
| | |
| We recommend the following languages for macOS, since they're the most commonly used:
| |
| | |
| * [[Language - C/C++|C/C++]] | |
| * [[Language - C Sharp|C#]] | | * [[Language - C Sharp|C#]] |
| * [[Language - Python | Python]] | | * [[Language - Python | Python]] |
| * [[Language - Java | Java]] | | * [[Language - Java | Java]] |
| | | ''Also supported:'' |
| We also support the following languages for macOS:
| |
| | |
| * [[Language - Objective C | Objective-C]] | | * [[Language - Objective C | Objective-C]] |
| * [[Language - Javascript | Javascript]] | | * [[Language - JavaScript | JavaScript]] |
| * [[Language - Swift | Swift]] | | * [[Language - Swift | Swift]] |
| * [[Language - Max/MSP|Max/MSP]] | | * [[Language - Max/MSP|Max/MSP]] |
|
| |
|
| ==Phidget Network Service== | | ==Phidget Network Server== |
| | | The Phidget Network Server is an extremely useful tool that allows you to remotely control Phidgets over your network. If you haven't already, check out the [[Phidget Network Server]] page for a complete overview. |
| The Phidget Network Service allows you to remotely control Phidgets over a network. For more information, please see the [[Phidget Network Service]] page. | |
| | |
| Drivers for the Phidget Network Service on macOS are already included in the [[#Quick Downloads | Drivers]] above. If you have the Phidget Control Panel app installed, you already have the Network Service installed.
| |
| | |
| There are two ways that you can connect to a Phidget hosted on another computer. The first method is by using the IP address/host name and port of the host computer. The second method makes the use of [http://en.wikipedia.org/wiki/Multicast_DNS mDNS], which allows Phidgets to be found and opened on the network by a server id instead of an IP address/host name. When using a server id, both the client and server will need to be running an implementation of zero configuration networking. The Phidget Network Service takes advantage of the [https://support.apple.com/kb/DL999?locale=en_US Bonjour] software, which is built-in to macOS. It is a tool developed by Apple to locate devices, such as Phidgets, on a network.
| |
| | |
| This section helps you install, check, and use the Network Service on macOS, but we also have an overview of the [[Phidget Network Service]] in general.
| |
| | |
| ===Using the Network Service===
| |
| | |
| To use a Phidget over the Network Service, you'll want to:
| |
| # Have two different computers connected to the same network. We will call the computer that has the Phidget directly connected to the USB port the '''host'''. The '''client''' will be the computer that runs a Phidget application to connect to the Phidget attached to the host. Please note that if you only have a single computer, you can also connect to the Phidget over the Network Service. The computer will simply act as both a host and client. This will allow you to bypass the [[General Phidget Programming # Details for Open() | one application per Phidget limitation]].
| |
| # Start the Network Service on the computer that directly connects to the Phidget
| |
| # Run your program on the remote computer that will control the Phidget over the network
| |
| | |
| First ensure that the Phidget drivers have been installed on both the host and client computers. Next, we will set up the Network Service and run the Phidget example program on the client. Please follow these steps:
| |
|
| |
|
| 1. On the host computer, double click on the [[File:Ph.jpg|link=]] icon in the Apps list to bring up the Control Panel. In the {{Code|Network Service}} tab, you can start, restart or stop the Network Service. You can also choose to have the Network Service start up automatically upon boot up by checking the box beside {{Code|Start automatically on boot}}. Otherwise, you will have to manually turn the Network Service on everytime you wish to use it. You'll need administrator privileges in order to make changes to these settings. You can see the status of the Network Service at the top of the window beside the Start/Stop button, where it will say "Network Service is running" or "Network Service is stopped".
| | ===Try it Out!=== |
| | In order to try the Phidget Network Server out, you will need a host computer, and a client computer: |
| | *'''Host computer:''' the computer that is physically connected to the Phidgets via USB and is running the Phidget Network Server. |
| | *'''Client computer:''' a computer running a Phidgets application that accesses Phidgets connected to the host computer. |
| | If you only have one computer, don't worry, your machine can act as both a host and a client. |
|
| |
|
| [[File:macOS_ControlPanel_NetworkService_Setup_Stopped.jpg|link=|left|425px|alt=macOS Control Panel Network Service Setup]]
| |
|
| |
|
| [[File:macOS_ControlPanel_NetworkService_Running.jpg|link=|425px|alt=macOS Control Panel Network Service Setup]] | | Next, open the Phidget Control Panel on your host computer. Do this by double-clicking on the [[File:Ph.jpg|link=]] icon in your applications folder. Navigate to the Network Server tab, you will see the following: |
| | [[File:macos_networkserver.png|link=|center]] |
|
| |
|
| 2. Ensure that the Phidget is plugged in to the host.
| |
|
| |
|
| 3. On the client computer, open up the Phidget Control Panel. On the {{Code|Phidgets}} tab you will see the Phidget that is plugged into the host as one of the entries listed under the heading of {{Code|Remote Server: <Hostname>}}. Double click on one of the Phidget's objects to open the example application.
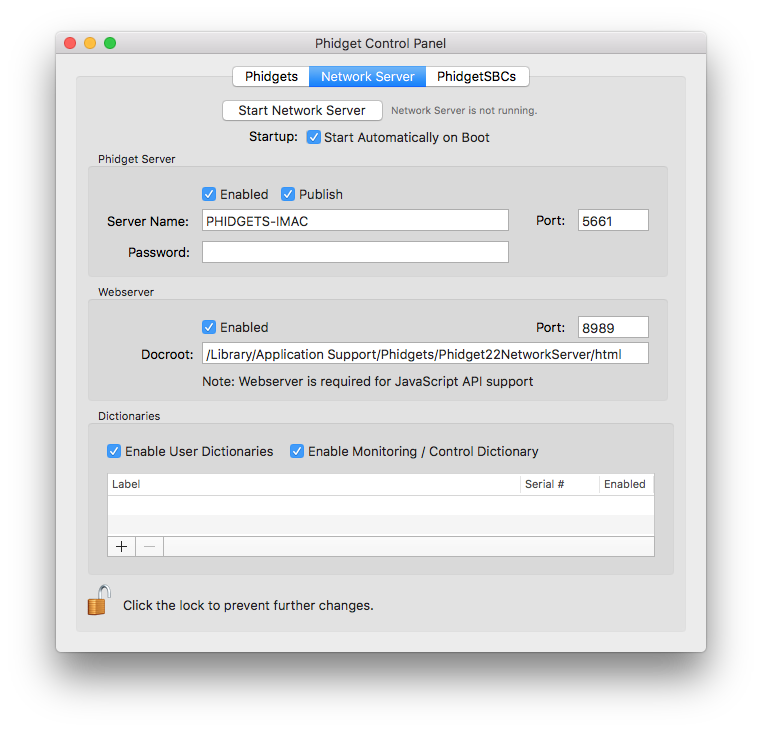
| | From here, you can start or stop the Network Server. You can also decide when the Network Server will start. |
| | [[File:macos_networkserver_run.png|link=|center]] |
|
| |
|
| [[File:macOS_ControlPanel_NetworkService_List.PNG|link=|alt=macOS Control Panel Network Service]]
| |
|
| |
|
| 4. The example application will open up, and you will be able to communicate with the Phidget over the Network Service.
| | Check the automatic start box and enter a server name. By enabling automatic startup, the Network Server will run immediately after macOS boots, so you won't have to manually start it again. You can verify the Network Server is running by looking at the label beside the start/stop button. |
|
| |
|
| [[File:macOS_network_Example.jpg|link=|alt=macOS Control Panel Example]]
| |
|
| |
|
| 5. You can confirm that this Phidget is truly being used of the Network Service by stopping the Network Service while the example application is still open. On the host's Phidget Control Panel, go to the {{Code|Network Service}} tab and hit {{Code|Stop Network Service}} to terminate the Network Service. Now, take a look at the example application on the client. Since the application can no longer find this Phidget over the Network Service, all of the information disappears and the window says that "Nothing" is attached to this channel.
| | Now that you have the Network Server running on your host computer, the next step will be accessing the Phidgets connected to your host computer from your client computer. Follow the steps below: |
|
| |
|
| [[File:macOS_ControlPanel_NetworkService_Disconnected.PNG|link=|alt=macOS Control Panel Network Service Stopped]]
| |
|
| |
|
| ===Debugging the Network Service===
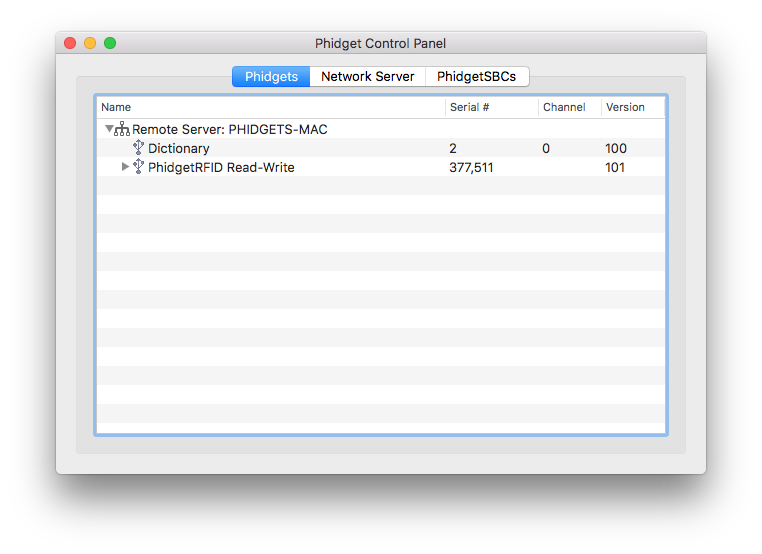
| | Open the Phidget Control Panel on your client computer. You will see something like this: |
| | [[File:macos_controlpanel_remote.png|link=|center]] |
|
| |
|
| In addition to enabling [[General Phidget Programming#Logging|logging]] in your Phidget code, you can get additional debugging information from the Network Service itself. This additional debugging can be found in the log file.
| |
|
| |
|
| You can find the Network Service log file at {{Code|/Library/Logs/}}. The easiest way to view this file is to run the Console, which you can launch by searching for it in spotlight. Click the magnifying glass in the top right corner of the screen or hit Command+Space and search for Console.
| | As you can see from the image above, Phidget servers are listed under the following heading: |
| | *Remote Server: Servername |
|
| |
|
| [[File:macOS_Console_log.PNG|link=|900px|alt=MacOS Console]]
| |
|
| |
|
| Under {{Code|/Library/Logs/}}, you can find {{Code|phidgetNetworkService22.log}}. Errors related to the Control Panel can instead be found in {{Code|phidgetcontrolpanel22.log}} in {{Code|~/Library/Logs/}}.
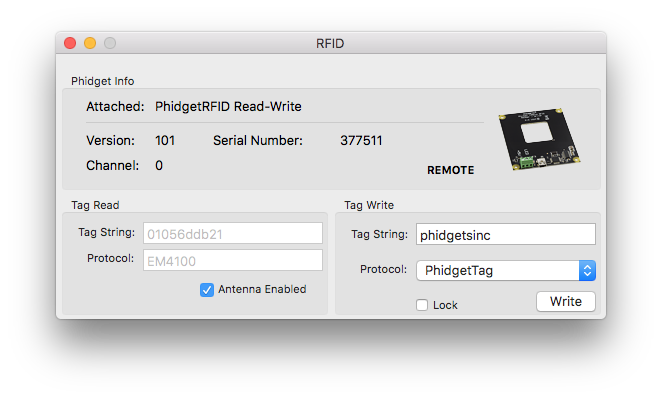
| | You now have access to the Phidgets that are connected to your host computer. Try double-clicking one of them to bring up an example: |
| | [[File:macos_controlpanel_remoteexample.png|link=|center]] |
|
| |
|
| Each message in the log file will list the type of the message, the time and date, the place in the libraries the message came from, and a description. This can be very useful for figuring out why certain parts of one of the examples or the Network Service are not working properly.
| |
|
| |
|
| ==Advanced Uses==
| | Note the label in the example indicating a remote connection. This means the example is using the Phidget Network Server in order to communicate with the device. |
|
| |
|
| | ===What's Next?=== |
| | Now that you have seen the Phidget Network Server in action, you may be interested in implementing an application that takes advantage of all it's features. Luckily, every programming language we support comes with example code on how to do this! Jump to [[#Programming|programming languages]] above. |
|
| |
|
| ==Appendix==
| |
|
| |
|
| ===Description of Library Files===
| | For more information about the Network Server tab on the Phidget Control Panel, visit the Visit the [[Phidget Control Panel|Phidget Control Panel]] page. |
|
| |
|
| This section will explain the files that were placed onto your system as part of the installation process.
| | ==Advanced Information== |
| * <b>{{Code|Phidget22.framework}}</b> contains the actual Phidget library, which is used at run-time. It is placed into {{Code|/Library/Frameworks}}.
| | ===Installed Files=== |
| * <b>{{Code|Phidget.kext}}</b> is the kernel extension. It is placed into {{Code|/System/Library/Extensions}}.
| | These files were placed onto your system as part of the installation process: |
| * <b>{{Code|phidgetnetworkservice22}}</b> is the Phidget Network Service. It is placed into {{Code|/usr/local/bin}}.
| | {| class="wikitable" |
| | |- |
| | | align="center" style="background:#f0f0f0;"|'''File''' |
| | | align="center" style="background:#f0f0f0;"|'''Description''' |
| | | align="center" style="background:#f0f0f0;"|'''Location''' |
| | |- |
| | |Phidget22.framework||contains our library, which is used at run-time.||/Library/Frameworks |
| | |- |
| | |Phidget.kext||kernel extension.||/System/Library/Extensions |
| | |- |
| | |phidgetnetworkserver22||Phidget Network Server||/usr/local/bin |
| | |- |
| | |} |
Quick Downloads
Already know what you're doing? Here you go:
If you need older versions of the Phidget22 macOS libraries, click here.
If you need Phidget21 macOS libraries, click here.
Getting Started with macOS
Welcome to using Phidgets with macOS. If you are ready to go, the first step in creating macOS applications with Phidgets is installing our libraries!
Install
To install our libraries, download the installer for your machine:
Next, open up the installer, and double click on Phidgets.pkg to install the libraries:
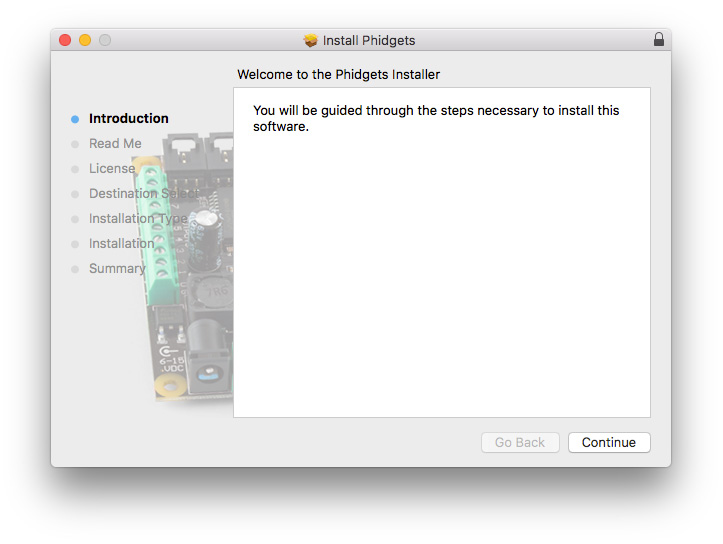
When prompted, continue with the installation:
If you are using OS X 10.13 or newer you will also need to give explicit permission for the driver to function. You can read about this here[1].
The libraries are now installed on your machine. Next, let's verify that they are working properly.
Verify
The best way to verify that your libraries are working properly is to use the Phidget Control Panel. The control panel is a powerful tool that will help you develop your Phidgets applications. Get started by following the instructions below:
Open Finder and navigate to the Phidget Control Panel in the Applications list:
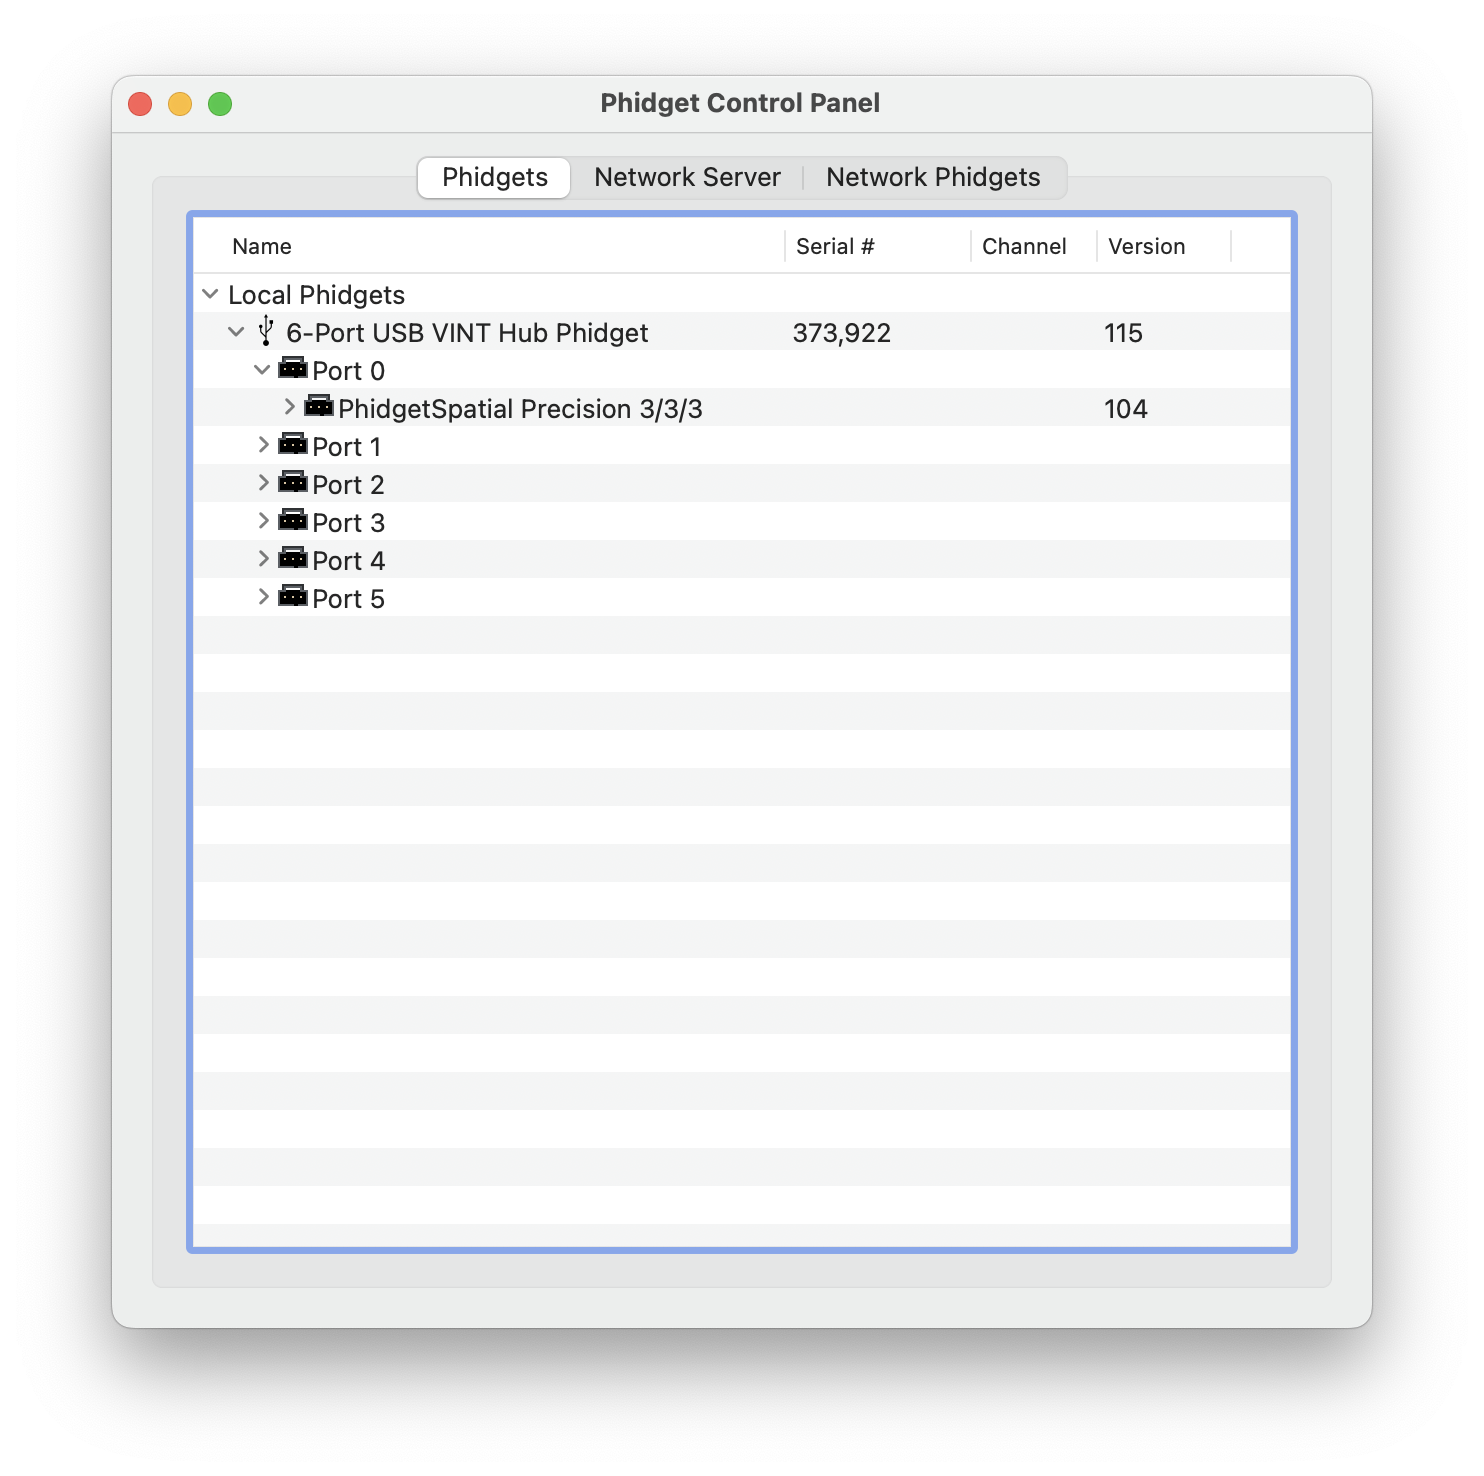
Double-click on the Phidgets icon to bring up the Phidget Control Panel. You can now see all the Phidgets that are plugged into your machine, as well as any Phidgets that are on the network:
Click on the arrow beside a device to expand it so that you can see all available channels. Double-click on one of these channels to open up a window that lets you interact with it:
The Phidget Control Panel can be used for testing devices, updating firmware, enabling a network server, and more! Visit the Phidget Control Panel page for more information.
Your Phidget is now able to communicate with your development machine. The next step is selecting a programming language so you can start to write some code!
Programming
Ready to write some code? Select one of the programming languages below:
Great choices for beginners:
Also supported:
Phidget Network Server
The Phidget Network Server is an extremely useful tool that allows you to remotely control Phidgets over your network. If you haven't already, check out the Phidget Network Server page for a complete overview.
Try it Out!
In order to try the Phidget Network Server out, you will need a host computer, and a client computer:
- Host computer: the computer that is physically connected to the Phidgets via USB and is running the Phidget Network Server.
- Client computer: a computer running a Phidgets application that accesses Phidgets connected to the host computer.
If you only have one computer, don't worry, your machine can act as both a host and a client.
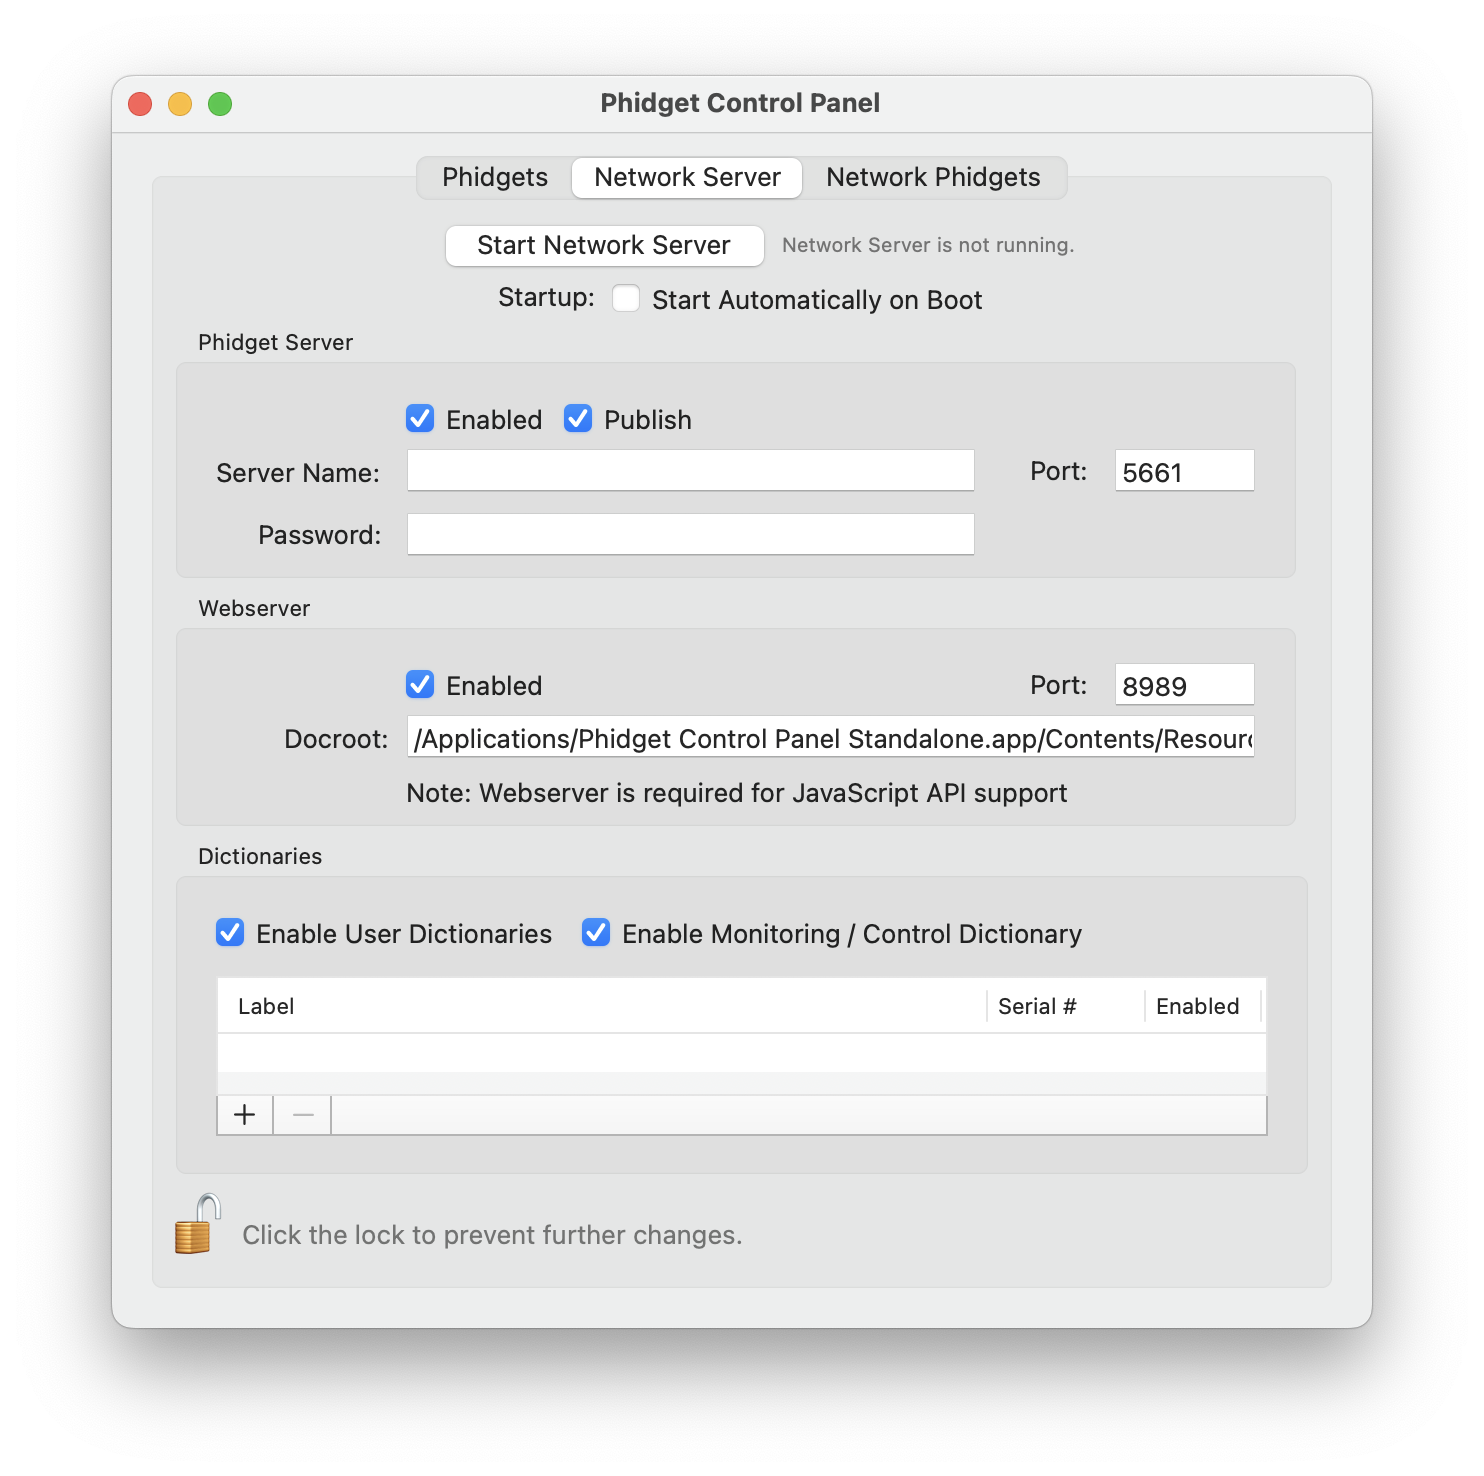
Next, open the Phidget Control Panel on your host computer. Do this by double-clicking on the  icon in your applications folder. Navigate to the Network Server tab, you will see the following:
From here, you can start or stop the Network Server. You can also decide when the Network Server will start.
Check the automatic start box and enter a server name. By enabling automatic startup, the Network Server will run immediately after macOS boots, so you won't have to manually start it again. You can verify the Network Server is running by looking at the label beside the start/stop button.
Now that you have the Network Server running on your host computer, the next step will be accessing the Phidgets connected to your host computer from your client computer. Follow the steps below:
Open the Phidget Control Panel on your client computer. You will see something like this:
As you can see from the image above, Phidget servers are listed under the following heading:
- Remote Server: Servername
You now have access to the Phidgets that are connected to your host computer. Try double-clicking one of them to bring up an example:
Note the label in the example indicating a remote connection. This means the example is using the Phidget Network Server in order to communicate with the device.
What's Next?
Now that you have seen the Phidget Network Server in action, you may be interested in implementing an application that takes advantage of all it's features. Luckily, every programming language we support comes with example code on how to do this! Jump to programming languages above.
For more information about the Network Server tab on the Phidget Control Panel, visit the Visit the Phidget Control Panel page.
Advanced Information
Installed Files
These files were placed onto your system as part of the installation process:
| File
|
Description
|
Location
|
| Phidget22.framework |
contains our library, which is used at run-time. |
/Library/Frameworks
|
| Phidget.kext |
kernel extension. |
/System/Library/Extensions
|
| phidgetnetworkserver22 |
Phidget Network Server |
/usr/local/bin
|