|
|
| (38 intermediate revisions by 2 users not shown) |
| Line 1: |
Line 1: |
| [[Category:OS]] | | [[Category:OS]] |
| {{OSLang|[[File:Icon-iOS.png|64x64px|left|link=OS - iOS]]|iOS is the operating system used on iOS devices such as the iPad, iPhone, and iPod touch.}} | | {| |
| __TOC__
| | |style="vertical-align:middle; width: 60%;"| |
| | |
| Phidgets are designed to run on devices with an iOS version of 8.0 or later. It is strongly recommended that your device have the latest iOS version available to the device installed. As iOS devices do not have USB ports, the Phidgets will have to be connected on a computer with USB ports, and the iOS device will be able to interact with the Phidget over the [[Phidget_Network Service|Network Service]]. If you are looking for a compact and an inexpensive way to host Phidgets over a network, take a look at our [{{SERVER}}/products.php?product_id=1073 Single Board Computer].
| |
| | |
| ==Quick Downloads==
| |
| | |
| If this is your first Phidget, we highly recommend working through the ''Getting Started'' guide for your specific Phidget device, which may be found in its [[:Category:UserGuide|user guide]].
| |
| | |
| If you are already a pro, and just want the iOS drivers:
| |
| | |
| *[{{SERVER}}/downloads/libraries/Phidget-iPhone.zip iOS Libraries]
| |
| | |
| ==Getting Started with iOS== | | ==Getting Started with iOS== |
| | Welcome to using Phidgets with iOS! |
|
| |
|
| ===Installing===
| | If you haven't already, check out the [[:Category:UserGuide|user guide]] for your device. If you are ready to go, the first step to creating an iOS application with Phidgets is downloading the Phidget libraries on your macOS development machine! |
| | | |{{TOC limit|3}} |
| iOS code is developed on a macOS machine, and so getting your Phidget to work locally on the macOS machine first will help you distinguish any issues from network ones later. The macOS machine will need the Phidget drivers installed, please see the [[OS - macOS | macOS]] page for more information.
| | |} |
| | | ==Download== |
| You will also need to [{{SERVER}}/downloads/libraries/Phidget-iPhone.zip iOS drivers] to code your program against.
| | The Phidget libraries for iOS development are available here: |
| The "installation" of the Phidget iOS libraries is simply linking and distributing the libraries with your project. As the most common platform to do this is through Xcode, we provide brief instructions on how to easily follow along with our already-linked examples later.
| | *[{{SERVER}}/downloads/phidget22/libraries/ios/Phidget22_iOS.zip iOS Libraries] |
| | |
| To install the libraries, follow these steps on the development computer:
| |
| | |
| 1. Download the Phidget [{{SERVER}}/downloads/libraries/Phidget-iPhone.zip drivers for iOS].
| |
| | |
| 2. Unzip the file, and you will find three things:
| |
| | |
| # Libraries for the iOS device and iOS simulator.
| |
| # Example Xcode project for the PhidgetInterfaceKit and PhidgetManager.
| |
| # Skeleton Xcode project - contains the minimal project settings already filled in for Phidgets development.
| |
| | |
| Feel free to browse around within the folders to get a sense of what will be going on the iOS side. We describe how to link and use these library files later on the [[Language - iOS#Write Your Own Code | Write your own iOS code]] section of the iOS Cocoa Touch page. For now, having found them means you can copy and install them to any project directory you want.
| |
| | |
| First, though, it will be useful to check to make sure Phidgets work with your iOS system.
| |
| | |
| ===Checking===
| |
| | |
| When you run a Phidgets iOS example, you transfer and link the libraries and code all at the same time. This should <i>just work</i> with our examples, but if problems arise this section gives more detail on pinpointing the source of the problem. We recommend starting with running the software examples right away - if the software works, you know the hardware works too.
| |
| | |
| ====Software====
| |
| | |
| The easiest way to see whether your libraries are set up correctly within our examples or your own project is just to download them to the iOS device and run them. Detailed instructions for this (including choosing the right {{Code|HelloWorld}} project to run) are on the [[Language - iOS]] page. That page will be your next step - but if the examples do not run using the instructions, return here to debug your hardware.
| |
| | |
| ====Hardware====
| |
| | |
| If you are having problems running the examples, you should check the hardware of the host computer. | |
| | |
| When using the [[#Network Service|Network Service]] to control a Phidget, the problem may be with the USB connection on the remote computer. Make sure both the server-side of (a) the Network service and (b) the USB connection are working by using the instructions on the [[OS - OS X|OS X page]]
| |
| | |
| ====Troubleshooting====
| |
| | |
| If the examples '''do not''' work but USB '''does''' work (i.e. your remote computer or iOS device can consistently see the device in the [[#Hardware|hardware]]), take a moment to check the basics:
| |
| * No other programs, drivers, or processes are using the Phidget on the host computer.
| |
| * You have copied and linked the Phidget iOS libraries (as described on the [[Language - iOS]] page)
| |
| * The Phidget libraries are the latest version (visit the [[#Quick Downloads| quick downloads section]] to download them)
| |
| * Ensure that the Network service drivers and the iOS libraries are both the latest version
| |
| * Ensure that you have the most up to date iOS version installed for your device.
| |
| * Check the [[#Common Problems and Solutions|common problems]] section below, some specific combinations can cause problems
| |
| | |
| If your problem doesn't seem to be fixed by these steps, make sure that the Phidget is seen '''consistently''' by USB in [[#Hardware|hardware]] (if it is erratic, try our [[General Troubleshooting|general troubleshooting guide]]). If you are still having problems after using the troubleshooting guide, please {{ContactUs|ask us}}!
| |
| | |
| ==Programming Languages==
| |
| | |
| iOS programs are written in [[Language - iOS|Objective C]] using the Cocoa Touch framework. You can read on within this page to learn how to use iOS with the Network service, or you can jump ahead right now to the [[Language - iOS|iOS]] page and start writing code!
| |
| | |
| ==Network Service== | |
| | |
| The Phidget Network Service allows you to remotely control a Phidget over a network.<br>This section helps you use the Network Service on iOS, but we also have an overview of the [[Phidget Network Service]] in general. | |
| | |
| Currently, iOS devices cannot ''host'' the Network Service, but they can use data streaming from another computer over the Network Service.
| |
| | |
| ===Setting Up the Network Service===
| |
| | |
| Using an iOS device, your network-controlled Phidget system will probably look something like this:
| |
| | |
| [[Image:webservice_general_pctoios.png|600px|link=|alt=]]
| |
| | |
| To begin,
| |
| | |
| 1. Start the Network Service on the host computer
| |
| * How to do this [[OS - Windows#Phidget Network Service|on Windows]]
| |
| * How to do this [[OS - OS X#Phidget Network Service|on Mac OS]]
| |
| * How to do this [[OS - Linux#Phidget Network Service|on Linux]]
| |
| * How to do this [[OS - Phidget SBC#Phidget Network Service|on the Phidget Single Board Computer]] | |
| | |
| 2. Download and unzip the [{{SERVER}}/downloads/libraries/Phidget-iPhone.zip iOS Examples] anywhere on the development computer.
| |
| | |
| 3. Open up the {{Code|HelloWorld.xcodeproj}} into Xcode. Select either an iOS device or iOS simulator as the destination. For more information, please see the [[Language - iOS#Use OurExamples|Use Our Examples]] section of the iOS language page.
| |
| | |
| 4. In Xcode, hit the {{Code|Run}} button to transfer the application to the device or simulator as well as run it.
| |
| | |
| ===Using the Network Service===
| |
| | |
| After performing the steps above, you will be using the Network Service already. Plugging in the Phidget to the host computer will give you a screen like this:
| |
| | |
| [[File:iOS Network service Example HelloWorld Output.png|link=|alt=HelloWorld Output]]
| |
|
| |
|
| The above screenshot shows that a number of Phidgets are attached to the USB ports of computer connected to the network. Go ahead and detach the Phidgets from the USB port of the host computer, and see what happens.
| | Download and unpack the libraries. You will need to reference these files from your Xcode project in order to use Phidgets. This step is covered in detail after you select your programming language below. |
|
| |
|
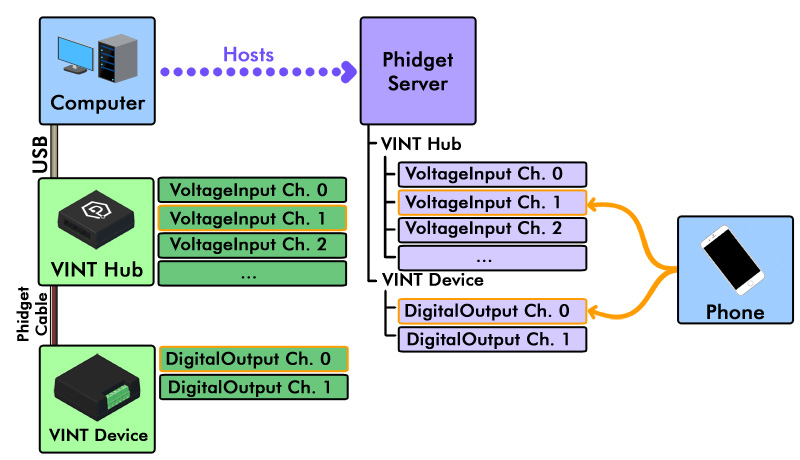
| ===Debugging the Network Service=== | | ==Network Server== |
| | Phidgets cannot be connected directly to iOS devices, therefore, in order to use Phidgets with your iOS device, you must have a host computer that is running the Phidget Network Server. |
|
| |
|
| Since an iOS device can only be a user and not a host of the Network Service, you should use debugging server side. Refer to the Network service sections for each operating system:
| | [[Image:iOS-connection.jpg|link=]] |
| * [[OS - Windows#Phidget Network Service|Windows]]
| |
| * [[OS - OS X#Phidget Network Service|Mac OS]]
| |
| * [[OS - Linux#Phidget Network Service|Linux]]
| |
| * [[OS - Phidget SBC#Phidget Network Service|Phidget Single Board Computer]]
| |
| In addition, if you are having Network Service problems, you will probably find the Network service section of our [[General Troubleshooting#Network Service Troubleshooting|General Troubleshooting Guide]] helpful as well.
| |
|
| |
|
| ==Advanced Uses==
| | *Host computer: the computer that is physically connected to the Phidgets via USB and is running the Phidget Network Server. |
| | *Client computer: a computer running a Phidgets application that accesses Phidgets connected to the host computer. When developing for iOS, your iOS device acts as the client. |
|
| |
|
| ===Description of Installer files===
| |
|
| |
|
| Here is the list of files and their description for each file that is distributed through the iOS drivers.
| | The next step is to install the Phidget libraries on your host computer, and get the Phidget Network Server up and running. Start by following the ''Getting Started'' guide, and continue with the ''Network Server'' guide. When you are done, come back and finish this guide! |
| * <b>{{Code|iphoneos/libPhidget21.a}}</b> contains the actual Phidget library, which is used at run-time. This library is used when you are testing the example on the actual iOS device.
| | *[[OS - Windows#Phidget Network Server| Windows]] |
| * <b>{{Code|iphonesimulator/libPhidget21.a}}</b> contains the actual Phidget library, which is used at run-time. This library is used when you are testing the example an iOS simulator. | | *[[OS - OS X#Phidget Network Server| macOS]] |
| * <b>{{Code|phidget21.h}}</b> lists all the Phidget API function calls available to your code. Your compiler also has to know where this file is. | | *[[OS - Linux#Phidget Network Server| Linux]] |
| * <b>{{Code|SkeletonProject}}</b> is a Xcode project containing the bare minimum project settings already filled in to code with the Phidget library. | | *[[OS - Phidget SBC#Phidget Network Server| Phidget Single Board Computer]] |
|
| |
|
| ==Common Problems and Solutions== | | ==Programming== |
| | Now that you have everything set up, all you have to do is code! Select from one of the following programming languages to get started: |
|
| |
|
| None at this time.
| | * [[Language - Objective C#iOS|Objective C]] |
| | * [[Language - Swift#iOS|Swift]] |