OS - Phidget SBC: Difference between revisions
No edit summary |
|||
| (38 intermediate revisions by 3 users not shown) | |||
| Line 1: | Line 1: | ||
<metadesc>Communicate with sensors, controllers and relays with the PhidgetSBC! It uses Debian Linux and can run autonomous programs in C, Java, and Python.</metadesc> | |||
[[Category:OS]] | [[Category:OS]] | ||
__TOC__ | __TOC__ | ||
| Line 4: | Line 5: | ||
==Quick Downloads== | ==Quick Downloads== | ||
Already know what you're doing? Here you go: | Already know what you're doing? Here you go: | ||
'''For PhidgetSBC (1070):''' | |||
*[{{SERVER}}/downloads/phidgetsbc/1070/changelog.txt changelog] | |||
*[{{SERVER}}/downloads/phidgetsbc/1070/phidgetsbc-minimal.bin Minimal Firmware] | |||
*[{{SERVER}}/downloads/phidgetsbc/1070/phidgetsbc-full.bin Full Firmware] | |||
*[{{SERVER}}/downloads/phidgetsbc/1070/buildroot-phidgetsbc.tar.gz Buildroot/Kernel Sources] | |||
'''For PhidgetSBC2 (1072):''' | |||
*[{{SERVER}}/downloads/phidgetsbc/1072/changelog.txt changelog] | |||
*[{{SERVER}}/downloads/phidgetsbc/1072/phidgetsbc2.bin SBC2 Firmware] | |||
*[{{SERVER}}/downloads/phidgetsbc/1072/phidgetsbc2-kerneldev.tar.gz SBC2 Kernel Development Package] | |||
'''For PhidgetSBC3 (1073) kernel version 3.6.3:''' | |||
*[{{SERVER}}/downloads/phidgetsbc/1073/changelog.txt changelog] | |||
*[{{SERVER}}/downloads/phidgetsbc/1073/linux-3.6.3/phidgetsbc3.bin SBC3 Firmware] | |||
*[{{SERVER}}/downloads/phidgetsbc/1073/linux-3.6.3/phidgetsbc3-kerneldev.tar.gz SBC3 Kernel Development Package] | |||
*[{{SERVER}}/downloads/phidgetsbc/1073/linux-3.6.3/phidgetsbc3-upgrade_3.6.3_3.14.27.tar.gz SBC3 Kernel upgrade package (3.6.3 -> 3.14.27)] | |||
'''For PhidgetSBC3 (1073) kernel version 3.14.27:''' | |||
*[{{SERVER}}/downloads/phidgetsbc/1073/changelog.txt changelog] | |||
*[{{SERVER}}/downloads/phidgetsbc/1073/linux-3.14.27/phidgetsbc3.bin SBC3 Firmware] | |||
*[{{SERVER}}/downloads/phidgetsbc/1073/linux-3.14.27/phidgetsbc3-update_3.14.27.tar.gz SBC3 Kernel update package (3.14.27)] | |||
*[{{SERVER}}/downloads/phidgetsbc/1073/linux-3.14.27/phidgetsbc3-kerneldev.tar.gz SBC3 Kernel Development Package] | |||
'''For PhidgetSBC4 (SBC3003):''' | |||
*[{{SERVER}}/downloads/phidgetsbc/SBC3003/changelog.txt changelog] | |||
*[{{SERVER}}/downloads/phidgetsbc/SBC3003/phidgetsbc4.zip SBC4 SD Card Image] | [{{SERVER}}/downloads/phidgetsbc/SBC3003/phidgetsbc4.md5 md5] | |||
*[{{SERVER}}/downloads/phidgetsbc/SBC3003/SBC3003_upgrade.tar.gz SBC4 Kernel/Bootloader Upgrade Package] | |||
==Getting Started | ==Getting Started With the Phidget SBC== | ||
Welcome to using the Phidget SBC. If you haven't already, check out the [[SBC3003 User Guide#Getting Started | user guide]] in order to set up the following: | Welcome to using the Phidget SBC. If you haven't already, check out the [[SBC3003 User Guide#Getting Started | user guide]] in order to set up the following: | ||
* Networking | * Networking | ||
| Line 21: | Line 41: | ||
If you are using an external computer, there are videos available to help you get started, here is a video for Java: | |||
<center>{{#ev:youtube|InbY-Ui1tg0}}</center> | |||
We also have videos for [https://www.youtube.com/watch?v=y7XhShmhiEU&list=PLwPK-C9lEEc0iciKTiWSWZ74tQysd2lsS&index=4 Python] and [https://www.youtube.com/watch?v=8vv8kx4743c&list=PLwPK-C9lEEc0iciKTiWSWZ74tQysd2lsS&index=2 C]. | |||
===Developing with an | If you will not be using an external computer, jump ahead to learn about [[#Installing packages for development|installing packages for development]], otherwise, keep reading! | ||
===Developing with an External Computer=== | |||
There are two main ways in which you can access your SBC from an external computer: | There are two main ways in which you can access your SBC from an external computer: | ||
*SBC Web Interface | *SBC Web Interface | ||
| Line 37: | Line 60: | ||
In order to use SSH, you need to know the following things about the SBC: | In order to use SSH, you need to know the following things about the SBC: | ||
*IP address (e.g. 192.168. | *IP address (e.g. 192.168.3.195) or the link local address (e.g. phidgetsbc.local) | ||
*The administrator password | *The administrator password | ||
| Line 66: | Line 89: | ||
Or, something like this (you will need to know the IP address of your SBC): | Or, something like this (you will need to know the IP address of your SBC): | ||
<syntaxhighlight lang=bash> | <syntaxhighlight lang=bash> | ||
ssh root@168 | ssh root@192.168.3.195 | ||
</syntaxhighlight> | </syntaxhighlight> | ||
| Line 82: | Line 105: | ||
</syntaxhighlight> | </syntaxhighlight> | ||
===Installing | ===Installing Packages for Development=== | ||
At this point you have connected to the SBC through one or more these three options: | At this point you have connected to the SBC through one or more these three options: | ||
*SBC Web Interface | *SBC Web Interface | ||
| Line 88: | Line 111: | ||
*Directly via monitor and keyboard | *Directly via monitor and keyboard | ||
Now that you are connected, you may want to start developing on/for the SBC. Before you do this, you need to install some packages. Let's start with C | Now that you are connected, you may want to start developing on/for the SBC. Before you do this, you need to install some packages. Let's start with C and Java. | ||
====C | ====C and Java==== | ||
The simplest way to install C | The simplest way to install C and Java support on the SBC is via the install buttons on located on the SBC Web Interface (System->Packages). Check ''Include full Debian Package Repository'' before installing. | ||
| Line 112: | Line 135: | ||
====Installing Python==== | ====Installing Python==== | ||
Installing support for Python has three steps: | Installing support for Python has three steps: | ||
#Ensure ''Include full Debian Package Repository'' is checked on the SBC Web Interface (System->Packages) | |||
#Install Python | |||
#Install Phidget Python module | |||
You will need to run commands on the SBC to install support for Python. You can either use SSH to issue the commands, or you can connect directly to the SBC via a monitor and keyboard. | You will need to run commands on the SBC to install support for Python. You can either use SSH to issue the commands, or you can connect directly to the SBC via a monitor and keyboard. | ||
| Line 133: | Line 156: | ||
</syntaxhighlight> | </syntaxhighlight> | ||
Next, copy the web link address for the [{{SERVER}}/downloads/libraries/ | Next, copy the web link address for the [{{SERVER}}/downloads/phidget22/libraries/any/Phidget22Python.zip Python Libraries] and use it in the following command (right click to copy into a terminal): | ||
<syntaxhighlight lang=bash> | <syntaxhighlight lang=bash> | ||
wget http://copied_link | wget http://copied_link | ||
| Line 156: | Line 179: | ||
=====Method 2: Use a USB Key===== | =====Method 2: Use a USB Key===== | ||
Copy the [{{SERVER}}/downloads/libraries/ | Copy the [{{SERVER}}/downloads/phidget22/libraries/any/Phidget22Python.zip Python Libraries] onto a USB key. Unpack the zip file into a folder on the USB key. Insert the key into the SBC. | ||
You will have to figure out where the USB key (and the Phidget Python library folder) is now located. We describe how in the general [[#Using USB Data Keys | Using USB Data Keys]] section. Next, run the following commands (be sure to modify the usb directory number if necessary): | You will have to figure out where the USB key (and the Phidget Python library folder) is now located. We describe how in the general [[#Using USB Data Keys | Using USB Data Keys]] section. Next, run the following commands (be sure to modify the usb directory number if necessary): | ||
| Line 166: | Line 189: | ||
You're now ready to begin programming! Continue through this guide for code examples and directions on where to go next. | You're now ready to begin programming! Continue through this guide for code examples and directions on where to go next. | ||
== | ==Developing Applications== | ||
=== | If you are interested in developing on an external computer, keep reading. If you are planning on developing directly on the SBC, you can jump ahead to [[#Developing directly on the Phidget SBC | developing directly on the SBC]]. | ||
===Developing with an External Computer=== | |||
When developing on an external computer, you will write, compile, and test your programs on that machine. When you are ready, you will then upload your programs to the SBC to run them. To demonstrate, we will use the Hello World example for Java. Download the following on your development machine before we get started: | |||
*[{{SERVER}}/downloads/phidget22/examples/java/Manager/Phidget22_HelloWorld_Java_Ex.zip Java HelloWorld Example] | |||
*[{{SERVER}}/downloads/phidget22/libraries/any/Phidget22Java.zip phidget22.jar] | |||
Next, follow these steps: | |||
1. Place phidget22.jar on your development machine in a directory that you will use to compile your Java files. | |||
2. Copy the HelloWorld.java file from the example package to the same directory. | |||
3. Compile the HelloWorld.java file. If you are using a Windows machine, type the following into the command prompt: | |||
<syntaxhighlight lang=bash> | |||
javac -classpath .;phidget22.jar HelloWorldExample.java | |||
javac -classpath .;phidget22.jar | |||
</syntaxhighlight> | </syntaxhighlight> | ||
If you are using a Linux or macOS machine, type the following into the terminal: | |||
<syntaxhighlight lang=bash> | |||
javac -classpath .:phidget22.jar | javac -classpath .:phidget22.jar HelloWorldExample.java | ||
</syntaxhighlight> | </syntaxhighlight> | ||
You should now have the following class file: | |||
*HelloWorldExample.class | |||
4. Using the SBC Web Interface, create a new project called HelloWorld: | |||
[[File:Phidgetsbc_createproject.PNG|link=|alt=|center]] | |||
5. On the next screen, you will be prompted to upload your files. We will upload the Java class file, and then click the Start button: | |||
[[File:Phidgetsbc_runprogram.PNG|link=|alt=|center]] | |||
6. You'll note that as it runs, there are two links below the Stop button: | |||
*stdout: view the program output like you would in a terminal or command prompt | |||
*stderr: view the program error output | |||
Success! The HelloWorld example is running on your SBC. If you aren't interested in developing directly on the Phidget SBC, jump ahead to [[#Running a program automatically|running a program automatically]]. | |||
===Developing Directly on the Phidget SBC=== | |||
When developing directly on the SBC, you will do so in one of the following ways: | |||
*Access the terminal by connecting directly to the SBC using a keyboard and monitor. | |||
*Access the terminal by using SSH. | |||
Regardless of how you choose to access the terminal, the process is the same. First, you will need to pick a terminal editor in order to write and edit your files. Here are some options we recommend: | |||
*nano - ''recommended for beginners, already installed'' | |||
*vi - ''advanced, already installed'' | |||
*emacs - ''advanced, needs to be installed'' | |||
Next, follow these steps: | |||
' | 1. If you haven't already, connect to the SBC using SSH or a keyboard and monitor. | ||
2. Download the [{{SERVER}}/downloads/phidget22/examples/java/Manager/Phidget22_HelloWorld_Java_Ex.zip Phidget Java HelloWorld Example] to the SBC. | |||
<syntaxhighlight lang=bash> | |||
wget http://examples_link | |||
</syntaxhighlight> | |||
3. Unpack the examples | |||
<syntaxhighlight lang=bash> | |||
unzip examples_filename | |||
</syntaxhighlight> | |||
4. Compile the HelloWorldExample.java example: | |||
<syntaxhighlight lang=bash> | |||
javac -classpath .:/usr/share/java/phidget22.jar HelloWorldExample.java | |||
</syntaxhighlight> | </syntaxhighlight> | ||
5.Run the HelloWorldExampleprogram: | |||
<syntaxhighlight lang= | <syntaxhighlight lang=bash> | ||
java -classpath .:/usr/share/java/phidget22.jar HelloWorldExample | |||
</syntaxhighlight> | </syntaxhighlight> | ||
Success! The HelloWorld example is running on your SBC. Now that you have a program running on your SBC, you may be interested in having it run automatically when the SBC boots, or maybe even on a schedule. Keep reading for more information. | |||
=== | ===Running a Program Automatically=== | ||
After testing your program, you will likely want it to run on boot, or on a schedule, without your input. | |||
====Run on Boot==== | |||
Running on boot ensures that your program will never miss an event. As long as the SBC is running, your code will be running. This section assumes you have written and compiled your program on an external computer, and have uploaded it to the SBC Web Interface. If you are not using the SBC Web Interface, jump ahead to [[#Via a Boot Script|using a boot script]]. | |||
To have your program run on boot, navigate to Projects->ProjectName->Startup Settings in the SBC Web Interface. After selecting your project, copy the settings from the image below: | |||
[[File:phidgetsbc_runonboot.PNG|link=|alt=|center]] | |||
We will review some of the options that are shown in the image above: | |||
*Startup Order: lower numbers boot first. Booting later means more programs are available for use, booting earlier means other programs can use your program. | |||
*Run as a daemon: starts the program as a daemon. Unless you have explicitly written your program as a daemon, leave this checked, or else your SBC may hang on boot. | |||
*Executable/Class name: your main Java class or C file. | |||
*Arguments: any command line arguments the program needs. | |||
After saving your changes, your program will run automatically whenever your SBC boots. | |||
=====Automatically Running Python Code===== | |||
To run a Python script as a standalone application, you will need to add a line called a "shebang" to the top of the script, with the path to your Python executable. If you have followed the steps in this guide, the line will be: | |||
= | <syntaxhighlight lang=python> | ||
#!/usr/bin/python | |||
</syntaxhighlight> | |||
====Run on a Schedule==== | |||
Running your program on a schedule allows you to perform your task once a week, or once a minute without worrying about memory management issues or instability problems that may arise. It executes, and then gets cleaned up. To run your program on a schedule, we recommend using Cron. Cron can automatically schedule programs (known as ''jobs'', or ''cron jobs''). Cron simply reads a ''crontab file'' and runs whatever programs are listed, with whatever timing they are listed with. Cron runs continuously in the background, but the cron jobs only run as long as they naturally would, and then they exit. | |||
Let`s set up your first cron job. We will use nano to edit the crontab file, but feel free to use whatever editor you prefer. | |||
First, set your editor to nano: | |||
<syntaxhighlight lang=bash> | <syntaxhighlight lang=bash> | ||
export EDITOR=nano | |||
</syntaxhighlight> | </syntaxhighlight> | ||
Next, edit your crontab file: | |||
<syntaxhighlight lang=bash> | <syntaxhighlight lang=bash> | ||
crontab -e | |||
</syntaxhighlight> | </syntaxhighlight> | ||
Finally, schedule your cron job: | |||
<syntaxhighlight lang=text> | |||
#cron job that will run at 5AM every week: | |||
0 5 * * 1 /root/code/myprogram argument1 | |||
<syntaxhighlight lang= | |||
# | |||
</syntaxhighlight> | </syntaxhighlight> | ||
[[File:phidgetsbc_cronjob.PNG|link=|alt=|center]] | |||
After entering your task, simply save and exit the file. | |||
====Run Using a Boot Script==== | |||
If you want your program to run on boot, you can install your program into the boot order using a script. This process is covered [[OS - Linux#As A Service|here]]. | |||
===Programming=== | |||
Ready to write some code? Select one of the programming languages below: | |||
*[[Language - C|C]] | |||
*[[Language - Java | Java]] | |||
*[[Language - Python | Python]] | |||
*[[Language - JavaScript | JavaScript]] | |||
*[[Language - C_Sharp | C#]] | |||
The | ==Phidget Network Server== | ||
The Phidget Network Server is an extremely useful feature of Phidgets that allows you to remotely control Phidgets over your network. If you haven't already, check out the [[Phidget Network Server]] page for a complete overview. | |||
===Try it Out!=== | |||
The Phidget SBC comes with the Phidget Network Server installed, and the SBC automatically starts the Network Server on boot. In order to change any of this default behaviour, navigate to Phidgets->phidget22NetworkServer using the SBC Web Interface: | |||
[[File:phidgetsbc_networkserver.PNG|link=|alt=|center]] | |||
= | |||
In order to try the Phidget Network Server out, you will need a host computer, and a client computer: | |||
*Host computer: the computer that is physically connected to the Phidgets via USB and is running the Phidget Network Server. | |||
*Client computer: a computer running a Phidgets application that accesses Phidgets connected to the host computer. | |||
* | |||
* | |||
For this example, we will use the Phidget SBC as the host computer. The next step is setting up your client computer. If you are using a Windows computer as your client, keep reading, otherwise, you can jump ahead here: | |||
*[[#macOS Client | macOS Client]] | |||
*[[#Linux Client | Linux Client]] | |||
====Windows Client==== | |||
In order to remotely access Phidgets on your SBC, you should get your client computer set up. Follow the Getting Started guide for Windows below before continuing: | |||
*[[OS - Windows#Getting started with Windows| Getting started with Windows]] | |||
Now that you have Phidget drivers and libraries installed on your client computer, we can test the Phidget Network Server by following the steps below: | |||
1. Open the Phidget Control Panel on your client computer. You will see something like this: | |||
[[File:Phidgetsbc_networkserver_windows.PNG|link=|alt=|center|]] | |||
2. You now have access to the Phidgets that are connected to your Phidget SBC. Try double-clicking one of them to bring up an example. | |||
====macOS Client==== | |||
In order to remotely access Phidgets on your SBC, you should get your client computer set up. Follow the Getting Started guide for macOS below before continuing: | |||
*[[OS - macOS#Getting started with macOS| Getting started with macOS]] | |||
Now that you have Phidget drivers and libraries installed on your client computer, we can test the Phidget Network Server by following the steps below: | |||
1. Open the Phidget Control Panel on your client computer. You will see something like this: | |||
[[File:Phidgetsbc_networkserver_macos.PNG|link=|alt=|center|]] | |||
[ | |||
2. You now have access to the Phidgets that are connected to your Phidget SBC. Try double-clicking one of them to bring up an example. | |||
====Linux Client==== | |||
In order to remotely access Phidgets on your SBC, you should get your client computer set up. Follow the Getting Started guide for Linux below before continuing: | |||
*[[OS - Linux#Getting started with Linux| Getting started with Linux]] | |||
Now that you have Phidget drivers and libraries installed on your client computer, we can test the Phidget Network Server by following the steps below: | |||
1. From the terminal, type in the following command: | |||
<syntaxhighlight lang=bash> | <syntaxhighlight lang=bash> | ||
phidget22admin -s | |||
</syntaxhighlight> | </syntaxhighlight> | ||
You will now see something like this: | |||
== | [[File:Phidgetsbc_linuxphidgetadmin.PNG|link=|alt=|center|]] | ||
As shown in the image above, the server running on your SBC can now be seen over the network. You will now be able to remotely access any Phidgets connected to your SBC. | |||
===What's Next?=== | |||
Now that you have seen the Network Server in action, you may be interested in implementing an application that takes advantage of all it's features. Luckily, every programming language we support comes with example code on how to do this! Jump to [[#Programming|programming languages]] above. | |||
==Advanced Information== | |||
===Writing Image to SD Card=== | |||
{{SDCardImage}} | |||
===Checking System Logs=== | |||
The SBC maintains two logs: a kernel log and a system log. | |||
: | |||
The kernel log is for low-level occurrences, such as devices attaching and leaving the USB hub, recording what drivers are being used, and so on. | |||
The system log (syslog) is for normal chatter from the operating system. Any program with the right permissions can use it (though you need to know the method to write to it, information all around the Internet can help) and it contains everything from the Ethernet going up and down, to webserver requests, and so on. If you don't run many programs or services on the SBC, the syslog will essentially be a mirror of the kernel log, because the kernel is the only thing talking. | |||
You can check these logs by using the web interface in the {{Code|System → Logs}} tab. | |||
Or you can perform more powerful filtering and displaying via an SSH terminal. For example, {{Code|dmesg}} is the command to display the kernel log, and {{Code|tail}} prints the last ten lines of input. So, if you are trying to see if you can get a device to be detected on USB, you can run <code>dmesg | tail</code> to print the latest ten lines of kernel log data. | |||
The actual locations of the log files (for filtering and reading) are: | |||
* {{Code|/var/log/syslog}} | |||
* {{Code|/var/log/dmesg}} | |||
: | But don't edit them directly! Always follow the advice and procedures around the Internet on how to properly log items to syslog. | ||
==Further Reading== | |||
Revision as of 20:19, 11 June 2018
Quick Downloads
Already know what you're doing? Here you go:
For PhidgetSBC (1070):
For PhidgetSBC2 (1072):
For PhidgetSBC3 (1073) kernel version 3.6.3:
- changelog
- SBC3 Firmware
- SBC3 Kernel Development Package
- SBC3 Kernel upgrade package (3.6.3 -> 3.14.27)
For PhidgetSBC3 (1073) kernel version 3.14.27:
For PhidgetSBC4 (SBC3003):
Getting Started With the Phidget SBC
Welcome to using the Phidget SBC. If you haven't already, check out the user guide in order to set up the following:
- Networking
- Administrator password
If you are ready to go, the first step will be deciding how you will use the SBC:
- Use the SBC like any other Linux computer, simply connect a monitor and a keyboard and begin your development.
- Use a more powerful external computer to develop your code, and then simply copy the files to the SBC.
If you are using an external computer, there are videos available to help you get started, here is a video for Java:
We also have videos for Python and C.
If you will not be using an external computer, jump ahead to learn about installing packages for development, otherwise, keep reading!
Developing with an External Computer
There are two main ways in which you can access your SBC from an external computer:
- SBC Web Interface
- Secure Shell (SSH)
The user guide covers the SBC Web Interface in detail, so we will review SSH below.
SSH
If you are unfamiliar with SSH, it is a simple yet powerful tool that allows you to log into a remote machine in order to execute commands. You can also transfer files using the associated SCP tool.
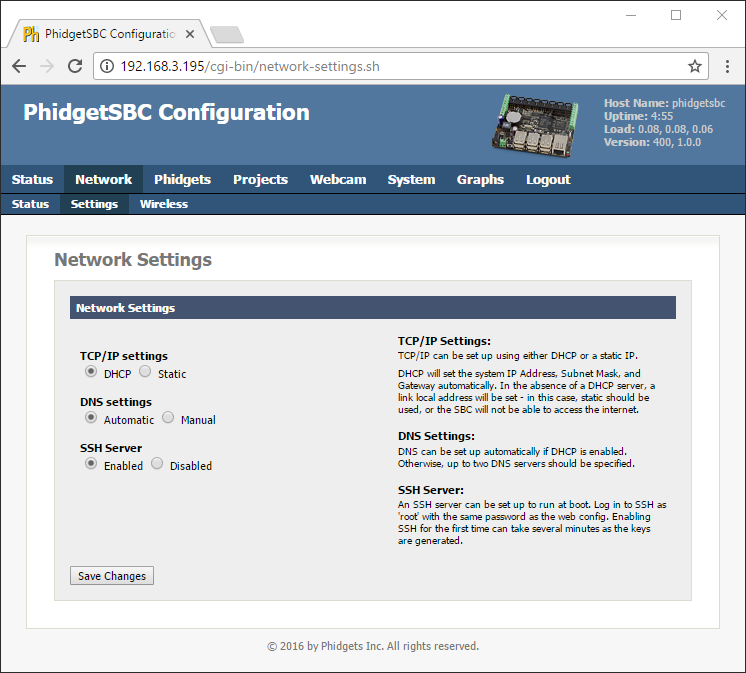
In order to use SSH, you need to know the following things about the SBC:
- IP address (e.g. 192.168.3.195) or the link local address (e.g. phidgetsbc.local)
- The administrator password
You must also enable SSH on the SBC. You can do this via the SBC Web Interface which is shown in the image below:
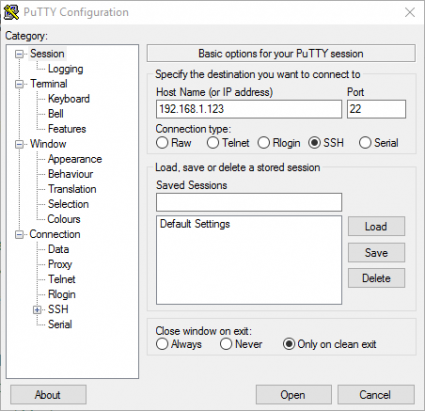
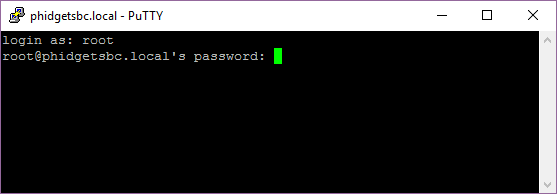
SSH on Windows
To use SSH on Windows, we recommend PuTTY. Use the images below as a guide for configuring PuTTY (use the IP address or the link local address interchangeably):

After clicking open, simply login as root and provide the administrator password:
To transfer files between your SBC and Windows machine, we recommend either of these programs:
You will follow a similar process to access the SBC as described for SSH.
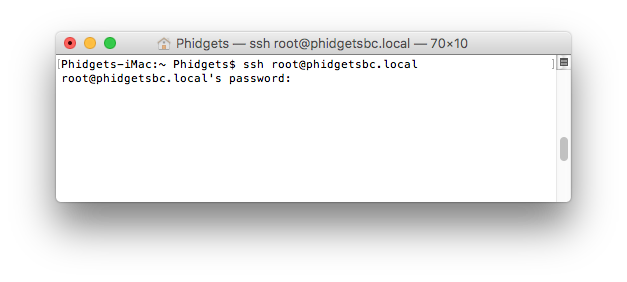
SSH on Linux and macOS
SSH is available on Linux and macOS by default. To run SSH, simply open the terminal and type the following:
ssh root@phidgetsbc.local
Or, something like this (you will need to know the IP address of your SBC):
ssh root@192.168.3.195
You will then be prompted for the password in order to gain access to the SBC:
To copy a file from the SBC to your development machine using SCP, simply open the terminal and type the following:
scp root@phidgetsbc.local:/path/to/source /path/to/destination
You can reverse this if you want to transfer a file from your development machine to your SBC:
scp /path/to/source root@phidgetsbc.local:/path/to/destination
Installing Packages for Development
At this point you have connected to the SBC through one or more these three options:
- SBC Web Interface
- SSH
- Directly via monitor and keyboard
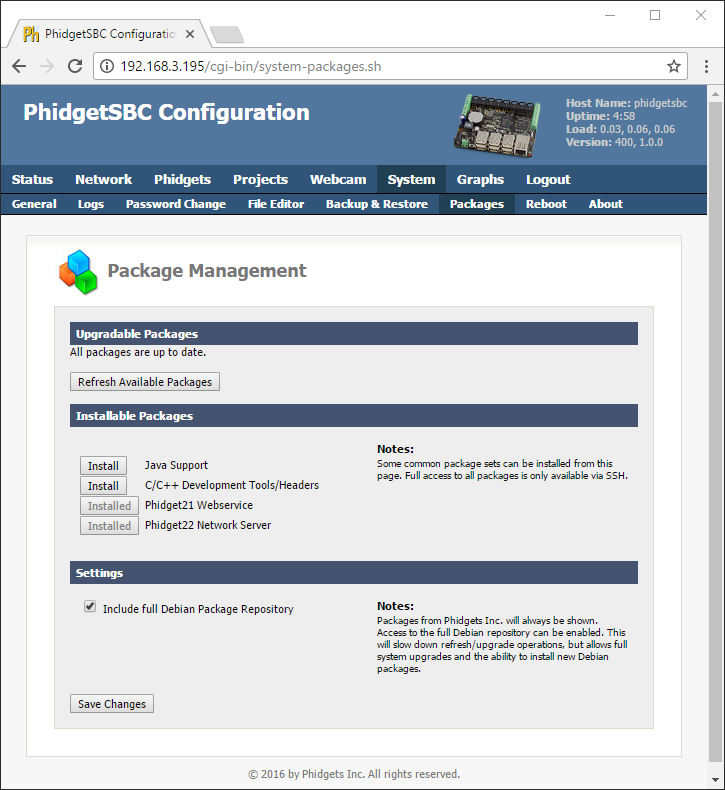
Now that you are connected, you may want to start developing on/for the SBC. Before you do this, you need to install some packages. Let's start with C and Java.
C and Java
The simplest way to install C and Java support on the SBC is via the install buttons on located on the SBC Web Interface (System->Packages). Check Include full Debian Package Repository before installing.
When developing for Java, ensure your development machine and your SBC have the same version of Java. Check your Java version by entering this command:
Java -version
If you need to update the version of Java on your SBC, use the following commands:
apt-get install openjdk-7-jre-headless
su
update-alternatives --config java
You're now ready to begin programming! Continue through this guide for code examples and directions on where to go next.
Installing Python
Installing support for Python has three steps:
- Ensure Include full Debian Package Repository is checked on the SBC Web Interface (System->Packages)
- Install Python
- Install Phidget Python module
You will need to run commands on the SBC to install support for Python. You can either use SSH to issue the commands, or you can connect directly to the SBC via a monitor and keyboard.
Basic Python
The base Python functionality can be downloaded and installed in one step:
apt-get install python
Next, install the Phidget Python module.
Method 1: Use the Internet
First, install wget and unzip:
apt-get install wget
apt-get install unzip
Next, copy the web link address for the Python Libraries and use it in the following command (right click to copy into a terminal):
wget http://copied_link
The Phidget Python libraries should now be downloaded in the folder you ran the previous command in. The next step is to unzip the file:
unzip filename
Finally, change directories to the unzipped folder:
cd /path/to/unzipped/folder
and install the Phidget Python libraries:
python setup.py install
You're now ready to begin programming! Continue through this guide for code examples and directions on where to go next.
Method 2: Use a USB Key
Copy the Python Libraries onto a USB key. Unpack the zip file into a folder on the USB key. Insert the key into the SBC.
You will have to figure out where the USB key (and the Phidget Python library folder) is now located. We describe how in the general Using USB Data Keys section. Next, run the following commands (be sure to modify the usb directory number if necessary):
cd /media/usb0/
python setup.py install
You're now ready to begin programming! Continue through this guide for code examples and directions on where to go next.
Developing Applications
If you are interested in developing on an external computer, keep reading. If you are planning on developing directly on the SBC, you can jump ahead to developing directly on the SBC.
Developing with an External Computer
When developing on an external computer, you will write, compile, and test your programs on that machine. When you are ready, you will then upload your programs to the SBC to run them. To demonstrate, we will use the Hello World example for Java. Download the following on your development machine before we get started:
Next, follow these steps:
1. Place phidget22.jar on your development machine in a directory that you will use to compile your Java files.
2. Copy the HelloWorld.java file from the example package to the same directory.
3. Compile the HelloWorld.java file. If you are using a Windows machine, type the following into the command prompt:
javac -classpath .;phidget22.jar HelloWorldExample.java
If you are using a Linux or macOS machine, type the following into the terminal:
javac -classpath .:phidget22.jar HelloWorldExample.java
You should now have the following class file:
- HelloWorldExample.class
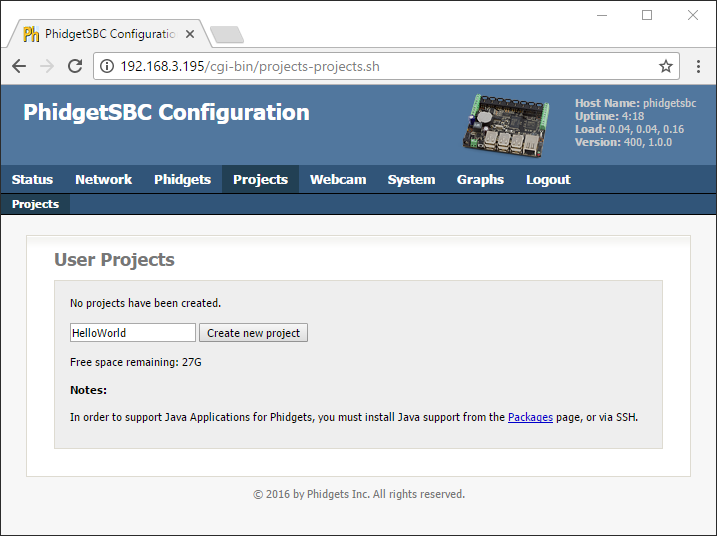
4. Using the SBC Web Interface, create a new project called HelloWorld:
5. On the next screen, you will be prompted to upload your files. We will upload the Java class file, and then click the Start button:
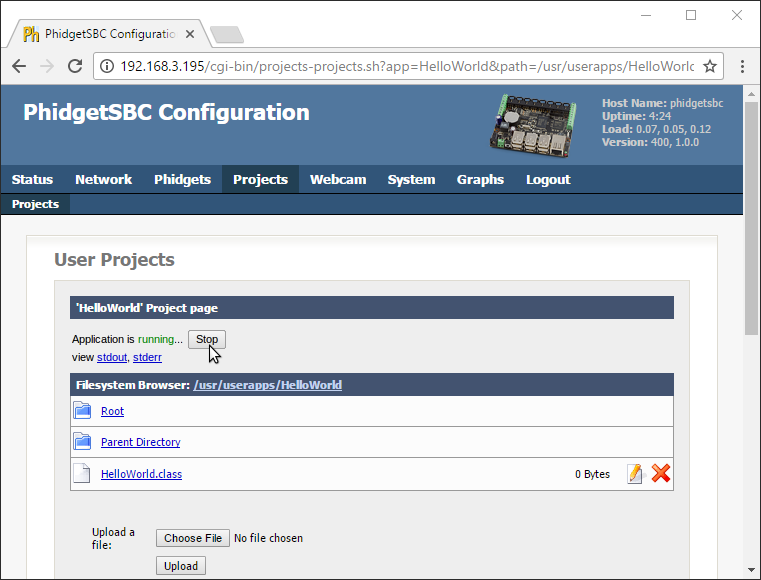
6. You'll note that as it runs, there are two links below the Stop button:
- stdout: view the program output like you would in a terminal or command prompt
- stderr: view the program error output
Success! The HelloWorld example is running on your SBC. If you aren't interested in developing directly on the Phidget SBC, jump ahead to running a program automatically.
Developing Directly on the Phidget SBC
When developing directly on the SBC, you will do so in one of the following ways:
- Access the terminal by connecting directly to the SBC using a keyboard and monitor.
- Access the terminal by using SSH.
Regardless of how you choose to access the terminal, the process is the same. First, you will need to pick a terminal editor in order to write and edit your files. Here are some options we recommend:
- nano - recommended for beginners, already installed
- vi - advanced, already installed
- emacs - advanced, needs to be installed
Next, follow these steps:
1. If you haven't already, connect to the SBC using SSH or a keyboard and monitor.
2. Download the Phidget Java HelloWorld Example to the SBC.
wget http://examples_link
3. Unpack the examples
unzip examples_filename
4. Compile the HelloWorldExample.java example:
javac -classpath .:/usr/share/java/phidget22.jar HelloWorldExample.java
5.Run the HelloWorldExampleprogram:
java -classpath .:/usr/share/java/phidget22.jar HelloWorldExample
Success! The HelloWorld example is running on your SBC. Now that you have a program running on your SBC, you may be interested in having it run automatically when the SBC boots, or maybe even on a schedule. Keep reading for more information.
Running a Program Automatically
After testing your program, you will likely want it to run on boot, or on a schedule, without your input.
Run on Boot
Running on boot ensures that your program will never miss an event. As long as the SBC is running, your code will be running. This section assumes you have written and compiled your program on an external computer, and have uploaded it to the SBC Web Interface. If you are not using the SBC Web Interface, jump ahead to using a boot script.
To have your program run on boot, navigate to Projects->ProjectName->Startup Settings in the SBC Web Interface. After selecting your project, copy the settings from the image below:
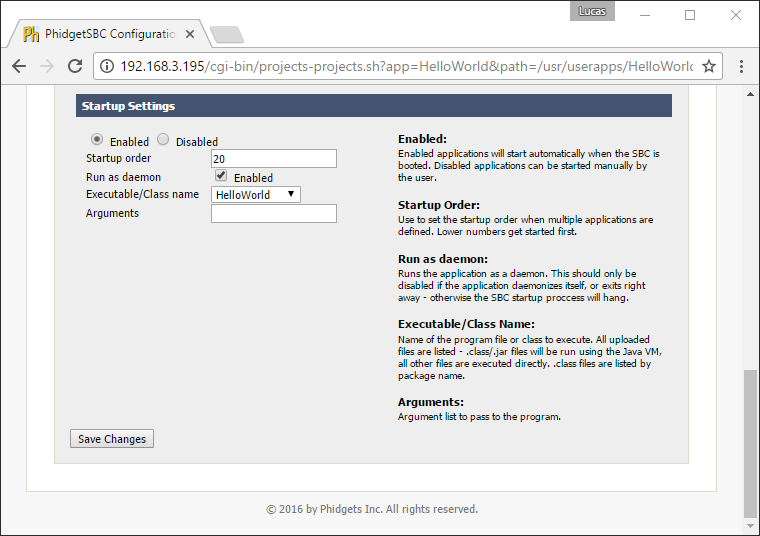
We will review some of the options that are shown in the image above:
- Startup Order: lower numbers boot first. Booting later means more programs are available for use, booting earlier means other programs can use your program.
- Run as a daemon: starts the program as a daemon. Unless you have explicitly written your program as a daemon, leave this checked, or else your SBC may hang on boot.
- Executable/Class name: your main Java class or C file.
- Arguments: any command line arguments the program needs.
After saving your changes, your program will run automatically whenever your SBC boots.
Automatically Running Python Code
To run a Python script as a standalone application, you will need to add a line called a "shebang" to the top of the script, with the path to your Python executable. If you have followed the steps in this guide, the line will be:
#!/usr/bin/python
Run on a Schedule
Running your program on a schedule allows you to perform your task once a week, or once a minute without worrying about memory management issues or instability problems that may arise. It executes, and then gets cleaned up. To run your program on a schedule, we recommend using Cron. Cron can automatically schedule programs (known as jobs, or cron jobs). Cron simply reads a crontab file and runs whatever programs are listed, with whatever timing they are listed with. Cron runs continuously in the background, but the cron jobs only run as long as they naturally would, and then they exit.
Let`s set up your first cron job. We will use nano to edit the crontab file, but feel free to use whatever editor you prefer.
First, set your editor to nano:
export EDITOR=nano
Next, edit your crontab file:
crontab -e
Finally, schedule your cron job:
#cron job that will run at 5AM every week:
0 5 * * 1 /root/code/myprogram argument1
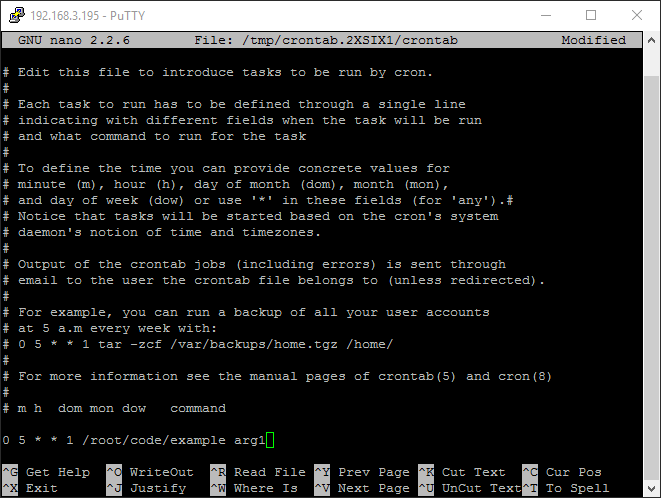
After entering your task, simply save and exit the file.
Run Using a Boot Script
If you want your program to run on boot, you can install your program into the boot order using a script. This process is covered here.
Programming
Ready to write some code? Select one of the programming languages below:
Phidget Network Server
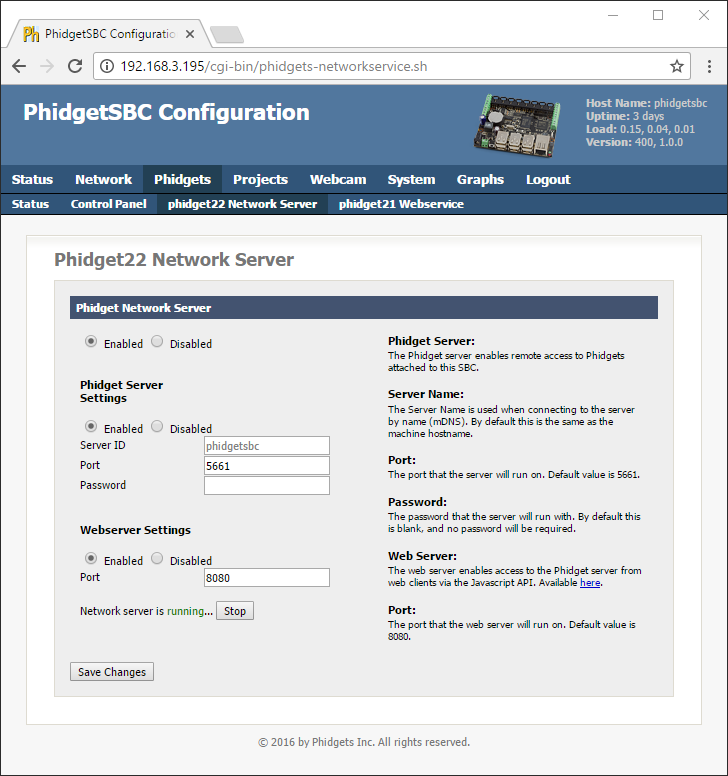
The Phidget Network Server is an extremely useful feature of Phidgets that allows you to remotely control Phidgets over your network. If you haven't already, check out the Phidget Network Server page for a complete overview.
Try it Out!
The Phidget SBC comes with the Phidget Network Server installed, and the SBC automatically starts the Network Server on boot. In order to change any of this default behaviour, navigate to Phidgets->phidget22NetworkServer using the SBC Web Interface:
In order to try the Phidget Network Server out, you will need a host computer, and a client computer:
- Host computer: the computer that is physically connected to the Phidgets via USB and is running the Phidget Network Server.
- Client computer: a computer running a Phidgets application that accesses Phidgets connected to the host computer.
For this example, we will use the Phidget SBC as the host computer. The next step is setting up your client computer. If you are using a Windows computer as your client, keep reading, otherwise, you can jump ahead here:
Windows Client
In order to remotely access Phidgets on your SBC, you should get your client computer set up. Follow the Getting Started guide for Windows below before continuing:
Now that you have Phidget drivers and libraries installed on your client computer, we can test the Phidget Network Server by following the steps below:
1. Open the Phidget Control Panel on your client computer. You will see something like this:
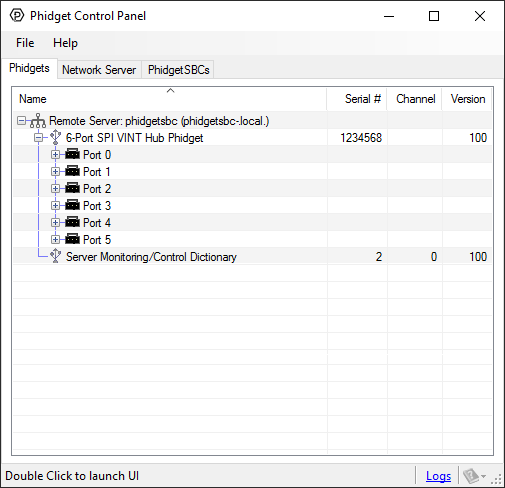
2. You now have access to the Phidgets that are connected to your Phidget SBC. Try double-clicking one of them to bring up an example.
macOS Client
In order to remotely access Phidgets on your SBC, you should get your client computer set up. Follow the Getting Started guide for macOS below before continuing:
Now that you have Phidget drivers and libraries installed on your client computer, we can test the Phidget Network Server by following the steps below:
1. Open the Phidget Control Panel on your client computer. You will see something like this:
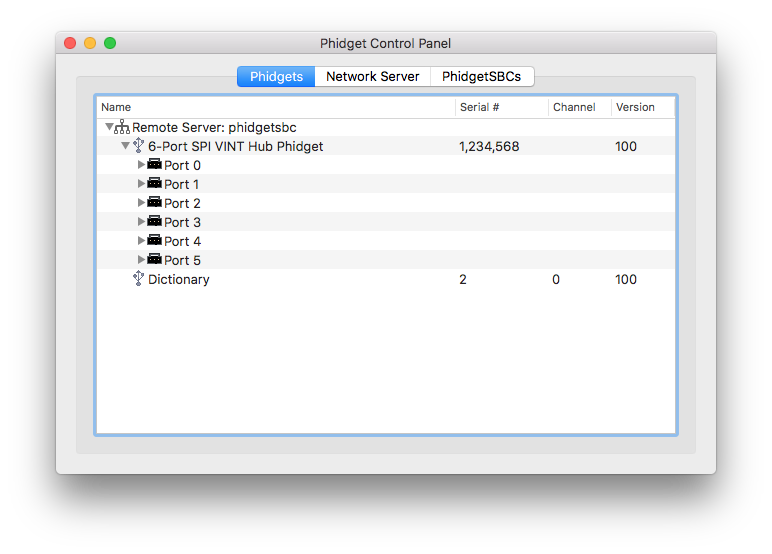
2. You now have access to the Phidgets that are connected to your Phidget SBC. Try double-clicking one of them to bring up an example.
Linux Client
In order to remotely access Phidgets on your SBC, you should get your client computer set up. Follow the Getting Started guide for Linux below before continuing:
Now that you have Phidget drivers and libraries installed on your client computer, we can test the Phidget Network Server by following the steps below:
1. From the terminal, type in the following command:
phidget22admin -s
You will now see something like this:
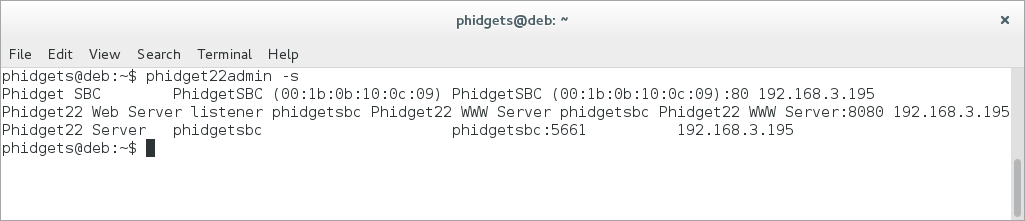
As shown in the image above, the server running on your SBC can now be seen over the network. You will now be able to remotely access any Phidgets connected to your SBC.
What's Next?
Now that you have seen the Network Server in action, you may be interested in implementing an application that takes advantage of all it's features. Luckily, every programming language we support comes with example code on how to do this! Jump to programming languages above.
Advanced Information
Writing Image to SD Card
If you would like to reflash your micro SD card, your first step will be to download the SBC4 SD Card Image. After downloading, unzip to get the .img file.
The next step is to flash your card. We recommend Etcher for flashing - this supports Windows, macOS, and Linux. It's also possible to flash from the command line on macOS and Linux, but this is not recommended as it does not verify the image (See Command Line).
Download and run Etcher. Plug in the MicroSD card using a card reader. Etcher will probably pick up the card automatically - otherwise, chose the card. Select the .img file using the select image button. :
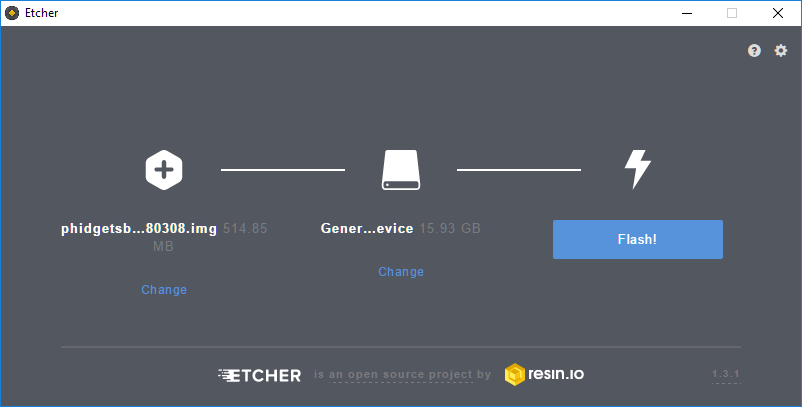
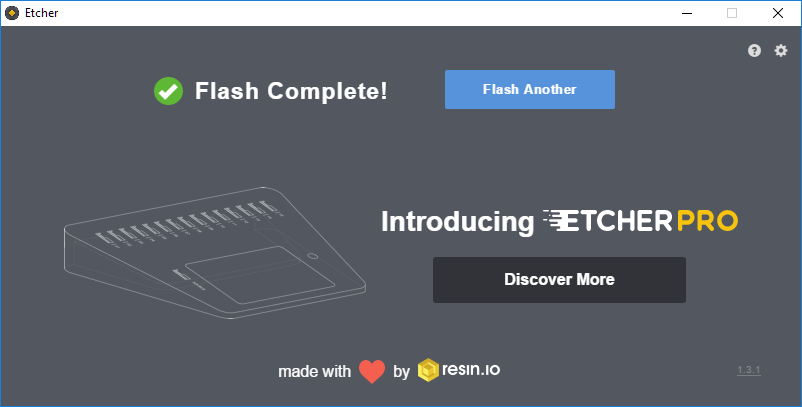
Next, press the Flash! button. After writing and verifying, you will see:
The next step is to plug the SD card back into the SBC and expand the file system. Jump ahead to expanding your file system.
Command Line
NOTE: Flashing from command line is not recommended. Please consider using Etcher on Windows, macOS or Linux.
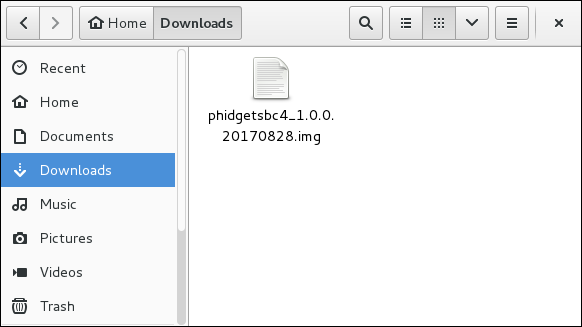
You should have already completed the first step, which is downloading the SD card image:

Next, make sure your SD card is plugged in, and enter the following into your terminal:
- diskutil list
This will list all of the devices currently mounted on your system:
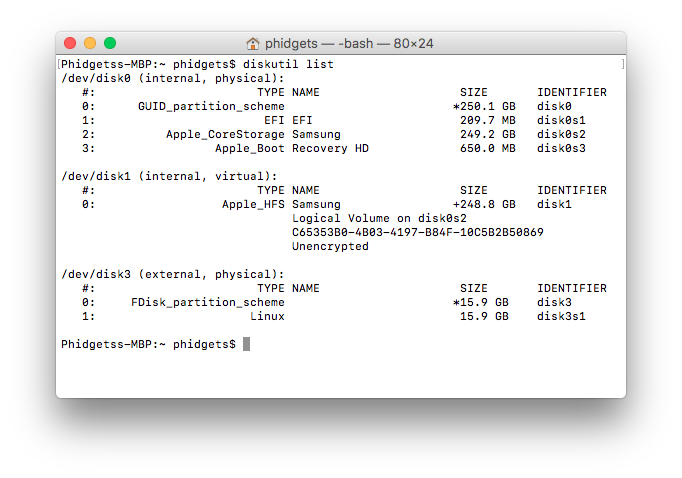
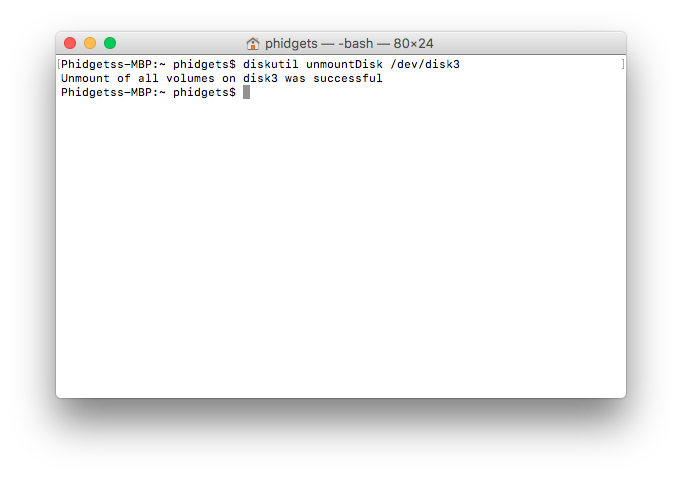
After verifying which device is your SD card, unmount it using the following command:
- diskutil unmountDisk /dev/diskX
Warning: Ensure you are writing to the correct disk
Next, we can write the image file to the SD card:
- if= path to your image file
- of = where to write output (note using rdisk instead of disk will result in faster write times)
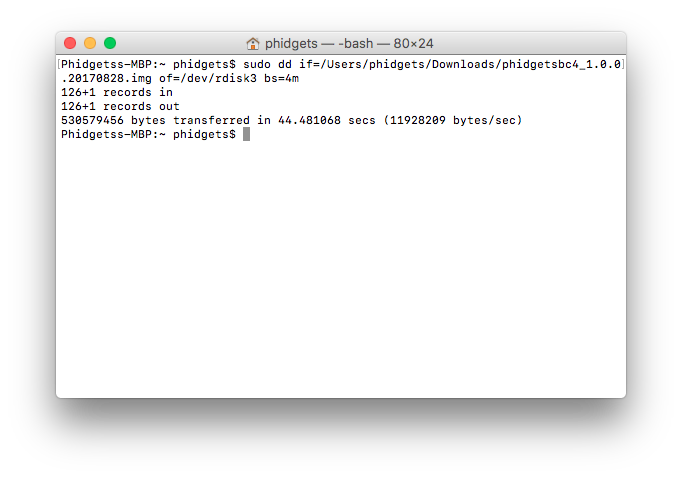
After writing, you are almost done. The next step is to plug the SD card back into the SBC and expand the file system. Jump ahead to expanding your file system.
You should have already completed the first step, which is downloading the SD card image:
Next, make sure your SD card is plugged in, and enter the following into your terminal:
- dh -f
This will list all of the devices currently mounted on your system:
After verifying which device is your SD card, unmount it using the following command:
- umount /dev/sdXX

Next, we can write the image file to the SD card:
- if= path to your image file
- of = where to write output (note: do not include partition number)
Warning: Ensure you are writing to the correct disk
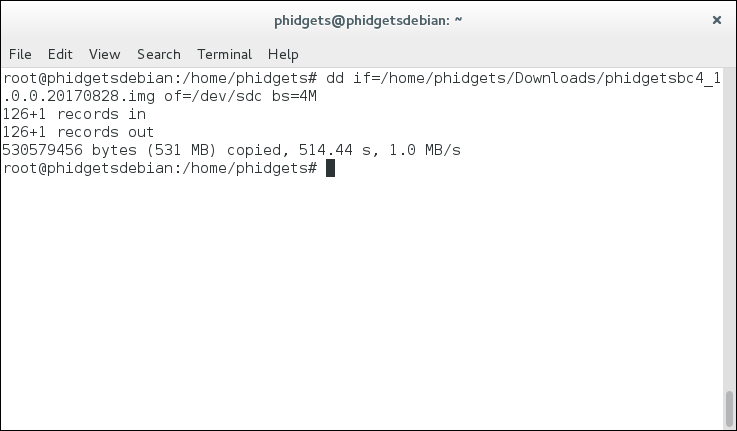
After writing, you are almost done. The next step is to plug the SD card back into the SBC and expand the file system.
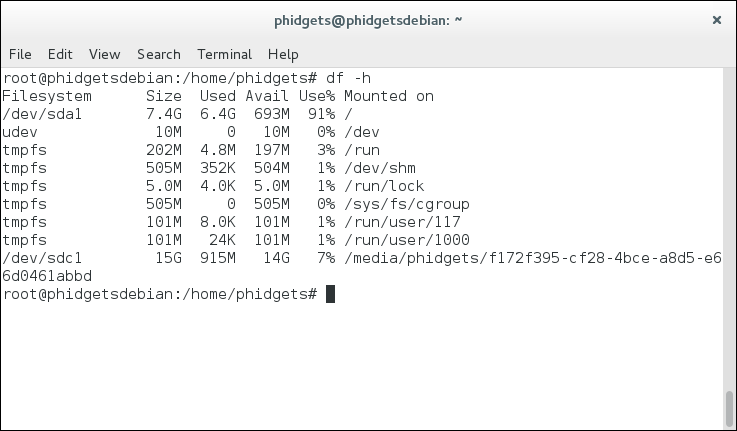
Expanding your File System
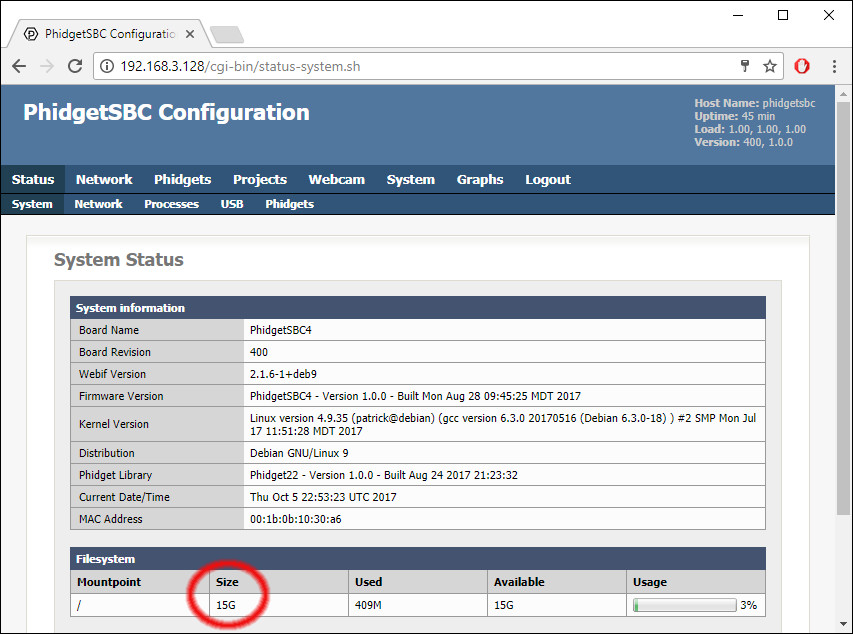
Note: PhidgetSBC4 SD card image version 3.0.0+ automatically expands the filesystem on first boot. For older SD card images, continue reading.
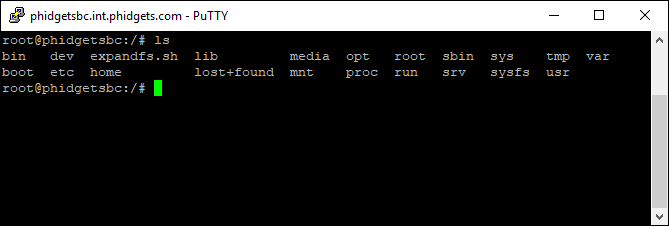
After writing the image file to your SD card, you will need to expand the file system size in order to take advantage of the full capacity of your card. In order to do this, you must run the expandfs.sh script which can be accessed at the / directory as shown here:
Note: if you plan on using SSH in order to run this script, you will need to enable SSH first (as it is turned off by default). Enabling SSH was covered above in the SSH section.
Next, simply run the script:
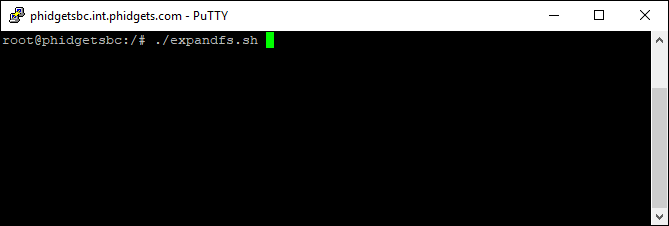
The SBC will automatically reboot, and your file system will be expanded. You can confirm that it has expanded by checking the file system size report.
Checking System Logs
The SBC maintains two logs: a kernel log and a system log.
The kernel log is for low-level occurrences, such as devices attaching and leaving the USB hub, recording what drivers are being used, and so on.
The system log (syslog) is for normal chatter from the operating system. Any program with the right permissions can use it (though you need to know the method to write to it, information all around the Internet can help) and it contains everything from the Ethernet going up and down, to webserver requests, and so on. If you don't run many programs or services on the SBC, the syslog will essentially be a mirror of the kernel log, because the kernel is the only thing talking.
You can check these logs by using the web interface in the System → Logs tab.
Or you can perform more powerful filtering and displaying via an SSH terminal. For example, dmesg is the command to display the kernel log, and tail prints the last ten lines of input. So, if you are trying to see if you can get a device to be detected on USB, you can run dmesg | tail to print the latest ten lines of kernel log data.
The actual locations of the log files (for filtering and reading) are:
/var/log/syslog/var/log/dmesg
But don't edit them directly! Always follow the advice and procedures around the Internet on how to properly log items to syslog.