OS - Phidget SBC: Difference between revisions
No edit summary |
No edit summary |
||
| Line 427: | Line 427: | ||
* Keep other running processes to a minimum. | * Keep other running processes to a minimum. | ||
** If you are running code locally right on the SBC, turn off the Phidget Network Server. | ** If you are running code locally right on the SBC, turn off the Phidget Network Server. | ||
===Saving a file system to flash to multiple SBC's=== | ===Saving a file system to flash to multiple SBC's=== | ||
Revision as of 16:57, 4 May 2017
Quick Downloads
Already know what you're doing? Here you go:
Note: updates should normally be done via the System -> Packages page on your PhidgetSBC4 web interface. It is rarely necessary to completely re-flash your device.
Getting Started with the Phidget SBC
Welcome to using the Phidget SBC. If you haven't already, check out the user guide in order to set up the following:
- Networking
- Administrator password
If you are ready to go, the first step will be deciding how you will use the SBC:
- Use the SBC like any other Linux computer, simply connect a monitor and a keyboard and begin your development.
- Use a more powerful external computer to develop your code, and then simply copy the files to the SBC.
Warning: Regardless of how you decide to use the SBC, you will be running on the SBC as root (super-user). This means you are able to overwrite important system files without the system asking for additional permissions.
If you will not be using an external computer, jump ahead to learn about installing packages for development, otherwise, keep reading!
Developing with an external computer
There are two main ways in which you can access your SBC from an external computer:
- SBC Web Interface
- Secure Shell (SSH)
The user guide covers the SBC Web Interface in detail, so we will review SSH below.
SSH
If you are unfamiliar with SSH, it is a simple yet powerful tool that allows you to log into a remote machine in order to execute commands. You can also transfer files using the associated SCP tool.
In order to use SSH, you need to know the following things about the SBC:
- IP address (e.g. 192.168.1.123) or the link local address (e.g. phidgetsbc.local)
- The administrator password
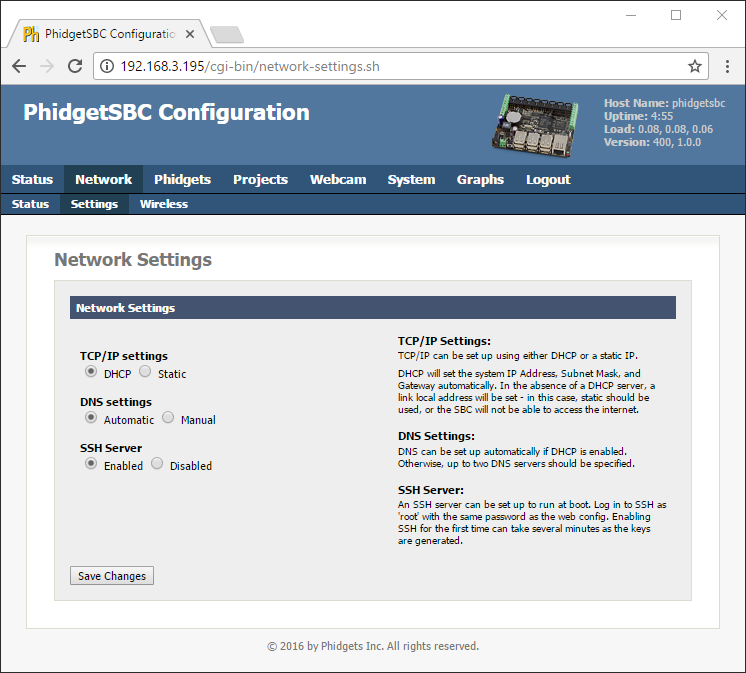
You must also enable SSH on the SBC. You can do this via the SBC Web Interface which is shown in the image below:
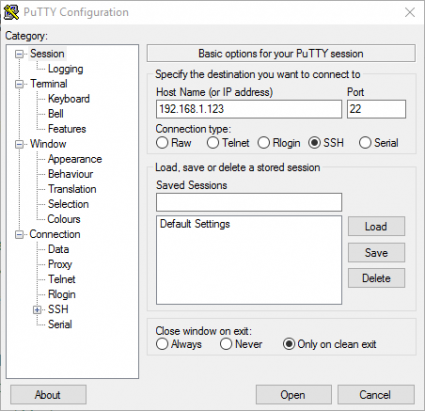
SSH on Windows
To use SSH on Windows, we recommend PuTTY. Use the images below as a guide for configuring PuTTY (use the IP address or the link local address interchangeably):

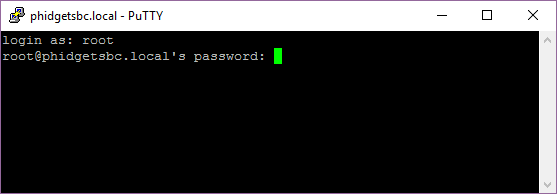
After clicking open, simply login as root and provide the administrator password:
To transfer files between your SBC and Windows machine, we recommend either of these programs:
You will follow a similar process to access the SBC as described for SSH.
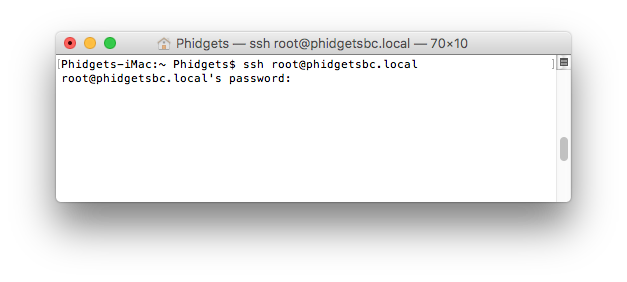
SSH on Linux and macOS
SSH is available on Linux and macOS by default. To run SSH, simply open the terminal and type the following:
ssh root@phidgetsbc.local
Or, something like this (you will need to know the IP address of your SBC):
ssh root@168.254.3.0
You will then be prompted for the password in order to gain access to the SBC:
To copy a file from the SBC to your development machine using SCP, simply open the terminal and type the following:
scp root@phidgetsbc.local:/path/to/source /path/to/destination
You can reverse this if you want to transfer a file from your development machine to your SBC:
scp /path/to/source root@phidgetsbc.local:/path/to/destination
Installing packages for development
At this point you have connected to the SBC through one or more these three options:
- SBC Web Interface
- SSH
- Directly via monitor and keyboard
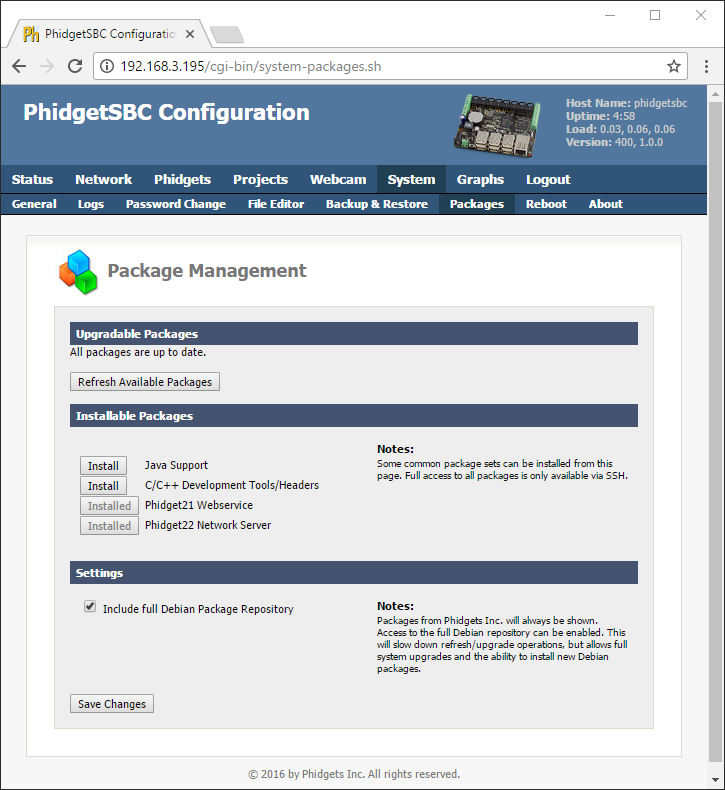
Now that you are connected, you may want to start developing on/for the SBC. Before you do this, you need to install some packages. Let's start with C/C++ and Java.
C/C++ and Java
The simplest way to install C/C++ and Java support on the SBC is via the install buttons on located on the SBC Web Interface (System->Packages). Check Include full Debian Package Repository before installing.
When developing for Java, ensure your development machine and your SBC have the same version of Java. Check your Java version by entering this command:
Java -version
If you need to update the version of Java on your SBC, use the following commands:
apt-get install openjdk-7-jre-headless
su
update-alternatives --config java
You're now ready to begin programming! Continue through this guide for code examples and directions on where to go next.
Installing Python
Installing support for Python has three steps:
- Ensure Include full Debian Package Repository is checked on the SBC Web Interface (System->Packages)
- Install Python
- Install Phidget Python module
You will need to run commands on the SBC to install support for Python. You can either use SSH to issue the commands, or you can connect directly to the SBC via a monitor and keyboard.
Basic Python
The base Python functionality can be downloaded and installed in one step:
apt-get install python
Next, install the Phidget Python module.
Method 1: Use the Internet
First, install wget and unzip:
apt-get install wget
apt-get install unzip
Next, copy the web link address for the Python Libraries and use it in the following command (right click to copy into a terminal):
wget http://copied_link
The Phidget Python libraries should now be downloaded in the folder you ran the previous command in. The next step is to unzip the file:
unzip filename
Finally, change directories to the unzipped folder:
cd /path/to/unzipped/folder
and install the Phidget Python libraries:
python setup.py install
You're now ready to begin programming! Continue through this guide for code examples and directions on where to go next.
Method 2: Use a USB Key
Copy the Python Libraries onto a USB key. Unpack the zip file into a folder on the USB key. Insert the key into the SBC.
You will have to figure out where the USB key (and the Phidget Python library folder) is now located. We describe how in the general Using USB Data Keys section. Next, run the following commands (be sure to modify the usb directory number if necessary):
cd /media/usb0/
python setup.py install
You're now ready to begin programming! Continue through this guide for code examples and directions on where to go next.
Programming with the Phidget SBC
Writing a Phidget Program
There are three ways to write and upload a Phidget program:
- Using the SBC Web Interface:
- This is useful for simple projects written in C or Java that you want to start at boot.
- Using SSH OR Using the SBC via keyboard and monitor
- Useful for projects that run at scheduled times (e.g. once per minute).
- Useful for projects that use languages other than Java or ARM-compiled C.
- Can also be used to start programs at boot, however, a startup script is needed. See this example.
If you aren't sure which method you prefer, keep reading. Otherwise, you can jump ahead here:
- Using SSH to run a program? Jump ahead to programming with SSH.
- Developing directly on the SBC? Jump ahead to developing code on the SBC.
- Using the Web Interface with your Java/C program? Keep reading!
Program in Java with the Web Interface
To show how to write, compile, and install Java programs on the SBC, we'll use the Hello World example for Java. Download the Java example package and make sure you have the same version of Java on both your development machine and on the SBC (how to check your version number was covered above).
The first step to getting the HelloWorld code running on on your SBC starts with your external development machine:
- Download phidget22.jar
- Place the SBC version of phidget22.jar on your development machine in the directory that you will use to compile the Java files.
- Copy the HelloWorld.java file into that working directory.
- Compile the HelloWorld.java file from within that working directory. From the command line prompt on Windows, this will be:
javac -classpath .;phidget22.jar HelloWorld.java- In a terminal on Linux or Mac OS, this will be:
javac -classpath .:phidget22.jar HelloWorld.java
- You should now have three compiled class files:
- HelloWorld.class
- HelloWorld$1.class
- HelloWorld$2.class
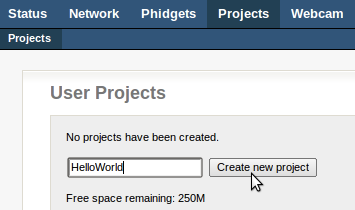
- Using the SBC Web Interface, create a new project called HelloWorld:
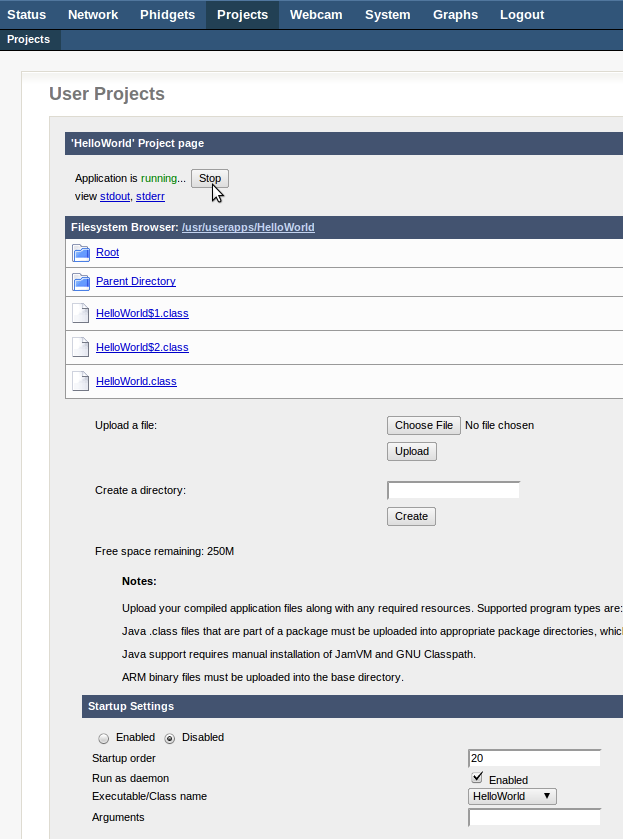
- On the next screen, you will be prompted to upload your files. We will upload the three Java class files, and then click the Start button:
- You'll note that as it runs, there are two links below the Stop button:
- stdout: view the program output like you would in a terminal or command prompt
- stderr: view the program error output
Success! The HelloWorld example is running on your SBC. If you aren't interested in programming with SSH, or developing directly on the Phidget SBC, jump ahead to running a program automatically.
Program with SSH
To show how to write, compile, and install Java programs on the SBC, we'll use the Hello World example for Java. Make sure you have Java installed before starting (this was covered above).
- Connect to the SBC using SSH.
- Download the Phidget Java Examples to the SBC.
wget http://copied_link
- Unpack the examples
unzip filename
- phidget22.jar is located at:
/usr/share/java/phidget22.jar
- Compile the HelloWorld.java example:
javac -classpath .:/usr/share/java/phidget22.jar HelloWorld.java
- To run the HelloWorld program, use:
java -classpath .:/usr/share/java/phidget22.jar HelloWorld
Success! The HelloWorld example is running on your SBC. If you aren't interested in developing directly on the Phidget SBC, jump ahead to running a program automatically.
Developing Code on the SBC
When you're developing directly on the SBC, you will need to use a terminal editor:
- nano - recommended for beginners
- vi
- emacs - needs to be installed
To install emacs, run this command on the SBC (ensure Include full Debian Package Repository is checked on the SBC Web Interface in System->Packages):
apt-get install emacs
Other than creating/editing files directly on the terminal, your experience will be identical to someone using SSH, so if you haven't read the section directly above, do so now.
Running a Program Automatically
After testing your program, you will likely want it to run on boot, or on a schedule, without your input.
Running on boot:
- Never miss an event. As long as the SBC is running, your code will be running.
Running on a schedule:
- Perform your task once a week, or once a minute without worrying about memory management issues or instability problems that may arise. It executes, and then gets cleaned up.
If you have made your choice and want to run your program on a schedule, jump ahead to running on a schedule. Otherwise, keep reading to learn how to run on boot!
Run on boot
This section deals with programs written in either Java or ARM-compiled C. If you are using a different type of program, jump ahead to using a boot script.
To have your program run on boot, navigate to Projects->Startup Settings in the SBC Web Interface. After selecting your project, copy the settings from the image below:
We will review some of the options that are shown in the image above:
- Startup Order: lower numbers boot first. Booting later means more programs are available for use, booting earlier means other programs can use your program.
- Run as a daemon: starts the program as a daemon. Unless you have explicitly written your program as a daemon, leave this checked, or else your SBC may hang on boot.
- Executable/Class name: your main Java class or C file
- Arguments: any command line arguments the program needs
Warning: Ensure your program is stable before taking the above steps. A program that is unstable (i.e. has memory leaks or similar) will cause your SBC to crash after running for days, or months on end.
Run on a schedule
To run your program on a schedule, we recommend using Cron. Cron can automatically schedule programs (known as jobs, or cron jobs). Cron simply reads a crontab file and runs whatever programs are listed, with whatever timing they are listed with. Cron runs continuously in the background, but the cron jobs only run as long as they naturally would, and then they exit.
Let`s set up your first cron job. We will use nano to edit the crontab file, but feel free to use whatever editor you prefer!
- Set your editor to nano:
export EDITOR=nano
- Edit your crontab file:
crontab -e
- Schedule your cron job
minute hour dayOfMonth month dayOfWeek YOUR_COMMAND
Done! Here is an example of a cron job that will run at 5 AM every week:
0 5 * * 1 /root/code/myprogram argument1
Run using a boot script
If you want your program to run on boot, you can install your program into the boot order using a script. This process is covered here.
Programming Languages
Ready to write some code? Select one of the programming languages below:
- C/C++
- Java
- Python
- JavaScript
- C# - not recommended, but possible using Mono
Network Server
The SBC comes with the Phidget Network Server installed, and the SBC automatically starts the Network Server at boot.
To practice using the Network Server, and to learn more about it, check out the Network Server section of the Linux page.
Advanced Information
Shutting off USB ports to save power
The SBC3 has an on-board USB hub that can control power to the ports. To do this unbind and rebind the USB drivers.
To turn off the ports echo "1-1" >/sys/bus/usb/drivers/usb/unbind
To turn on the ports echo "1-1" >/sys/bus/usb/drivers/usb/bind
These will also cause detach and attach events for the Phidget devices, respectively. While the drivers are unbound, you will not get any hot plug events for any devices on USB.
Using a Different Wireless Adapter
The support for the wireless adaptor that Phidgets sells is written into the SBC kernel. Hence, we do not support using other adaptors.
However, Linux is very flexible, and it is possible (though not easy) to write a custom kernel for the SBC and add support for a new wireless adaptor. We can't help you with this, but we do provide some basic guidelines for building your own kernel. You can also have a look at our thoughts on our own experience with choosing a Wifi adapter: Alternative Wi-Fi Adapters on the SBC.
Using a Different Webcam
In addition to the webcam that Phidgets sells, you have the option to use many different webcams with the SBC. There is a long list of compatible webcams.
The common thread for these webcams is that they use UVC - the USB Video Class - drivers for Linux. You can then use mount to find out what video device your webcam is mounted under.
Taking Pictures With the Webcam
Probably the most straightforward way to use a webcam for pictures rather than video is to use the opencv library. You can get it by:
apt-get install libcv2.1
If there is no libcv2.1 package, you can perform apt-cache search libcv to find the current version.
The opencv libraries can also be used within Python, by installing the link between them:
apt-get install python-opencv
Then taking pictures from within code becomes quite simple. For example, in Python, taking and saving an image is four lines:
#! /usr/bin/python

import cv

# The webcam is located at /dev/video0
# OpenCV only needs the number after video
webcam = cv.CaptureFromCAM(0)

frame = cv.QueryFrame(webcam)

cv.SaveImage("image.jpg", frame)
For the complete OpenCV documentation, see The OpenCV Reference, and specifically the section on Reading and Writing Images.
Note: The SBC is probably not as powerful for image processing and transport when compared to your desktop computer. Try running your image processing code on the SBC from an early point in development. During those test runs, you can visit the first System page of the SBC Web Interface to check the processor and memory use. For more information on processor power, check the specification for your SBC (on the product page on our main website) as well as our discussion of pushing processor limits below.
Checking System Logs
The SBC maintains two logs: a kernel log and a system log.
The kernel log is for low-level occurrences, such as devices attaching and leaving the USB hub, recording what drivers are being used, and so on.
The system log (syslog) is for normal chatter from the operating system. Any program with the right permissions can use it (though you need to know the method to write to it, information all around the Internet can help) and it contains everything from the Ethernet going up and down, to webserver requests, and so on. If you don't run many programs or services on the SBC, the syslog will essentially be a mirror of the kernel log, because the kernel is the only thing talking.
You can check these logs by using the web interface in the System → Logs tab.
Or you can perform more powerful filtering and displaying via an SSH terminal. For example, dmesg is the command to display the kernel log, and tail prints the last ten lines of input. So, if you are trying to see if you can get a device to be detected on USB, you can run dmesg | tail to print the latest ten lines of kernel log data.
The actual locations of the log files (for filtering and reading) are:
/var/log/syslog/var/log/dmesg
But don't edit them directly! Always follow the advice and procedures around the Internet on how to properly log items to syslog.
X Forwarding
Although most tasks can be done using the SBC Web Interface or SSH, you can also set up X11 forwarding on the SBC. X11 is the window manager base, which provides a graphical windowing system on the SBC. Although you probably won't connect directly to the X11 manager (i.e. by plugging a screen directly into the SBC), X11 also gives a user the ability to forward graphical windows over SSH. You will need the following packages installed:
x11-commonxbase-clients
After installing, make sure that the line in /etc/ssh/sshd_config has a line that says:
X11Forwarding yes
Then log out and log back into the SBC. This second time you log in, use the -X switch to turn on X forwarding for that connection:
ssh -X root@phidgetsbc.local
Then you should be able to run programs that launch a window, and it will launch remotely and appear on the computer you have the SSH connection from.
Pushing Processor Limits
The SBC, though more powerful than many embedded computers out there, is probably about as powerful as your smartphone. If you hook up 1 ms Phidget sampling devices to all six of its USB ports, events and packets will probably get lost. The exact data rates you can accomplish depend on:
- What else is running on the SBC
- How efficient your code is for external operations (like File I/O)
- Other minor details (e.g. the temperature of the SBC, etc)
If you want to achieve data rates as fast as possible, try these tips:
- Program in C, not in an interpreted language (Python, Java, .NET)
- Perform file I/O as little as possible. Locally cache data, manage your writing to a file in a separate thread, and use low-level write calls.
- Change the filesystem to a faster, non-compressed file system.
- Alternatively, use a high-data-rate USB key.
- Keep other running processes to a minimum.
- If you are running code locally right on the SBC, turn off the Phidget Network Server.
Saving a file system to flash to multiple SBC's
You may want to create a complete backup of your SBC root filesystem, which can then be flashed to other SBCs. This is how it could be done:
You will need a USB drive - we have had issues using cheap flash drives, so a real USB drive is recommended. Make sure it's empty, as it will be reformatted.
All of these commands are executed on your SBC, while logged in over SSH.
First, re-format the USB drive as ext3. Assuming the USB drive is sda and has a single partition:
umount /dev/sda1
mkfs.ext3 /dev/sda1
mount -t ext3 /dev/sda1 /media/usb0
Then, remount / as readonly, so it doesn't change as we're copying it. To do this, we need to kill all running processes except sshd:
service udev stop
service ifplugd stop
service rsyslog stop
service avahi-daemon stop
service phidgetNetworkserver stop
service ntp stop
service busybox-httpd stop
service dbus stop
service cron stop
pkill dhclient
mount -o remount,ro /
If the remount says that / is busy, do a 'ps auxww' and 'pkill' anything else that may be running until it remounts properly.
Then, copy / to the flash drive:
mkdir /media/usb0/root
mount --bind / /mnt/
cp -a /mnt/* /media/usb0/root/
Then, clean up the copy - removing files specific to this board. We also remove the APT cache to save space.
find /media/usb0/root/var/log -type f -print0 | xargs -0 rm -f
rm -rf /media/usb0/root/var/lib/apt/lists/*
mkdir /media/usb0/root/var/lib/apt/lists/partial
rm -f /media/usb0/root/var/cache/apt/*.bin
rm /media/usb0/root/etc/udev/rules.d/70-persistent-net.rules
rm /media/usb0/root/etc/ssh/ssh_host_*
then, create the ubinize.cfg file:
For SBC3:
cd /media/usb0
cat > ubinize.cfg << EOF
[rootfs]
mode=ubi
image=/media/usb0/system_ubifs.img
vol_id=0
vol_size=83MiB
vol_type=dynamic
vol_name=rootfs0
vol_flags=autoresize
EOF
For SBC2:
cd /media/usb0
cat > ubinize.cfg << EOF
[rootfs]
mode=ubi
image=/media/usb0/system_ubifs.img
vol_id=0
vol_size=64128KiB
vol_type=dynamic
vol_name=rootfs
vol_flags=autoresize
EOF
NOTE: you may need to increase vol_size if your filesystem is larger.
then, create the UBI image from the copy:
For SBC3:
mkfs.ubifs -F -m 4KiB -e 248KiB -c 4000 -r /media/usb0/root /media/usb0/system_ubifs.img
ubinize -o /media/usb0/system_ubi.img -m 4KiB -p 256KiB ubinize.cfg
For SBC2:
mkfs.ubifs -m 2KiB -e 126KiB -c 4050 -r /media/usb0/root /media/usb0/system_ubifs.img
ubinize -o /media/usb0/system_ubi.img -m 2KiB -p 128KiB -s 512 ubinize.cfg
then, unmount the drive to ensure everything is written out properly:
umount /dev/sda1
Then, you can remove the /root/ folder and system_ubifs.img. system_ubi.img can be flashed to other SBCs using the recovery system.
Software Details
For even more advanced uses of the SBC, it may help to know the gritty details of the SBC software system.
- Operating System
- Debian/GNU Linux
- Kernel 2.6.X or higher (generally kept up to date with latest releases, use
uname -rto check the kernel version)
- Main Filesystem (rootfs)
- UBIFS (a raw flash type of file system)
- Mounted in a 460 MB Nand partition (in Read/Write mode)
- Kernel
- uImage format
- Has its own 3MiB partition on bare Nand
- Web Interface Scripts and Configuration Data
- Located in
/etc/webif - Modifying these scripts can be done; however, it is very easy to enter invalid data that could cause the system to behave unexpectedly or not boot.
- User Applications uploaded through Web Interface
- Located in
/usr/userapps
- Webcam Device Location
/dev/video0- Numbers increase with more webcams
- Date and Time
- Set using ntp (network time protocol) at boot
- The ntp daemon continues to run in the background and will periodically update the clock
- The network keeps the SBC very close to real time
- Also there is a real-time clock with battery backup which will preserve date/time across reboots, power removal
- The real-time clock is synced to system time during reboot/shutdown
- If power is unplugged suddenly, and the network not restored, the real-time clock may not have the correct time
- Wireless Networking System
- Wireless adapter support for the wireless adapter that Phidgets sells is written into the kernel
- It supports WEP and WPA
- It is best configured through the configuration interface.
- Nand Layout
- The board contains 512MiB on Nand. This nand is split into 7 partitions as follows:
- 0: u-boot size: 256K Read Only
- 1: u-boot_env size: 128K Read Only
- 2: recovery_kernel size: 2M Read Only
- 3: kernel size: 3M Writable
- 4: flashfs size: ~3.625M Read Only
- 5: recovery_fs size: ~ 43M Read Only
- 6: rootfs size: ~ 460M Writable
- The final size of flashfs/recovery_fs/rootfs depends on the image size at production, and on the number/location of bad blocks in the NAND.
- Note: U-Boot and recovery kernel and filesystem cannot be written from Linux - this is a safety measure.
- Boot Loader
- U-Boot is used for setting up the processor and booting Linux, and is only accessible via a serial connection.
- Normal users will not need to use or modify it.
- Be very careful when modifying the u-boot partition. If it is damaged or overwritten, it is difficult to fix.
- When using U-Boot, a prompt will appear via serial shortly after power on.
- The environment variables will help you determine how to boot Linux on the SBC
- You can also refer to the U-Boot documentation
- Boot Process
- From power on...
- 1. Processor loads first 4 bytes from NAND into Steppingstone and runs it.
- 2. Steppingstone sets up RAM, copies u-boot from NAND into RAM and runs U-Boot.
- 3. U-Boot initializes the processor, sets GPIO state, etc., copies the linux kernel into RAM, sets up the kernel command line arguments, checks that the kernel image is valid, and boots it.
- 4. Linux boots, bringing up USB, Networking, NAND, etc. and then mounts the rootfs NAND partition on /.
- 5. init gets run as the parents of all processes, as uses the /etc/inittab script to bring up the system. This includes mounting other filesystems, settings the hostname, and running the scripts in /etc/init.d, among other things.
- 6. inittab then turns the green LED on.
- 7. inittab then sets up a getty on the first serial port, ready for interfacing using the debug board.