Language - Swift
Quick Downloads
Already know what you're doing? Here you go:
Getting Started with Swift
Welcome to using Phidgets with Swift! By using Swift, you will have access to the complete Phidget22 API, including events. We also provide example code in Swift for multiple Phidget classes.
iOS
If you didn't come from the iOS page, be sure to check it out first before you continue reading!
Xcode
Use our examples
One of the best ways to start programming with Phidgets is to use our example code as a guide. In order to run the examples for iOS you will need to download Xcode from the Mac App Store.
Now that you have Xcode installed, download and unpack the examples:
- Phidget Examples for Swift.
When you are ready to run the examples, open Phidgets.xcodeproj and follow these steps:
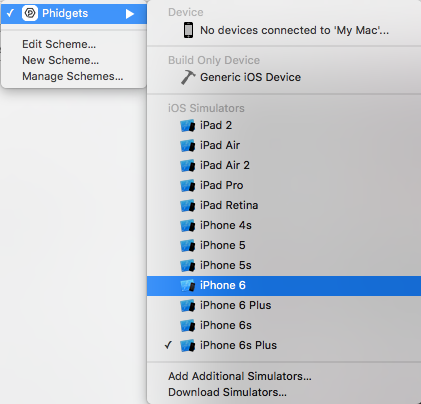
Select the target you want the application to run on. Note: you must be an Apple Developer in order to download the app to your iOS device.
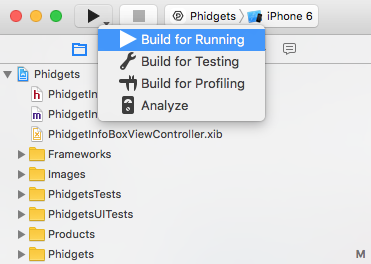
To run the example, click on the Run button.
The program will detect any servers that are currently online and have Phidgets connected. Here is an example output:
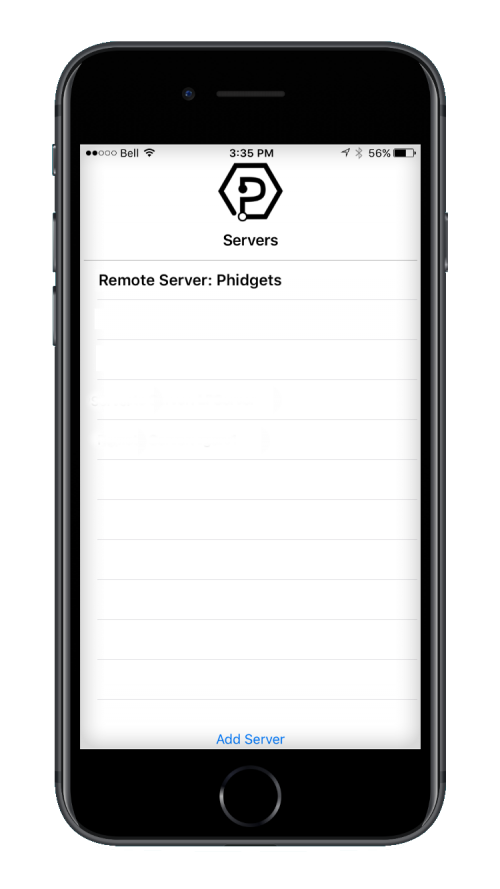
After confirming that the Phidgets Example is working, you can proceed to run the example for your specific device. Do this by selecting your server and then continue to navigate through the hierarchy until you reach your device. After tapping your device, the example will show automatically. Currently, we have example programs for the following classes:
- DigitalInput
- DigitalOutput
- VoltageInput
- VoltageRatioInput
Here is an example of what the DigitalOutput example looks like:
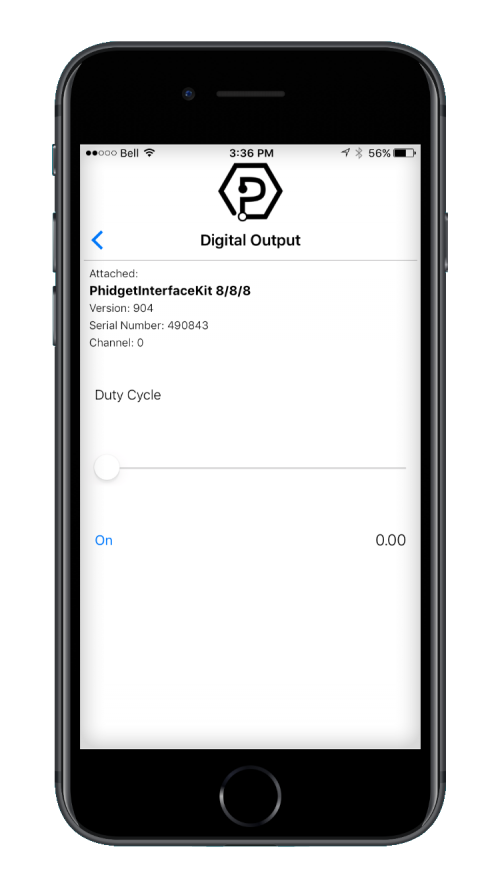
You should now have the example up and running for your device. Play around with the device and experiment with some of the functionality. When you are ready, the next step is configuring your project and writing your own code!
Configure your project
Whether you are building a project from scratch, or adding Phidget functionality to an existing project, you will need to configure your development environment to properly link the Phidget library. To begin:
1. Create a new Xcode project
2. Select an iOS application. For this tutorial's purposes, we will use a Single View Application.

3. Give the project a descriptive name such as PhidgetTest, select Swift as the language, and choose which devices will be supported.
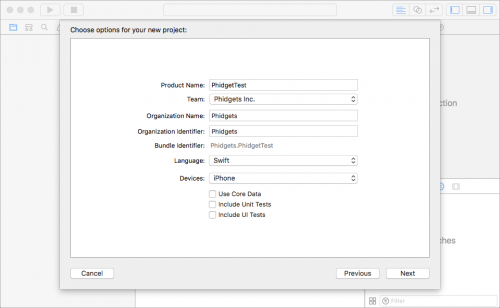
A .xcodeproj file will be created in the destination folder.
4. Remember the iOS drivers you downloaded from the iOS page? Move the iphoneos and iphonesimulator folders as well as phidget22.h into the same directory as your .xcodeproj
5. In Xcode, open Project Settings → Build Settings and navigate to the Linking section
6. In Linking → Other Linker Flags, following the following steps:
Select Any iOS Simulator SDK and enter: $(SRCROOT)/iphonesimulator/libPhidget22.a
Select Any iOS SDK and enter: $(SRCROOT)/iphoneos/libPhidget22.a

7. In Search Paths→Header Search Paths enter $(SRCROOT)

8. In your header file, add a reference to phidget22.h
#import "phidget22.h"
Success! The project now has access to Phidgets and we are ready to begin coding.
Write Code
By following the instructions for your operating system and compiler above, you probably now have a working example and want to understand it better so you can change it to do what you want. This teaching section has resources for you to learn from the examples and write your own. Your main reference for writing Objective-C code will be the Phidget22 API Manual:
The following code snippets describe how to do various general tasks with Phidgets. You should be able to find places in the examples where these snippets exist, and modify them to suit your requirements. Remember: your main reference for writing Objective-C code will be the Phidget22 API Manual and the example code.
Step One: Initialize and Open
You will need to declare your Phidget variable in your code. For example, we can declare a Phidget Digital Output like this:
var ch:PhidgetDigitalInput? = nil
The object name for any Phidget is listed in the Phidget22 API manual. Every type of Phidget also inherits functionality from the Phidget base class.
Next, the Phidget object needs to be initialized and opened.
PhidgetDigitalInput_create(&ch)
Phidget_open(ch)
Step Two: Wait for Attachment (plugging in) of the Phidget
Simply calling open does not guarantee you can use the Phidget immediately. To use a Phidget, it must be plugged in (attached). We can handle this by using event driven programming and tracking the attach events and detach events. Alternatively, we can call the following function:
Phidget_openWaitForAttachment(ch, 5000) //wait for attach for 5 seconds, if not time out
Waiting for attachment will block indefinitely until a connection is made, or until the timeout value is exceeded.
To use events to handle attachments, we need to first declare the function that will be called when an attach event is fired - in this case we will call the function gotAttach.
let gotAttach: @convention(c)(PhidgetHandle?, UnsafeMutableRawPointer?) -> () = {phid,context in
    DispatchQueue.main.async(execute: {
        let myObject = Unmanaged<YourViewController>.fromOpaque(context!).takeUnretainedValue()
        myObject.onAttachHandler()
    })
}
Next, we have to modify our create/open code to emulate the following:
PhidgetDigitalInput_create(&ch)
Phidget_setOnAttachHandler(ch,gotAttach,bridge(self))
Phidget_open(ch)
The bridge function mentioned above is described here:
func bridge<T : AnyObject>(_ obj : T) -> UnsafeMutableRawPointer {
    return Unmanaged.passUnretained(obj).toOpaque()
}
Step Three: Do Things with the Phidget
We recommend the use of event driven programming when working with Phidgets. In a similar way to handling an attach event as described above, we can add an event handler with the following code:
PhidgetDigitalInput_setOnStateChangeHandler(ch, gotStateChange, bridge(self))
This code will connect a function and an event. In this case, the gotStateChange function will be called when there has been a change to the devices input. Next, we need to create the gotStateChange function.
let gotStateChange: @convention(c)(PhidgetDigitalInputHandle?, UnsafeMutableRawPointer?, CInt) -> () = {_,context,cState in
    var state:Int32 = cState
    DispatchQueue.main.async(execute: {
        let myObject = Unmanaged<YourViewController>.fromOpaque(context!).takeUnretainedValue()
        myObject.onStateChangeHandler(state)
    })
}
Above, the onStateChangeHandler method is invoked on the main thread. Event data is stored as an Int32.
The method onStateChangeHandler is defined as follows:
func onStateChangeHandler(_ state:Int32){
    if  state == 0{
        stateLabel.text = "False"
    }
    else{
        stateLabel.text = "True"
    }
}
The example shown above simply changes the text of a UITextField to display whether the input is true or false.
Some events such as the attach or detach events belong to the base Phidget object and are thus common to all Phidgets. Please refer to the Phidget22 API manual and the Swift examples for a list of events and their usage.
If events do not suit your needs, you can also poll the device directly for data using code like this:
var state = 0
PhidgetDigitalOutput_getState(ch, &state)
stateLabel.text = state ? "True" : "False"
Polling code can be used inside a polling loop as an alternative to event driven programming.
Step Four: Close and Delete
At the end of your program, don't forget to close your device.
Phidget_close(ch)
PhidgetDigitalInput_delete(&digin)
Further Reading
Phidget Programming Basics - Here you can find the basic concepts to help you get started with making your own programs that use Phidgets.
Data Interval/Change Trigger - Learn about these two properties that control how much data comes in from your sensors.
Using Multiple Phidgets - It can be difficult to figure out how to use more than one Phidget in your program. This page will guide you through the steps.
Polling vs. Events - Your program can gather data in either a polling-driven or event-driven manner. Learn the difference to determine which is best for your application.
Logging, Exceptions, and Errors - Learn about all the tools you can use to debug your program.
Phidget Network Service - Phidgets can be controlled and communicated with over your network- either wirelessly or over ethernet.