Language - Max/MSP: Difference between revisions
No edit summary |
|||
| (43 intermediate revisions by 5 users not shown) | |||
| Line 1: | Line 1: | ||
<metadesc>Communicate over USB with sensors, controllers and relays with Phidgets! Our Max/MSP library is supported under Windows or MacOS.</metadesc> | |||
[[Category:Language]] | [[Category:Language]] | ||
__TOC__ | __TOC__ | ||
== Quick Downloads == | |||
=== Documentation === | |||
*{{Phidget22API}} (select Max/MSP from the drop-down menu) | |||
* | === Example Code === | ||
* [{{SERVER}}/downloads/ | * [{{SERVER}}/downloads/phidget22/libraries/windows/Phidget22MaxMSP.zip Max/MSP Examples] | ||
=== Libraries === | |||
*[{{SERVER}}/downloads/phidget22/libraries/windows/Phidget22MaxMSP.zip Phidget Max/MSP library - Windows] | |||
*[{{SERVER}}/downloads/phidget22/libraries/macos/Phidget22MaxMSP.zip Phidget Max/MSP library - macOS] | |||
{{WindowsQuickDownloads}} | {{WindowsQuickDownloads}} | ||
{{MacQuickDownloads}} | {{MacQuickDownloads}} | ||
==Getting | == Getting Started with Max/MSP == | ||
Welcome to using Phidgets with Max/MSP! By using Max/MSP, you will have access to the complete {{Phidget22API}}, including events. We also provide example code in Max/MSP for all Phidget devices. | |||
Phidget22 supports Max/MSP versions 6 and up. | |||
If you are developing for Windows, keep reading. Otherwise, jump ahead to [[#macOS | macOS]]. | |||
== Windows == | |||
{{Windows_Languages}} | |||
===Use Our Examples=== | |||
One of the best ways to start programming with Phidgets is to use our example code as a guide. In order to run the examples, you will need to download and install Max/MSP from [https://cycling74.com/downloads Cycling '74]. | |||
Next, download and unpack the Phidgets Max/MSP library: | |||
*[{{SERVER}}/downloads/phidget22/libraries/windows/Phidget22MaxMSP.zip Phidget Max/MSP library] | |||
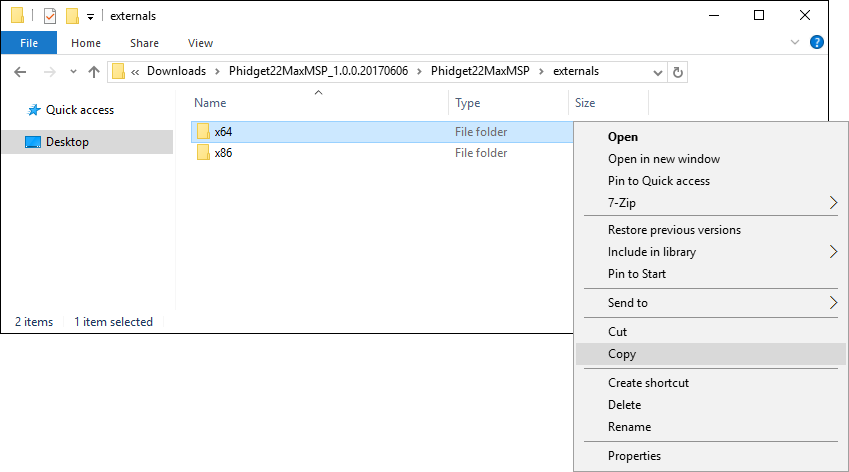
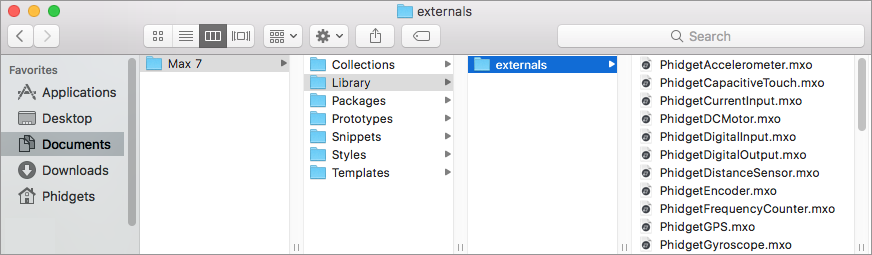
After unpacking the download, navigate to the ''externals'' folder. Copy the following folder to your clipboard: | |||
*32-bit Max/MSP -> copy the ''x86'' folder | |||
*64-bit Max/MSP -> copy the ''x64'' folder | |||
[[Image:Max_externals.png|link=|center]] | |||
The folder you copied needs to be placed in a specific location for Max/MSP to reference it. We will find this location in in the next step. | |||
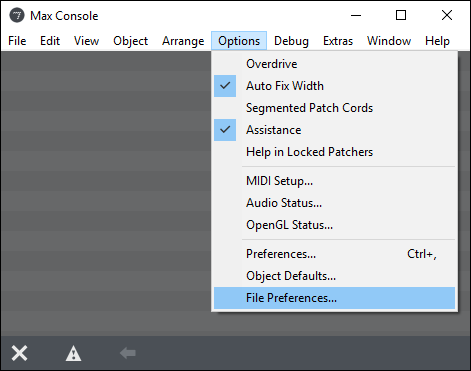
= | Open Max/MSP and navigate to ''Options'' -> ''File Preferences''. | ||
[[Image:Max_filepreferences.png|link=|center]] | |||
You will see something similar to this: | |||
[[Image:Max_filepreferences_locations.PNG|link=|center]] | |||
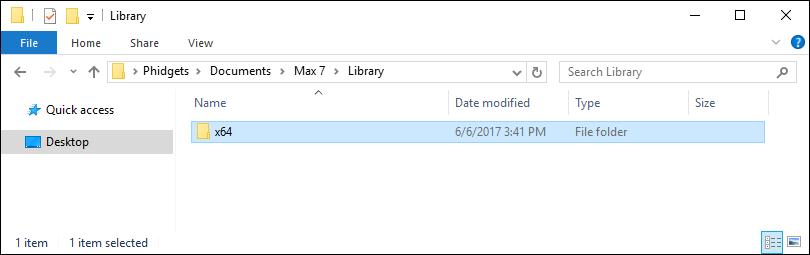
The folder that you copied earlier needs to be placed in any of the locations listed in ''File Preferences''. Navigate to one of the locations and paste the folder: | |||
[[Image:Max_folder.PNG|link=|center]] | |||
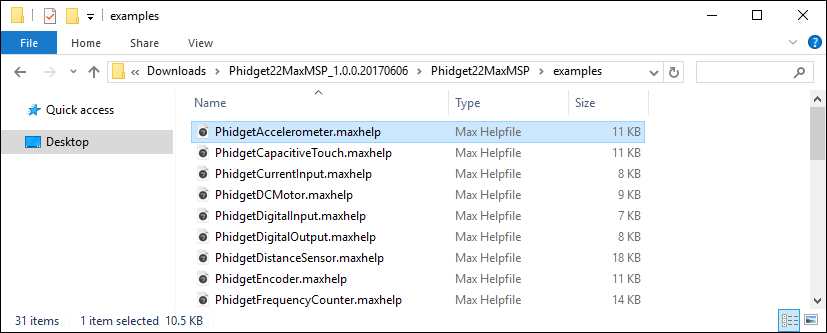
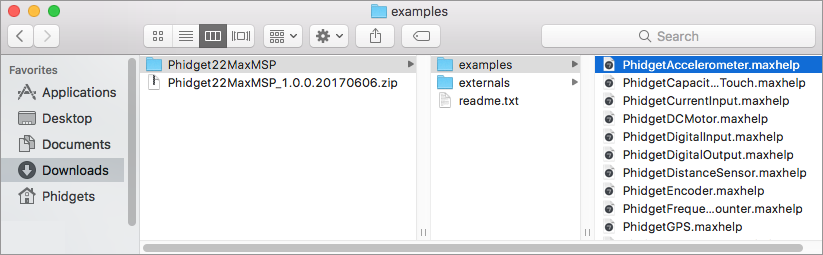
The Phidget Max/MSP library is now being referenced. Next, navigate to the ''examples'' folder located within the Phidget22MaxMSP folder you previously unpacked: | |||
[[Image:Max_examples.PNG|link=|center]] | |||
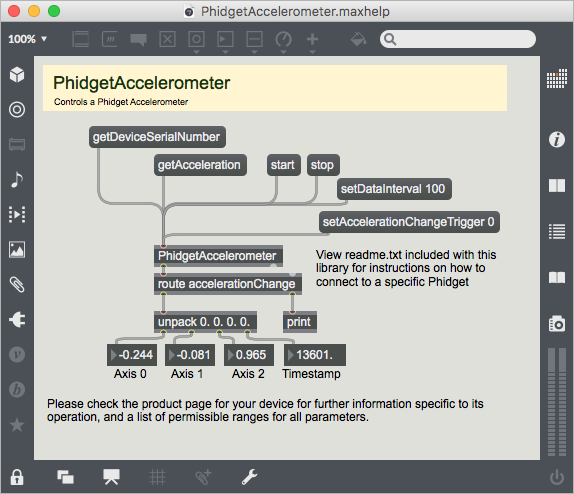
[[ | From here, select an example that will work with your Phidget and open it in Max/MSP. You can run the example by simply pressing the ''start'' button: | ||
[[Image:Max_run.png|link=|center]] | |||
You should now have the example up and running for your device. Play around with the device and experiment with some of the functionality. When you are ready, the next step is configuring your project and writing your own code! | |||
===Configure Your Project=== | |||
When you are building a project from scratch, or adding Phidget function calls to an existing project, you'll need to configure the Max/MSP environment to properly link the Phidget Max/MSP library. | |||
Ensure the Phidget library files are moved to a location in the Max/MSP search path. This procedure is covered in detail above in the [[#Use our examples | use our examples]] section. | |||
After moving the library files into the correct location your project will have access to Phidgets. Next, view the [[#Write Code | write your own code]] section below. | |||
==macOS== | |||
{{macOS_Languages}} | |||
===Use Our Examples=== | ===Use Our Examples=== | ||
One of the best ways to start programming with Phidgets is to use our example code as a guide. In order to run the examples, you will need to download and install Max/MSP from [https://cycling74.com/downloads Cycling '74]. | |||
Next, download and unpack the Phidgets Max/MSP library: | |||
*[{{SERVER}}/downloads/phidget22/libraries/macos/Phidget22.dmg Phidget Max/MSP library] | |||
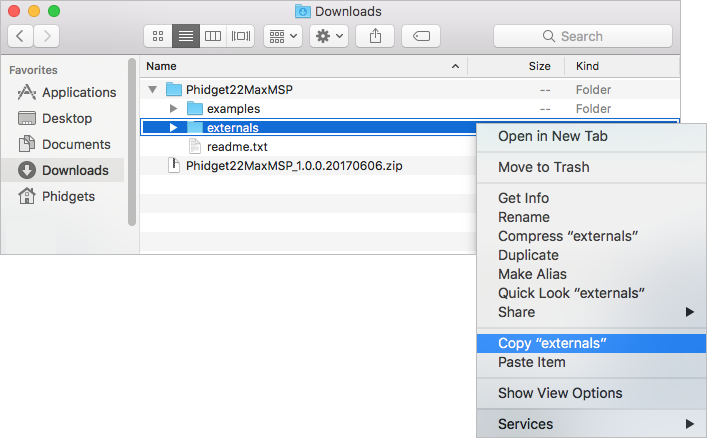
After unpacking the download, navigate to the ''externals'' folder and copy it to your clipboard: | |||
[[Image:Max_mac_externals.png|link=|center]] | |||
The | The folder you copied needs to be placed in a specific location for Max/MSP to reference it. We will find this location in in the next step. | ||
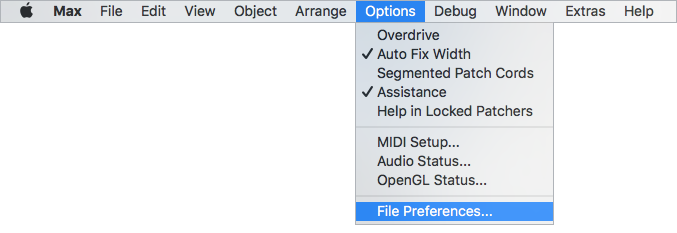
= | Open Max/MSP and navigate to ''Options'' -> ''File Preferences''. | ||
[[Image:Max_mac_filepreferences.png|link=|center]] | |||
You will see something similar to this: | |||
[[Image:Max_mac_filepreferences_locations.png|link=|center]] | |||
The | The folder that you copied earlier needs to be placed in any of the locations listed in ''File Preferences''. Navigate to one of the locations and paste the folder: | ||
[[Image:Max_mac_folder.png|link=|center]] | |||
The | The Phidget Max/MSP library is now being referenced. Next, navigate to the ''examples'' folder located within the Phidget22MaxMSP folder you previously unpacked: | ||
[[Image:Max_mac_examples.png|link=|center]] | |||
From here, select an example that will work with your Phidget and open it in Max/MSP. You can run the example by simply pressing the ''start'' button: | |||
[[Image:Max_mac_run.png|link=|center]] | |||
You should now have the example up and running for your device. Play around with the device and experiment with some of the functionality. When you are ready, the next step is configuring your project and writing your own code! | |||
===Configure Your Project=== | |||
When you are building a project from scratch, or adding Phidget function calls to an existing project, you'll need to configure the Max/MSP environment to properly link the Phidget Max/MSP library. | |||
Ensure the Phidget library files are moved to a location in the Max/MSP search path. This procedure is covered in detail above in the [[#Use our examples 2 | use our examples]] section. | |||
[[ | After moving the library files into the correct location your project will have access to Phidgets. Next, view the [[#Write Code | write your own code]] section below. | ||
== Write Code == | |||
{{WriteCode_Intro|Max/MSP|MaxMSP}} | |||
[[ | === Example Flow === | ||
First, let's explain how to operate the examples. We will take a look at the PhidgetVoltageInput example: | |||
[[Image: MSP Example.png|link=|center]] | |||
For the | For this particular example, the Max object is called PhidgetVoltageInput, which is located near the bottom left of the screen. Objects/message boxes are connected to the inputs and outputs of the PhidgetVoltageInput object. The input objects will either cause a property of the device to change or request for a property to be retrieved. The output objects return the retrieved information. All the supported functions for Max/MSP will be documented in the {{Phidget22API}} for your device. | ||
= | Try it for yourself! Click on the getDeviceSerialNumber message box to request the Phidget to retrieve the serial number of the device. You should see the a message in the Max window denoting the serial number of your device. All devices support the getDeviceSerialNumber message, making it an easy way to determine if the Phidget libraries are correctly set up, and whether the Max/MSP application is connected to your device. | ||
[[Image: MaxMSP_GetSerial.png|link=|center]] | |||
If | If your example contains a get[DataType] message box, click on it to cause the associated data to be output with a relevant prefix. [DataType] can denote any data the object may offer, such as Voltage for a voltage input. A list of available messages and their associated outputs is outlined in the {{Phidget22API}} for your device. | ||
[[Image: MaxMSP_GetVoltage.png|link=|center]] | |||
If your example contains the start message box, you can continuously poll for events. Just press the start message box to start sampling. When an event occurs on a Phidget (i.e. when a sensor detects a change in the measured data), associated data will be output with related prefixes. Press the stop message box to stop sampling. | |||
For the PhidgetDigitalOutput example, there are setDutyCycle and setState message boxes. Changing the numbers will cause the digital output to change. Your example may contain device specific message boxes to click on. Click them to see what they do! | |||
=== Code Snippets === | |||
Your best resource to program code in MaxMSP will be our examples. | |||
If you aren't familiar with concepts in Phidget programming, you may find our General Phidget Programming page helpful. It provides a very generic overview of what traditional languages follow when using Phidgets. For setup 'syntax', your main resource will of course be this MaxMSP page, the {{Phidget22API}}, and the examples. But for conceptual details about particular actions - opening a Phidget, for example - the General Phidget Programming page is a more in-depth resource. | |||
Keep in mind when reading these general resources that the Max/MSP libraries may not implement the full {{Phidget22API}} - some function calls and Phidget classes may not be supported. | |||
In general, Phidget objects can be placed inside the patcher, and functions can be called on them using appropriately connected messages. We go over a basic setup for this below. | |||
[ | ==== Step One: Initialize and Open ==== | ||
This tutorial uses a Phidget Voltage Input, and thus the object we use will be called PhidgetVoltageInput. Initializing and opening the device is be done by placing a new object. Other objects handle different Phidgets - a Spatial, a Temperature Sensor, a Motor Controller, etc. Only the name of the object changes. You can find the name for the object in the .maxhelp file for your device. The help file will be named the same as the software object for your device. If you are not sure what the software object for your device is, find your Phidget on our [http://www.phidgets.com webpage], and then check the API documentation for it. | |||
In the case of a Voltage Input, we name it PhidgetVoltageInput: | |||
[[Image: MaxMSP_VoltageInput_generic.png|link=|center]] | |||
'''Important:''' a local connection will reserve the device until closed. This prevents any other instances from retrieving data from the Phidget, including other programs. Every Phidget object in Max will automatically try to connect to and reserve a Phidget for itself. As long as a MaxMSP Phidget object is running, it will continuously try to connect to a Phidget, even trying to reconnect if it gets disconnected. | |||
=====Specifying a Phidget===== | |||
When the instance is created as with the Voltage Input above, normally it will make a connection to the first device of its type it can find. The Phidget object can also be declared with a number of specifiers to open a specific Phidget instead. | |||
Specifiers can be added to the object in the format: | |||
'''PhidgetExternal {Specifiers}''' | |||
These will be written in the form: | |||
'''specifier=value''' | |||
The full list of specifiers that can be used to identify a Phidget in Max/MSP are as follows: | |||
{| | |||
|- | |||
|'''serialnumber''' | |||
|The serial number of the device | |||
|- | |||
|'''channel''' | |||
|The channel of the device to open | |||
|- | |||
|'''hubport''' | |||
|The hub port the device is plugged into (where applicable) | |||
|- | |||
|'''ishubport''' | |||
|Specifies whether this channel should be opened on a hub port directly, or on a VINT device attached to a hub port. | |||
|- | |||
|'''remote''' | |||
|Forces the object to connect to a remote device over a network, ignoring devices on the local machine | |||
|- | |||
|'''local''' | |||
|Forces the object to connect to a device plugged into the local machine, ignoring network devices | |||
|} | |||
For instance, to open a VoltageInput with serial number 349428, you would use: | |||
[[Image: MaxMSP VoltageInput specific.png|link=|center]] | |||
Some other examples would be: | |||
''Open a Digital Input:'' | |||
PhidgetDigitalInput | |||
Open a | ''Open channel 1 of a Digital Input on port 2 of a hub with serial number 35569'' | ||
PhidgetDigitalInput serialnumber=35569 channel=1 hubport=2 | |||
''Open open hub port 2 as a DigitalInput for a hub with serial number 35569'' | |||
PhidgetDigitalInput serialnumber=35569 hubport=2 ishubport=1 | |||
Open | ''Open a Digital Input with serial number 35569 on a remote server'' | ||
PhidgetDigitalInput serialnumber=35569 remote=1 | |||
To access Phidgets over a network, use the PhidgetNet object in your patcher | |||
==== | =====Using a Phidget Over a Network===== | ||
To use the Network Server, first the Phidget needs to be plugged in to a computer that has the Network Server turned on within your local network. (For information on how to do this, see the Phidget Network Server page in the section on how to use the Network Server for your operating system). | |||
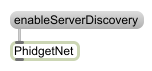
Next, in your patch you need a PhidgetNet object. To automatically find local networks, send it a message saying enableServerDiscovery. | |||
[[Image: MaxMSP Enable Server Discovery.png|link=|center]] | |||
Then, to connect a Phidget over the network, change the object text to specify it is to connect to a Phidget on a remote server, as per the following example. | |||
[[Image: MaxMSP Remote.png|link=|center]] | |||
==== Step Two: Wait for Attachment (plugging in) of the Phidget ==== | |||
Although this is a required step in many of our other languages (and therefore you may be expecting this if coming from another Phidget language), in MaxMSP you do not have to add a specific waitForAttachment block. | |||
Keep in mind, however, that if your Phidget is not responding within your MaxMSP program, it may simply not be plugged in! Send a getAttached message to a Phidget object at any time to see if it's attached. | |||
==== Step Three: Do Things with the Phidget ==== | |||
There are two main approaches for retrieving data when working with Phidgets. Data is accessed either by one-time polling or at a fixed rate via on-board timers for some devices. | |||
Getting or setting values directly via polling on the Phidget is done through messages linked to the inlet. The object’s inlet can be wired to send commands to the device, and the outlet used to retrieve the results. Setting values on the Phidget is achieved by using the set messages, and some properties can be read with get messages: | |||
[[Image: MaxMSP_get_and_set.png|link=|center]] | |||
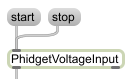
[[Image: | To sample at a fixed rate, use the start and stop messages to start and stop the data flow, respectively. | ||
[[Image: MaxMSP_Start_Stop.png|link=|center]] | |||
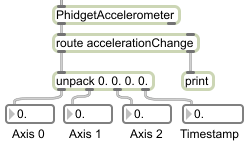
Data from the outlet of a Phidget object is always given a prefix to allow for routing. For instance, the digital input state state change event data is given the prefix “stateChange”, and the voltage input voltage change event similarly use “voltageChange”. The specific prefixes used for each set of outlet data is listed under the API page for their class in the {{Phidget22API}}. | |||
[[Image: MaxMSP_Routing.png|link=|center]] | |||
Although this is a required step in many of our | |||
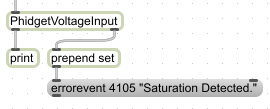
The rightmost outlet on the Phidget object outputs error event data. This will send information on error events such as saturation events. To see which error events may apply to your device, check its API page in the {{Phidget22API}}. | |||
[[Image: MaxMSP_Error_Event.png|link=|center]] | |||
==== Step Four: Close and Delete ==== | |||
Although this is a required step in many of our other languages (and therefore you may be expecting this if coming from another Phidget language), in MaxMSP you do not have to add a specific close and delete block. | |||
====Special Case: Multiple Phidgets==== | ====Special Case: Multiple Phidgets==== | ||
Multiple Phidgets of the same type can easily be used inside a single program, it only requires another Phidget object placed. If two of the same type of Phidget object are placed, the serial number | Multiple Phidgets of the same type can easily be used inside a single program, it only requires another Phidget object placed. If two of the same type of Phidget object are placed, the serial number and channel arguments should always be specified (as well as hub port, if applicable) to ensure that the correct Phidget gets associated with the correct object. | ||
== Further Reading == | |||
[[Phidget Programming Basics]] - Here you can find the basic concepts to help you get started with making your own programs that use Phidgets. | |||
[[Data Interval/Change Trigger]] - Learn about these two properties that control how much data comes in from your sensors. | |||
[[Using Multiple Phidgets]] - It can be difficult to figure out how to use more than one Phidget in your program. This page will guide you through the steps. | |||
[[Polling vs. Events]] - Your program can gather data in either a polling-driven or event-driven manner. Learn the difference to determine which is best for your application. | |||
[[Logging, Exceptions, and Errors]] - Learn about all the tools you can use to debug your program. | |||
[[Phidget Network Server]] - Phidgets can be controlled and communicated with over your network- either wirelessly or over ethernet. | |||
Revision as of 21:32, 26 June 2018
Quick Downloads
Documentation
- Phidget22 API (select Max/MSP from the drop-down menu)
Example Code
Libraries
- Phidget Max/MSP library - Windows
- Phidget Max/MSP library - macOS
- Windows Drivers Installer (32-Bit)
- Windows Drivers Installer (64-Bit)
- macOS Installer
Getting Started with Max/MSP
Welcome to using Phidgets with Max/MSP! By using Max/MSP, you will have access to the complete Phidget22 API, including events. We also provide example code in Max/MSP for all Phidget devices.
Phidget22 supports Max/MSP versions 6 and up.
If you are developing for Windows, keep reading. Otherwise, jump ahead to macOS.
Windows
If you haven't already, please visit the Windows page before you continue reading. There you will be instructed on how to properly set up your Windows machine so you can follow the guides below!
Use Our Examples
One of the best ways to start programming with Phidgets is to use our example code as a guide. In order to run the examples, you will need to download and install Max/MSP from Cycling '74.
Next, download and unpack the Phidgets Max/MSP library:
After unpacking the download, navigate to the externals folder. Copy the following folder to your clipboard:
- 32-bit Max/MSP -> copy the x86 folder
- 64-bit Max/MSP -> copy the x64 folder
The folder you copied needs to be placed in a specific location for Max/MSP to reference it. We will find this location in in the next step.
Open Max/MSP and navigate to Options -> File Preferences.
You will see something similar to this:
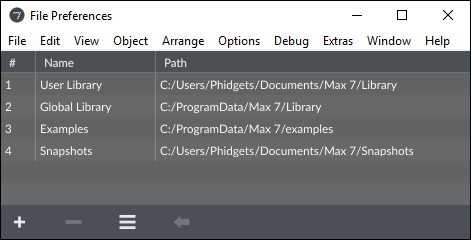
The folder that you copied earlier needs to be placed in any of the locations listed in File Preferences. Navigate to one of the locations and paste the folder:
The Phidget Max/MSP library is now being referenced. Next, navigate to the examples folder located within the Phidget22MaxMSP folder you previously unpacked:
From here, select an example that will work with your Phidget and open it in Max/MSP. You can run the example by simply pressing the start button:

You should now have the example up and running for your device. Play around with the device and experiment with some of the functionality. When you are ready, the next step is configuring your project and writing your own code!
Configure Your Project
When you are building a project from scratch, or adding Phidget function calls to an existing project, you'll need to configure the Max/MSP environment to properly link the Phidget Max/MSP library.
Ensure the Phidget library files are moved to a location in the Max/MSP search path. This procedure is covered in detail above in the use our examples section.
After moving the library files into the correct location your project will have access to Phidgets. Next, view the write your own code section below.
macOS
If you haven't already, please visit the macOS page before you continue reading. There you will be instructed on how to properly set up your macOS machine so you can follow the guides below!
Use Our Examples
One of the best ways to start programming with Phidgets is to use our example code as a guide. In order to run the examples, you will need to download and install Max/MSP from Cycling '74.
Next, download and unpack the Phidgets Max/MSP library:
After unpacking the download, navigate to the externals folder and copy it to your clipboard:
The folder you copied needs to be placed in a specific location for Max/MSP to reference it. We will find this location in in the next step.
Open Max/MSP and navigate to Options -> File Preferences.
You will see something similar to this:
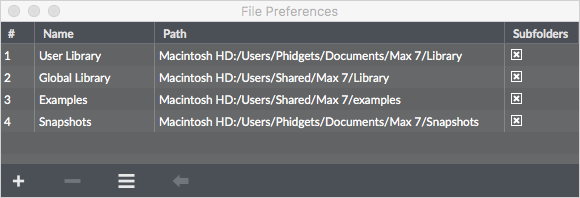
The folder that you copied earlier needs to be placed in any of the locations listed in File Preferences. Navigate to one of the locations and paste the folder:
The Phidget Max/MSP library is now being referenced. Next, navigate to the examples folder located within the Phidget22MaxMSP folder you previously unpacked:
From here, select an example that will work with your Phidget and open it in Max/MSP. You can run the example by simply pressing the start button:
You should now have the example up and running for your device. Play around with the device and experiment with some of the functionality. When you are ready, the next step is configuring your project and writing your own code!
Configure Your Project
When you are building a project from scratch, or adding Phidget function calls to an existing project, you'll need to configure the Max/MSP environment to properly link the Phidget Max/MSP library.
Ensure the Phidget library files are moved to a location in the Max/MSP search path. This procedure is covered in detail above in the use our examples section.
After moving the library files into the correct location your project will have access to Phidgets. Next, view the write your own code section below.
Write Code
By following the instructions for your operating system and compiler above, you now have working examples and a project that is configured. This teaching section will help you understand how the examples were written so you can start writing your own code.
Remember: your main reference for writing Max/MSP code will be the Phidget22 API Manual and the example code.
Example Flow
First, let's explain how to operate the examples. We will take a look at the PhidgetVoltageInput example:
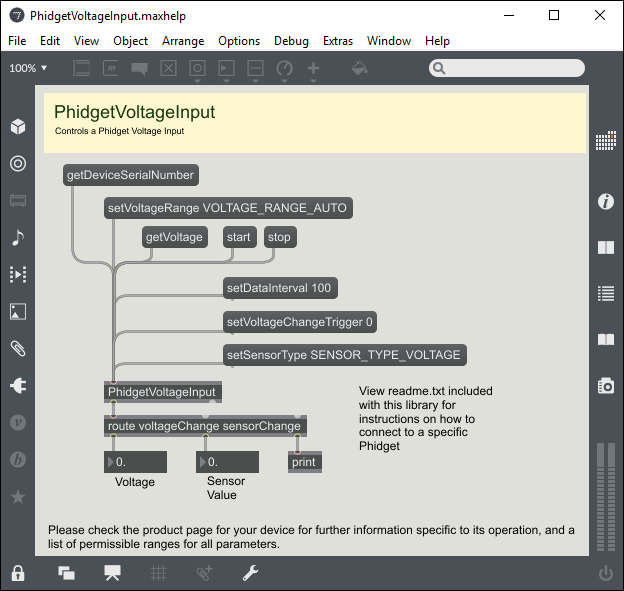
For this particular example, the Max object is called PhidgetVoltageInput, which is located near the bottom left of the screen. Objects/message boxes are connected to the inputs and outputs of the PhidgetVoltageInput object. The input objects will either cause a property of the device to change or request for a property to be retrieved. The output objects return the retrieved information. All the supported functions for Max/MSP will be documented in the Phidget22 API for your device.
Try it for yourself! Click on the getDeviceSerialNumber message box to request the Phidget to retrieve the serial number of the device. You should see the a message in the Max window denoting the serial number of your device. All devices support the getDeviceSerialNumber message, making it an easy way to determine if the Phidget libraries are correctly set up, and whether the Max/MSP application is connected to your device.
If your example contains a get[DataType] message box, click on it to cause the associated data to be output with a relevant prefix. [DataType] can denote any data the object may offer, such as Voltage for a voltage input. A list of available messages and their associated outputs is outlined in the Phidget22 API for your device.
If your example contains the start message box, you can continuously poll for events. Just press the start message box to start sampling. When an event occurs on a Phidget (i.e. when a sensor detects a change in the measured data), associated data will be output with related prefixes. Press the stop message box to stop sampling.
For the PhidgetDigitalOutput example, there are setDutyCycle and setState message boxes. Changing the numbers will cause the digital output to change. Your example may contain device specific message boxes to click on. Click them to see what they do!
Code Snippets
Your best resource to program code in MaxMSP will be our examples.
If you aren't familiar with concepts in Phidget programming, you may find our General Phidget Programming page helpful. It provides a very generic overview of what traditional languages follow when using Phidgets. For setup 'syntax', your main resource will of course be this MaxMSP page, the Phidget22 API, and the examples. But for conceptual details about particular actions - opening a Phidget, for example - the General Phidget Programming page is a more in-depth resource.
Keep in mind when reading these general resources that the Max/MSP libraries may not implement the full Phidget22 API - some function calls and Phidget classes may not be supported.
In general, Phidget objects can be placed inside the patcher, and functions can be called on them using appropriately connected messages. We go over a basic setup for this below.
Step One: Initialize and Open
This tutorial uses a Phidget Voltage Input, and thus the object we use will be called PhidgetVoltageInput. Initializing and opening the device is be done by placing a new object. Other objects handle different Phidgets - a Spatial, a Temperature Sensor, a Motor Controller, etc. Only the name of the object changes. You can find the name for the object in the .maxhelp file for your device. The help file will be named the same as the software object for your device. If you are not sure what the software object for your device is, find your Phidget on our webpage, and then check the API documentation for it.
In the case of a Voltage Input, we name it PhidgetVoltageInput:
Important: a local connection will reserve the device until closed. This prevents any other instances from retrieving data from the Phidget, including other programs. Every Phidget object in Max will automatically try to connect to and reserve a Phidget for itself. As long as a MaxMSP Phidget object is running, it will continuously try to connect to a Phidget, even trying to reconnect if it gets disconnected.
Specifying a Phidget
When the instance is created as with the Voltage Input above, normally it will make a connection to the first device of its type it can find. The Phidget object can also be declared with a number of specifiers to open a specific Phidget instead.
Specifiers can be added to the object in the format: PhidgetExternal {Specifiers}
These will be written in the form: specifier=value
The full list of specifiers that can be used to identify a Phidget in Max/MSP are as follows:
| serialnumber | The serial number of the device |
| channel | The channel of the device to open |
| hubport | The hub port the device is plugged into (where applicable) |
| ishubport | Specifies whether this channel should be opened on a hub port directly, or on a VINT device attached to a hub port. |
| remote | Forces the object to connect to a remote device over a network, ignoring devices on the local machine |
| local | Forces the object to connect to a device plugged into the local machine, ignoring network devices |
For instance, to open a VoltageInput with serial number 349428, you would use:
Some other examples would be:
Open a Digital Input:
PhidgetDigitalInput
Open channel 1 of a Digital Input on port 2 of a hub with serial number 35569
PhidgetDigitalInput serialnumber=35569 channel=1 hubport=2
Open open hub port 2 as a DigitalInput for a hub with serial number 35569
PhidgetDigitalInput serialnumber=35569 hubport=2 ishubport=1
Open a Digital Input with serial number 35569 on a remote server
PhidgetDigitalInput serialnumber=35569 remote=1
To access Phidgets over a network, use the PhidgetNet object in your patcher
Using a Phidget Over a Network
To use the Network Server, first the Phidget needs to be plugged in to a computer that has the Network Server turned on within your local network. (For information on how to do this, see the Phidget Network Server page in the section on how to use the Network Server for your operating system).
Next, in your patch you need a PhidgetNet object. To automatically find local networks, send it a message saying enableServerDiscovery.
Then, to connect a Phidget over the network, change the object text to specify it is to connect to a Phidget on a remote server, as per the following example.
Step Two: Wait for Attachment (plugging in) of the Phidget
Although this is a required step in many of our other languages (and therefore you may be expecting this if coming from another Phidget language), in MaxMSP you do not have to add a specific waitForAttachment block.
Keep in mind, however, that if your Phidget is not responding within your MaxMSP program, it may simply not be plugged in! Send a getAttached message to a Phidget object at any time to see if it's attached.
Step Three: Do Things with the Phidget
There are two main approaches for retrieving data when working with Phidgets. Data is accessed either by one-time polling or at a fixed rate via on-board timers for some devices.
Getting or setting values directly via polling on the Phidget is done through messages linked to the inlet. The object’s inlet can be wired to send commands to the device, and the outlet used to retrieve the results. Setting values on the Phidget is achieved by using the set messages, and some properties can be read with get messages:

To sample at a fixed rate, use the start and stop messages to start and stop the data flow, respectively.
Data from the outlet of a Phidget object is always given a prefix to allow for routing. For instance, the digital input state state change event data is given the prefix “stateChange”, and the voltage input voltage change event similarly use “voltageChange”. The specific prefixes used for each set of outlet data is listed under the API page for their class in the Phidget22 API.
The rightmost outlet on the Phidget object outputs error event data. This will send information on error events such as saturation events. To see which error events may apply to your device, check its API page in the Phidget22 API.
Step Four: Close and Delete
Although this is a required step in many of our other languages (and therefore you may be expecting this if coming from another Phidget language), in MaxMSP you do not have to add a specific close and delete block.
Special Case: Multiple Phidgets
Multiple Phidgets of the same type can easily be used inside a single program, it only requires another Phidget object placed. If two of the same type of Phidget object are placed, the serial number and channel arguments should always be specified (as well as hub port, if applicable) to ensure that the correct Phidget gets associated with the correct object.
Further Reading
Phidget Programming Basics - Here you can find the basic concepts to help you get started with making your own programs that use Phidgets.
Data Interval/Change Trigger - Learn about these two properties that control how much data comes in from your sensors.
Using Multiple Phidgets - It can be difficult to figure out how to use more than one Phidget in your program. This page will guide you through the steps.
Polling vs. Events - Your program can gather data in either a polling-driven or event-driven manner. Learn the difference to determine which is best for your application.
Logging, Exceptions, and Errors - Learn about all the tools you can use to debug your program.
Phidget Network Server - Phidgets can be controlled and communicated with over your network- either wirelessly or over ethernet.