Language - JavaScript Browser
|
Language - JavaScript JavaScript with Browser Welcome to using Phidgets with JavaScript! By using JavaScript, you will have access to the complete Phidget22 API, including events. Using JavaScript with a browser provides a good way to create a powerful web interface for your Phidgets programs. |
Install Phidget Drivers for JavaScript in Browser
Before getting started with the guides below, ensure you have the following components installed on your machine:
- You will need the Phidgets Drivers installed on the server machine
- You will need the Phidgets JavaScript Library for Browsers
Version Change
Note: The Phidgets JavaScript library has been bumped to version 2.x.x following a rewrite. The version 2 API is mostly identical to version 1, but does have some breaking changes. It is highly recommended that any code written against version 1 be updated to version 2, as version 1 is considered unstable.
Phidget Network Server
The JavaScript library requires the Phidget Network Server. Start by configuring the server for your OS:
The Phidget Server includes a built-in Webserver. This must be enabled when using the JavaScript library in browser, but can be left disabled when using the library from Node.js.
The Phidget Server Webserver can be used to serve files - such as the Phidget JavaScript library, or your own projects. By default, it serves the JavaScript control panel files. The main purpose of the Webserver is to support a Websockets connection for the Browser library - because regular sockets cannot be used in Browser. The Node.js library uses raw sockets to connect to the Phidget Server, and so does not require the Webserver or Websockets.
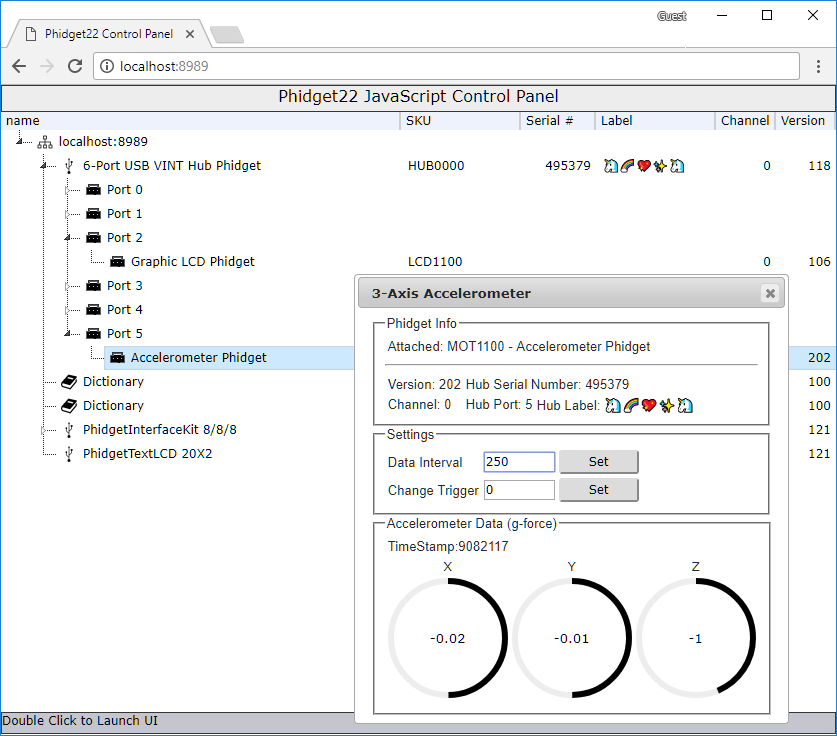
JavaScript Control Panel
The JavaScript control panel is a Browser version of our Phidget control panel. This can be used to view and control all Phidgets attached to a Phidget server. The JavaScript control panel is installed by default on Windows, macOS and PhidgetSBC. You can also download the source here.
Make sure the Phidget Server - Webserver is enabled, and running, then navigate to http://localhost:8989. You will now see a program written with JavaScript/HTML that mimics the Phidget Control Panel. It will show all the Phidgets attached to your machine. By double-clicking on the Phidgets, and example will launch.
Use Our Examples
One of the best ways to start programming with Phidgets is to use our example code as a guide. Our browser examples are available here.
Write Your Own Code
Let's start by writing a simple HTML page that makes a dynamic list of attached Phidgets visible to the user. We will be using the JavaScript library jQuery in these examples. jQuery is not required in order to use Phidgets, however, it will make it easier for us to access elements on an HTML page.
To start, create a new empty folder.
Next, download the latest JavaScript browser library from here and copy the files into the folder.
Next, create a file called index.html and copy the following code into it (Note: if you have a newer jQuery, modify the code below to match your version):
<!DOCTYPE html>
<html>
<head>
    <title>Phidget Manager</title>
    <script src="jquery-2.1.4.min.js"></script>
    <script src="sha256.min.js"></script>
    <script src="phidget22.min.js"></script>
    <script>
        $(document).ready(function() {
            var conn = new phidget22.Connection(8989, 'localhost');

            conn.connect().then(function() {
                console.log('connected');
            }).catch(function(err) {
                conn.delete();
                alert('failed to connect to server:' + err);
            });

            var man = new phidget22.Manager({
                onDeviceAttach: function(dev) {
                    $('#list').append(new Option(dev.getDeviceName(), dev.getKey()));
                },
                onDeviceDetach: function(dev) {
                    $("#list option[value='" + dev.getKey() + "']").remove();
                }
            });
            man.open();
        });
    </script>
</head>

<body>
    <label> Attached Phidgets: </label>
    <div>
        <select multiple id="list" style="width: 500px; height: 200px"></select>
    </div>
</body>
</html>
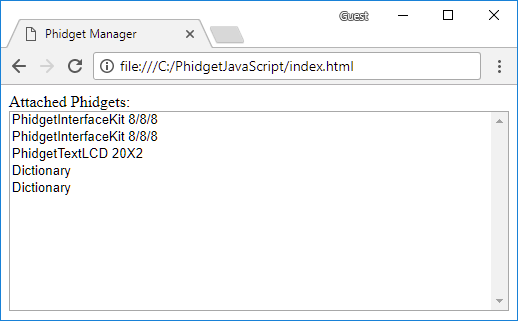
This code uses the Phidget Manager to list any Phidget accessible from your computer (either directly via USB or indirectly over the network).
Finally, double click index.html to open it in a browser. You should see something like this:
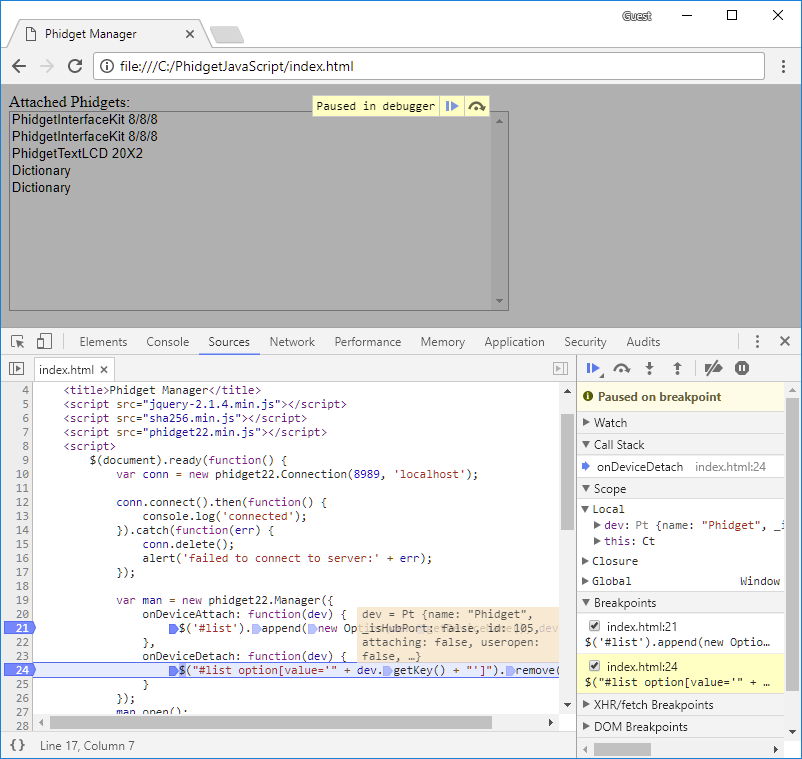
Open the developer console to get a better idea what is going on:
For information about the Node.js examples, keep reading. Otherwise, skip ahead to the edit the examples section located below.
What's Next?
Now that you have set up Phidgets to work with your programming environment, we recommend you read our guide on Phidget Programming Basics to learn the fundamentals of programming with Phidgets.![]()