Language - JavaScript: Difference between revisions
(→Linux) |
|||
| (23 intermediate revisions by 3 users not shown) | |||
| Line 1: | Line 1: | ||
<metadesc>Communicate over USB with sensors, controllers and relays with Phidgets! Our JavaScript API supports Windows/MacOS/Linux using html or Node.js.</metadesc> | |||
[[Category:Language]] | [[Category:Language]] | ||
__TOC__ | __TOC__ | ||
== | == Quick Downloads == | ||
=== Documentation === | |||
*{{Phidget22API}} (Select JavaScript from drop-down menu) | |||
=== Example Code === | |||
*{{SampleCode|JavaScript|JavaScript Examples (Node.js)}} | |||
*[{{SERVER}}/downloads/phidget22/tools/any/Phidget22JavaScriptControlPanel.zip Javascript Examples (HTML)] | |||
== | === Libraries === | ||
*[{{SERVER}}/downloads/phidget22/libraries/any/Phidget22JavaScript.zip JavaScript Library Download] | |||
{{AllQuickDownloads}} | |||
== Getting Started with JavaScript == | |||
Welcome to using Phidgets with JavaScript! By using JavaScript, you will have access to the complete {{Phidget22API}}, including events. We also provide example code in JavaScript for all Phidget devices. | |||
If you are developing for Windows, keep reading. Otherwise, select your operating system to jump ahead: | |||
*[[#macOS | macOS]] | |||
*[[#Linux | Linux]] | |||
== Windows == | |||
{{Windows_Languages}} | |||
===Browser=== | |||
====Use Our Examples==== | |||
One of the best ways to start programming with Phidgets is to use our example code as a guide. Our browser examples are graphical and are installed with the Phidget libraries. In order to check them out, first open the Phidget Control Panel and navigate to the Network Server tab: | |||
[[File:Windows_networkserver.PNG|link=|center]] | |||
= | Next, make sure the Webserver is enabled (''Enabled'' checkbox in ''Webserver'' section), and start the Phidget Network Server by clicking on the ''Start'' button at the bottom of the window. Click on the hyperlink as shown in the image below (or navigate to http://localhost:8989): | ||
[[File:Javascript_windows_localhost.png|link=|center]] | |||
You will now see a program written with JavaScript/HTML that mimics the Phidget Control Panel. It will show all the Phidgets attached to your machine. By double-clicking on the Phidgets, and example will launch: | |||
[[File:Javascript_windows_controlpanel.png|link=|center]] | |||
To view the source code that drives the examples, navigate to the following location: | |||
*C:/Program Files/Phidgets/Phidget22/html | |||
[[File:Javascript_windows_filelocation.png|link=|center]] | |||
Here you can view the code that was written to create the main webpage as well as all of the examples. | |||
====Write Your Own Code==== | ====Write Your Own Code==== | ||
Let's start by writing a simple HTML page that makes a dynamic list of attached Phidgets visible to the user. | |||
We will be using the JavaScript library [https://jquery.com/download/ jQuery] in these examples. jQuery is not required in order to use Phidgets, however, it will make it easier for us to access elements on an HTML page. | |||
To start, create a new folder that looks like this: | |||
[[File:Javascript_windows_folderlibraries.png|link=|center]] | |||
The referenced libraries are installed with the Phidget libraries and can be found at the following location: | |||
*C:/Program Files/Phidgets/Phidget22/html | |||
Next, create a file called ''index.html'' and copy the following code into it (Note: if you have newer JavaScript libraries, modify the code below to match your version numbers): | |||
<syntaxhighlight lang=javascript> | <syntaxhighlight lang=javascript> | ||
<!DOCTYPE html> | <!DOCTYPE html> | ||
<html> | <html> | ||
<head> | <head> | ||
| Line 93: | Line 107: | ||
</syntaxhighlight> | </syntaxhighlight> | ||
After copying the code above into your ''index.html'' file, your folder should look like this: | |||
[[File:Javascript windows folder.png|link=|center]] | |||
Next, open the Network Server tab in the Phidget Control Panel and modify the Webserver ''Docroot'' to your folders location: | |||
[[File:Javascript_windows_docrootchange.png|link=|center]] | |||
Finally, click on the hyperlink to see the example (or navigate to http://localhost:8989): | |||
[[File:Javascript_windows_example.png|link=|center]] | |||
[[ | Open the developer console to get a better idea what is going on: | ||
[[File:Javascript_windows_devconsole.png|link=|center]] | |||
For information about the Node.js examples, keep reading. Otherwise, skip ahead to the [[#Edit the Examples | edit the examples]] section located below. | |||
[ | ===Node.js=== | ||
====Use Our Examples==== | |||
One of the best ways to start programming with Phidgets is to use our example code as a guide. In order to run the examples, you will need to download and install [https://nodejs.org/ Node.js]. | |||
Now that you have Node.js installed, select an example that will work with your Phidget: | |||
*{{SampleCode|JavaScript|JavaScript Examples}} | |||
< | Next, navigate to the Network Server tab in the Phidget Control Panel and press the ''Start'' button after ensuring the Phidget Server is enabled (''Enabled'' checkbox in ''Phidget Server'' section). | ||
<syntaxhighlight | [[File:Windows_networkserver.PNG|link=|center]] | ||
Navigate to the example folder that you previously downloaded, open the command prompt at this location and enter the following command: | |||
<syntaxhighlight lang='bash'> | |||
npm update | |||
</syntaxhighlight> | |||
[[File:Javascript_windows_npmupdate.png]] | |||
Next, enter the following command to run the example (replacing Accelerometer with your example name): | |||
<syntaxhighlight lang='bash'> | |||
node Accelerometer localhost | |||
</syntaxhighlight> | </syntaxhighlight> | ||
[[File:Javacsript_windows_nodeexample.png|link=|center]] | |||
You should now have the example up and running. When you are ready, the next step is [[#Edit the Examples | editing the examples]]. | |||
==macOS== | |||
=== Browser Example=== | |||
====Use Our Examples==== | |||
One of the best ways to start programming with Phidgets is to use our example code as a guide. Our browser examples are graphical and are installed with the Phidget libraries. In order to check them out, first open the Phidget Control Panel and navigate to the Network Server tab: | |||
[[File:Macos_networkserver_run.png|link=|center]] | |||
Next, make sure the Webserver is enabled (''Enabled'' checkbox in ''Webserver'' section), and start the Phidget Network Server by clicking on the ''Start'' button at the top of the window. A button labelled ''View in Browser...'' will appear. Click on it now (or navigate to http://localhost:8989). | |||
[[File:Javascript_macos_viewinbrowswer.png|link=|center]] | |||
You will now see a program written with JavaScript/HTML that mimics the Phidget Control Panel. It will show all the Phidgets attached to your machine. By double-clicking on the Phidgets, and example will launch: | |||
[[File:Javascript_macos_browserexample.png|link=|center]] | |||
To view the source code that drives the examples, navigate to the following location: | |||
*/Library/Application Support/Phidgets/Phidget22NetworkServer/html | |||
[[File:Javascript_macos_filelocation.png|link=|center]] | |||
Here you can view the code that was written to create the main webpage as well as all of the examples. | |||
====Write Your Own Code==== | |||
Let's start by writing a simple HTML page that makes a dynamic list of attached Phidgets visible to the user. | |||
We will be using the JavaScript library [https://jquery.com/download/ jQuery] in these examples. jQuery is not required in order to use Phidgets, however, it will make it easier for us to access elements on an HTML page. | |||
To start, create a new folder that looks like this: | |||
[[File:Javascript_macos_folderlibraries.png|link=|center]] | |||
The referenced libraries are installed with the Phidget libraries and can be found at the following location: | |||
*/Library/Application Support/Phidgets/Phidget22NetworkServer/html | |||
Next, create a file called ''index.html'' and copy the following code into it (Note: if you have newer JavaScript libraries, modify the code below to match your version numbers): | |||
<syntaxhighlight lang=javascript> | <syntaxhighlight lang=javascript> | ||
<!DOCTYPE html> | |||
<html> | |||
<head> | |||
<title>Javascript Test Program</title> | |||
<script src="jquery-2.1.4.min.js"></script> | |||
<script src="sha256.js"></script> | |||
<script src="jphidgets22.1.0.0.min.js"></script> | |||
<script> | |||
$(document).ready(function () { | |||
var conn = new jPhidgets.Connection('ws://' + window.location.host + '/phidgets', { name: window.location.host }); | |||
conn.connect().then(function () { | |||
console.log('connected'); | |||
}).catch(function (err) { | |||
alert('failed to connect to server:' + err); | |||
});; | |||
conn.onattach = function(dev) { | |||
$('#list').append(new Option(dev.name,dev.phid)); | |||
} | |||
conn.ondetach = function(dev) { | |||
$("#list option[value='" + dev.phid + "']").remove(); | |||
} | |||
}); | |||
</script> | |||
</head> | |||
<body> | <body> | ||
| Line 168: | Line 233: | ||
<select multiple id="list" style="width: 500px;"></select> | <select multiple id="list" style="width: 500px;"></select> | ||
</div> | </div> | ||
</body> | </body> | ||
</html> | |||
</syntaxhighlight> | </syntaxhighlight> | ||
After copying the code above into your ''index.html'' file, your folder should look like this: | |||
[[File:Javascript_macos_folder.png|link=|center]] | |||
Next, open the Network Server tab in the Phidget Control Panel and modify the Webserver ''Docroot'' to your folders location: | |||
[[File:Javascript_macos_docrootchange.png|link=|center]] | |||
Finally, click on the hyperlink (or navigate to http://localhost:8989) to see the example: | |||
[[File:Javascript_macos_example.png|link=|center]] | |||
Open the developer console to get a better idea what is going on: | |||
[[File:Javascript_macos_devconsole.png|link=|center]] | |||
For information about the Node.js example, keep reading. Otherwise, skip ahead to the [[#Edit the Examples | edit the examples]] section located below. | |||
===Node.js=== | |||
====Use Our Examples==== | |||
One of the best ways to start programming with Phidgets is to use our example code as a guide. In order to run the examples, you will need to download and install [https://nodejs.org/ Node.js]. | |||
Now that you have Node.js installed, select an example that will work with your Phidget: | |||
*{{SampleCode|JavaScript|JavaScript Examples}} | |||
Next, navigate to the Network Server tab in the Phidget Control Panel and press the ''Start Network Server'' button after ensuring the Phidget Server is enabled (''Enabled'' checkbox in ''Phidget Server'' section). | |||
[[File:Macos_networkserver_run.png|link=|center]] | |||
Navigate to the example folder that you previously downloaded, open the command prompt at this location and enter the following command: | |||
<syntaxhighlight lang= | <syntaxhighlight lang='bash'> | ||
sudo npm update | |||
</syntaxhighlight> | </syntaxhighlight> | ||
[[File:Javascript_macos_npmupdate.png ]] | |||
Next, enter the following command to run the example (replacing Accelerometer with your example name): | |||
<syntaxhighlight lang='bash'> | |||
node Accelerometer localhost | |||
</syntaxhighlight> | |||
[[File:Javascript_macos_nodeexample.png|link=|center]] | |||
You should now have the example up and running. When you are ready, the next step is [[#Edit the Examples | editing the examples]]. | |||
== Linux == | |||
===Browser Example=== | |||
====Use Our Examples==== | ====Use Our Examples==== | ||
One of the best ways to start programming with Phidgets is to use our example code as a guide. Our browser examples are graphical and can be downloaded here: | |||
[{{SERVER}}/downloads/phidget22/tools/any/Phidget22JavaScriptControlPanel.zip Javascript Examples (HTML)] | |||
or they can be unpacked using <syntaxhighlight lang=bash> apt-get install phidget22wwwjs </syntaxhighlight> | |||
After unpacking the examples, navigate to the following location: | |||
*/etc/phidgets | |||
Open the file named ''phidget22networkserver.pc'' and navigate to the ''www'' section, you should see something like this: | |||
[[File:Javacsript_linux_networkconfig.PNG|link=|center]] | |||
As you can see from the image above, our ''docroot'' location is defined as the following location: | |||
*/var/phidgets/www | |||
Create the docroot location (if it doesn't exist already) and copy the contents of the example you downloaded into it by entering the following commands into the terminal: | |||
<syntaxhighlight lang='bash'> | |||
mkdir /var/phidgets | |||
mkdir /var/phidgets/www | |||
cp -a YOUR_SOURCE_FOLDER/. /var/phidgets/www | |||
</syntaxhighlight> | |||
[[File:Javascript_linux_mkdir.PNG|link=|center]] | |||
Now that the example code is located at the ''docroot'' location, and the Phidget Webserver is enabled (can be seen in ''www'' section of ''phidget22networkserver.pc''), navigate to http://localhost:8080. You will see a program written with JavaScript/HTML that mimics the Phidget Control Panel (available on macOS and Windows). It will show all the Phidgets attached to your machine. By double-clicking on the Phidgets, and example will launch: | |||
[[File:Javascript_linux_graphicalexample.PNG|link=|center]] | |||
Take a look at the source files that are now located at /var/phidgets/www | |||
===Write Your Own Code=== | |||
Let's start by writing a simple HTML page that makes a dynamic list of attached Phidgets visible to the user. | |||
We will be using the JavaScript library [https://jquery.com/download/ jQuery] in these examples. jQuery is not required in order to use Phidgets, however, it will make it easier for us to access elements on an HTML page. | |||
To start, create a new folder that looks like this: | |||
[[File:Javascript_linux_folderlibraries.PNG|link=|center]] | |||
The referenced libraries can be found in the [{{SERVER}}/downloads/phidget22/tools/any/Phidget22JavaScriptControlPanel.zip Javascript Examples (HTML)] that we provide. | |||
=== | Next, create a file called index.html and copy the following code into it (Note: if you have newer JavaScript libraries, modify the code below to match your version numbers): | ||
<syntaxhighlight lang=javascript> | |||
<!DOCTYPE html> | |||
<html> | |||
<head> | |||
<title>Javascript Test Program</title> | |||
<script src="jquery-2.1.4.min.js"></script> | |||
<script src="sha256.js"></script> | |||
<script src="jphidgets22.1.0.0.min.js"></script> | |||
<script> | |||
= | $(document).ready(function () { | ||
var conn = new jPhidgets.Connection('ws://' + window.location.host + '/phidgets', { name: window.location.host }); | |||
conn.connect().then(function () { | |||
console.log('connected'); | |||
}).catch(function (err) { | |||
alert('failed to connect to server:' + err); | |||
});; | |||
= | conn.onattach = function(dev) { | ||
$('#list').append(new Option(dev.name,dev.phid)); | |||
} | |||
conn.ondetach = function(dev) { | |||
$("#list option[value='" + dev.phid + "']").remove(); | |||
} | |||
}); | |||
</script> | |||
</head> | |||
<body> | |||
<label> Attached Phidgets: </label> | |||
<div> | |||
<select multiple id="list" style="width: 500px;"></select> | |||
</div> | |||
</body> | |||
</html> | |||
</syntaxhighlight> | |||
After copying the code above into your ''index.html'' file, your folder should look like this: | |||
[[File:Javascript_linux_folder.PNG|link|center]] | |||
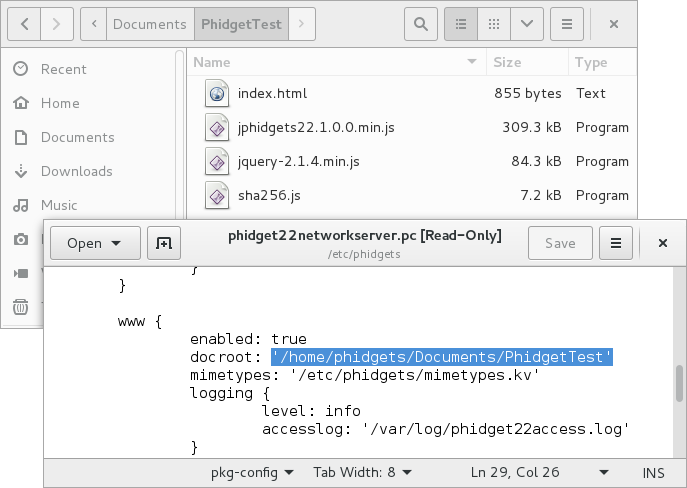
Next, modify the ''phidget22networkserver.pc'' file that is located at ''/etc/phidgets''. Navigate to the ''www'' section and change the ''docroot'' location to match the location of your ''index.html'' file: | |||
[[File:Javascript_linux_modifydocroot.PNG|link=|center]] | |||
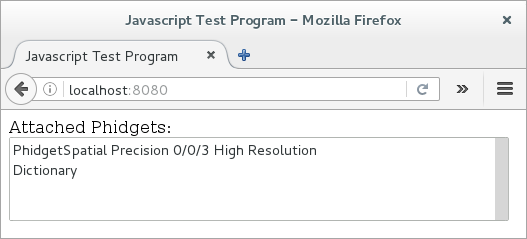
After modifying the docroot location, ensure you restart the Phidget Network Server. After restarting the Phidget Network Server, navigate to http://localhost:8080 to view the example: | |||
[[File:Javascript_linux_example.PNG|link=|center]] | |||
Try opening the developer console for your web browser to see the Phidget JavaScript code executing and to get a better feel for the program. | |||
== | ====Node.js==== | ||
One of the best ways to start programming with Phidgets is to use our example code as a guide. In order to run the examples, you will need to download and install [https://nodejs.org/ Node.js]. | |||
Now that you have Node.js installed, select an example that will work with your Phidget: | |||
*{{SampleCode|JavaScript|JavaScript Examples}} | |||
= | Navigate to the example folder that you previously downloaded, open the terminal at this location and enter the following command: | ||
<syntaxhighlight lang='bash'> | |||
npm update | |||
</syntaxhighlight> | |||
[[File:Javascript_linux_npmupdate.PNG|link=|center]] | |||
Next, enter the following command to run the example (replacing Accelerometer with your example name): | |||
<syntaxhighlight lang='bash'> | |||
node Accelerometer localhost | |||
</syntaxhighlight> | |||
[[File:Javascript_macos_nodeexample.png|link=|center]] | |||
| | |||
You should now have the example up and running. When you are ready, the next step is [[#Edit the Examples | editing the examples]]. | |||
== | == Edit the Examples == | ||
{{WriteCode_Intro|JavaScript}} | |||
=== Step One: Connect=== | |||
In Javascript, you must first connect to the Phidget server using the {{Code|Connection}} object. | In Javascript, you must first connect to the Phidget server using the {{Code|Connection}} object. | ||
<syntaxhighlight lang=javascript> | <syntaxhighlight lang=javascript> | ||
| Line 300: | Line 436: | ||
</syntaxhighlight> | </syntaxhighlight> | ||
Where {{Code|url}}, {{Code|n}}, and {{Code|p}} are variables defined elsewhere in the program. If the connection is successful, we call another function that contains the rest of our code. | Where {{Code|url}}, {{Code|n}}, and {{Code|p}} are variables defined elsewhere in the program. If the connection is successful, we call another function that contains the rest of our code. | ||
=== Step Two: Create and Open=== | |||
After connecting, the {{Code|Open()}} function opens the software object, and once it has successfully opened we can interact with it and start receiving data from it. We can also set up event handlers just before opening. | After connecting, the {{Code|Open()}} function opens the software object, and once it has successfully opened we can interact with it and start receiving data from it. We can also set up event handlers just before opening. | ||
For example, if we were using an Digital Input as our device, it would look like this: | For example, if we were using an Digital Input as our device, it would look like this: | ||
<syntaxhighlight lang=javascript> | <syntaxhighlight lang=javascript> | ||
| Line 328: | Line 461: | ||
</syntaxhighlight> | </syntaxhighlight> | ||
Once the object successfully opens, you can access it and you will start to get events from it. We can define the event handler functions : | Once the object successfully opens, you can access it and you will start to get events from it. We can define the event handler functions : | ||
<syntaxhighlight lang=javascript> | <syntaxhighlight lang=javascript> | ||
| Line 344: | Line 475: | ||
</syntaxhighlight> | </syntaxhighlight> | ||
Now that they've been registered in the {{Code|runCode()}} function and the device has been opened, these event handlers will be able to trigger. The first one triggers when the DigitalInput channel attaches, and the second one will trigger whenever the state of the attached DigitalInput changes. | Now that they've been registered in the {{Code|runCode()}} function and the device has been opened, these event handlers will be able to trigger. The first one triggers when the DigitalInput channel attaches, and the second one will trigger whenever the state of the attached DigitalInput changes. | ||
=== Step Three: Do Things with the Phidget === | |||
Some values can be directly read and set on the Phidget. These functions can be used inside a polling loop as an alternative to event driven programming. The lines inside the loop would be something like this, after which you could do something with the value: | Some values can be directly read and set on the Phidget. These functions can be used inside a polling loop as an alternative to event driven programming. The lines inside the loop would be something like this, after which you could do something with the value: | ||
<syntaxhighlight lang=javascript> | <syntaxhighlight lang=javascript> | ||
| Line 359: | Line 488: | ||
</syntaxhighlight> | </syntaxhighlight> | ||
=== Step Four: Close === | |||
At the end of your program (or at least, at the end of the part that uses the Phidget), it is advisable to close your device. This ensures that the Phidget will be available to other programs that want to use it, since a channel can only be in use by one program at a time unless it's opened remotely. It's not necessary to delete the object after closing in Javascript. | At the end of your program (or at least, at the end of the part that uses the Phidget), it is advisable to close your device. This ensures that the Phidget will be available to other programs that want to use it, since a channel can only be in use by one program at a time unless it's opened remotely. It's not necessary to delete the object after closing in Javascript. | ||
<syntaxhighlight lang=javascript> | <syntaxhighlight lang=javascript> | ||
| Line 370: | Line 497: | ||
</syntaxhighlight> | </syntaxhighlight> | ||
== Further Reading == | == Further Reading == | ||
[[Phidget Programming Basics]] - Here you can find the basic concepts to help you get started with making your own programs that use Phidgets. | [[Phidget Programming Basics]] - Here you can find the basic concepts to help you get started with making your own programs that use Phidgets. | ||
| Line 384: | Line 509: | ||
[[Logging, Exceptions, and Errors]] - Learn about all the tools you can use to debug your program. | [[Logging, Exceptions, and Errors]] - Learn about all the tools you can use to debug your program. | ||
[[Phidget Network | [[Phidget Network Server]] - Phidgets can be controlled and communicated with over your network- either wirelessly or over ethernet. | ||
Revision as of 18:52, 7 February 2018
Quick Downloads
Documentation
- Phidget22 API (Select JavaScript from drop-down menu)
Example Code
Libraries
- Windows Drivers Installer (32-Bit)
- Windows Drivers Installer (64-Bit)
- Windows Development Libraries
- macOS Installer
- Linux Libraries
- Linux Phidget Network Server
Getting Started with JavaScript
Welcome to using Phidgets with JavaScript! By using JavaScript, you will have access to the complete Phidget22 API, including events. We also provide example code in JavaScript for all Phidget devices.
If you are developing for Windows, keep reading. Otherwise, select your operating system to jump ahead:
Windows
If you haven't already, please visit the Windows page before you continue reading. There you will be instructed on how to properly set up your Windows machine so you can follow the guides below!
Browser
Use Our Examples
One of the best ways to start programming with Phidgets is to use our example code as a guide. Our browser examples are graphical and are installed with the Phidget libraries. In order to check them out, first open the Phidget Control Panel and navigate to the Network Server tab:
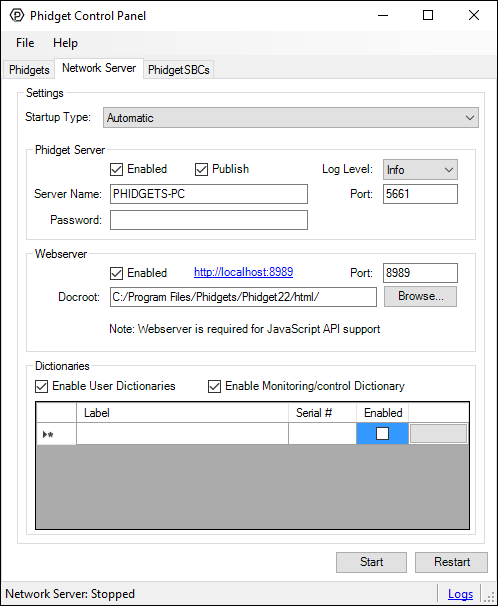
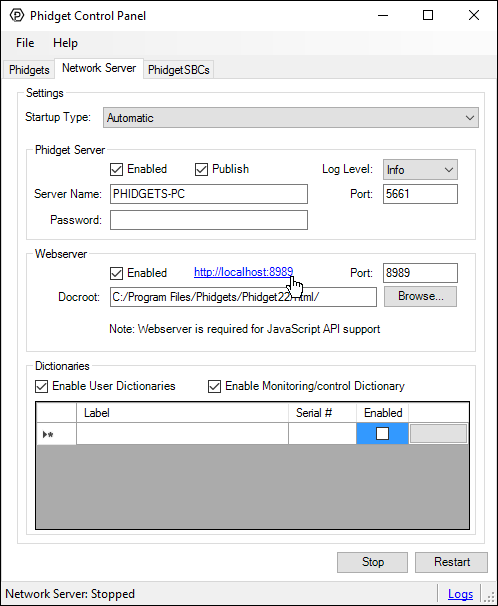
Next, make sure the Webserver is enabled (Enabled checkbox in Webserver section), and start the Phidget Network Server by clicking on the Start button at the bottom of the window. Click on the hyperlink as shown in the image below (or navigate to http://localhost:8989):
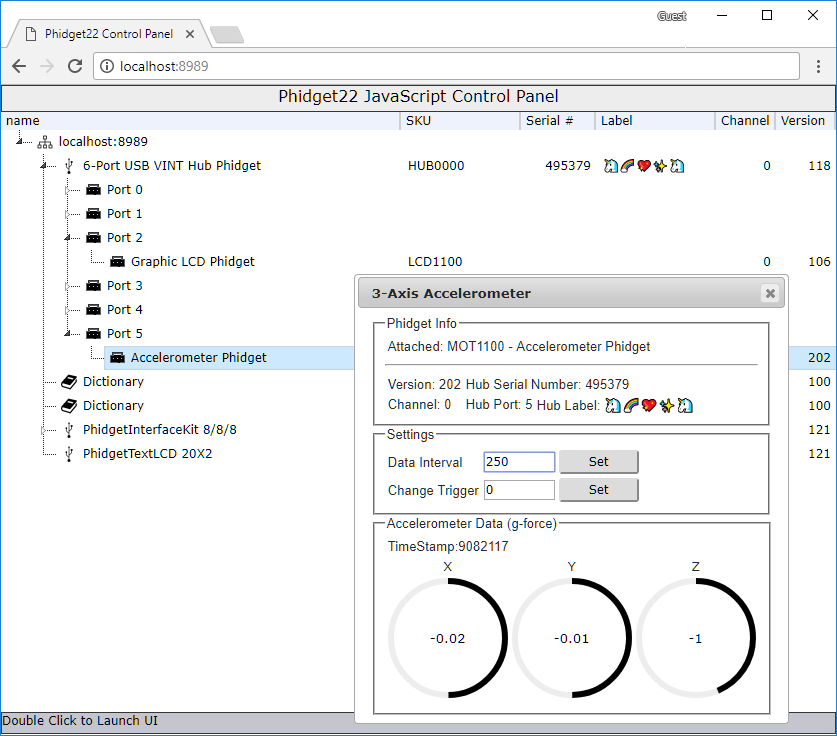
You will now see a program written with JavaScript/HTML that mimics the Phidget Control Panel. It will show all the Phidgets attached to your machine. By double-clicking on the Phidgets, and example will launch:
To view the source code that drives the examples, navigate to the following location:
- C:/Program Files/Phidgets/Phidget22/html
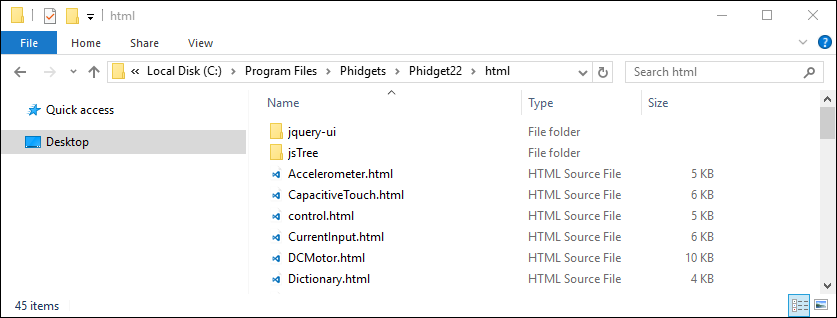
Here you can view the code that was written to create the main webpage as well as all of the examples.
Write Your Own Code
Let's start by writing a simple HTML page that makes a dynamic list of attached Phidgets visible to the user. We will be using the JavaScript library jQuery in these examples. jQuery is not required in order to use Phidgets, however, it will make it easier for us to access elements on an HTML page.
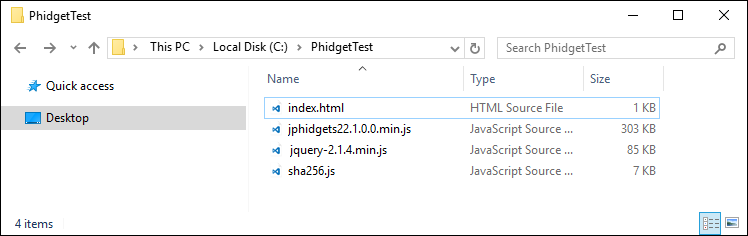
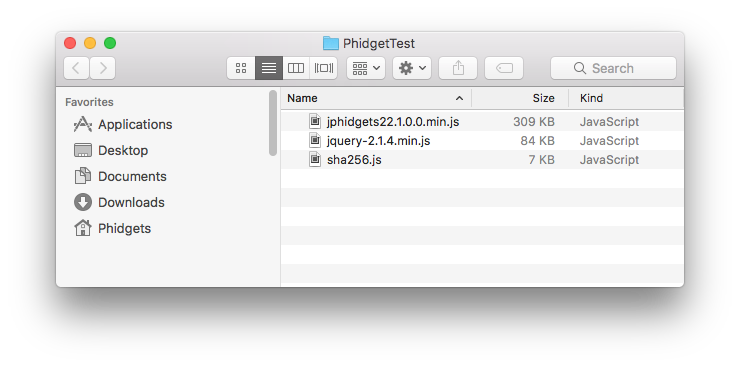
To start, create a new folder that looks like this:

The referenced libraries are installed with the Phidget libraries and can be found at the following location:
- C:/Program Files/Phidgets/Phidget22/html
Next, create a file called index.html and copy the following code into it (Note: if you have newer JavaScript libraries, modify the code below to match your version numbers):
<!DOCTYPE html>
<html>
<head>
<title>Javascript Test Program</title>
<script src="jquery-2.1.4.min.js"></script>
<script src="sha256.js"></script>
<script src="jphidgets22.1.0.0.min.js"></script>

<script>

	$(document).ready(function () {
		var conn = new jPhidgets.Connection('ws://' + window.location.host + '/phidgets', { name: window.location.host });

		conn.connect().then(function () {
			console.log('connected');
		}).catch(function (err) {
			alert('failed to connect to server:' + err);
		});;

		conn.onattach = function(dev) {
			$('#list').append(new Option(dev.name,dev.phid));
		}

		conn.ondetach = function(dev) {
			$("#list option[value='" + dev.phid + "']").remove();
		}
	});

</script>
</head>

<body>
	<label> Attached Phidgets: </label>
	<div>
		<select multiple id="list" style="width: 500px;"></select>
	</div>
</body>
</html>
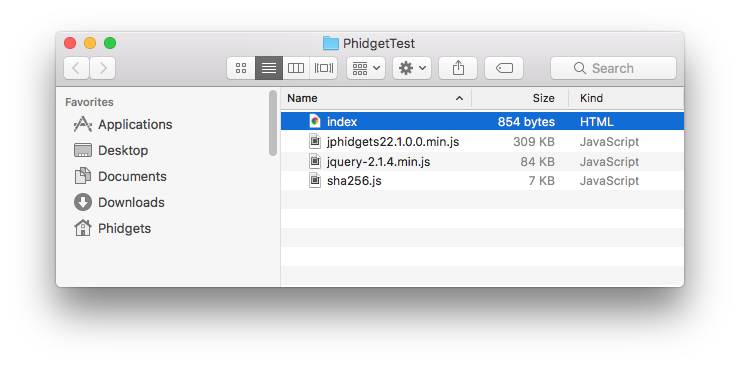
After copying the code above into your index.html file, your folder should look like this:
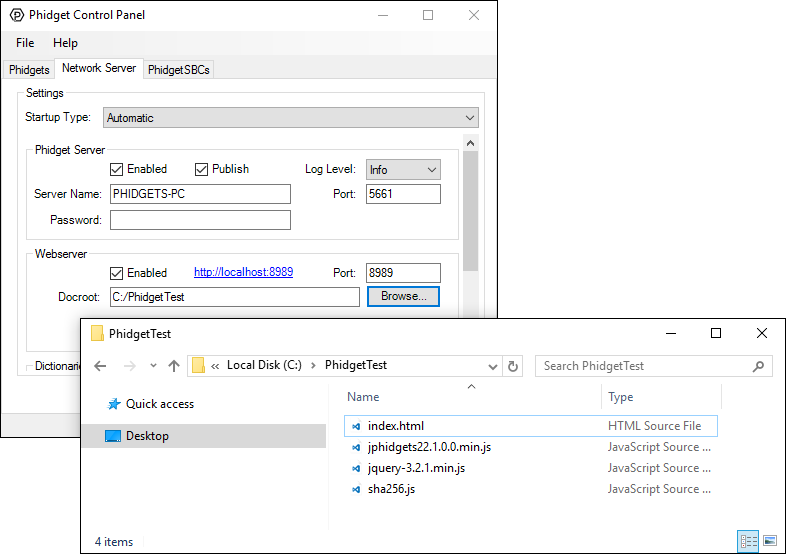
Next, open the Network Server tab in the Phidget Control Panel and modify the Webserver Docroot to your folders location:
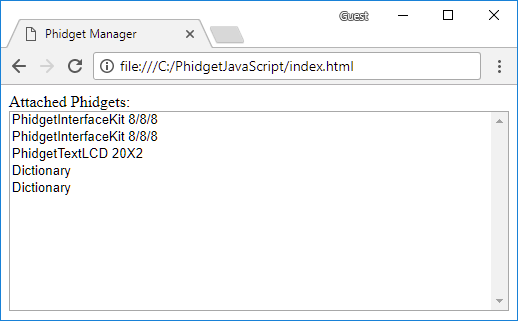
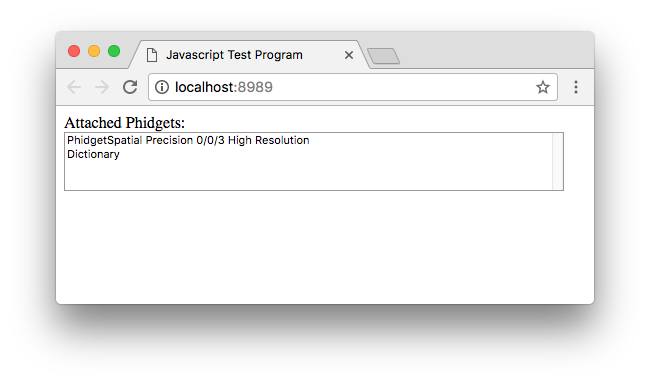
Finally, click on the hyperlink to see the example (or navigate to http://localhost:8989):
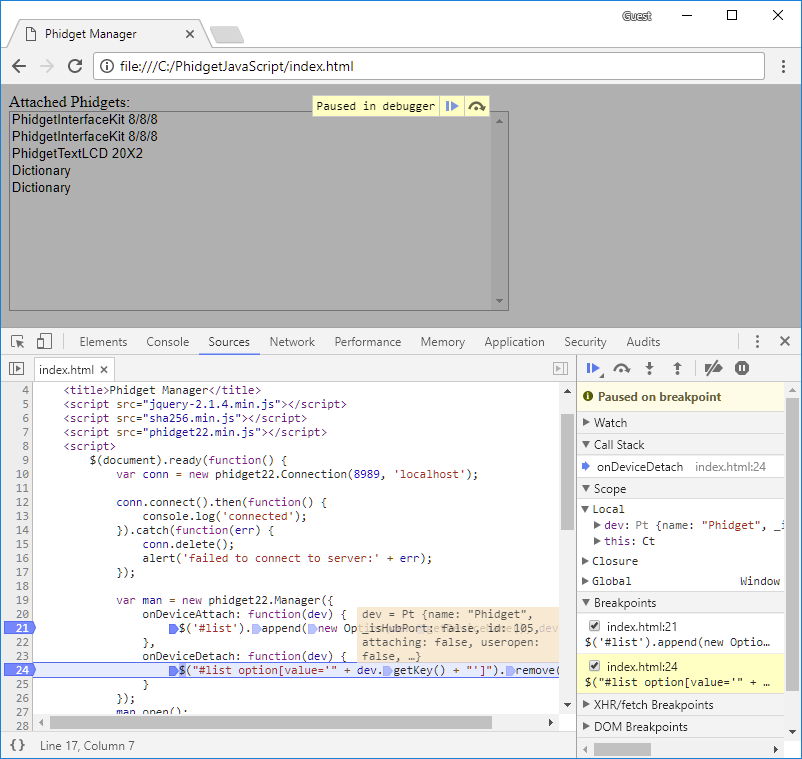
Open the developer console to get a better idea what is going on:
For information about the Node.js examples, keep reading. Otherwise, skip ahead to the edit the examples section located below.
Node.js
Use Our Examples
One of the best ways to start programming with Phidgets is to use our example code as a guide. In order to run the examples, you will need to download and install Node.js.
Now that you have Node.js installed, select an example that will work with your Phidget:
Next, navigate to the Network Server tab in the Phidget Control Panel and press the Start button after ensuring the Phidget Server is enabled (Enabled checkbox in Phidget Server section).
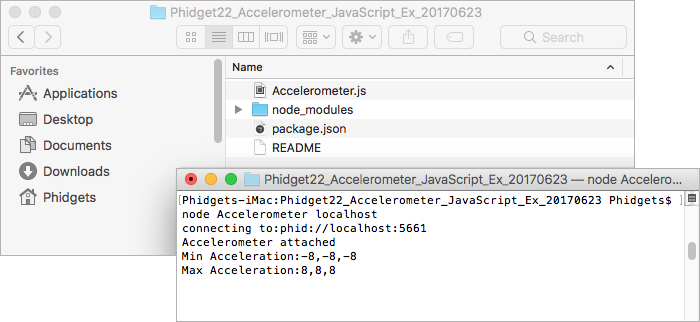
Navigate to the example folder that you previously downloaded, open the command prompt at this location and enter the following command:
npm update

Next, enter the following command to run the example (replacing Accelerometer with your example name):
node Accelerometer localhost
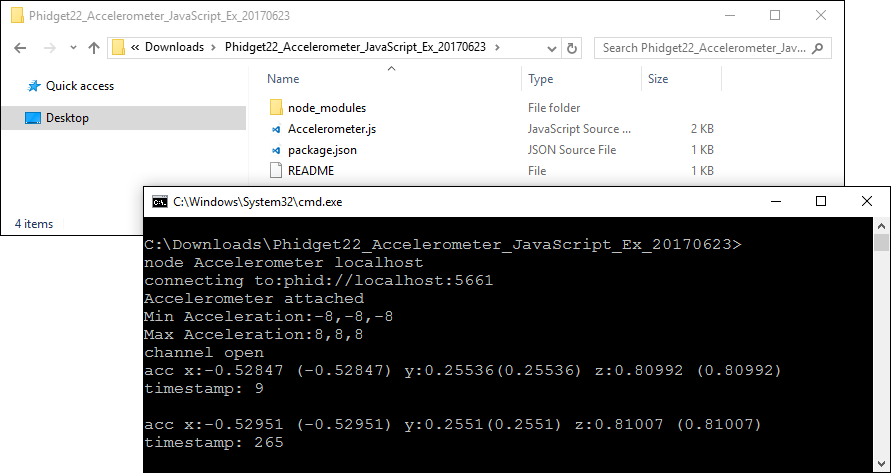
You should now have the example up and running. When you are ready, the next step is editing the examples.
macOS
Browser Example
Use Our Examples
One of the best ways to start programming with Phidgets is to use our example code as a guide. Our browser examples are graphical and are installed with the Phidget libraries. In order to check them out, first open the Phidget Control Panel and navigate to the Network Server tab:
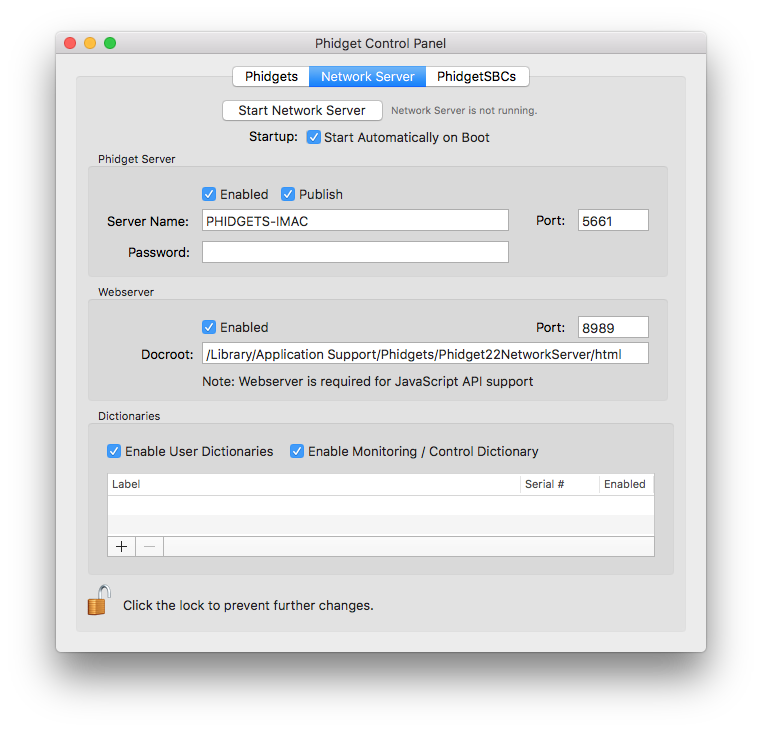
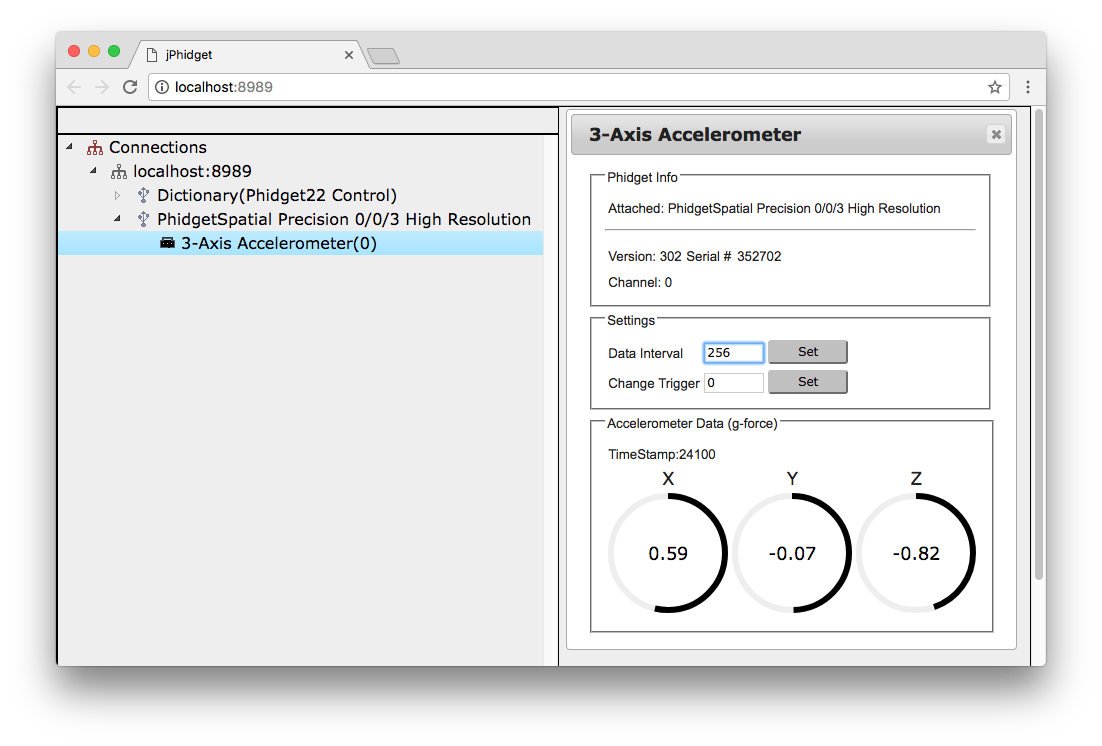
Next, make sure the Webserver is enabled (Enabled checkbox in Webserver section), and start the Phidget Network Server by clicking on the Start button at the top of the window. A button labelled View in Browser... will appear. Click on it now (or navigate to http://localhost:8989).

You will now see a program written with JavaScript/HTML that mimics the Phidget Control Panel. It will show all the Phidgets attached to your machine. By double-clicking on the Phidgets, and example will launch:
To view the source code that drives the examples, navigate to the following location:
- /Library/Application Support/Phidgets/Phidget22NetworkServer/html
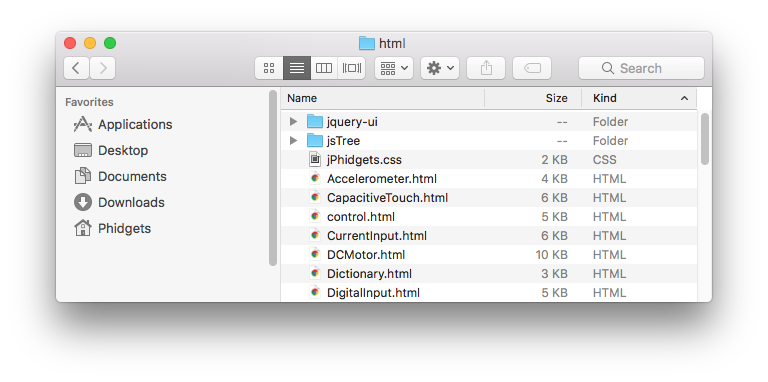
Here you can view the code that was written to create the main webpage as well as all of the examples.
Write Your Own Code
Let's start by writing a simple HTML page that makes a dynamic list of attached Phidgets visible to the user. We will be using the JavaScript library jQuery in these examples. jQuery is not required in order to use Phidgets, however, it will make it easier for us to access elements on an HTML page.
To start, create a new folder that looks like this:
The referenced libraries are installed with the Phidget libraries and can be found at the following location:
- /Library/Application Support/Phidgets/Phidget22NetworkServer/html
Next, create a file called index.html and copy the following code into it (Note: if you have newer JavaScript libraries, modify the code below to match your version numbers):
<!DOCTYPE html>
<html>
<head>
<title>Javascript Test Program</title>
<script src="jquery-2.1.4.min.js"></script>
<script src="sha256.js"></script>
<script src="jphidgets22.1.0.0.min.js"></script>

<script>

	$(document).ready(function () {
		var conn = new jPhidgets.Connection('ws://' + window.location.host + '/phidgets', { name: window.location.host });

		conn.connect().then(function () {
			console.log('connected');
		}).catch(function (err) {
			alert('failed to connect to server:' + err);
		});;

		conn.onattach = function(dev) {
			$('#list').append(new Option(dev.name,dev.phid));
		}

		conn.ondetach = function(dev) {
			$("#list option[value='" + dev.phid + "']").remove();
		}
	});

</script>
</head>

<body>
	<label> Attached Phidgets: </label>
	<div>
		<select multiple id="list" style="width: 500px;"></select>
	</div>
</body>
</html>
After copying the code above into your index.html file, your folder should look like this:
Next, open the Network Server tab in the Phidget Control Panel and modify the Webserver Docroot to your folders location:

Finally, click on the hyperlink (or navigate to http://localhost:8989) to see the example:
Open the developer console to get a better idea what is going on:

For information about the Node.js example, keep reading. Otherwise, skip ahead to the edit the examples section located below.
Node.js
Use Our Examples
One of the best ways to start programming with Phidgets is to use our example code as a guide. In order to run the examples, you will need to download and install Node.js.
Now that you have Node.js installed, select an example that will work with your Phidget:
Next, navigate to the Network Server tab in the Phidget Control Panel and press the Start Network Server button after ensuring the Phidget Server is enabled (Enabled checkbox in Phidget Server section).
Navigate to the example folder that you previously downloaded, open the command prompt at this location and enter the following command:
sudo npm update

Next, enter the following command to run the example (replacing Accelerometer with your example name):
node Accelerometer localhost
You should now have the example up and running. When you are ready, the next step is editing the examples.
Linux
Browser Example
Use Our Examples
One of the best ways to start programming with Phidgets is to use our example code as a guide. Our browser examples are graphical and can be downloaded here: Javascript Examples (HTML)
or they can be unpacked using
apt-get install phidget22wwwjs
After unpacking the examples, navigate to the following location:
- /etc/phidgets
Open the file named phidget22networkserver.pc and navigate to the www section, you should see something like this:
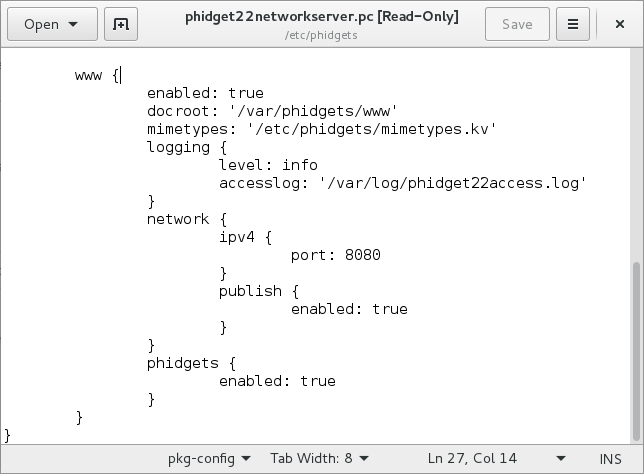
As you can see from the image above, our docroot location is defined as the following location:
- /var/phidgets/www
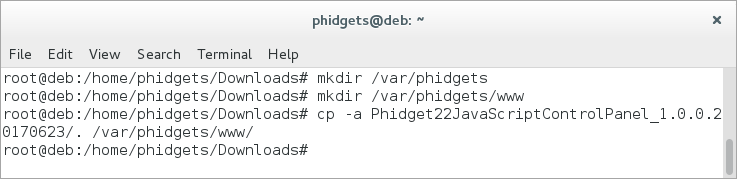
Create the docroot location (if it doesn't exist already) and copy the contents of the example you downloaded into it by entering the following commands into the terminal:
mkdir /var/phidgets
mkdir /var/phidgets/www
cp -a YOUR_SOURCE_FOLDER/. /var/phidgets/www
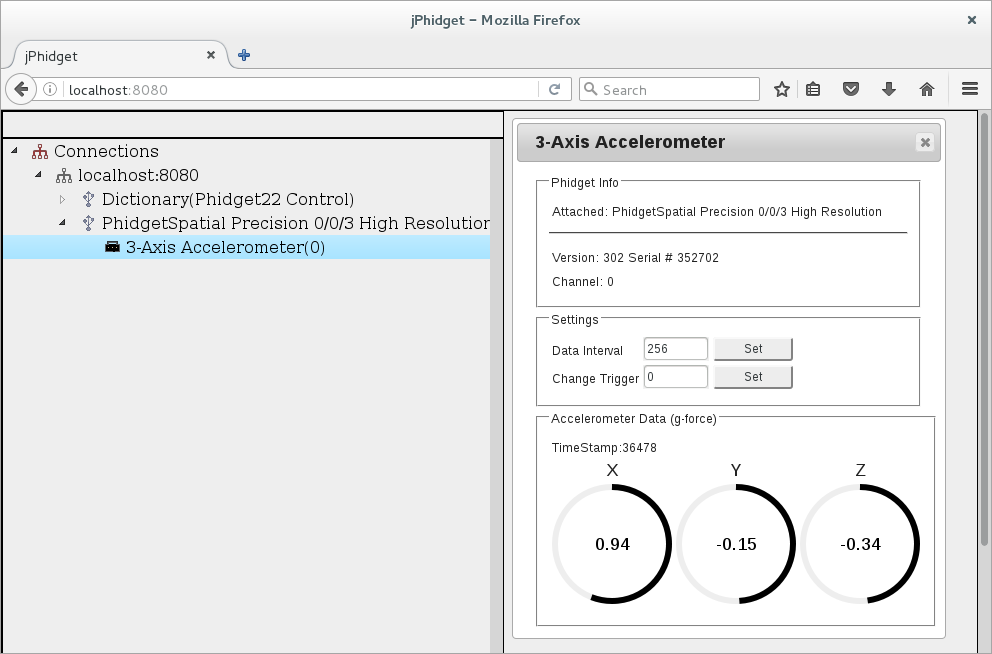
Now that the example code is located at the docroot location, and the Phidget Webserver is enabled (can be seen in www section of phidget22networkserver.pc), navigate to http://localhost:8080. You will see a program written with JavaScript/HTML that mimics the Phidget Control Panel (available on macOS and Windows). It will show all the Phidgets attached to your machine. By double-clicking on the Phidgets, and example will launch:
Take a look at the source files that are now located at /var/phidgets/www
Write Your Own Code
Let's start by writing a simple HTML page that makes a dynamic list of attached Phidgets visible to the user. We will be using the JavaScript library jQuery in these examples. jQuery is not required in order to use Phidgets, however, it will make it easier for us to access elements on an HTML page.
To start, create a new folder that looks like this:
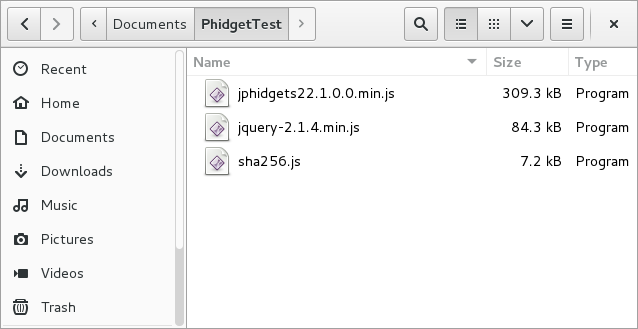
The referenced libraries can be found in the Javascript Examples (HTML) that we provide.
Next, create a file called index.html and copy the following code into it (Note: if you have newer JavaScript libraries, modify the code below to match your version numbers):
<!DOCTYPE html>
<html>
<head>
<title>Javascript Test Program</title>
<script src="jquery-2.1.4.min.js"></script>
<script src="sha256.js"></script>
<script src="jphidgets22.1.0.0.min.js"></script>

<script>

	$(document).ready(function () {
		var conn = new jPhidgets.Connection('ws://' + window.location.host + '/phidgets', { name: window.location.host });

		conn.connect().then(function () {
			console.log('connected');
		}).catch(function (err) {
			alert('failed to connect to server:' + err);
		});;

		conn.onattach = function(dev) {
			$('#list').append(new Option(dev.name,dev.phid));
		}

		conn.ondetach = function(dev) {
			$("#list option[value='" + dev.phid + "']").remove();
		}
	});

</script>
</head>

<body>
	<label> Attached Phidgets: </label>
	<div>
		<select multiple id="list" style="width: 500px;"></select>
	</div>
</body>
</html>
After copying the code above into your index.html file, your folder should look like this:

Next, modify the phidget22networkserver.pc file that is located at /etc/phidgets. Navigate to the www section and change the docroot location to match the location of your index.html file:
After modifying the docroot location, ensure you restart the Phidget Network Server. After restarting the Phidget Network Server, navigate to http://localhost:8080 to view the example:
Try opening the developer console for your web browser to see the Phidget JavaScript code executing and to get a better feel for the program.
Node.js
One of the best ways to start programming with Phidgets is to use our example code as a guide. In order to run the examples, you will need to download and install Node.js.
Now that you have Node.js installed, select an example that will work with your Phidget:
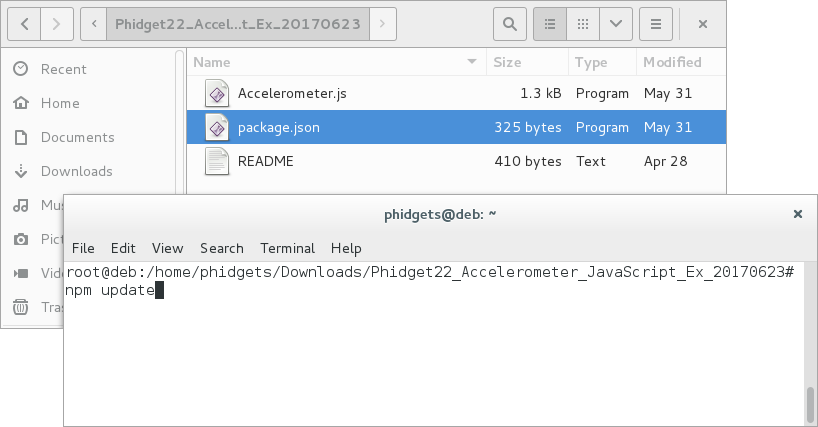
Navigate to the example folder that you previously downloaded, open the terminal at this location and enter the following command:
npm update
Next, enter the following command to run the example (replacing Accelerometer with your example name):
node Accelerometer localhost
You should now have the example up and running. When you are ready, the next step is editing the examples.
Edit the Examples
By following the instructions for your operating system and compiler above, you now have working examples and a project that is configured. This teaching section will help you understand how the examples were written so you can start writing your own code.
Remember: your main reference for writing JavaScript code will be the Phidget22 API Manual and the example code.
Step One: Connect
In Javascript, you must first connect to the Phidget server using the Connection object.
function main() {

	...

	var conn = new jPhidget22.Connection(url, { name: n, passwd: p });
	conn.connect()
	  .then(runCode);
}
Where url, n, and p are variables defined elsewhere in the program. If the connection is successful, we call another function that contains the rest of our code.
Step Two: Create and Open
After connecting, the Open() function opens the software object, and once it has successfully opened we can interact with it and start receiving data from it. We can also set up event handlers just before opening.
For example, if we were using an Digital Input as our device, it would look like this:
function runCode() {
	var ch = new jPhidget22.DigitalInput();

	ch.onAttach = digitalInput_attach;
	ch.onStateChange = digitalInput_change;

	ch.open().then(function() {
		// code to execute after open succeeds
	}).catch(function (err) {
		// code to execute if open fails
	});

}
Once the object successfully opens, you can access it and you will start to get events from it. We can define the event handler functions :
function digitalInput_attach(ch) {
	console.log(ch + ' attached');
}

function digitalInput_change(state) {
	console.log('state changed:' + state);
}
Now that they've been registered in the runCode() function and the device has been opened, these event handlers will be able to trigger. The first one triggers when the DigitalInput channel attaches, and the second one will trigger whenever the state of the attached DigitalInput changes.
Step Three: Do Things with the Phidget
Some values can be directly read and set on the Phidget. These functions can be used inside a polling loop as an alternative to event driven programming. The lines inside the loop would be something like this, after which you could do something with the value:
var di_state = ch.getState(); // get the state of the digital input

ch.setState(1); // set the state of the digital input
Step Four: Close
At the end of your program (or at least, at the end of the part that uses the Phidget), it is advisable to close your device. This ensures that the Phidget will be available to other programs that want to use it, since a channel can only be in use by one program at a time unless it's opened remotely. It's not necessary to delete the object after closing in Javascript.
ch.close();
Further Reading
Phidget Programming Basics - Here you can find the basic concepts to help you get started with making your own programs that use Phidgets.
Data Interval/Change Trigger - Learn about these two properties that control how much data comes in from your sensors.
Using Multiple Phidgets - It can be difficult to figure out how to use more than one Phidget in your program. This page will guide you through the steps.
Polling vs. Events - Your program can gather data in either a polling-driven or event-driven manner. Learn the difference to determine which is best for your application.
Logging, Exceptions, and Errors - Learn about all the tools you can use to debug your program.
Phidget Network Server - Phidgets can be controlled and communicated with over your network- either wirelessly or over ethernet.