Language - Java
![]() Java is a modern, object-oriented programming language developed by Oracle.
Java is a modern, object-oriented programming language developed by Oracle.
Introduction
Quick Downloads
Just need the Java documentation, drivers, libraries, and examples? Here they are:
Documentation
Example Code
Libraries and Drivers
- phidget21.jar
- 32 bit Windows Drivers and Libraries
- 64 bit Windows Drivers and Libraries
- 32-bit Windows Drivers Installer
- 64-bit Windows Drivers Installer
- Linux Source
- Mac OS X Drivers Installer
Getting started with Java
If you are new to writing code for Phidgets, we recommend starting by running, then modifying existing examples. This will allow you to:
- Make sure your libraries are properly linked
- Go from source code to a test application as quickly as possible
- Ensure your Phidget is hooked up properly
Instructions are divided up by operating system. Choose:
- Windows 2000 / XP / Vista / 7
- Mac OS X
- Linux (including PhidgetSBC)
Windows(2000/XP/Vista/7)
Description of Library Files
Java programs on Windows depend on two files, which the installers in the Quick Downloads section put onto your system:
phidget21.dllcontains the actual Phidget library, which is used at run-time. By default, it is placed inC:\Windows\System32.phidget21.jaris the Phidget Java library for JDK 1.4.2 or higher. Your compiler has to know where this file is. By default, it is placed intoC:\Program Files\Phidgets. So, you can either point your compiler to that location, or copy and link to it in a directory for your project workspace. For more information, please see the section for your specific compiler/environment.
If you do not want to use our installer, you can download the phidget21.dll as well as the phidget21.jar and manually install them where you want; refer to our Manual Installation Instructions.
Running the examples and writing your own code can be fairly compiler-specific, so we include instructions for each compilers/environments.
Mac OS X
Java has excellent support on Mac OS X through the Java Compiler.
The first step in using Java on Mac is to install the Phidget libraries. Compile and install them as explained on the getting started guide for your device. Then, the OS - Mac OS X page also describes the different Phidget files, their installed locations, and their roles....
Running the examples and writing your own code can be fairly compiler-specific, so we include instructions for each compilers/environments.
Linux
Java has excellent support on Linux - there is an established implementation of the Java compiler and interpreter, and several Integrated Development Environments (IDEs) including NetBeans and Eclipse.
The first step in using Java on Linux is to install the base Phidget libraries. Compile and install them as explained on the main Linux page. That Linux page also describes the different basic Phidget library files, their installed locations, and their roles.
You will also need the Phidget Java Libraries (phidget21.jar).
Once downloaded, the phidget21.jar library file does not get 'installed' (i.e. do not run java -jar phidget21.jar). Rather, the library file gets put into the path of whatever program you write, and you will link it via both the java compiler and the java interpreter. We will walk you through this.
Description of Library Files
The Phidget Java libraries depend on the C libraries being installed as explained on the main Linux page. If you browse around within the phidget21.jar archive, you will find Java class files (too many to reasonably list here) that have names related to the devices they provide an API for.
These Java class files use the functions available in the dynamic Phidget21 C-language library on Linux. Dynamic libraries end with .so, and so the C library that the Phidget Java class files use is /usr/lib/libphidget21.so.
Compilers
Linux gets somewhat complicated in that two Java compilers exist: openjdk and gcj. Furthermore, a given IDE can usually use either compiler. That being said, we only offer support here for openJDK and IDEs running openJDK.
To find out which type of compiler your computer has, use the -version option on the command line. You can use the same option for your runtime environment (interpreter):
$> java -version
java version "1.6.0_23"
OpenJDK Runtime Environment (IcedTea6 1.11pre) (6b23~pre11-0ubuntu1.11.10.1)
OpenJDK 64-Bit Server VM (build 20.0-b11, mixed mode)

$> javac -version
javac 1.6.0_23
The good news is that you can have both openjdk and gcj on your machine, co-habitating happily. There can be only one linked java and javac in /usr/bin/ however, and so this will correspond to whichever java compiler and interpreter you installed last.
If you do not have openjdk installed already (this is the default Java installation for most Linux machines, so you will probably know), and you choose to install it for Phidget purposes, it is important is that the java version be greater than the javac version. Otherwise, your runtime environment will consider the stuff your compiler produces to be newfangled nonsense. So when installing Java from a repository, you should install both the jdk and the jre. These are, unfortunately, usually separate packages in a repository (e.g. openjdk-7-jre and openjdk-7-jdk).
NetBeans Installation
Although Eclipse is standard in the Debian/Ubuntu package repository, NetBeans is no longer standard. What is more, Netbeans does not install by default into a folder within your path. As our Phidget full Java examples are written using NetBeans, we provide basic installation instructions here so you can actually run them.
To install NetBeans:
1. Download the install script from website: http://netbeans.org/downloads/
2. Change the permissions of the downloaded file to be executable. Usually, this is something like:
chmod +x netbeans-7.1-ml-javase-linux.sh
3. Run the downloaded file as a script. (This will result in a GUI interaction that walks you through installation.)
4. To find the location where the NetBeans installation occurred, run:
updatedblocate netbeans
5. Usually, the location of the binary is /usr/local/netbeans-7.1/bin/netbeans, where 7.1 is the installed version.
Use Our Examples
We have two different types of Phidget examples in Java:
- Simple examples, to be run on the command line, and
- Full examples, to be run in NetBeans
Both are contained within the Phidget Java example download package.
Command Line
The simple examples in Java
Write Your Own Code
Running the examples and writing your own code can be fairly compiler-specific, so we include instructions for each compilers/environments.
Things to cover that are not covered below:
- Description of files
- Dependence on libphidget21.so
- Using jar in a manifest (including compiled C header)
- Use of sudo without udev rules installed
- Makefile in examples
- Use and expansion
- Other batch compiling of all examples
- Differences between gcj and openjdk packages
- Compiling lines (e.g. .:phidget21)
- Runtime linking of java file resources
- Mismatch of javac and java versions
- On command line
- On Eclipse (weird error given)
- Some information about IDEs as given below in windows, but also
- Binding netbeans to gcj (not sure if it is possible in openjdk)
- Opening simple examples (not copy and paste)
Compilers/Environments
You can program Phidgets with Java in command line with the javac compiler as well as in IDEs such as NetBeans and Eclipse. This instructions in this section was written for a Windows environment, but the steps also holds true for Mac OS X and Linux environments.
Javac
Use Our Examples
Download the example and unpack them into a folder. Here, you can find example programs for all the devices. If you aren't sure what the software example for your device is called, check the software object listed in the Getting Started guide for your device. Please only use the simple examples. The full examples are intended for the NetBeans IDE.
Ensure that the phidget21.jar is in the same directory as the source code.
To compile in Windows command prompt:
javac -classpath .;phidget21.jar example.java
The command to compile in a Mac OS X and Linux terminal are slightly different. Rather than prefixing phidget21.jar with a semi-colon( ; ), a colon( : ) is used.
javac -classpath .:phidget21.jar example.java
This will create Java bytecode in the form of .class files. On Windows, type the following to run the program:
java -classpath .;phidget21.jar example
On Mac OS X and Linux, type:
java -classpath .:phidget21.jar example
If you wish, you can compile the project as a .jar so there are fewer files to maintain. The [Java SDK] provides the jar utility which packages all the .class files into a single .jar file.
To begin, you will have to provide a Manifest file to indicate the program entry point. With your favourite text editor, create a new file with the following content:
Manifest-Version: 1.0
Class-Path: phidget21.jar
Main-Class: example
Ensure that the file ends in a single new line or a carriage return character.
Save the file as example.mf and place it in the same directory as the other .class files.
Next, create the .jar with:
jar -cfm example.jar example.mf *.class
Afterwards, you can run the .jar with:
java -jar example.jar
Once you have the Java examples running, we have a teaching section below to help you follow them.
Write Your Own Code
When you are building a project from scratch, or adding Phidget function calls to an existing project, you'll need to configure your development environment to properly link the Phidget Java libraries. Please see the previous section for instructions.
In your code, you will need to include the Phidget library:
import com.phidgets.*;
import com.phidgets.event.*;
The project now has access to the Phidget21 function calls and you are ready to begin coding.
The same teaching section which describes the examples also has further resources for programming your Phidget.
NetBeans
Use Our Examples
You first download the examples, unpack them into a folder, and then find the source code for your device. The source file will be named the same as the software object for your device. If you aren't sure what the software example for your device is called, check the software object listed in the Getting Started guide for your device. The full examples were written in NetBeans, so the rest of this section will use these examples. To use the simple examples, you will have to import the source code into a new NetBeans project.
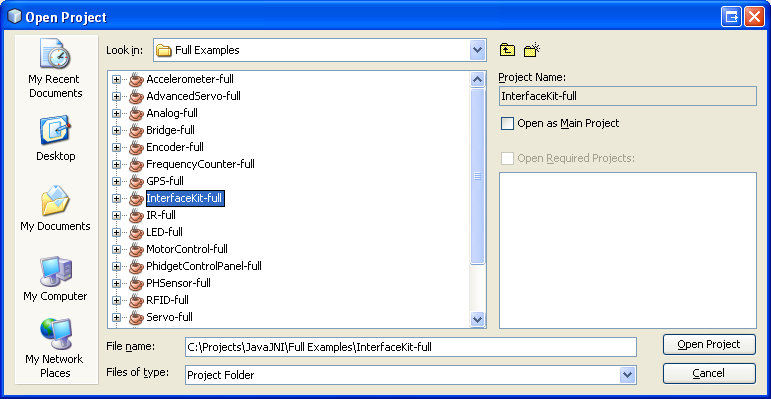
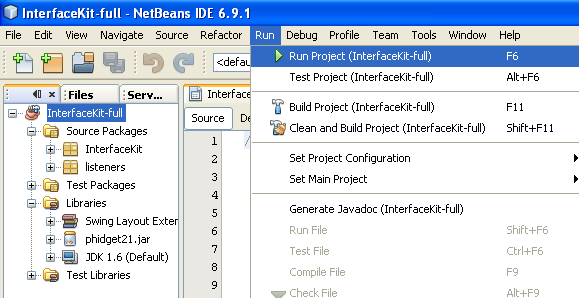
The only thing left to do is to run the examples! Click on Run → Run Project. The project, by default tries to find the phidget21.jar in ..\..\lib.
Once you have the Java examples running, we have a teaching section below to help you follow them.
Write Your Own Code
When you are building a project from scratch, or adding Phidget function calls to an existing project, you'll need to configure your development environment to properly link the Phidget Java libraries. To begin:
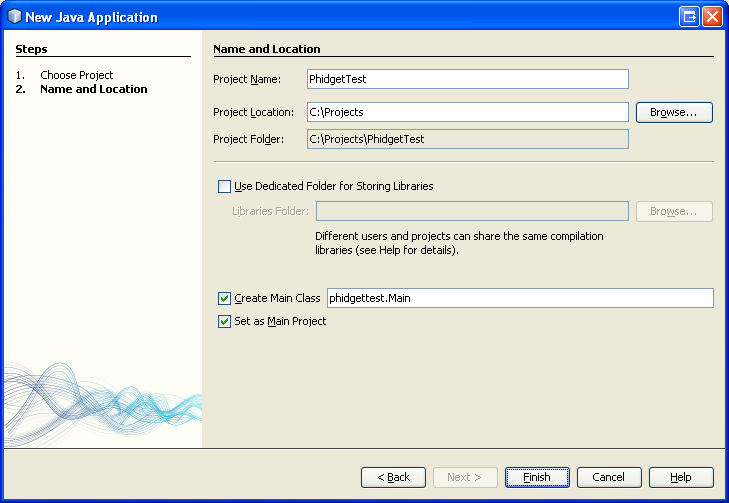
1. Create a new Java application project with a descriptive name such as PhidgetTest.
2. Add a reference to the Phidget Java library. In the projects pane, right click Libraries and add the jar.
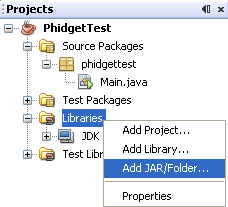
3. Find and select phidget21.jar.

4. Then, in your code, you will need to include the Phidget library:
import com.phidgets.*;
import com.phidgets.event.*;
The project now has access to the Phidget21 function calls and you are ready to begin coding.
The same teaching section which describes the examples also has further resources for programming your Phidget.
Eclipse
Use Our Examples
1. Download the examples and unpack them into a folder. Here, you can find example programs for all the devices. If you aren't sure what the software example for your device is called, check the software object listed in the Getting Started guide for your device. Please use the simple examples. The full examples were written in NetBeans, and are not compatible with Eclipse. The rest of this guide will assume that the simple examples are used. The example source code will be copied into your Eclipse project later on. Keep note of the file name of the example as a Java class will be created with the same name.
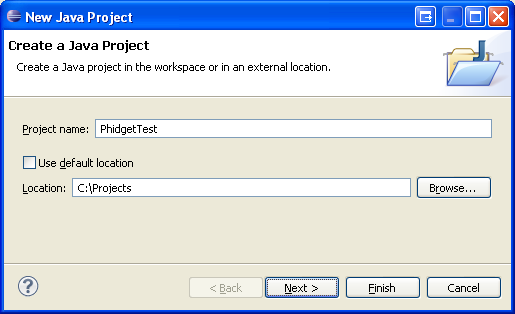
2. Generate a new Java project with a descriptive name such as PhidgetTest. Click next.
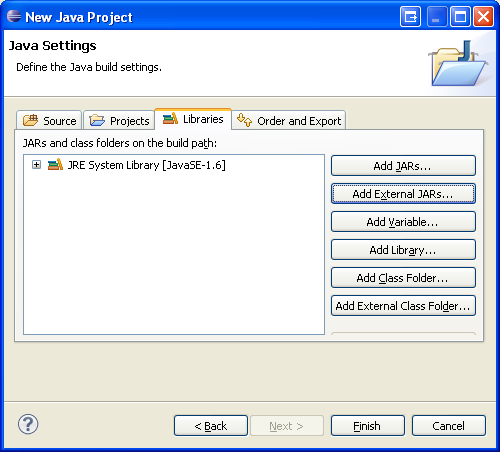
3. On the next screen, go to the libraries panel and add an external jar.
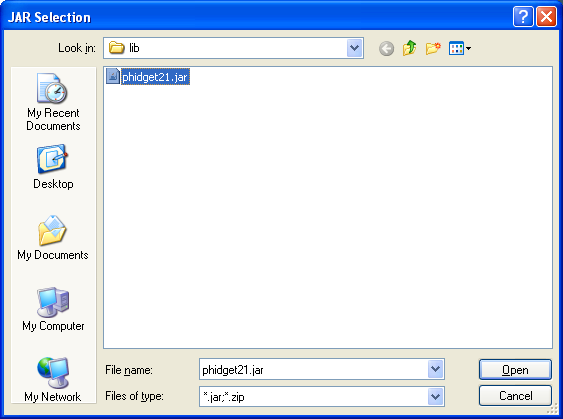
4. Find and select phidget21.jar.
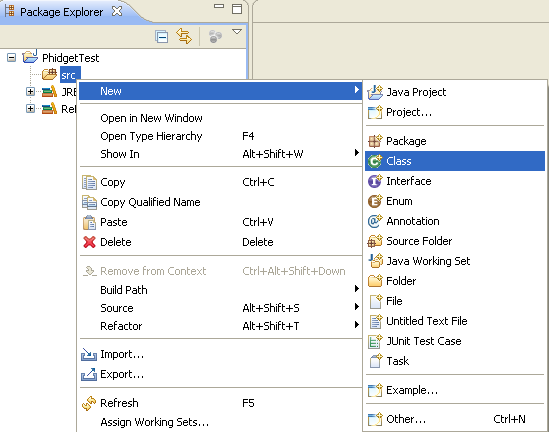
5. Add a new Java class to the project.
6. Name this class with the same name as the simple example's name.
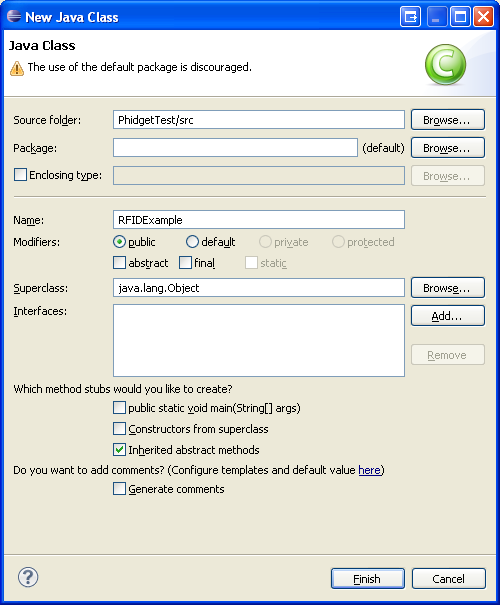
7. Copy and paste the example source code over to the class you created.
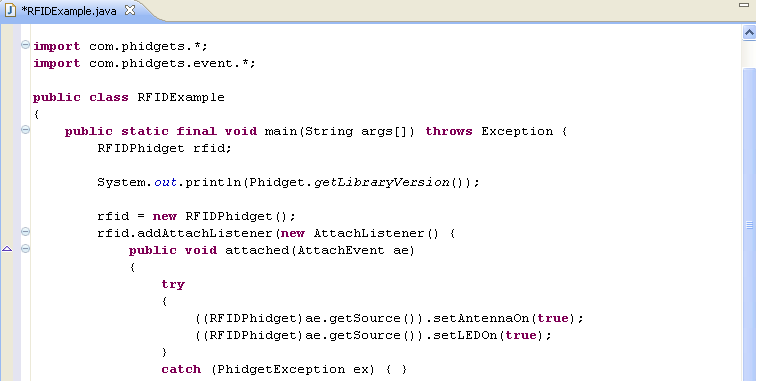
8. The only thing left to do is to run the examples!
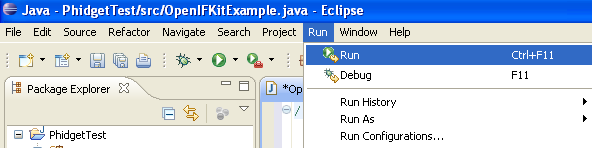
Once you have the Java examples running, we have a teaching section below to help you follow them.
Write Your Own Code
When you are building a project from scratch, or adding Phidget function calls to an existing project, you'll need to configure your development environment to properly link the Phidget Java libraries. Please see the Use Our Examples section for instructions.
In your code, you will need to include the Phidget library:
import com.phidgets.*;
import com.phidgets.event.*;
The project now has access to the Phidget21 function calls and you are ready to begin coding.
The same teaching section which describes the examples also has further resources for programming your Phidget.
Follow the Examples
By following the instructions for your operating system and compiler above, you probably now have a working example and want to understand it better so you can change it to do what you want. This teaching section has resources for you to learn from the examples and write your own.
Next, comes our API information. These resources outline the Phidgets Java methods:
Template:UsingAPhidgetInCodeGeneral
Example Flow
Common Problems and Solutions/Workarounds
Here you can put various frequent problems and our recommended solutions.