Language - C Sharp Windows Visual Studio: Difference between revisions
No edit summary |
No edit summary |
||
| Line 17: | Line 17: | ||
The Phidget22.NET library is now available on nuget.org [https://www.nuget.org/packages/Phidget22.NET/ here]. Nuget is the recommended way to install and use the .NET library in Visual Studio. The nuget package bundles the C library on Windows, so there are no other prerequisites that need to be installed. The nuget package adds targets for .NET Core and .NET Standard, so it should be usable from almost any .NET environment which also supports the C library. | The Phidget22.NET library is now available on nuget.org [https://www.nuget.org/packages/Phidget22.NET/ here]. Nuget is the recommended way to install and use the .NET library in Visual Studio. The nuget package bundles the C library on Windows, so there are no other prerequisites that need to be installed. The nuget package adds targets for .NET Core and .NET Standard, so it should be usable from almost any .NET environment which also supports the C library. | ||
== | ==Using Phidgets in Your Programs== | ||
There are two main ways you can go about adding Phidgets to your programs in Visual Studio. You can either start from a working project provided by the Phidgets code sample generator, or you can add the Phidgets libraries to an existing Visual Studio project. | |||
Select your preferred method below for instructions: | |||
<tabber> | |||
Using Code Samples= | |||
{{Finding Code Samples|C#|CSharp}} | |||
The code samples we provide for C# are written to be used as '''Console Applications''', but the concepts within can easily be re-purposed for use in a Windows Forms Application. | |||
==Using the Code Samples== | |||
You can download a working '''Visual Studio''' project for '''C#''' directly from the [{{server}}/?view=code_samples&lang=CSharp Code Samples] page. Simply make your selections, and click the '''Visual Studio Project''' button under '''Downloads'''. | |||
[[File:CSharp_Visual_Studio_Sample_Download.jpg|border|center|800px|link=]] | |||
Open the example project and start the example by pressing the ''Start'' button: | |||
[[File:Csharp_visualstudio_run.png |link=|center]] | |||
|-| | |||
Adding Phidgets to an Existing Project= | |||
==Setting up a New Project== | ==Setting up a New Project== | ||
| Line 93: | Line 49: | ||
Create a new project (a | Create a new project (a Console Application will be created for this example): | ||
{{#tag:tabber| | |||
Visual Studio 2017= | Visual Studio 2017= | ||
[[Image: | [[Image:CSharp_VS2017_New_Project_Console.png|link=|center|700px]] | ||
{{!}}-{{!}} | |||
Visual Studio 2015= | Visual Studio 2015= | ||
[[Image: | [[Image:CSharp_VS2015_New_Project_Console.png|link=|center|700px]] | ||
}} | |||
| Line 114: | Line 70: | ||
[[Image:CSharp_VS2015_Add_Reference_2.png|link=|center]] | [[Image:CSharp_VS2015_Add_Reference_2.png|link=|center|850px]] | ||
| Line 125: | Line 81: | ||
Success! The project now has access to Phidgets. | Success! The project now has access to Phidgets. | ||
</tabber> | |||
{{Language Page What's Next}} | {{Language Page What's Next}} | ||
Revision as of 21:24, 16 October 2019
|
Language - C# Windows with Visual Studio Welcome to using Phidgets with C#! By using C#, you will have access to the complete Phidget22 API, including events. Visual Studio is an IDE provided by Microsoft that can be used to develop code in a wide variety of programming languages, including C#. |
Install Phidget Drivers for Windows
Before getting started with the guides below, ensure you have the following components installed on your machine:
- You will need the Phidgets Windows Drivers
Nuget
The Phidget22.NET library is now available on nuget.org here. Nuget is the recommended way to install and use the .NET library in Visual Studio. The nuget package bundles the C library on Windows, so there are no other prerequisites that need to be installed. The nuget package adds targets for .NET Core and .NET Standard, so it should be usable from almost any .NET environment which also supports the C library.
Using Phidgets in Your Programs
There are two main ways you can go about adding Phidgets to your programs in Visual Studio. You can either start from a working project provided by the Phidgets code sample generator, or you can add the Phidgets libraries to an existing Visual Studio project.
Select your preferred method below for instructions:
Finding Code Samples
To find the code sample to use for your Phidget, navigate to the Code Samples page and select your device from the drop-down menu.
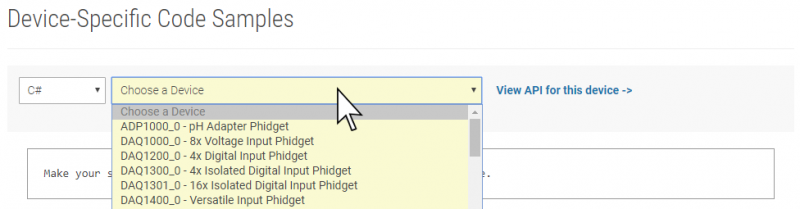
Once you select your device, the code sample generator will give you a working code sample, and a selection of options to customize it to your needs.
The code samples we provide for C# are written to be used as Console Applications, but the concepts within can easily be re-purposed for use in a Windows Forms Application.
Using the Code Samples
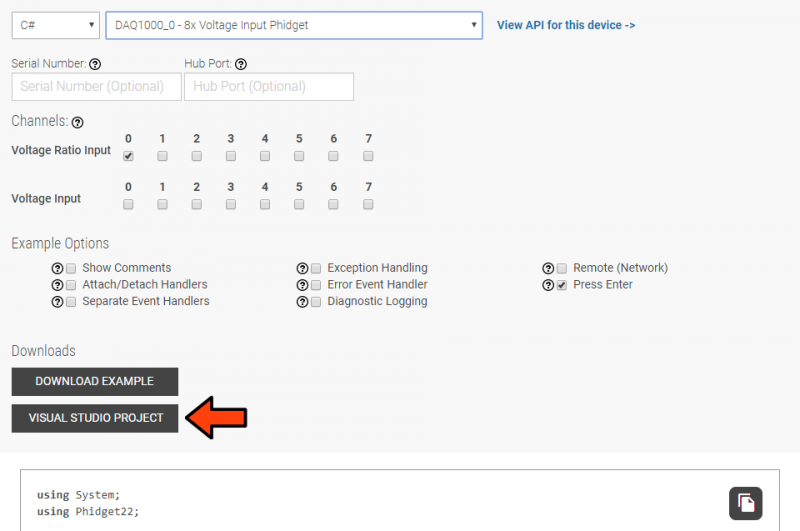
You can download a working Visual Studio project for C# directly from the Code Samples page. Simply make your selections, and click the Visual Studio Project button under Downloads.
Open the example project and start the example by pressing the Start button:

Setting up a New Project
When you are building a project from scratch, or adding Phidget functionality to an existing project, you'll need to configure your development environment to properly link the Phidget .NET library. To begin:
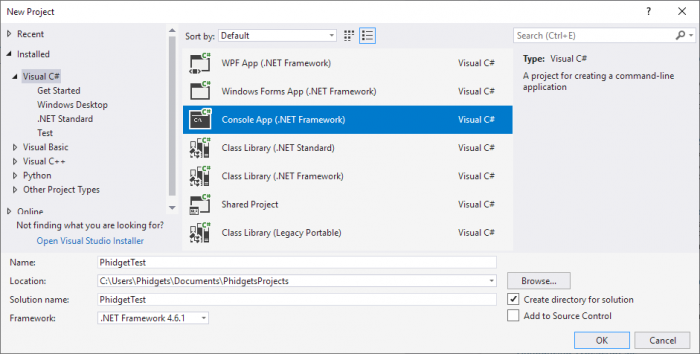
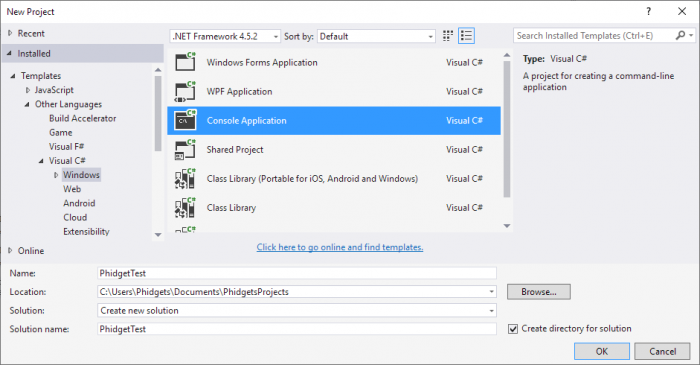
Create a new project (a Console Application will be created for this example):
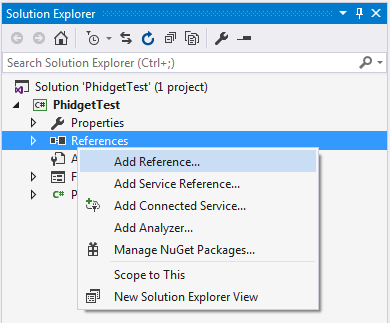
Next, right-click to add a reference to the Phidget .NET library:
On the following screen, click Browse... and navigate to the location of Phidget22.NET.dll:
- C:\Program Files\Phidgets\Phidget22\Phidget22.NET.dll

Finally, to include the Phidget .NET library, add the following lines to main window class file:
using Phidget22;
using Phidget22.Events;
Success! The project now has access to Phidgets.
What's Next?
Now that you have set up Phidgets to work with your programming environment, we recommend you read our guide on Phidget Programming Basics to learn the fundamentals of programming with Phidgets.![]()