Language - Android Java
Quick Downloads
Documentation
- Phidget22 API (Select Java from drop-down menu)
Example Code
Libraries
- Windows Drivers Installer (32-Bit)
- Windows Drivers Installer (64-Bit)
- Windows Development Libraries
- macOS Installer
- Linux Libraries
- Linux Phidget Network Server
Getting Started with Android Java
If you are new to writing code for Phidgets, we recommend starting by running, then modifying existing examples. This will allow you to:
- Make sure your libraries are properly linked
- Go from source code to a test application as quickly as possible
- Ensure your Phidget is hooked up properly
Android Studio
Use Our Examples
In order to run the examples in Android Studio, all you need to do is download the the relevant example project for your device from:
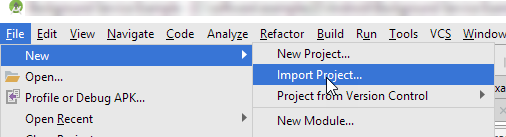
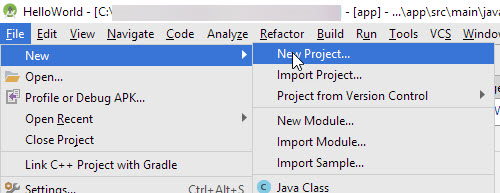
Next, open Android Studio on your development machine. Import the project using File->New->Import Project
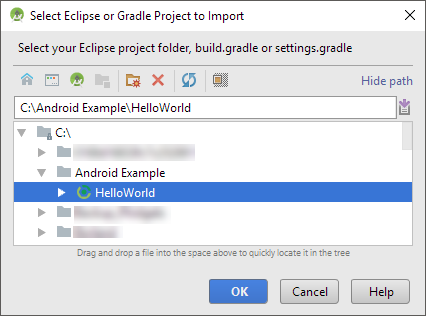
Navigate to your project in the resulting dialog box and click 'OK'
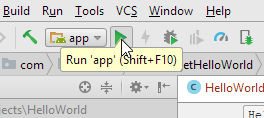
Once the project has been imported, you can simply click the 'Run' button, and the example will compile and run on your chosen device.
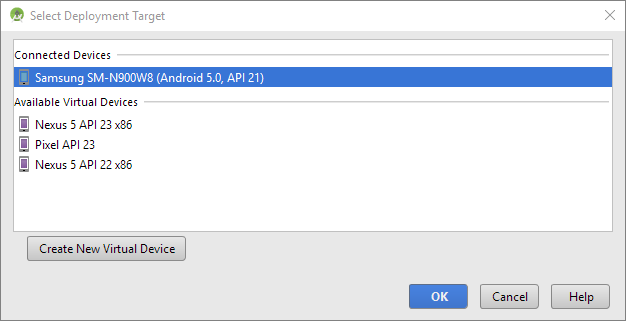
You may be prompted to select the Deployment Target. In this case, select your Android device and click OK.
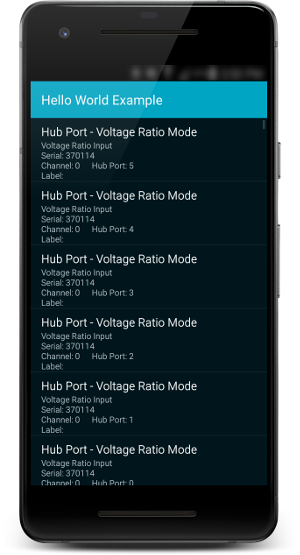
Once the app is running on your device, if a Phidget corresponding to the example is attached either directly via USB, or to a computer running the Phidget Network Service on the same local network as the Android device, then device information and settings should appear on the screen.
In this case, we've run the "Hello World" example, so a list of available Phidgets is displayed.
When you are ready, the next step is configuring your project and writing your own code!
Important Note
The examples provided are designed to be incredibly simplistic in order to highlight the base requirements to run Phidgets on Android. To this end, we opted to open and close the Phidgets in the onCreate and onDestroy handlers of the main activity respectively. This is likely a bad idea for implementing apps for any practical use, as the activity is prone to being destroyed and re-created for a wide variety of reasons, from closing the app, to rotating the screen. In order to ensure your Phidget remains attached through these events, we recommend running your Phidgets in a secondary service.
Check the Common Problems section for more information.
Creating a New Project
When you are building a project from scratch, or adding Phidget functionality to an existing project, you'll need to configure your development environment to properly link the Phidget Java libraries for Android Java.
To start, create a new project in Android Studio:
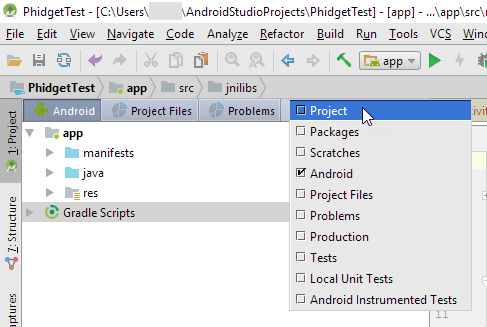
Once you have a new project, be sure to switch the side bar to Project view.
Next, download the Phidget22 Android Java libraries, extract the contents, and open the resulting folder.
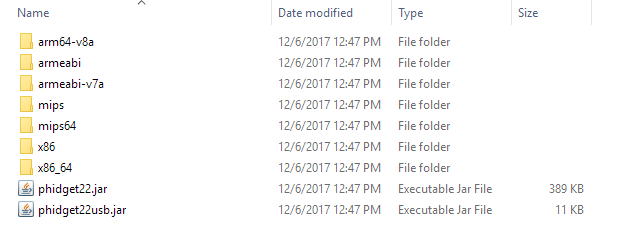
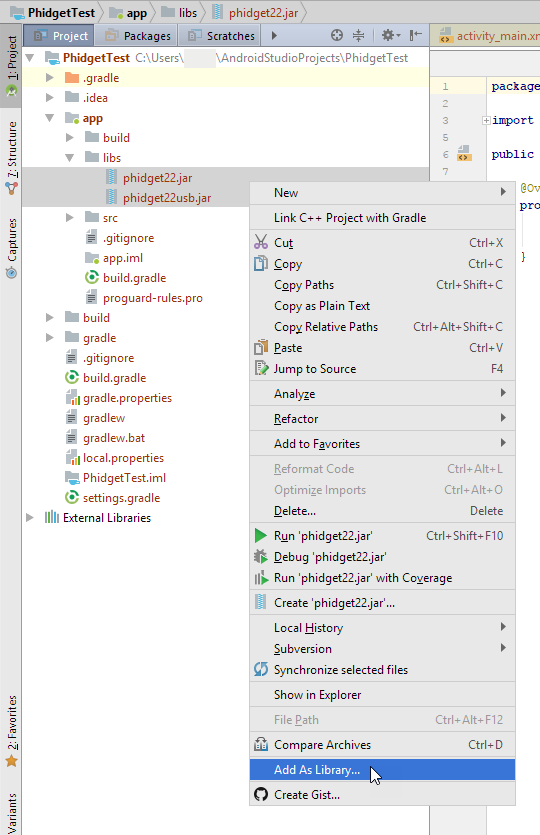
Copy the .jar files into the app/libs/ folder of your project. If you are only going to use network Phidgets in your app, then you don't need to copy Phidget22usb.jar into your project.
Right click the jar files you just copied and select "Add As Library".
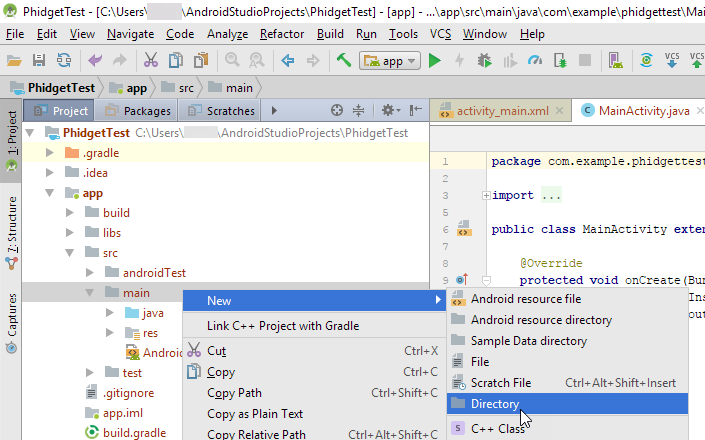
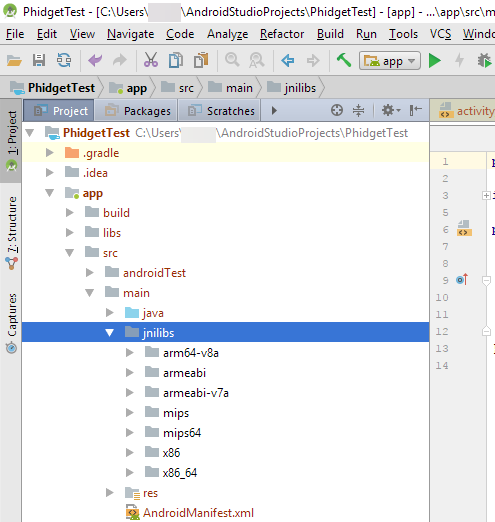
Create a directory called jnilibs under app/src/main
Copy the remaining folders from the Phidget22 library (containing versions of libphidget22java.so) into the directory you just created.
To allow the use of the network and/or USB connections, the following lines must be added to your AndroidManifest.xml file:
<!-- Required for network access -->
<uses-permission android:name="android.permission.INTERNET" />

<!-- Required for USB access -->
<uses-feature android:name="android.hardware.usb.host" />
Finally, to import the Phidget22 library into your code, add the following line to the rest of your imports:
import com.phidget22.*;
The project now has access to Phidgets. Next, view the write your own code section located below.
Write Code
By following the instructions for your operating system and compiler above, you now have working examples and a project that is configured. This teaching section will help you understand how the examples were written so you can start writing your own code.
Remember: your main reference for writing {{{1}}} code will be the Phidget22 API Manual and the example code.
Step One: Initialize and Open
You will need to declare your Phidget object in your code. For example, we can declare a digital input object like this:
DigitalInput device;
Next, we need to initialize the method(s) that the Android device can communicate with the Phidget. This is done either by enabling Network Server Discovery, and/or allowing direct USB connections as follows:
//Enable server discovery to list remote Phidgets
this.getSystemService(Context.NSD_SERVICE);
Net.enableServerDiscovery(ServerType.DEVICE_REMOTE);

//Allow direct USB connection of Phidgets
com.phidget22.usb.Manager.Initialize(this);
To support remote (network) Phidgets on Android API versions earlier than API version 16, or to connect to Phidget Network Servers with passwords, you will need to add the specific server to your program:
//Add a specific network server to communicate with Phidgets remotely
Net.addServer("ServerName", "192.168.1.105", 5661, "password", 0);
After the connection methods are established, the Phidget object needs to be initialized and opened:
device = new DigitalInput();
device.open();
Although we are not including it on this page, you should include error handling for all Phidget functions. Here is an example of the previous code with error handling:
try{
    device = new DigitalInput();
    device.open();
}catch (PhidgetException e) {
    e.printStackTrace();
}
Step Two: Wait for Attachment (plugging in) of the Phidget
Simply calling open does not guarantee you can use the Phidget immediately. To use a Phidget, it must be plugged in (attached). We can handle this by using event driven programming and tracking the attach events. Alternatively, we can modify our code so we wait for an attachment:
ch = new DigitalInput();
ch.open(5000); //wait for attach for 5 seconds, if not time out
Waiting for attachment will block indefinitely until a connection is made, or until the timeout value is exceeded.
To use events, we have to modify our code:
ch = new DigitalInput();
device.addAttachListener(new AttachListener() {
    public void onAttach(final AttachEvent attachEvent) {
        AttachEventHandler handler = new AttachEventHandler(device);
        synchronized(handler)
        {
            runOnUiThread(handler);
            try {
                handler.wait();
            } catch (InterruptedException e) {
                e.printStackTrace();
            }
        }
    }
});
ch.open();
Next, we have to declare the function that will be called when an attach event is fired - in this case the function AttachEventHandler will be called.
class AttachEventHandler implements Runnable {
    Phidget device;

    public AttachEventHandler(Phidget device) {
        this.device = device;
    }

    public void run() {
        TextView attachedTxt = (TextView) findViewById(R.id.attachedTxt);
        attachedTxt.setText("Attached");

        //notify that we're done
        synchronized(this)
        {
	    this.notify();
        }
    }
}
Step Three: Do Things with the Phidget
We recommend the use of event driven programming when working with Phidgets. In a similar way to handling an attach event as described above, we can also add an event handler for a state change event:
ch = new DigitalInput();
device.addStateChangeListener(new DigitalInputStateChangeListener() {
	public void onStateChange(DigitalInputStateChangeEvent stateChangeEvent) {
        DigitalInputStateChangeEventHandler handler =
            new DigitalInputStateChangeEventHandler(device, stateChangeEvent);
	runOnUiThread(handler);
    }
});
ch.open();
This code will connect a function and an event. In this case, the DigitalInputStateChangeEventHandler function will be called when there has been a change to the devices input. Next, we need to create the DigitalInputStateChangeEventHandler function:
class DigitalInputStateChangeEventHandler implements Runnable {
    Phidget device;
    DigitalInputStateChangeEvent stateChangeEvent;

    public DigitalInputStateChangeEventHandler(Phidget device,
       DigitalInputStateChangeEvent stateChangeEvent)
    {
        this.device = device;
        this.stateChangeEvent = stateChangeEvent;
    }

    public void run() {
        CheckBox stateBox = (CheckBox) findViewById(R.id.stateBox);
        stateBox.setChecked(stateChangeEvent.getState());
    }
}
If events do not suit your needs, you can also poll the device directly for data using code like this:
boolean state = ch.getState();
Step Four: Close and Delete
At the end of your program, be sure to close your device.
ch.close()
Once the device is closed, to completely clean up after using Phidgets, you must uninitialize the USB connection as follows:
//Disable USB connection to Phidgets
com.phidget22.usb.Manager.Uninitialize();
Further Reading
Phidget Programming Basics - Here you can find the basic concepts to help you get started with making your own programs that use Phidgets.
Data Interval/Change Trigger - Learn about these two properties that control how much data comes in from your sensors.
Using Multiple Phidgets - It can be difficult to figure out how to use more than one Phidget in your program. This page will guide you through the steps.
Polling vs. Events - Your program can gather data in either a polling-driven or event-driven manner. Learn the difference to determine which is best for your application.
Logging, Exceptions, and Errors - Learn about all the tools you can use to debug your program.
Phidget Network Server - Phidgets can be controlled and communicated with over your network- either wirelessly or over ethernet.
Common Problems, Solutions and Workarounds
Issue: My Phidget detached when I rotated my phone
You are likely using one of our examples, or handling the opening and closing of Phidgets in a similar way. In either case, chances are you are opening and closing Phidgets in your main activity. This is not recommended for practical applications, as the entire activity can be destroyed and re-created many times through its lifecycle due to configuration changes such as rotating the screen. This is a reality of the Android operating system, and must be addressed in whatever way best suits your application.
A good option to keep your Phidgets connected would be to implement a Started Service or a Foreground Service, depending on your application, and open your Phidgets there.