Part 1: Setup
Select your Operating System:
Step 1: Install Phidgets Library
Step 2: Connect Devices
Step 3: Connect Wireless
Step 4: Verify Connection
Step 5: Update
Step 1: Install Phidgets Library
Before you begin using your Phidgets, you will need to install the Phidget Library.
1. Download the installer for your system:
● 32-bit Installer Download
● 64-bit Installer Download
If you're unsure which one you should get, press ⊞ WIN + Pause/Break:
Before installing our libraries, be sure to read our Software License.
Step 1: Install Phidgets Library
2. Open the download. If it asks you for permission, select Run
Step 1: Install Phidgets Library
3a. Select Next
Step 1: Install Phidgets Library
3b. Read the Licence Agreement. Select Next.
Step 1: Install Phidgets Library
3c. Choose Installation Location. Select Next.
Step 1: Install Phidgets Library
3d. Select Next to confirm install.
Step 1: Install Phidgets Library
3e. Wait for Installation to complete. This should only take a few moments.
Step 1: Install Phidgets Library
3f. Installation Complete. Close installation Window.
Step 2: Connect Devices
● Connect Power Jack
● Connect VINT Device(s)
● Connect Ethernet to a Router or Switch (optional)
Step 3: Verify Connection
Choose a setup method:
Configure with mobile device
Connect with ethernet cable
(Requires physical access to router or switch)
Step 3: Connect Wireless
1. When you connect the power supply to the HUB5000, the red LED should turn on.
Step 3: Connect Wireless
2. On your mobile device, go to the Wi-Fi settings and connect to the HUB5000:
Step 3: Connect Wireless
3. When asked for a password, enter the password printed on the HUB5000’s label.
Step 3: Connect Wireless
4. Once your device is connected to the HUB5000’s WiFi signal:
Click on the WiFi network and find an option that says “Manage router” or “Visit homepage”.
Go to your internet browser and type 192.168.100.1 in the address bar.
Step 3: Connect Wireless
5. Create a password for your HUB5000. You'll use it to access the Configure Page from now on.
Step 3: Connect Wireless
6. Navigate to the network page. Change the Mode to Client.
Step 3: Connect Wireless
7. Enter your Wifi Network details and click Save & Apply. It may take a few minutes for your Phidgets to appear in the Phidget Control Panel, which
we’ll check in the next step.
Step 4: Verify Connection
1. Open the Phidgets Control Panel:
If your Control Panel does not open, look in your taskbar. Double click the Phidget Icon.
Step 4: Verify Connection
2. If connected, your Phidgets will appear in the Phidget Control Panel.
Step 5: Update
Now that you've confirmed that you have access to your Phidgets, you should ensure the HUB5000 is fully updated. You can update the firmware of the VINT Hub by
going back to the Phidget Control Panel. If there's a blue arrow beside the version number, it means an update is available:
Right-click anywhere on that row and select Upgrade Firmware. When it's done, the number in the Version column will change.
Step 5: Update
Next, to update the OS firmware, go to the Network Phidgets tab in the control panel, find your HUB5000 and double-click on it. If the OS firmware is out
of date, you'll see the following window pop up with steps to follow:
1. Download the firmware (you can get it here if the button does not
work)
2. Open the web interface by clicking the button or entering the HUB5000's IP address in your web browser.
3. Go to the System tab and scroll down to the Upgrade Firmware section. Select the file you just downloaded and click Upgrade and Restart.
You'll be instructed to wait a few minutes before logging back into the web interface.
Step 5: Update
When you log back in, you can confirm that the new version has successfully installed by checking to see if the firmware version listed in the
Status section matches the first three numbers in the firmware file name that you downloaded. You can also check the version in the
Network Phidgets tab on the Phidget Control Panel.
Done!
Now that you're able to see and interact with your devices in the Phidget Control Panel and they're fully updated, you're done with the Setup part of this
guide.
Scroll down to Part 2: Using Your Phidget for the next step.
For more help installing in Windows (e.g. manual install, using a VM, etc.), visit this page:
● Windows Advanced Information
Step 3: Connect Wireless
1. When you connect the power supply to the HUB5000, the red LED should turn on.
Step 3: Connect Wireless
2. In your Web Browser, enter hub5000.local
Step 3: Connect Wireless
3. Create a password for your HUB5000. You'll use this password to access the Configure Page from now on.
Step 3: Connect Wireless
4. Navigate to the network page. Change the Mode to Client.
Step 3: Connect Wireless
5. Enter your Wifi Network details to use your Hub wirelessly and click Save & Apply. You can then disconnect the ethernet cable.
It may take a few minutes for your Phidgets to appear in the Phidget Control Panel, which we’ll check in the next step.
Step 4: Verify Connection
1. Open the Phidgets Control Panel:
If your Control Panel does not open, look in your taskbar. Double click the Phidget Icon.
Step 4: Verify Connection
2. If connected, your Phidgets will appear in the Phidget Control Panel.
Step 5: Update
Now that you've confirmed that you have access to your Phidgets, you should ensure the HUB5000 is fully updated. You can update the firmware of the VINT Hub by
going back to the Phidget Control Panel. If there's a blue arrow beside the version number, it means an update is available:
Right-click anywhere on that row and select Upgrade Firmware. When it's done, the number in the Version column will change.
Step 5: Update
Next, to update the OS firmware, go to the Network Phidgets tab in the control panel, find your HUB5000 and double-click on it. If the OS firmware is out
of date, you'll see the following window pop up with steps to follow:
1. Download the firmware (you can get it here if the button does not
work)
2. Open the web interface by clicking the button or entering the HUB5000's IP address in your web browser.
3. Go to the System tab and scroll down to the Upgrade Firmware section. Select the file you just downloaded and click Upgrade and Restart.
You'll be instructed to wait a few minutes before logging back into the web interface.
Step 5: Update
When you log back in, you can confirm that the new version has successfully installed by checking to see if the firmware version listed in the
Status section matches the first three numbers in the firmware file name that you downloaded. You can also check the version in the
Network Phidgets tab on the Phidget Control Panel.
Done!
Now that you're able to see and interact with your devices in the Phidget Control Panel and they're fully updated, you're done with the Setup part of this
guide.
Scroll down to Part 2: Using Your Phidget for the next step.
For more help installing in Windows (e.g. manual install, using a VM, etc.), visit this page:
● Windows Advanced Information
Step 1: Install Phidgets Library
Step 2: Connect Devices
Step 3: Connect Wireless
Step 4: Verify Connection
Step 5: Update
Step 1: Install Phidgets Library
Before you begin using your Phidgets, you will need to install the Phidget Library.
1. Download the installer for your system:
● OS X 10.11+: Installer Download
● Mac OS X 10.7 - OS X 10.10: Installer Download
● Mac OS X 10.5 - OS X 10.6: Installer Download
Before installing our libraries, be sure to read our Software License.
Step 1: Install Phidgets Library
2. Open the download and double click on Phidgets.pkg
Step 1: Install Phidgets Library
3a. Select Continue
Step 1: Install Phidgets Library
3b. Read and continue. Read the License and click Agree.
Step 1: Install Phidgets Library
3c. Here, you have the option to select the installation location. Select Install.
Step 1: Install Phidgets Library
3d. MacOS may ask for permission to install. Enter your username and password and Install Software.
Step 1: Install Phidgets Library
3e. Wait for Installation to complete. This should only take a few moments.
Step 1: Install Phidgets Library
3f. You may see a message that the extension has been blocked. Select Open Security Preferences.
Step 1: Install Phidgets Library
3g. Beside the message for Phidgets Inc, Click Allow.
Step 1: Install Phidgets Library
3h. Installation Complete, Click Close.
Step 1: Install Phidgets Library
3i. To delete the installer, click Move to Trash.
Step 2: Connect Devices
● Connect Power Jack
● Connect VINT Device(s)
● Connect Ethernet to a Router or Switch (optional)
Step 3: Verify Connection
Choose a setup method:
Configure with mobile device
Connect with ethernet cable
(Requires physical access to router or switch)
Step 3: Connect Wireless
1. When you connect the power supply to the HUB5000, the red LED should turn on.
Step 3: Connect Wireless
2. On your mobile device, go to the Wi-Fi settings and connect to the HUB5000:
Step 3: Connect Wireless
3. When asked for a password, enter the password printed on the HUB5000’s label.
Step 3: Connect Wireless
4. Once your device is connected to the HUB5000’s WiFi signal:
Click on the WiFi network and find an option that says “Manage router” or “Visit homepage”.
Go to your internet browser and type 192.168.100.1 in the address bar.
Step 3: Connect Wireless
5. Create a password for your HUB5000. You'll use this password to access the Configure Page from now on.
Step 3: Connect Wireless
6. Navigate to the network page. Change the Mode to Client.
Step 3: Connect Wireless
7. Enter your Wifi Network details and click Save & Apply. It may take a few minutes for your Phidgets to appear in the Phidget Control Panel, which
we’ll check in the next step.
Step 4: Verify Connection
1. Open the Phidget Control Panel:
Step 4: Verify Connection
2. If connected, your Phidgets will appear in the Phidget Control Panel.
Step 5: Update
Now that you've confirmed that you have access to your Phidgets, you should ensure the HUB5000 is fully updated. You can update the firmware of the VINT Hub by
going back to the Phidget Control Panel. If the name of the device is red, it means an update is available:
Double click on the device in the control panel to update the VINT Hub firmware. When it's finished, the text will turn from red to black and the number in the
Version column will change.
Step 5: Update
To upgrade the firmware of the operating system on the HUB5000, download the most recent file
here.
Next, go back to the web configuration page and click on the System tab. Scroll down to Upgrade Firmware and select the file you download and hit
Upgrade & Restart. You'll be instructed to wait a few minutes before logging back into the web interface.
When you log back in, you can confirm that the new version has successfully installed by checking to see if the firmware version listed in the
Status section matches the first three numbers in the firmware file name that you downloaded.
Done!
Now that you're able to see and interact with your devices in the Phidget Control Panel, you're done with the Setup part of this guide.
Scroll down to Part 2: Using Your Phidget for the next step.
For more info installing in MacOS (e.g. developer tools, driver extension, etc.), visit this page:
● MacOS Advanced Information
Step 3: Connect Wireless
1. When you connect the power supply to the HUB5000, the red LED should turn on.
Step 3: Connect Wireless
2. In your Web Browser, enter hub5000.local
Step 3: Connect Wireless
3. Create a password for your HUB5000. You'll use this password to access the Configure Page from now on.
Step 3: Connect Wireless
4. Navigate to the network page. Change the Mode to Client.
Step 3: Connect Wireless
5. Enter your Wifi Network details to use your Hub wirelessly and click Save & Apply. You can then disconnect the ethernet cable.
It may take a few minutes for your Phidgets to appear in the Phidget Control Panel, which we’ll check in the next step.
Step 4: Verify Connection
1. Open the Phidget Control Panel:
Step 4: Verify Connection
2. If connected, your Phidgets will appear in the Phidget Control Panel.
Step 5: Update
Now that you've confirmed that you have access to your Phidgets, you should ensure the HUB5000 is fully updated. You can update the firmware of the VINT Hub by
going back to the Phidget Control Panel. If the name of the device is red, it means an update is available:
Double click on the device in the control panel to update the VINT Hub firmware. When it's finished, the text will turn from red to black and the number in the
Version column will change.
Step 5: Update
To upgrade the firmware of the operating system on the HUB5000, download the most recent file
here.
Next, go back to the web configuration page and click on the System tab. Scroll down to Upgrade Firmware and select the file you download and hit
Upgrade & Restart. You'll be instructed to wait a few minutes before logging back into the web interface.
When you log back in, you can confirm that the new version has successfully installed by checking to see if the firmware version listed in the
Status section matches the first three numbers in the firmware file name that you downloaded.
Done!
Now that you're able to see and interact with your devices in the Phidget Control Panel, you're done with the Setup part of this guide.
Scroll down to Part 2: Using Your Phidget for the next step.
For more info installing in MacOS (e.g. developer tools, driver extension, etc.), visit this page:
● MacOS Advanced Information
Step 1: Install Phidgets Library
Step 2: Connect Devices
Step 3: Connect Wireless
Step 4: Verify Connection
Step 5: Update
Step 1: Install Phidgets Library
1. First, you need to install the libusb-1.0 development libraries. For example, in Debian based distributions:
apt-get install libusb-1.0-0-dev
You’ll also need a C compiler and builder, if you don’t already have one installed.
apt-get install gcc
apt-get install make
Step 1: Install Phidgets Library
2. Next, download and unpack the Phidgets library:
● libphidget22
Step 1: Install Phidgets Library
3. Use the following commands in the location you unpacked to install the library:
./configure
make
sudo make install
Step 1: Install Phidgets Library
4. (Optional) You can also download and unpack the following optional packages:
● phidget22networkserver - Phidget Network Server, which
enables the use of Phidgets over your network
● phidget22admin - Admin tool to track who is connected to your
Phidgets when using the network server
● libphidget22extra - Required for phidget22networkserver
and phidget22admin
● libphidget22java - The Java libraries for Phidget22
For installation instructions for these packages, see the README file included with each one.
Step 2: Connect Devices
● Connect Power Jack
● Connect VINT Device(s)
● Connect Ethernet to a Router or Switch (optional)
Step 3: Verify Connection
Choose a setup method:
Configure with mobile device
Connect with ethernet cable
(Requires physical access to router or switch)
Step 3: Connect Wireless
1. When you connect the power supply to the HUB5000, the red LED should turn on.
Step 3: Connect Wireless
2. On your mobile device, go to the Wi-Fi settings and connect to the HUB5000:
Step 3: Connect Wireless
3. When asked for a password, enter the password printed on the HUB5000’s label.
Step 3: Connect Wireless
4. Once your device is connected to the HUB5000’s WiFi signal:
Click on the WiFi network and find an option that says “Manage router” or “Visit homepage”.
Go to your internet browser and type 192.168.100.1 in the address bar.
Step 3: Connect Wireless
5. Create a password for your HUB5000. You'll use this password to access the Configure Page from now on.
Step 3: Connect Wireless
6. Navigate to the network page. Change the Mode to Client.
Step 3: Connect Wireless
7. Enter your Wifi Network details and click Save & Apply. It may take a few minutes for your Phidgets to appear in the Phidget Control Panel, which
we’ll check in the next step.
Step 4: Verify Connection
1. The easiest way to verify that your libraries are working properly is to compile and run an example program. Download and unpack this C example that will
detect any Phidget:
● HelloWorld C Example
Step 4: Verify Connection
2. Next, open the terminal in the location where you unpacked the example. Compile and run using:
gcc HelloWorld.c -o HelloWorld -lphidget22
sudo ./HelloWorld
ou should receive a “Hello” line for each Phidget channel that is discovered:
You need to run it with sudo in order to be able to access USB devices. In order to use
Phidgets without sudo, you need to set your udev rules. See the Advanced Information page on the final slide of this guide for details.
Step 5: Update
Now that you've confirmed that you have access to your Phidgets, you should ensure the HUB5000 is fully updated. You can update the firmware of the VINT Hub
using the phidget22admin tool (see included readme for further
instructions).
To upgrade the firmware of the operating system on the HUB5000, download the most recent file
here.
Next, go back to the web configuration page and click on the System tab. Scroll down to Upgrade Firmware and select the file you download and hit
Upgrade & Restart. You'll be instructed to wait a few minutes before logging back into the web interface.
When you log back in, you can confirm that the new version has successfully installed by checking to see if the firmware version listed in the
Status section matches the first three numbers in the firmware file name that you downloaded.
Done!
Now that you're able to see your devices in the Hello World example and the device is fully updated, you're done with the Setup part of this guide.
Scroll down to Part 2: Using Your Phidget for the next step.
For more info installing in Linux (e.g. Udev rules, old versions, etc.), visit this page:
● Linux Advanced Information
Step 3: Connect Wireless
1. When you connect the power supply to the HUB5000, the red LED should turn on.
Step 3: Connect Wireless
2. In your Web Browser, enter hub5000.local
Step 3: Connect Wireless
3. Create a password for your HUB5000. You'll use this password to access the Configure Page from now on.
Step 3: Connect Wireless
4. Navigate to the network page. Change the Mode to Client.
Step 3: Connect Wireless
5. Enter your Wifi Network details to use your Hub wirelessly and click Save & Apply. You can then disconnect the ethernet cable.
It may take a few minutes for your Phidgets to appear in the Phidget Control Panel, which we’ll check in the next step.
Step 4: Verify Connection
1. The easiest way to verify that your libraries are working properly is to compile and run an example program. Download and unpack this C example that will
detect any Phidget:
● HelloWorld C Example
Step 4: Verify Connection
2. Next, open the terminal in the location where you unpacked the example. Compile and run using:
gcc HelloWorld.c -o HelloWorld -lphidget22
sudo ./HelloWorld
You should receive a “Hello” line for each Phidget channel that is discovered:
You need to run it with sudo in order to be able to access USB devices. In order to use
Phidgets without sudo, you need to set your udev rules. See the Advanced Information page on the final slide of this guide for details.
Step 5: Update
Now that you've confirmed that you have access to your Phidgets, you should ensure the HUB5000 is fully updated. You can update the firmware of the VINT Hub
using the phidget22admin tool (see included readme for further
instructions).
To upgrade the firmware of the operating system on the HUB5000, download the most recent file
here.
Next, go back to the web configuration page and click on the System tab. Scroll down to Upgrade Firmware and select the file you download and hit
Upgrade & Restart. You'll be instructed to wait a few minutes before logging back into the web interface.
When you log back in, you can confirm that the new version has successfully installed by checking to see if the firmware version listed in the
Status section matches the first three numbers in the firmware file name that you downloaded.
Done!
Now that you're able to see your devices in the Hello World example and the device is fully updated, you're done with the Setup part of this guide.
Scroll down to Part 2: Using Your Phidget for the next step.
For more info installing in Linux (e.g. Udev rules, old versions, etc.), visit this page:
● Linux Advanced Information
Part 2: Using Your Phidget
About
The Wireless VINT Hub provides a stable wireless interface to connect your devices to your computer over your wi-fi network. The Wireless VINT Hub has 6 ports. Each port can either:
- Connect to a VINT Device
- Read a 0-5V Voltage or ratiometric sensor (connect to Analog Input sensors)
- Act as a digital output (control LEDs, relays, digital circuits, and other simple electronics)
- Act as a digital input (read the state of a switch)
Explore Your Phidget Channels Using the Control Panel
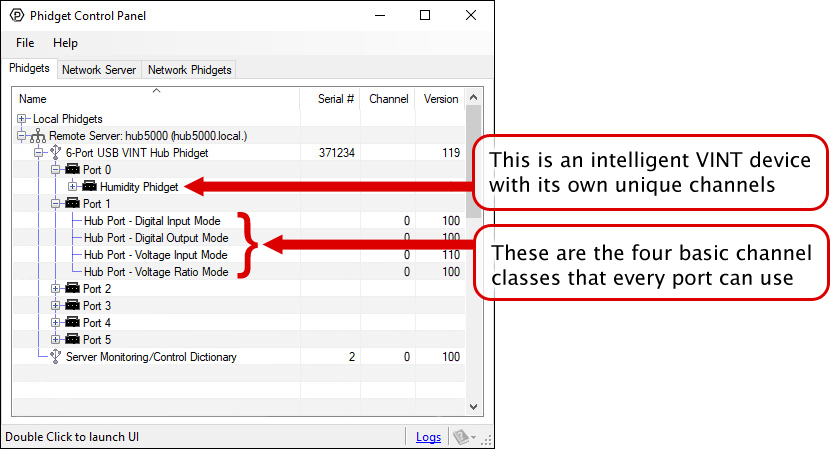
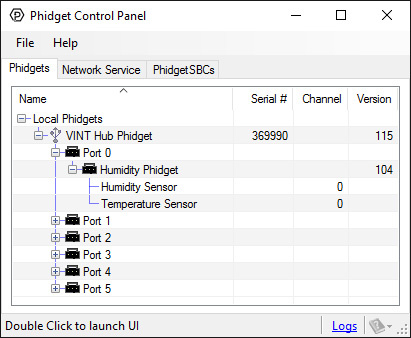
The Wireless VINT Hub is a connecting point between your computer and device allowing for simple communication. You can use your Control Panel to view your attached Phidgets. Explore the 5 types of connections bellow:
Expand All
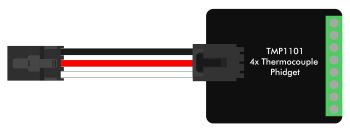
VINT Devices like the TMP1101 or DCC1003 are Phidgets that digitally communicate with the VINT Hub. Each device will have unique features, so it is recommended you visit the individual product page for more details.
When attached correctly these Phidgets will appear by name in your Control Panel, with each channel listed below the name. For example, when the HUM1000 is attached you will see:
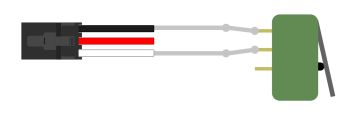
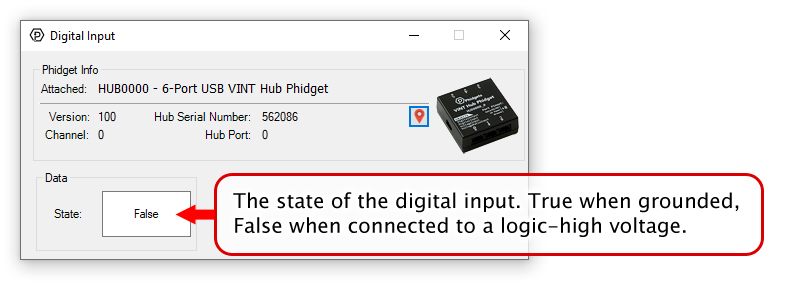
Digital Input is one of the VINT Hub’s built-in Channel Classes. Any of the these ports can act as an active-low digital input, making them useful for reading switches and buttons. The above image provides an example of how to wire a switch to be used with the VINT Hub.
If you open Digital Input Mode in the Control Panel you will be able to see the state of your button/switch.

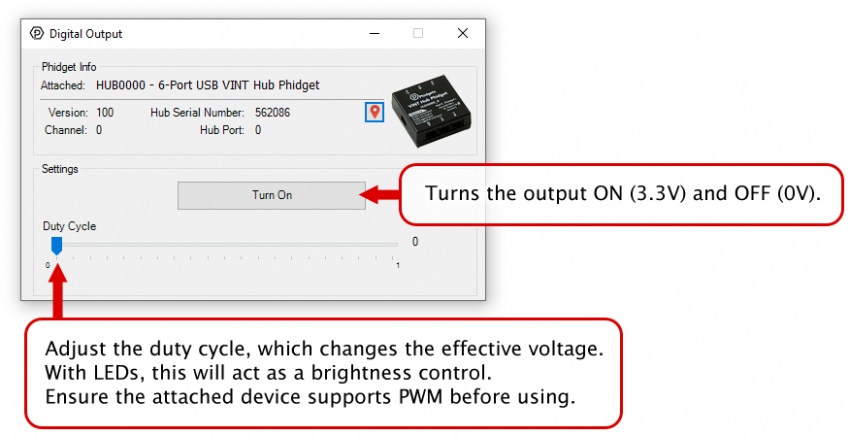
Digital Output is one of the VINT Hub’s built-in Channel Classes. Any of these ports can be used as a 3.3V digital output, making them useful for blinking LEDs. The above image demonstrates how to connect your LED to be used with the VINT Hub.
Open Digital Output Mode in the Control Panel to control the 3.3V output.
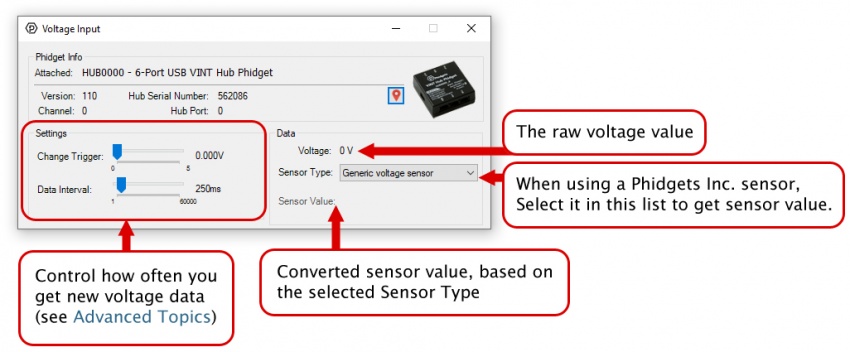
Voltage Input is one of the VINT Hub’s built-in Channel Classes. Any of these ports can be used to read voltage, making them great for reading non-ratiometric sensors and monitoring 5V digital circuits.
Open Voltage Input Mode in the Control Panel to view your device’s output voltage.
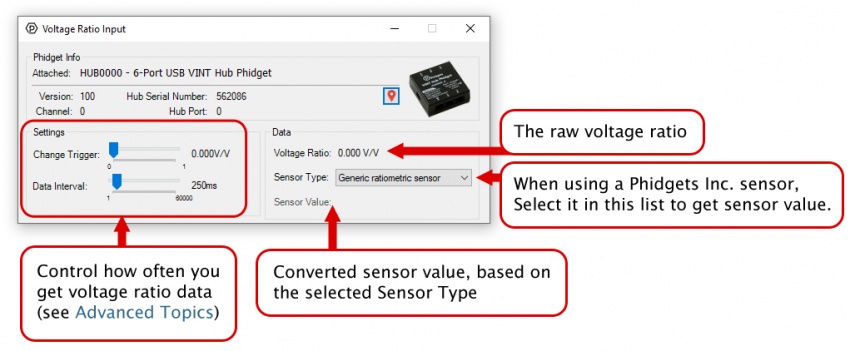
Voltage Ratio Input is one of the VINT Hub’s built-in Channel Classes. Any of these ports can act as a Voltage Ratio Input comparing the voltage provided to the voltage returned by the device, making it useful for connecting ratiometric sensors. The voltage ratio is reported in Volts per Volt. For example, if the Phidget is providing 5V and the sensor is sending back 2.5V, the ratio will be 0.5V/V.
Open Voltage Ratio Input Mode in the Control Panel to view your device’s voltage ratio.
Part 3: Create your Program
1. Setting up your Programming Environment
2. Phidget Programming Basics
Part 4: Advanced Topics and Troubleshooting
Expand All
Before you open a Phidget channel in your program, you can set these properties to specify which channel to open. You can find this information through the Control Panel.
1. Open the Control Panel and double-click on the red map pin icon:
2. The Addressing Information window will open. Here you will find all the information you need to address your Phidget in your program.
See the Phidget22 API for your language to determine exact syntax for each property.
The Change Trigger is the minimum change in the sensor data needed to trigger a new data event.
The Data Interval is the time (in ms) between data events sent out from your Phidget.
The Data Rate is the reciprocal of Data Interval (measured in Hz), and setting it will set the reciprocal value for Data Interval and vice-versa.
You can modify one or both of these values to achieve different data outputs. You can learn more about these properties here.
You can download the most recent HUB5000 firmware binary here:
To upgrade the firmware, go into the web configuration page as outlined in Part 1 of this User Guide. From there, click on "System", and upload this file by click on "select file" under the "Upgrade Firmware" section. After that, click on "Upgrade and Restart". You'll be instructed to wait a few minutes before logging back into the web interface.
When you log in, you can confirm that the new version has successfully installed by checking to see if the firmware version listed in the "Status" section matches the first three numbers in the firmware file name that you downloaded. You can also check the version in the "Network Phidgets" tab on the Phidget Control Panel.
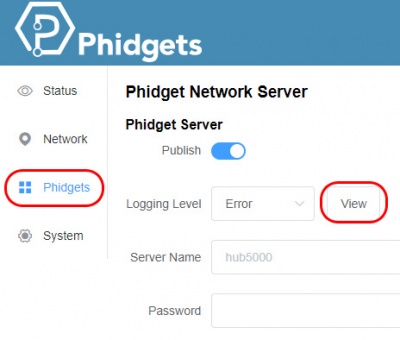
You can find the HUB5000's network server logs by opening the web configuration page as outlined in Part 1 of this User Guide. From there, click on "Phidgets" and then "View" beside the logging level selection.
For an ethernet connected HUB5000 to be completely CE compliant, you must put a ferrite bead on the ethernet cable. Ferrite beads are only necessary when building the HUB5000 into a larger system that needs to be CE compliant. You can find clamp-on ferrite beads at electronic parts stores such as Digikey.
For more information on the capabilities of the ports on the VINT Hub, see the VINT Primer.
Configuration using the Phidget Control Panel
To get to the HUB5000's configuration page, open the Phidget Control Panel and find it under the "Network Phidgets" tab as outlined in Part 1 of this User Guide.
Configuration using Phone
If the HUB5000 is in access point mode, you can access the configuration page through your phone: Connect to the HUB5000 Wi-Fi signal and enter the password on the sticker. Once you're connected, go to your internet app and go to address 192.168.100.1 . This address will take you to the configuration login page.
Settings
- Status: This section lists the hardware and firmware version of the HUB5000, along with the network addresses.
- Network: This section allows you to change the network connection settings and switch between Access Point mode and Client mode.
- Phidgets: This section has the Phidget Server controls(including controls to change the log level and view the log file). This section also contains the Web Server controls.
- System: This section allows you to change the password, and has other advanced settings including firmware upgrade and system/kernel logs.
Pressing the reset button will reboot the HUB5000.
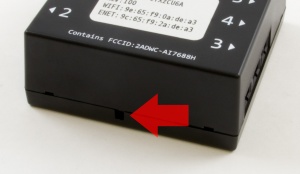
Holding the button down for 10 seconds before releasing will perform a reset. The reset will clear all settings, including the web configuration page password, and reset the Wi-Fi password to the one on the HUB5000's label.
As a last resort, you can perform a factory reset. Only perform a factory reset if the regular reset is not working, or there was an error during a firmware upgrade. Holding the button down before plugging in power, and keeping pressed for 15 seconds before releasing, will restore the original factory firmware.
When opening channels with Phidgets, you can set several properties to make sure you are accessing the precise channel you want. The HUB5000 has a unique serial number that can be used to find its ports or any VINT devices connected to them. If you want something more customizable and human-readable, you can use the device label instead. You can customize the device label by using writeDeviceLabel on the Hub object after it has been opened.
With the device label, you can address any of the VINT Hub's channels, or any connected VINT device channels. The device label will remain after the VINT Hub is unplugged as it is stored in flash memory.

