HIN1000 User Guide
Getting Started
Welcome to the HIN1000 user guide! In order to get started, make sure you have the following hardware on hand:
- HIN1000 Touch Keypad Phidget
- VINT Hub
- USB cable and computer
- Phidget cable
Next, you will need to connect the pieces:
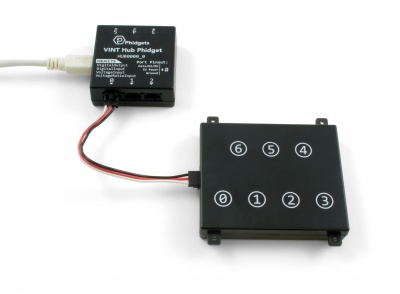
- Connect the VINT Hub to your computer with a USB cable.
- Connect the HIN1000 to the VINT Hub using the Phidget cable.
Using the HIN1000
Phidget Control Panel
In order to demonstrate the functionality of the HIN1000, the Phidget Control Panel running on a Windows machine will be used.
The Phidget Control Panel is available for use on both macOS and Windows machines.
Windows
To open the Phidget Control Panel on Windows, find the ![]() icon in the taskbar. If it is not there, open up the start menu and search for Phidget Control Panel
icon in the taskbar. If it is not there, open up the start menu and search for Phidget Control Panel
macOS
To open the Phidget Control Panel on macOS, open Finder and navigate to the Phidget Control Panel in the Applications list. Double click on the ![]() icon to bring up the Phidget Control Panel.
icon to bring up the Phidget Control Panel.
For more information, take a look at the getting started guide for your operating system:
Linux users can follow the getting started with Linux guide and continue reading here for more information about the HIN1000.
First Look
After plugging the HIN1000 into your computer and opening the Phidget Control Panel, you will see something like this:
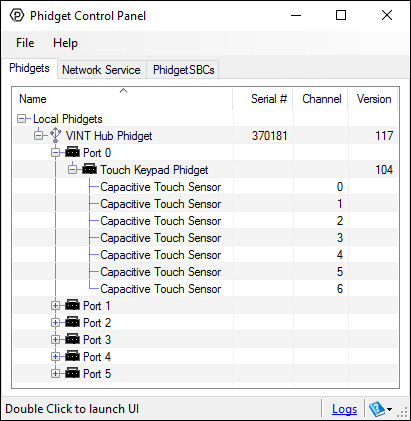
The Phidget Control Panel will list all connected Phidgets and associated objects, as well as the following information:
- Serial number: allows you to differentiate between similar Phidgets.
- Channel: allows you to differentiate between similar objects on a Phidget.
- Version number: corresponds to the firmware version your Phidget is running. If your Phidget is listed in red, your firmware is out of date. Update the firmware by double-clicking the entry.
The Phidget Control Panel can also be used to test your device. Double-clicking on an object will open an example.
Capacitive Touch
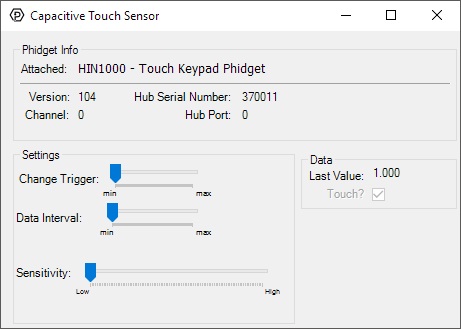
When you double click on a Capacitive Touch object, a window like the one pictured will open.
- At the top of the window, information about your device and the properties of this particular channel will be listed.
- On the left, change trigger and/or data interval can be changed. For more information on these settings, see the Data Rate/Change Trigger page. In addition, the sensor's sensitivity can be adjusted. The higher the sensitivity, the more susceptible the sensor will be to sensing touch.
- On the right, the Touch? check box will be checked if an object is touching or nearly touching the surface associated with this capacitive touch object. For capacitive touch objects that have a linear or circular touch region, the Last Value corresponds to the location on the region that the current or most recent touch occurred.
Finding The Addressing Information
Before you can access the device in your own code, and from our examples, you'll need to take note of the addressing parameters for your Phidget. These will indicate how the Phidget is physically connected to your application. For simplicity, these parameters can be found by clicking the button at the top of the Control Panel example for that Phidget.

In the Addressing Information window, the section above the line displays information you will need to connect to your Phidget from any application. In particular, note the Channel Class field as this will be the API you will need to use with your Phidget, and the type of example you should use to get started with it. The section below the line provides information about the network the Phidget is connected on if it is attached remotely. Keep track of these parameters moving forward, as you will need them once you start running our examples or your own code.

Using Your Own Program
You are now ready to start writing your own code for the device. The best way to do that is to start from our Phidget is compatible with the [https://www.phidgets.com/?view=code_samples&class=CapacitiveTouch CapacitiveTouch Examples. Code Samples].
Select your programming language of choice from the drop-down list to get an example for your device. You can use the options provided to further customize the example to best suit your needs.

Once you have your example, you will need to follow the instructions on the page for your programming language to get it running. To find these instructions, select your programming language from the Programming Languages page.
Technical Details
Re-Calibration
Since capacitive touch sensors rely on checking capacitance against a threshold to detect when they are touched, they need to keep a good baseline of the capacitance of their environment. The HIN1000 will re-calibrate its baseline levels if it detects a constant touch for more than 60 seconds, in order to prevent getting stuck in a touched state. Similarly, it will re-calibrate its baseline capacitance to adjust to falling capacitance (such as when it is moved away from a surface) in order to prevent getting stuck in a not-touched state. The latter adjustment happens soon after the baseline is detected to have fallen.
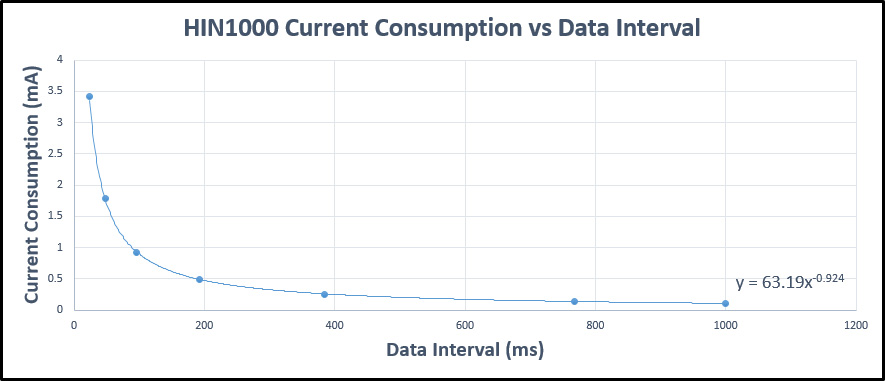
Current Consumption
The current consumption of the HIN1000 varies depending on the data interval that you choose. When it is connected but not configured, it will draw a minimal current of around 50 µA. Once it has been configured, current consumption will increase as the interval between data events is shortened, as illustrated by this graph:
What to do Next
- Programming Languages - Find your preferred programming language here and learn how to write your own code with Phidgets!
- Phidget Programming Basics - Once you have set up Phidgets to work with your programming environment, we recommend you read our page on to learn the fundamentals of programming with Phidgets.